
Related Manuals for Altech PVR9600


Summary of Contents for Altech PVR9600
-
Page 1: User Manual
AUSTRALIAN HIGH DEFINITION PVR 9600 TRIPLE TUNER PERSONAL VIDEO RECORDER 9600 User Manual Record up to 6 programs at once *Refer to page 38 For assistance: Page 1 of 52 support@uec.com.au www.uec.com.au... - Page 2 For assistance: Page 2 of 52 support@uec.com.au www.uec.com.au...
-
Page 3: Table Of Contents
USER GUIDE Table of Contents Important Safety Information, Contents, Quick Help Table..................4 Front and Back Panels ................................6 The Power Adapter.................................7 9600 Install & Connect the PVR Set top box ........................8 The Remote Control ................................11 9600 Set top box Menu..............................14 9600 Set top box Features............................29 Software Upgrade..................................35 PVR Functionality..................................37... -
Page 4: Important Safety Information, Contents, Quick Help Table
61 2 9425 5777 Australia, Tel. + Lightning If the set top box is installed in a location that is subject to extensive lightning activity, Altech UEC recommends that a surge protection device is installed for the set top box mains supply. Earthing The earth/grounding system must comply with local regulations. - Page 5 Contents 9600 set top box Remote control x AAA batteries V DC Power supply adapter with power lead AV Cable User manual Quick Help Description Information PG PIN (default) 1234 Settings PIN (default) 1234 Reset to Factory Default Go to: Menu Settings General Factory Defaults...
-
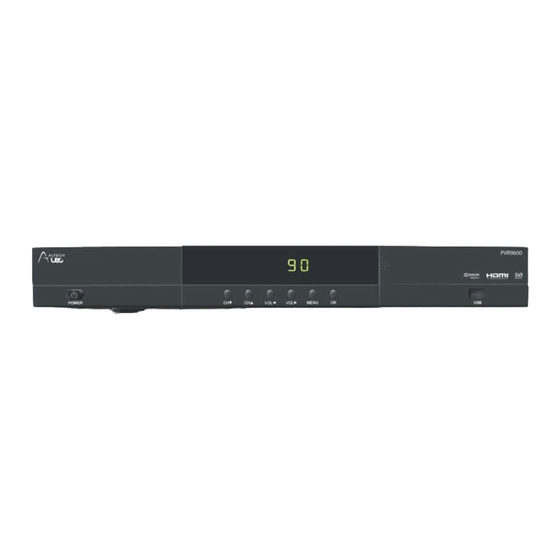
Page 6: Front And Back Panels
FRONT AND BACK PANEL Front Panel Standby Button Switches the set top box between ON and STANDBY Changes to the previous available channel or navigates in menu mode Changes to the next available channel or navigates in menu mode Decreases the volume level or navigates in menu mode Increases the volume level or navigates in menu mode MENU Selects the Menu system... -
Page 7: The Power Adapter
Back Panel Antenna IN Connects to the TV terrestrial antenna Antenna OUT Antenna loop through connection to other devices such as TV or another STB / PVR / VCR Internet Ethernet port for internet connectivity Composite Video Connects to the video inputs on TV Audio Left &... -
Page 8: Install & Connect The Pvr 9600 Set Top Box
INSTALLATION & CONNECTION OF THE PVR 9600 Carefully remove set top box from the packaging. Insert the supplied batteries into the remote control paying attention to the +/- indicators. Connection options are listed below, it is important to ensure that all connections are secure before connecting the set top box and power pack to the mains. Direct to TV connection HDMI Inputs AV Inputs... -
Page 9: Hdmi Out
Connection via Amplifier/Home Theatre System HDMI Inputs AV Inputs Option 2 & 3 Option 1 Option 2 Option 1 Option 3 HDMI out HDMI Inputs Optical Inputs AV Inputs For assistance: Page 9 of 52 support@uec.com.au www.uec.com.au... -
Page 10: Hdmi Inputs
Amplifier/Home Theatre System with HDMI inputs/output and a High Definition TV) Option 1: Digital audio connection via HDMI • Connect the terrestrial antenna to the Antenna IN on the set top box. • Connect a HDMI cable to the HDMI connector on the set top box and then connect the other end of the cable to the HDMI input connector of the Amplifier/Home Theatre system. -
Page 11: The Remote Control
THE REMOTE CONTROL Remote Control Unit The Remote Control Unit (RCU) might not operate properly if the RCU is operated beyond the following conditions. 1. Distance – up to 6 meters in front of the decoder 2. Angle – up to 30 degrees to the left or right from the centre of the decoder Refer to the image on the left. -
Page 12: Recording Recording
Button Name Button Function Identification Standby Switches the set top box between ON and STANDBY. Mute Turns the sound ON/OFF Help Launches the Help function where supported Apps APPS Not available Media MEDIA Launches the Media functionality for playback of supported Media files. Mail MAIL Select to view received messages... - Page 13 Button Name Button Function Identification Info Launches I-plate & extended I-plate for program information Navigation Menu navigation and selection Arrows (4) and OK Channel Up/ CH+/CH- Allows channel up and down Down navigation Volume Up/ V+/V- Adjusts volume up and down Down Back BACK...
-
Page 14: Pvr 9600 Set Top Box Menu
PVR 9600 SET TOP BOX MENU Main Menu Main Menu Launch the menu by pressing the MENU button on the remote to set up the set top box for the user’s preferences. Navigate through the different menus using: Press OK button to launch sub menu of the selected menu. - Page 15 Channels > Press OK or buttons to navigate to sub menu options. This menu allows you to: • Navigate the channel list and tune to a channel by selecting a channel and pressing • Create favourite channels by pressing the FAV button appears next to the channel selected).
-
Page 16: Device Info
Signal info This menu allows you to: • View the selected channel frequency, signal strength and quality by selecting a channel and pressing the button. Press BACK to scroll to other menu options or press EXIT to resume channel viewing. Device Info >... - Page 17 Wired Network > Press OK or buttons to navigate to sub menu options. This menu allows you to: Select the network mode: Wired. • Tick Auto configuration to automatically configure your network settings • Untick Auto configuration to let you set up the network settings manually Press the button on the...
-
Page 18: Hdmi Out
AV (Audio Video) > Press OK or buttons to navigate to sub menu options. This menu allows you to: • Select Aspect ratio (16:9, 4:3 letterbox, 4:3 Pan & Scan) • Select Digital Audio (PCM or Dolby Digital) on the optical output/ HDMI output •... - Page 19 General > Press OK or buttons to navigate to sub menu options. This menu allows you to: • Select Parental Control program lock (None • Select Time Zone (NSW/ACT • Set i-Plate time out 60s) • Enable/Disable automatic upgrades via Internet •...
- Page 20 TV Guide The TV Guide offers you programming information for up to 8 days (if supported by the broadcaster). To access the TV Guide, press the TV GUIDE button on the remote. Use the on the remote to scroll through the TV Guide. Pressing the buttons will move the grid left/right...
- Page 21 > Press OK or buttons to navigate to sub menu options. This menu allows you to: • Set Continuous Timeshift to ON/OFF (default is OFF) • Set Skip Forwards time 2min 5min 10min 15min) • Set Skip Backwards time 2min 5min 10min 15min)
- Page 22 PVR Content Recordings Press OK or > buttons to navigate through the listings. Shortcut: Press RECORDING on the remote. The recorded list shows all programs recorded to the hard drive. This list allows you to: • play a recorded program •...
- Page 23 Recordings list Sorted by Name You can sort the recordings list either by Name (sorted in alphabetical order) or by Date by pressing the button alternately. Press BACK to scroll to other menu options or press EXIT to resume channel viewing. Recordings list Sorted by Date You can sort the recordings...
-
Page 24: Failed Recordings
Series Tag > Press OK or buttons to navigate through the listings. Shortcut: Press SERIES TAG on the remote. The series tag shows all series events that have been scheduled. This list allows you to: • delete future series tag recordings Press BACK to scroll to other menu options or press EXIT... -
Page 25: Hdd Manager
HDD Manager > Press OK or buttons to navigate to sub menu options. The HDD Manager shows information about the internal hard drive in the set top box. This menu allows you to: • monitor the available disk space for recordings •... -
Page 26: Video Playback
Media Videos Shortcut: Press MEDIA on the remote to launch > media menu. Press OK or buttons to navigate through the listings. Videos will list any video files found on the USB that the set top box can recognize. This menu allows you to: •... -
Page 27: Music Playback
Music Shortcut: Press MEDIA on the remote to launch media > menu. Press OK or buttons to navigate through the listings. Music will list any music files found on the USB that the set top box can recognize. This menu allows you to: •... - Page 28 Help This menu allows you to: • Navigate to technical support and information across all features, functions and services supported by the set top box. Shortcut: Press ? on the remote to launch HELP menu Press BACK or EXIT to resume channel viewing.
-
Page 29: Pvr 9600 Set Top Box Features
PVR 9600 SET TOP BOX FEATURES I-Plate The information plate (i-Plate) displays information about the current and next programmes available on the day on that channel at the bottom of the TV screen. Launch i-Plate by pressing button on the remote. Press the buttons on the remote to scroll on... - Page 30 I-Plate Toggling Diagram Launch Exit Launch Exit extended extended Select INFO Select INFO Select INFO Select INFO standard standard information information i-plate i-plate popup popup Select EXIT Select EXIT I-Plate Help The i-Plate help contain information on what button functions are available to set up a reminder, series recording and to navigate within i-Plate.
-
Page 31: Changing Channels
Changing Channels There are several methods in changing channels. • Press CH+/CH- buttons to change the channel to the next/previous channel respectively < > • On i-Plate, press buttons to navigate to different channels and press OK to select • On TV Guide, press buttons to navigate to up / down the channels and press OK to select •... -
Page 32: Setting A Reminder
Popup Reminder Reminders are used to notify when a program is about to start on a different channel. There are options available that allow you to: • Press OK to switch to that channel • Press EXIT to remove the pop up reminder and remain on the current channel you are watching. - Page 33 Setting a Reminder METHOD On the TV Guide, navigate using the to the channel and program where a reminder is to be set. Press the button to set the reminder and will appear next to the program title. To delete this reminder, press button again.
-
Page 34: Parental Control
Parental Control This set top box has a parental control feature to control viewing in your home. Entering the PG PIN code gains access to this feature and you can set the program classification level to: None MA 15+ AV15+ The default pin for the parental lock is 1234. -
Page 35: Software Upgrade
SOFTWARE UPGRADE Software Upgrade via USB Software upgrade is done by plugging an external USB device containing a valid software upgrade file. Go to Menu Settings Device Info Check for updates. Software Upgrade via Internet If no upgrade on USB is found a banner will appear asking to check for upgrade via Internet. - Page 36 Software Upgrade Successful Message A Pop up message will appear indicating a successful software upgrade. The set top box will reboot with the software upgrade. You can double check the software upgrade version by going to Menu Settings Device Info You can verify if your set top box’s software is current by logging into our website at:...
-
Page 37: Pvr Functionality
PVR FUNCTIONALITY Recording Modes 9600 The PVR allows the user to record 6 channels simultaneously across 3 networks while watching a 7th from within a recording channel i.e., record SBS, ABC and ABC2 and watch ABC2 or watch a pre-recorded program from the hard drive. This set top box has several ways of recording;... - Page 38 Chase Play Chase Play allows you to PLAYBACK an event from the recorded list even if it has not yet completed recording. A notification will appear if you reached “LIVE” broadcast while fast -forwarding the chase play event. Recordings Across 3 Frequency Networks with Record Conflict Detection You can record up to 6 channels across 3 frequency networks.
- Page 39 6 Recording Limit Reached Pop up message indicating that 6 recording programs limit is reached. 3 Frequency Networks Limit Reached Pop up message indicating that recordings across 3 frequency networks limit is reached. Unavailable Channel Pop up message indicating that a selected channel outside the 3 recording frequency networks is not available for viewing.
- Page 40 Timeshift PAUSE, REWIND and FAST FORWARD Live TV via time shift buffer. A channel change will clear this time shift buffer. NOTE: • Timeshifting is limited up to 2 hours maximum behind Live broadcast. • Continuous timeshift setting must be set to ON to rewind Live TV from the beginning where the channel is...
- Page 41 Rewinding a timeshifted program A running time will appear on the i-plate as you rewind the timeshifted program to indicate the current position behind Live broadcast. Fast forwarding a timeshifted program A running time will appear on the i-plate as you fast forward the timeshifted program to indicate the current position behind Live broadcast.
-
Page 42: Additional Information
Internet Connectivity This feature allows you to connect the set top box to the internet via Ethernet or WiFi connection (through a 3rd party Altech UEC approved WiFi USB dongle) to update the software of the set top box. For assistance: Page 42 of 52 support@uec.com.au... -
Page 43: Set Top Box Specifications, Troubleshooting
SET TOP BOX SPECIFICATIONS & TROUBLESHOOTING Set Top Box Specifications Input impedance Video Profile level MPEG ML / MPEG – Part / VC Video Output System Video Output Terminal Composite Video Output, HDMI Output Video Output Level Audio Decoding MPEG Level II / MPEG AAC / MPEG AAC / MPEG... -
Page 44: Trouble Shooting
Trouble Shooting Problem Possible Causes Solution No LED light on the front The AC power adapter maybe Ensure proper connection of the AC disconnected. power adapter into the back of the set panel / Set top box will not top box and into the AC mains. turn ON. -
Page 45: Warranty
WARRANTY CERTIFICATE Congratulations on your purchase of a Altech UEC product. Altech UEC’s commitment to quality includes our after sales support and servicing. Should this product develop a manufacturing fault, Altech UEC herby provides you with a warranty against defects as follows:... -
Page 46: Legal Matters
How to Make a Claim: This warranty against defects is provided by Altech UEC, Level 2, 27 Sirius Road, Lane Cove West, NSW 2066, phone (02) 9425 5777. If a defect in the product is detected within 12 months, you are entitled to claim a warranty. Please first contact the supplier that you made your original... - Page 47 Please note that there is a fee associated with the written request to cover shipping, handling, processing and the cost of media. Altech UEC reserves the right to exclude or include GPL/LGPL components from its products as it sees fit.
-
Page 48: Help And Information
Altech UEC Austrailia Email Sales sales@uec.com.au support@uec.com.au Support If you have comments, suggestions or want to provide feedback on the product, visit www.uec.com.au. For the latest PVR9600 Viewer’s Guide go to website www.uec.com.au. For assistance: Page 48 of 52 support@uec.com.au www.uec.com.au... - Page 49 Notes: For assistance: Page 49 of 52 support@uec.com.au www.uec.com.au...
- Page 50 Notes: For assistance: Page 50 of 52 support@uec.com.au www.uec.com.au...
- Page 51 Notes: For assistance: Page 51 of 52 support@uec.com.au www.uec.com.au...
- Page 52 ALTECH UEC PTY. LTD LEVEL 2 , 27 SIRIUS RD, LANE COVE WEST, NSW 2066 SYDNEY, AUSTRALIA THE LATEST VERSION OF THIS USER MANUAL CAN BE DOWNLOADED AT: www.uec.com.au...
Need help?
Do you have a question about the PVR9600 and is the answer not in the manual?
Questions and answers