Table of Contents
Advertisement
Advertisement
Table of Contents

Related Manuals for Altech VAST DSR4639


Summary of Contents for Altech VAST DSR4639
-
Page 1: User Manual
VAST DSR4639 USER MANUAL P a g e © Copyright 2012 Altech UEC (Pty) Ltd... - Page 2 You are also entitled to have the goods repaired or replaced if the goods fail to be of acceptable quality and the failure does not amount to a major failure. P a g e © Copyright 2012 Altech UEC (Pty) Ltd...
-
Page 3: Table Of Contents
EMINDER POPUPS ................17 OW TO SET A REMINDER ................. 18 OW TO DELETE A REMINDER ..............18 XAMPLE OF A ANNER EMINDER ............18 XAMPLE OF AN UTOTUNE EMINDER P a g e © Copyright 2012 Altech UEC (Pty) Ltd... - Page 4 IMESHIFT PTION 12.17 ................... 30 ECORDING FFSETS 12.18 .................... 31 ETTINGS 12.19 ..................31 ORMAT RIVE 12.20 ................32 RIVE NFORMATION RECORDING ................. 33 13.1 ..................33 NSTANT RECORD P a g e © Copyright 2012 Altech UEC (Pty) Ltd...
- Page 5 18.2 ..............43 AVING IMESHIFT ROGRAMS 18.3 ..................... 43 ELETE VENT 18.4 ...................... 43 ORTING 18.5 ....................44 ROUPING MEDIA PLAYER ................44 ETHERNET ................... 44 MHEG .................... 44 P a g e © Copyright 2012 Altech UEC (Pty) Ltd...
- Page 6 ............45 HAIN ECORDING OESN ECORD FREQUENTLY ASKED QUESTIONS ........... 46 23.1 ?............... 46 OURS ECORD 23.2 ? ........ 46 RASE ROGRAMS LAYLIST 23.3 ? ............46 UBTITLES LAYBACK P a g e © Copyright 2012 Altech UEC (Pty) Ltd...
- Page 7 P a g e © Copyright 2012 Altech UEC (Pty) Ltd...
-
Page 8: Introduction
2 x AA batteries. 1.1.3 12 v Power supply adapter with fig 8 power lead. 1.1.4 AV cable 1.1.5 Component video (YPbPr) cable 1.1.6 F-F loop through cable. 1.1.7 User manual P a g e © Copyright 2012 Altech UEC (Pty) Ltd... -
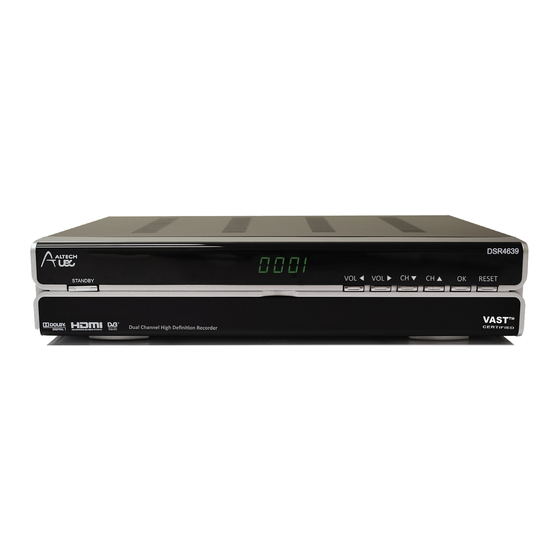
Page 9: Front Panel
Decreases the volume level. Increases the volume level. Changes to the next available channel. Changes to the previous available channel. Accepts the selection. RESET Reboots the decoder, i.e. if decoder freezes etc. P a g e © Copyright 2012 Altech UEC (Pty) Ltd... -
Page 10: Back Panel
Audio = Left & Right Connects to the analog audio inputs on TV Video =YPbPr Connects to the YPbPr inputs on TV Composite Video Connects to the video inputs on TV 10 | P a g e © Copyright 2012 Altech UEC (Pty) Ltd... -
Page 11: Installing And Connecting The Pvr
PVR should lock to service and present video. OOP THROUGH CONNECTION Connect the Loop through F-F connector on LNB1 out to LNB 2 4.2.1 in –see the below picture 11 | P a g e © Copyright 2012 Altech UEC (Pty) Ltd... -
Page 12: Option A: Av Connector (Standard Definition Tv)
HDMI input connector of the AV home theatre system. 4.5.4 Then connect the output HDMI of the AV home theatre system to the TV. 12 | P a g e © Copyright 2012 Altech UEC (Pty) Ltd... -
Page 13: Smart Card
The only setting that is not reset is the LNB setting. Please manually edit this setting to the desired value. UMBER The default menu pin is 1234. 6.1.1 13 | P a g e © Copyright 2012 Altech UEC (Pty) Ltd... -
Page 14: Remote Control
Media hot key Scheduled list hot key Timeshift list hot key TV/Radio Closed captions/ Subtitles PVR menu Play Rewind Stop Fast forward Record Jump back Pause Jump forward 14 | P a g e © Copyright 2012 Altech UEC (Pty) Ltd... -
Page 15: Pvr Remote Control Button Functions
TV/RADIO Press this button once to switch between TV and radio services. Hold the button down to launch the bouquet popup (if available) 15 | P a g e © Copyright 2012 Altech UEC (Pty) Ltd... -
Page 16: Dsd4121 Decoder Features And Menu
NOTE: The i-Plate will only timeout when changing channels from the “CH+” or “CH-” button. If you have manually opened the i-Plate, the “EXIT” button must be pressed to remove it. 16 | P a g e © Copyright 2012 Altech UEC (Pty) Ltd... -
Page 17: I-Plate Extended Mode
Pressing the “OK’ button again will change the “B” to an “A” next to the program 8.5.3 name. This indicates an Auto tune reminder has been set. 17 | P a g e © Copyright 2012 Altech UEC (Pty) Ltd... -
Page 18: How To Delete A Reminder
Cancel the reminder by pressing the “EXIT” button. 8.8.3 Tune immediately to the selected programme by pressing the “OK” button, if you 8.8.4 do nothing, the decoder will automatically tune to the reminder channel. 18 | P a g e © Copyright 2012 Altech UEC (Pty) Ltd... -
Page 19: Volume And Mute
Press the mute button to mute the sound and press it again to un-mute. UBTITLES AND LOSED APTIONS 10.1 URNING ON SUBTITLES LOSED APTIONS 10.1.1 There is a menu option to enable subtitles. This can be found in the settings 19 | P a g e © Copyright 2012 Altech UEC (Pty) Ltd... -
Page 20: Turning Off Subtitles Or Closed Captions
To access the TV Guide, press the “TV Guide” button on the remote control. 11.1.2 11.1.3 All information in the TV guide is controlled and populated by the broadcaster. 20 | P a g e © Copyright 2012 Altech UEC (Pty) Ltd... -
Page 21: Data Loading
OVING AROUND THE 11.3.1 Use the up/down/left/right buttons to scroll though the event grid. 11.3.2 Use the CH+ and CH- buttons to move the grid by 24 hours. 21 | P a g e © Copyright 2012 Altech UEC (Pty) Ltd... -
Page 22: Menu
Highlight the correct option and press OK to edit it 12.3.5 Use the left and right keys to select options, or if required, use the number keys to type in new values. 22 | P a g e © Copyright 2012 Altech UEC (Pty) Ltd... -
Page 23: Dish Installation Menu
Type in the new LNB frequency 12.5.6 Press OK to save the change setting. 12.5.7 To return to the main menu press left arrow or EXIT of the remote 23 | P a g e © Copyright 2012 Altech UEC (Pty) Ltd... -
Page 24: T O Rescan
For a permanent setting, change the aspect ratio in the menu. 12.7.2 Digital audio should only be changed to Dolby when used in conjunction with a Dolby decoder. 24 | P a g e © Copyright 2012 Altech UEC (Pty) Ltd... -
Page 25: User Settings
Use the left and right arrow keys to select the correct time zone 12.9.4 Press OK when the correct one has been selected 12.9.5 Press EXIT or right arrow to return to the main menu section. 25 | P a g e © Copyright 2012 Altech UEC (Pty) Ltd... -
Page 26: Reset To Factory Defaults
In the menu, highlight the “USB upgrade” option and press OK. 12.11.3 The set top box will reboot and apply the upgrade automatically – it may take a 12.11.4 few minutes to complete. 26 | P a g e © Copyright 2012 Altech UEC (Pty) Ltd... -
Page 27: Information
12.12 NFORMATION The information section contains the information for the set top box and smart card. 27 | P a g e © Copyright 2012 Altech UEC (Pty) Ltd... -
Page 28: Parental Control
To make changes to this menu, press right to navigate to the Parental Level option. 12.13.2 The set top box will request the parental pin. The default parental pin is 1234. 28 | P a g e © Copyright 2012 Altech UEC (Pty) Ltd... -
Page 29: Change Parental Pin
The default parental pin can be changed to another pin value. The pin will be reset back to the default if a “reset to factory defaults” is 12.14.2 performed. 29 | P a g e © Copyright 2012 Altech UEC (Pty) Ltd... -
Page 30: Pvr Settings
The Record Stop Offset adds extra time to the end of a recording. (e.g. if a program ends at 11:00am and the Stop Offset is set to 10 minutes, the recording 30 | P a g e © Copyright 2012 Altech UEC (Pty) Ltd... -
Page 31: Jump Settings
To format the hard drive, press the GREEN button or press OK when Format Hard Drive is highlighted. 12.19.3 The following popup will be displayed 12.19.4 Press OK to format the hard drive. 31 | P a g e © Copyright 2012 Altech UEC (Pty) Ltd... -
Page 32: Hard Drive Information
12.20.2 Press YELLOW button or OK when Hard Drive Information is highlighted to display hard drive information. A similar screen will be displayed 32 | P a g e © Copyright 2012 Altech UEC (Pty) Ltd... -
Page 33: 13 Recording
13.1.3 A maximum of two events may be recorded at any time hence there may be two recording information popups displayed over the iplate. 33 | P a g e © Copyright 2012 Altech UEC (Pty) Ltd... -
Page 34: Tv Guide (Epg) Record
Press the yellow button on the program in the TV guide to make the yellow chain icon appear. 13.3.3 These chain events are only recorded if there is a spare tuner available and no conflicts checking is done on other chain events. 34 | P a g e © Copyright 2012 Altech UEC (Pty) Ltd... -
Page 35: Timebased Record
Choosing Parental Setting “ON” means the Parental guidance pin will need to be entered before the playback can start. 13.4.4 The maximum duration of a time based recording is 24 hours. 35 | P a g e © Copyright 2012 Altech UEC (Pty) Ltd... -
Page 36: T O Schedule A Timebased Recording
Scroll to the Scheduled List icon and press OK to launch the Scheduled List screen Press the “R” (Record) button on the remote control to add a Time based 13.5.3 recording (timed event) 13.5.4 The following screen will appear: 36 | P a g e © Copyright 2012 Altech UEC (Pty) Ltd... -
Page 37: 14 Conflicts
If you try to record 3 programs that overlap on different channels, a message will inform you that there is a conflict. (Expect for chain recordings which do not have conflict checking) 37 | P a g e © Copyright 2012 Altech UEC (Pty) Ltd... -
Page 38: Timeshifting
To save the program to the playlist (so it won’t be automatically deleted), press 15.2.3 the green button to “copy to the playlist” in the timeshift list screen. 38 | P a g e © Copyright 2012 Altech UEC (Pty) Ltd... -
Page 39: Viewing Pause Buffer And Recording
If you are watching behind live press the record button, a popup will appear informing that you are behind live and all of the event that is in the timeshift list will be moved to the playlist. 39 | P a g e © Copyright 2012 Altech UEC (Pty) Ltd... -
Page 40: Playlist
Select Playlist and press OK. 16.1.5 Use the up and down arrow keys to move through the recorded programs. 16.1.6 Press OK on a program to start it playing back. 40 | P a g e © Copyright 2012 Altech UEC (Pty) Ltd... -
Page 41: Delete Event
Press the blue button to group the items and another time to ungroup them. 16.4.3 When the playlist is in the grouped mode, it can still be sorted by name or date by pressing the yellow button. 41 | P a g e © Copyright 2012 Altech UEC (Pty) Ltd... -
Page 42: Scheduled List
17.3.1 To sort the list in alphabetical order, press the yellow button. 17.3.2 To sort the list according to recording start time, press the yellow button again. 42 | P a g e © Copyright 2012 Altech UEC (Pty) Ltd... -
Page 43: Grouping
18.4.1 To sort the list in alphabetical order, press the yellow button. 18.4.2 To sort the list according to recording start time, press the yellow button again. 43 | P a g e © Copyright 2012 Altech UEC (Pty) Ltd... -
Page 44: Grouping
NOTE: MHEG applications will only launch when the STB is viewing live AV. (ie : If the STB is viewing behind live, or performing a playback, the MHEG app will not launch) 44 | P a g e © Copyright 2012 Altech UEC (Pty) Ltd... - Page 45 If a chain recording didn’t record then there were probably already 2 recordings 22.3.1 in progress. To make sure a program records, set up the recording as a normal single recording. 45 | P a g e © Copyright 2012 Altech UEC (Pty) Ltd...
-
Page 46: F Requently A Sked Q Uestions
When the format is complete, the HDD status on the screen should say “Connected and working”, and the Playlist will be empty. 23.3 UBTITLES LAYBACK To turn on subtitles, press the “CC” closed caption button on the remote. 23.3.1 46 | P a g e © Copyright 2012 Altech UEC (Pty) Ltd... - Page 47 47 | P a g e © Copyright 2012 Altech UEC (Pty) Ltd...
-
Page 48: Legal Matters
Please note that there is a fee associated with the written request to cover shipping, handling, processing and the cost of media. Altech UEC reserves the right to exclude or include GPL/LGPL components from its products as it sees fit. -
Page 49: Product Warranty
Any repairs made in these first 12 months must be made by the Altech UEC Repair Centre in order to rely on this warranty certificate. This certificate, plus the original purchase receipt showing the date of purchase of the new DSR4639 Decoder, must be provided when returning the DSR4639 Decoder for warrantee purposes. -
Page 50: Help And Information
DISCLAIMER Altech UEC makes no warranties, either expressed or implied, and including, but not limited to, implied warranties of merchant ability and fitness of the DSR4639 Decoder for a particular purpose. This extends to the hardware, software, the DSR4639 Basic Viewer's Guide and any other written materials accompanying the DSR4639 Decoder at the time of its sale. - Page 51 Altech UEC Pty Ltd Level 2, 27 Sirius Rd Lane Cove West NSW 2066 Sydney Australia The latest version of this user manual can be downloaded at www.uec.com.au 51 | P a g e © Copyright 2012 Altech UEC (Pty) Ltd...
Need help?
Do you have a question about the VAST DSR4639 and is the answer not in the manual?
Questions and answers
How do you pair/program a new remote to a DSR4639
How do I pair a new remote to my Altech 4639?