TP-Link Archer D7 User Manual
Ac1750 wireless dual band gigabit adsl2+ modem router
Hide thumbs
Also See for Archer D7:
- Quick installation manual (2 pages) ,
- User manual (116 pages) ,
- Installation manual (2 pages)

Related Manuals for TP-Link Archer D7


Summary of Contents for TP-Link Archer D7
- Page 1 Archer D7 AC1750 Wireless Dual Band Gigabit ADSL2+ Modem Router Rev: 1.0.0 1910010943...
- Page 2 COPYRIGHT & TRADEMARKS Specifications are subject to change without notice. is a registered trademark of TP-LINK TECHNOLOGIES CO., LTD. Other brands and product names are trademarks or registered trademarks of their respective holders. No part of the specifications may be reproduced in any form or by any means or used to make any derivative such as translation, transformation, or adaptation without permission from TP-LINK TECHNOLOGIES CO., LTD.
-
Page 3: Fcc Statement
FCC STATEMENT This equipment has been tested and found to comply with the limits for a Class B digital device, pursuant to part 15 of the FCC Rules. These limits are designed to provide reasonable protection against harmful interference in a residential installation. This equipment generates, uses and can radiate radio frequency energy and, if not installed and used in accordance with the instructions, may cause harmful interference to radio communications. -
Page 4: National Restrictions
This is a class B product. In a domestic environment, this product may cause radio interference, in which case the user may be required to take adequate measures. National Restrictions This device is intended for home and office use in all EU countries (and other countries following the EU directive 1999/5/EC) without any limitation except for the countries mentioned below: Country Restriction... -
Page 5: Industry Canada Statement
Industry Canada Statement Complies with the Canadian ICES-003 Class B specifications. Cet appareil numérique de la classe B est conforme à la norme NMB-003 du Canada. This device complies with RSS 210 of Industry Canada. This Class B device meets all the requirements of the Canadian interference-causing equipment regulations. -
Page 6: Safety Information
Safety Information When product has power button, the power button is one of the way to shut off the product; when there is no power button, the only way to completely shut off power is to disconnect the product or the power adapter from the power source. ... -
Page 7: Declaration Of Conformity
DECLARATION OF CONFORMITY For the following equipment: Product Description: AC1750 Wireless Dual Band Gigabit ADSL2+ Modem Router Model No.: Archer D7 Trademark: TP-LINK We declare under our own responsibility that the above products satisfy all the technical regulations applicable to the product within the scope of Council Directives:... -
Page 8: Table Of Contents
CONTENTS Package Contents ....................1 Chapter 1. Product Overview...................2 1.1 Overview of the Modem Router ..................2 1.2 Main Features......................... 3 1.3 Panel Layout........................4 1.3.1 The Front Panel ........................4 1.3.2 The Back Panel........................6 Chapter 2. Connecting the Modem Router .............7 2.1 System Requirements .................... - Page 9 4.7.2 Clients List.......................... 40 4.7.3 Address Reservation......................40 4.7.4 Conditional Pool ......................... 41 4.8 Wireless 2.4GHz......................42 4.8.1 Basic Settings ........................43 4.8.2 WPS Settings ........................44 4.8.3 Wireless Security ....................... 47 4.8.4 Wireless Schedule ......................49 4.8.5 Wireless MAC Filtering ...................... 49 4.8.6 Wireless Advanced ......................
- Page 10 4.13.1 IPv6 Default Gateway....................... 75 4.13.2 IPv6 Static Route ......................75 4.14 Forwarding........................76 4.14.1 Virtual Servers ........................77 4.14.2 Port Triggering ........................78 4.14.3 DMZ ..........................80 4.14.4 UPnP ..........................81 4.15 Parental Control......................81 4.16 Firewall ......................... 83 4.16.1 Rule ..........................
- Page 11 4.24 Logout......................... 108 Appendix A: Specifications .................109 Appendix B: Troubleshooting ................110 ppendix C: Technical Support................113...
-
Page 12: Package Contents
Package Contents The following contents should be found in your package: One Archer D7 AC1750 Wireless Dual Band Gigabit ADSL2+ Modem Router One Power Adapter for Archer D7 AC1750 Wireless Dual Band Gigabit ADSL2+ Modem Router Quick Installation Guide ... -
Page 13: Chapter 1. Product Overview
Archer D7 AC1750 Wireless Dual Band Gigabit ADSL2+ Modem Router User Guide Chapter 1. Product Overview Thank you for choosing the Archer D7 AC1750 Wireless Dual Band Gigabit ADSL2+ Modem Router. 1.1 Overview of the Modem Router The Archer D7 AC1750 Wireless Dual Band Gigabit ADSL2+ Modem Router integrates 4-port Switch, Firewall, NAT-Router and Wireless AP. -
Page 14: Main Features
Archer D7 AC1750 Wireless Dual Band Gigabit ADSL2+ Modem Router User Guide 1.2 Main Features Complies with IEEE 802.11ac to provide a wireless data rate of up to 450Mbps (2.4GHz) + 1300Mbps (5GHz). Four 10/100/1000Mbps Auto-Negotiation RJ45 LAN ports (Auto MDI/MDIX), one RJ11 port. -
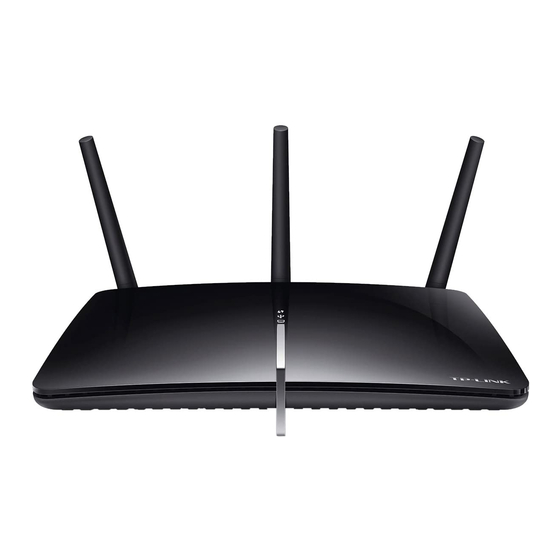
Page 15: Panel Layout
Archer D7 AC1750 Wireless Dual Band Gigabit ADSL2+ Modem Router User Guide 1.3 Panel Layout 1.3.1 The Front Panel Figure 1-1 The modem router’s LEDs are located on the top panel (View from top to bottom). They indicate the device’s working status. For details, please refer to LED Explanation. - Page 16 Archer D7 AC1750 Wireless Dual Band Gigabit ADSL2+ Modem Router User Guide There is a device connected to this LAN port, or the LAN port is sending or receiving data. (LAN) There is no device connected to this LAN port.
-
Page 17: The Back Panel
Archer D7 AC1750 Wireless Dual Band Gigabit ADSL2+ Modem Router User Guide 1.3.2 The Back Panel Figure 1-2 ADSL: Through the port, you can connect the modem router with the telephone. Or you can connect them by an external separate splitter. For details, please refer to 2.3 Connecting the... -
Page 18: Chapter 2. Connecting The Modem Router
Plug one end of the twisted-pair ADSL cable into the ADSL port on the rear panel of Archer D7. Connect the other end to the MODEM port of the external splitter. Step 2: Connect the Ethernet cable. Attach one end of a network cable to your computer’s Ethernet port or a regular hub/switch port, and the other end to the LAN port on the modem router Archer D7. - Page 19 Archer D7 AC1750 Wireless Dual Band Gigabit ADSL2+ Modem Router User Guide Figure 2-1...
-
Page 20: Chapter 3. Quick Installation Guide
AC1750 Wireless Dual Band Gigabit ADSL2+ Modem Router User Guide Chapter 3. Quick Installation Guide This chapter will show you how to configure the basic functions of your Archer D7 AC1750 Wireless Dual Band Gigabit ADSL2+ Modem Router using Quick Setup Wizard within minutes. -
Page 21: Quick Installation Guide
192.168.1.2 ~ 192.168.1.254. 3.2 Quick Installation Guide With a Web-based utility, it is easy to configure and manage the Archer D7 AC1750 Wireless Dual Band Gigabit ADSL2+ Modem Router. The Web-based utility can be used on any Windows, Macintosh or UNIX OS with a Web browser, such as Microsoft Internet Explorer, Mozilla Firefox or Apple Safari. - Page 22 Archer D7 AC1750 Wireless Dual Band Gigabit ADSL2+ Modem Router User Guide Note: 1) Do not mix up the user name and password with your ADSL account user name and password which are needed for PPP connections. 2) If the above screen does not pop up, it means that your Web-browser has been set to a proxy.
- Page 23 Archer D7 AC1750 Wireless Dual Band Gigabit ADSL2+ Modem Router User Guide Select Yes and then click Next to continue. Figure 3-6 Note: If the connection type can not be detected, please select No to configure it manually (shown in Figure 3-7).
- Page 24 Archer D7 AC1750 Wireless Dual Band Gigabit ADSL2+ Modem Router User Guide Note: If you are using the modem router on a new DSL line and have not completed your DSL provider’s online registration, you may be using a generic username and password. When registration is completed, you will need to update the username and password if you have created a new one.
- Page 25 Archer D7 AC1750 Wireless Dual Band Gigabit ADSL2+ Modem Router User Guide Figure 3-11 On this page, please confirm all parameters. Click Back to modify or click the Save button to save your configuration. Figure 3-12 You will see the Complete screen below, click Finish to complete these settings.
- Page 26 Archer D7 AC1750 Wireless Dual Band Gigabit ADSL2+ Modem Router User Guide Figure 3-13 The basic settings for your modem router are completed. Please open the web browser and try to log on to http://www.tp-link.com to test your Internet connection.
-
Page 27: Chapter 4. Configuring The Modem Router
Archer D7 AC1750 Wireless Dual Band Gigabit ADSL2+ Modem Router User Guide Chapter 4. Configuring the Modem Router This chapter will show each Web page's key function and the configuration way. 4.1 Login After your successful login, you will see the twenty-three main menus on the left of the Web-based utility. -
Page 28: Quick Setup
Archer D7 AC1750 Wireless Dual Band Gigabit ADSL2+ Modem Router User Guide Figure 4-1 4.3 Quick Setup Please refer to Section 3.2 Quick Installation Guide. -
Page 29: Operation Mode
Archer D7 AC1750 Wireless Dual Band Gigabit ADSL2+ Modem Router User Guide 4.4 Operation Mode Choose “Operation Mode”, and you will see the screen as shown in Figure 4-2. Select your desired mode and then click Save. Figure 4-2 DSL Modem Router Mode: The device enables multi-users to share Internet via ADSL using its ADSL port and share it wirelessly at 1300Mbps wireless speeds over the crystal clear 5GHz band and 450Mbps over the 2.4GHz band. -
Page 30: Wan Settings
Archer D7 AC1750 Wireless Dual Band Gigabit ADSL2+ Modem Router User Guide 4.5.1 WAN Settings Choose “Network”“WAN Settings”, and you will see the WAN Port Information Table in the screen similar to Figure 4-3, which describes the WAN port settings and the relevant manipulation to each interface. - Page 31 Archer D7 AC1750 Wireless Dual Band Gigabit ADSL2+ Modem Router User Guide Figure 4-4 4.5.1.1 Static IP Select this option if your ISP provides static IP information to you. You should set static IP address, IP subnet mask, and gateway address in the screen below.
- Page 32 Archer D7 AC1750 Wireless Dual Band Gigabit ADSL2+ Modem Router User Guide Figure 4-5 ATM Configuration: VPI (0~255): Identifies the virtual path between endpoints in an ATM network. The valid range is from 0 to 255. Please input the value provided by your ISP.
-
Page 33: Dynamic Ip
Archer D7 AC1750 Wireless Dual Band Gigabit ADSL2+ Modem Router User Guide DNS Server/ Secondary DNS Server: Here you can set DNS Server (at least one) manually. The Route will use this DNS Server for priority. Enable IPv6: Check the box to enable IPv6. - Page 34 Archer D7 AC1750 Wireless Dual Band Gigabit ADSL2+ Modem Router User Guide Figure 4-6 Click Advance, advanced selections for WAN Service Setup can be shown. MTU (bytes): Maximum Transmission Unit Size. Check this box then you can change the MTU size.
- Page 35 Archer D7 AC1750 Wireless Dual Band Gigabit ADSL2+ Modem Router User Guide Get IP with Unicast: This is disabled by default. The minority of DHCP Server of ISP will not support to enable this. When the Route is connected right but IP cannot get, you can select this box.
- Page 36 Archer D7 AC1750 Wireless Dual Band Gigabit ADSL2+ Modem Router User Guide Figure 4-7 PPP Username/Password/Confirm Password: Enter the User Name, Password and Confirm Password provided by your ISP. These fields are case-sensitive. Connection Mode: For PPPoE connection, you can select Always on or Connect on demand or Connect manually.
- Page 37 Archer D7 AC1750 Wireless Dual Band Gigabit ADSL2+ Modem Router User Guide IPv6 Default Gateway: Select a WAN connection from the drop-down list as the IPv6 default gateway. Click Advance, advanced selections for WAN Service Setup can be shown.
- Page 38 Archer D7 AC1750 Wireless Dual Band Gigabit ADSL2+ Modem Router User Guide Figure 4-8 4.5.1.5 IPoA If your ISP provides an IPoA connection, select IPoA option for the Connection Type on the screen.
-
Page 39: Bridge
Archer D7 AC1750 Wireless Dual Band Gigabit ADSL2+ Modem Router User Guide Figure 4-9 IP Address/Subnet Mask: Enter the IP Address and Subnet Mask provided by ISP. If you forget, you can ask your ISP. DNS Server/Secondary DNS Server: Type in your preferred DNS server. -
Page 40: Interface Grouping
Archer D7 AC1750 Wireless Dual Band Gigabit ADSL2+ Modem Router User Guide Note: After you finish the Internet configuration, please click Save to make the settings take effect. 4.5.2 Interface Grouping Choose “Network”“Interface Grouping”, you can view all the current groups on this page (shown in Figure 4-11). -
Page 41: Lan Settings
Archer D7 AC1750 Wireless Dual Band Gigabit ADSL2+ Modem Router User Guide Figure 4-12 Click Save to make the entry effective immediately 4.5.3 LAN Settings Choose “Network”“LAN Settings” menu, and you will see the LAN screen (shown in Figure 4-13). Please configure the parameters for LAN ports according to the descriptions below. -
Page 42: Ipv6 Lan Settings
Archer D7 AC1750 Wireless Dual Band Gigabit ADSL2+ Modem Router User Guide Enable IGMP Snooping: If you select the option, please choose the IGMP Mode: Standard Mode or Blocking Mode. Enable Second IP: You can configure the modem router’s second IP Address and Subnet Mask for LAN Interface through which you can also access to the Web-based Utility as the default IP Address and Subnet Mask. - Page 43 Archer D7 AC1750 Wireless Dual Band Gigabit ADSL2+ Modem Router User Guide Address Autoconfiguration Type: Select a type to assign IPv6 addresses to the computers in your LAN. RADVD and DHCPv6 Server are provided. If RADVD is selected, it doesn’t need to be configured.
-
Page 44: Mac Clone
Archer D7 AC1750 Wireless Dual Band Gigabit ADSL2+ Modem Router User Guide Click the Save button to save the settings. 4.5.5 MAC Clone Choose menu “Network”“MAC Clone”, you can configure the MAC address of the WAN Interface as shown below. -
Page 45: Dsl Settings
Archer D7 AC1750 Wireless Dual Band Gigabit ADSL2+ Modem Router User Guide PPTP Passthrough: Point-to-Point Tunneling Protocol (PPTP) allows the Point-to-Point Protocol (PPP) to be tunneled through an IP network. To allow PPTP tunnels to pass through the modem router, click Enable. - Page 46 Note: You could also use other VPN Routers to set VPN tunnels with Archer D7. Archer supports up to 10 VPN tunnels simultaneously. Click Add New Connection in Figure 4-21 and then you will enter the screen shown in Figure...
- Page 47 Archer D7 AC1750 Wireless Dual Band Gigabit ADSL2+ Modem Router User Guide Figure 4-22 IPSec Connection Name: Enter a name for your VPN. Remote IPSec Gateway Address (URL): Enter the destination gateway IP address in the box which is the public WAN IP or Domain Name of the remote VPN server endpoint. (For example: Input 219.134.112.247 in Device1, Input 219.134.112.246 in Device 2)
-
Page 48: Iptv
Archer D7 AC1750 Wireless Dual Band Gigabit ADSL2+ Modem Router User Guide Click Show Advanced Settings and then you can configure the Advanced Settings. Figure 4-23 Mode: Select Main Mode to configure the standard negotiation parameters for IKE phase1. -
Page 49: Dhcp Server
Archer D7 AC1750 Wireless Dual Band Gigabit ADSL2+ Modem Router User Guide Figure 4-24 Enable IPTV: Check the box to enable IPTV function. . VPI (0~255): Identifies the virtual path between endpoints in an ATM network. The valid range is from 0 to 255. - Page 50 Archer D7 AC1750 Wireless Dual Band Gigabit ADSL2+ Modem Router User Guide Figure 4-25 Start IP Address: Enter a value for the DHCP server to start with when issuing IP addresses. Because the default IP address for the modem router is 192.168.1.1, the default Start IP Address is 192.168.1.100, and the Start IP Address must be 192.168.1.100 or greater, but...
-
Page 51: Clients List
Archer D7 AC1750 Wireless Dual Band Gigabit ADSL2+ Modem Router User Guide Note: To use the DHCP server function of the modem router, you must configure all computers on the LAN as "Obtain an IP Address automatically". You have to disable NAT of the WAN connections, or the DHCP Relay may not take effect. -
Page 52: Conditional Pool
Archer D7 AC1750 Wireless Dual Band Gigabit ADSL2+ Modem Router User Guide To Reserve an IP address: Click the Add New button. Then Figure 4-28 will pop up. Enter the MAC address (in XX:XX:XX:XX:XX:XX format.) and IP address (in dotted-decimal notation) of the computer for which you want to reserve an IP address. -
Page 53: Wireless 2.4Ghz
Archer D7 AC1750 Wireless Dual Band Gigabit ADSL2+ Modem Router User Guide Click the Save button. Figure 4-30 To modify or delete an existing entry: Click the Edit in the entry you want to modify. If you want to delete the entry, click the Delete. -
Page 54: Basic Settings
Archer D7 AC1750 Wireless Dual Band Gigabit ADSL2+ Modem Router User Guide 4.8.1 Basic Settings Choose menu “Wireless 2.4GHz” → “Basic Settings”, you can configure the basic settings for the wireless network of 2.4GHz on this page. Figure 4-31 SSID: Wireless network name shared among all points in a wireless network. The SSID must be identical for all devices in the wireless network. -
Page 55: Wps Settings
Archer D7 AC1750 Wireless Dual Band Gigabit ADSL2+ Modem Router User Guide Channel Width: Select the channel width from the drop-down list . The default setting is automatic, which can adjust the channel width for your clients automatically. ... - Page 56 Archer D7 AC1750 Wireless Dual Band Gigabit ADSL2+ Modem Router User Guide Figure 4-32 WPS: Enable or disable the WPS function here. Current PIN: The current value of the modem router's PIN is displayed here. The default PIN ...
- Page 57 Archer D7 AC1750 Wireless Dual Band Gigabit ADSL2+ Modem Router User Guide Figure 4-33 Step 2: Press and hold the WPS button of the client device directly. Step 3: The Wi-Fi Protected Setup LED flashes for two minutes during the Wi-Fi Protected Setup process.
-
Page 58: Wireless Security
Archer D7 AC1750 Wireless Dual Band Gigabit ADSL2+ Modem Router User Guide Note: The WPS LED on the modem router will light green for five minutes if the device has been successfully added to the network. The WPS function cannot be configured if the Wireless Function of the modem router is disabled. - Page 59 Archer D7 AC1750 Wireless Dual Band Gigabit ADSL2+ Modem Router User Guide Group Key Update Period: Specify the group key update interval in seconds. The value should be 30 or above. Enter 0 to disable the update. WPA/WPA2 – Enterprise: It’s based on Radius Server.
-
Page 60: Wireless Schedule
Archer D7 AC1750 Wireless Dual Band Gigabit ADSL2+ Modem Router User Guide 128-bit: You can enter 26 hexadecimal digits (any combination of 0-9, a-f, A-F, zero key is not promoted) or 13 ASCII characters. Be sur e to click the Save button to save your settings on this page. - Page 61 Archer D7 AC1750 Wireless Dual Band Gigabit ADSL2+ Modem Router User Guide Figure 4-37 To filter wireless users by MAC Address, click Enable. The default setting is Disabled. MAC Address: The wireless station's MAC address that you want to filter.
-
Page 62: Wireless Advanced
Archer D7 AC1750 Wireless Dual Band Gigabit ADSL2+ Modem Router User Guide Click the Enable/ Disabled Selected button to make selected entries enabled or disabled. Click the Delete Selected button to delete the selected entries. For example: If you desire that the wireless station A with MAC address 00:1D:0F:11:22:33 and the... -
Page 63: Wireless Status
Archer D7 AC1750 Wireless Dual Band Gigabit ADSL2+ Modem Router User Guide Transmit Power: Here you can specify the transmit power of the modem router. You can select 100%, 50% or 25%. 100% is the default setting and is recommended. -
Page 64: Wireless 5Ghz
Archer D7 AC1750 Wireless Dual Band Gigabit ADSL2+ Modem Router User Guide Sent Packets: Packets sent by the station. SSID: The wireless network name. Click on the Refresh button to update this page. Wireless 5GHz There are seven submenus under the Wireless 5Ghz menu: Basic Settings, WPS Settings, Wireless Security, Wireless Schedule, Wireless MAC Filtering, Wireless Advanced and Wireless Status. - Page 65 Archer D7 AC1750 Wireless Dual Band Gigabit ADSL2+ Modem Router User Guide Region: Select your region from the drop-down list. This field specifies the region where the wireless function of the modem router can be used. It may be illegal to use the wireless function of the modem router in a region other than one of those specified in this field.
-
Page 66: Wps Settings
Archer D7 AC1750 Wireless Dual Band Gigabit ADSL2+ Modem Router User Guide Authentication Type: This option should be chosen if the key type is WEP(ASCII) or WEP(HEX). It indicates the authorization type of the Root AP. Password: If the AP your modem router is going to connect needs password, you need to fill the password in this blank. - Page 67 Archer D7 AC1750 Wireless Dual Band Gigabit ADSL2+ Modem Router User Guide You can also keep the default WPS Status as Enabled and click the Add device button in Figure 4-42, then Choose “Press the button of the new device in two minutes” and click Connect.
-
Page 68: Wireless Security
Archer D7 AC1750 Wireless Dual Band Gigabit ADSL2+ Modem Router User Guide Note: The WPS LED on the modem router will light green for five minutes if the device has been successfully added to the network. The WPS function cannot be configured if the Wireless Function of the modem router is disabled. - Page 69 Archer D7 AC1750 Wireless Dual Band Gigabit ADSL2+ Modem Router User Guide Group Key Update Period: Specify the group key update interval in seconds. The value should be 30 or above. Enter 0 to disable the update. WPA/WPA2 – Enterprise: It’s based on Radius Server.
-
Page 70: Wireless Schedule
Archer D7 AC1750 Wireless Dual Band Gigabit ADSL2+ Modem Router User Guide 64-bit: You can enter 10 hexadecimal digits (any combination of 0-9, a-f, A-F, zero key is not promoted) or 5 ASCII characters. 128-bit: You can enter 26 hexadecimal digits (any combination of 0-9, a-f, A-F, zero key is not promoted) or 13 ASCII characters. - Page 71 Archer D7 AC1750 Wireless Dual Band Gigabit ADSL2+ Modem Router User Guide Figure 4-47 To filter wireless users by MAC Address, click Enable. The default setting is Disabled. MAC Address: The wireless station's MAC address that you want to filter.
-
Page 72: Wireless Advanced
Archer D7 AC1750 Wireless Dual Band Gigabit ADSL2+ Modem Router User Guide Click the Delete Selected button to delete the selected entries. For example: If you desire that the wireless station A with MAC address 00:1D:0F:11:22:33 and the wireless station B with MAC address 00:0A:EB:00:07:5F are able to access the modem router, but... -
Page 73: Wireless Status
Archer D7 AC1750 Wireless Dual Band Gigabit ADSL2+ Modem Router User Guide Figure 4-49 Transmit Power: Here you can specify the transmit power of the modem router. You can select 100%, 50% or 25%. 100% is the default setting and is recommended. -
Page 74: Guest Network
Archer D7 AC1750 Wireless Dual Band Gigabit ADSL2+ Modem Router User Guide Click on the Refresh button to update this page. 4.10 Guest Network There are four submenus under the Guest Network menu: Basic Settings 2.4GHz, Basic Settings 5GHz, Guest Status 2.4GHz and Guest Status 5GHz. Click any of them, and you will be able to scan or configure the corresponding function. -
Page 75: Basic Settings 5Ghz
Archer D7 AC1750 Wireless Dual Band Gigabit ADSL2+ Modem Router User Guide WPA/WPA2-Personal. WPA/WPA2-Personal is the WPA/WPA2 authentication type based on pre-shared passphrase. Authentication Type: Select the Authentication Type from the drop-down list, the default method is Auto, and you can leave it as a default setting. -
Page 76: Guest Status 2.4Ghz
Archer D7 AC1750 Wireless Dual Band Gigabit ADSL2+ Modem Router User Guide You can enable or disable Guest Network. When you enable this function, you could set wireless parameters for Guest Network. SSID: The guest network name. When setting up a Guest network, it is strongly recommended to use a name that easily distinguishes it from your primary network. -
Page 77: Guest Status 5Ghz
Archer D7 AC1750 Wireless Dual Band Gigabit ADSL2+ Modem Router User Guide Click on the Refresh button to update this page. 4.10.4 Guest Status 5GHz Choose menu “Guest Network”“Guest Status 5GHz”, you can see the MAC Address, Current Status, Received Packets and Sent Packets for each connected wireless station. -
Page 78: User Accounts
Archer D7 AC1750 Wireless Dual Band Gigabit ADSL2+ Modem Router User Guide Figure 4-55 Volume: The volume name of the USB drive the users have access to. File System: The system of the USB drive. Capacity: The storage capacity of the USB driver. -
Page 79: Storage Sharing
Archer D7 AC1750 Wireless Dual Band Gigabit ADSL2+ Modem Router User Guide Figure 4-56 To add a new user account, please follow the steps below: Choose the index from the drop-down list of Choose Index. Self-define a New Username. Enter the password in the New Password field. - Page 80 Archer D7 AC1750 Wireless Dual Band Gigabit ADSL2+ Modem Router User Guide Anonymous access to all the volumes: This function is enabled by default, so users can access all activated volumes of Storage Sharing without accounts. If you want to add a shared folder which does not allow anonymous login, uncheck the box to disable this function.
-
Page 81: Ftp Server
Archer D7 AC1750 Wireless Dual Band Gigabit ADSL2+ Modem Router User Guide Click the Enable/Disable Selected button to enable or disable the selected entries. Click the Delete Selected button to delete the selected entries. Note: The max share folders number is 10. If you want to share a new folder when the number has reached 10, you can delete an existing share folder and then add a new one. -
Page 82: Media Server
Archer D7 AC1750 Wireless Dual Band Gigabit ADSL2+ Modem Router User Guide Figure 4-60 Click the Browse button, and then select the Select Volume from the drop-down list. Enter display name of the share folder in Share Name filed. Click the Apply button to apply the settings. -
Page 83: Print Server
Archer D7 AC1750 Wireless Dual Band Gigabit ADSL2+ Modem Router User Guide To add a new share folder for your media server, please follow the instructions below: Click Add New Folder button, and you will see the screen as shown in Figure 4-62. -
Page 84: Default Gateway
Archer D7 AC1750 Wireless Dual Band Gigabit ADSL2+ Modem Router User Guide 4.12.1 Default Gateway Choose “Route Settings”“Default Gateway”, you can see the Default Gateway screen. You can select a WAN Interface from the drop-down list as the system default gateway. -
Page 85: Rip Settings
Archer D7 AC1750 Wireless Dual Band Gigabit ADSL2+ Modem Router User Guide Figure 4-66 Enter the following data: Destination IP Address: The Destination IP Address is the address of the network or host that you want to assign to a static route. -
Page 86: Ipv6 Route Settings
Archer D7 AC1750 Wireless Dual Band Gigabit ADSL2+ Modem Router User Guide Note: RIP cannot be configured on the WAN Interface which has NAT enabled (such as PPPoE). 4.13 IPv6 Route Settings Choose “IPv6 Route Settings”, it includes four menus: IPv6 Default Gateway and IPv6 Static Route. -
Page 87: Forwarding
Archer D7 AC1750 Wireless Dual Band Gigabit ADSL2+ Modem Router User Guide Figure 4-70 Enter the following data: Destination IPv6 Address: The Destination IPv6 Address is the address of the network or host that you want to assign to a static route. -
Page 88: Virtual Servers
Archer D7 AC1750 Wireless Dual Band Gigabit ADSL2+ Modem Router User Guide 4.14.1 Virtual Servers Choose menu “Forwarding” → “Virtual Servers”, and then you can view and add virtual servers in the next screen (shown in Figure 4-71). Virtual servers can be used for setting up public services on your LAN. -
Page 89: Port Triggering
Archer D7 AC1750 Wireless Dual Band Gigabit ADSL2+ Modem Router User Guide Figure 4-72 Note: It is possible that you have a computer or server that has more than one type of available service. If so, select another service, and type the same IP address for that computer or server. - Page 90 Archer D7 AC1750 Wireless Dual Band Gigabit ADSL2+ Modem Router User Guide To add a new rule, follow the steps below. Click the Add New button, the next screen will pop-up as shown in Figure 4-74. Select a common application from the Common Service Port drop-down list, then the Trigger Port field and the Open Ports field will be automatically filled.
-
Page 91: Dmz
Archer D7 AC1750 Wireless Dual Band Gigabit ADSL2+ Modem Router User Guide To modify or delete an existing entry: Find the desired entry in the table. Click Edit as desired on the Edit column. Click the Enable/ Disabled Selected button to make selected entries enabled/ disabled. -
Page 92: Upnp
Archer D7 AC1750 Wireless Dual Band Gigabit ADSL2+ Modem Router User Guide 4.14.4 UPnP Choose menu “Forwarding→UPnP”, and then you can view the information about UPnP in the screen (shown in Figure 4-76). The Universal Plug and Play (UPnP) feature allows the devices, such as Internet computers, to access the local host resources or devices as needed. - Page 93 Archer D7 AC1750 Wireless Dual Band Gigabit ADSL2+ Modem Router User Guide Figure 4-77 Enable Parental Control: Check the box if you want this function to take effect. This function is disabled by default. MAC Address of Parental PC: In this field, enter the MAC address of the controlling PC, or ...
-
Page 94: Firewall
Archer D7 AC1750 Wireless Dual Band Gigabit ADSL2+ Modem Router User Guide 4.16 Firewall There are four submenus under the Firewall menu: Rule, LAN Host, WAN Host and Schedule. Click any of them, and you will be able to configure the corresponding function. -
Page 95: Lan Host
Archer D7 AC1750 Wireless Dual Band Gigabit ADSL2+ Modem Router User Guide The methods to add a new rule: Click the Add New button and the next screen will pop up as shown in Figure 4-79. Give a name (e.g. Rule_1) for the rule in the Description field. -
Page 96: Wan Host
Archer D7 AC1750 Wireless Dual Band Gigabit ADSL2+ Modem Router User Guide Edit: To modify an existing entry. To add a new entry, please follow the steps below. Click the Add New button. In the Mode field, select IP Address or MAC Address. -
Page 97: Schedule
Archer D7 AC1750 Wireless Dual Band Gigabit ADSL2+ Modem Router User Guide In Description field, create a unique description for the host (e.g. Host_1). In IP Address field, enter the IP address. If you select MAC Address, the screen shown is Figure 4-83. - Page 98 Archer D7 AC1750 Wireless Dual Band Gigabit ADSL2+ Modem Router User Guide Figure 4-85 Description: Here displays the description of the schedule and this description is unique. Edit: Here you can modify an existing schedule. To add a new schedule, follow the steps below: 1.
-
Page 99: Ipv6 Firewall
Archer D7 AC1750 Wireless Dual Band Gigabit ADSL2+ Modem Router User Guide 4.17 IPv6 Firewall There are four submenus under the IPv6 Firewall menu: IPv6 Rule, IPv6 LAN Host, IPv6 WAN Host and IPv6 Schedule. Click any of them, and you will be able to configure the corresponding function. -
Page 100: Ipv6 Lan Host
Archer D7 AC1750 Wireless Dual Band Gigabit ADSL2+ Modem Router User Guide Figure 4-88 Give a name (e.g. Rule_1) for the rule in the Description field. Select a host from the IPv6 LAN Host drop-down list or choose “Add IPv6 LAN Host”. -
Page 101: Ipv6 Wan Host
Archer D7 AC1750 Wireless Dual Band Gigabit ADSL2+ Modem Router User Guide Edit: To modify an existing entry. To add a new entry, please follow the steps below. Click the Add New button, and you will see the screen as shown in Figure 4-90. -
Page 102: Ipv6 Schedule
Archer D7 AC1750 Wireless Dual Band Gigabit ADSL2+ Modem Router User Guide Figure 4-92 Create a unique description for the host (e.g. Host_1) in the Description field. Enter an IPv6 address in the IPv6 Address field. Enter the prefix length of the IPv6 address in the Prefix Length field. -
Page 103: Ipv6 Tunnel
Archer D7 AC1750 Wireless Dual Band Gigabit ADSL2+ Modem Router User Guide Figure 4-94 Create a unique description for the schedule (e.g. Schedule_1) in Description field. Select the day or days you need in Apply To field. In time field, you can select all day-24 hours or you may enter the Start Time and Stop Time in the corresponding field. - Page 104 Archer D7 AC1750 Wireless Dual Band Gigabit ADSL2+ Modem Router User Guide Figure 4-95 Enable: Check the box to enable IPv6 Tunnel function. It is disabled by default. Mechanism: Select a type for IPv6 tunnel from the drop-down list. DS-Lite, 6RD and 6to4 are supported.
- Page 105 Archer D7 AC1750 Wireless Dual Band Gigabit ADSL2+ Modem Router User Guide Figure 4-97 WAN Connection: Select a WAN connection from the drop-down list. Only the connected WAN connections can be shown in the drop-down list. Configuration Type: Select a configuration type for this tunnel. Auto means to obtain the following parameters automatically while Manual means you set them manually.
-
Page 106: Bandwidth Control
Archer D7 AC1750 Wireless Dual Band Gigabit ADSL2+ Modem Router User Guide 4.19 Bandwidth Control Choose menu “Bandwidth Control”, and then you can configure the Upstream Bandwidth and Downstream Bandwidth in the next screen. The values you configure should be less than 1000000Kbps. -
Page 107: Ip&Mac Binding
Archer D7 AC1750 Wireless Dual Band Gigabit ADSL2+ Modem Router User Guide Figure 4-100 Click the Save button. Click the Enable/ Disable Selected button to make selected entries enabled or disabled. Click the Delete Selected button to delete the selected entries. -
Page 108: Arp List
Archer D7 AC1750 Wireless Dual Band Gigabit ADSL2+ Modem Router User Guide When you want to add or modify an IP & MAC Binding entry, you can click the Add New button or Edit button, and then you will go to the next page. This page is used for adding or modifying an IP &... -
Page 109: Dynamic Dns
Archer D7 AC1750 Wireless Dual Band Gigabit ADSL2+ Modem Router User Guide Click the Refresh button to refresh all items. 4.21 Dynamic DNS Choose menu “Dynamic DNS”, and you can configure the Dynamic DNS function. The modem router offers the DDNS (Dynamic Domain Name System) feature, which allows the... -
Page 110: System Tools
Archer D7 AC1750 Wireless Dual Band Gigabit ADSL2+ Modem Router User Guide Figure 4-105 4.23 System Tools Choose menu “System Tools”, and you can see the submenus under the main menu: System Log, Time Settings, Manage Control, CWMP Settings, SNMP Settings, Backup & Restore, Factory Defaults, Firmware Upgrade, Reboot and Statistics. -
Page 111: Time Settings
Archer D7 AC1750 Wireless Dual Band Gigabit ADSL2+ Modem Router User Guide Figure 4-106 Log Type: By selecting the log type, only logs of this type will be shown. Log Level: By selecting the log level, only logs of this level will be shown. -
Page 112: Manage Control
Archer D7 AC1750 Wireless Dual Band Gigabit ADSL2+ Modem Router User Guide Figure 4-108 Time Zone: Select your local time zone from this pull down list. Date: Enter your local date in MM/DD/YY into the right blanks. Time: Enter your local time in HH/MM/SS into the right blanks. -
Page 113: Cwmp Settings
Archer D7 AC1750 Wireless Dual Band Gigabit ADSL2+ Modem Router User Guide Figure 4-109 Current User Status: This box displays the information about User Type, User Name, Host IP Address and Host MAC Address. Account Management: Here you can set the account user information about Old Password, ... -
Page 114: Snmp Settings
Archer D7 AC1750 Wireless Dual Band Gigabit ADSL2+ Modem Router User Guide Figure 4-110 CWMP: Select enable the CWMP function. Inform: Enable or disable the function. If enabled, the information will be informed to ACS server periodically. ... -
Page 115: Backup & Restore
Archer D7 AC1750 Wireless Dual Band Gigabit ADSL2+ Modem Router User Guide Figure 4-111 An SNMP Agent is an application running on the modem router that performs the operational role of receiving and processing SNMP messages, sending responses to the SNMP manager, and sending traps when an event occurs. -
Page 116: Firmware Upgrade
Archer D7 AC1750 Wireless Dual Band Gigabit ADSL2+ Modem Router User Guide Figure 4-113 Click the Restore button to reset all configuration settings to their default values. The default User Name: admin The default Password: admin The default Subnet Mask: 255.255.255.0 ... -
Page 117: Reboot
Archer D7 AC1750 Wireless Dual Band Gigabit ADSL2+ Modem Router User Guide Note: New firmware versions are posted at http://www.tp-link.com and can be downloaded for free. There is no need to upgrade the firmware unless the new firmware has a new feature you want to use. - Page 118 Archer D7 AC1750 Wireless Dual Band Gigabit ADSL2+ Modem Router User Guide Figure 4-116 Statistics Status: Enable or Disable. The default value is disabled. To enable it, click the Enable. If it is disabled, the function of DoS protection in Security settings will be disabled.
-
Page 119: Logout
Archer D7 AC1750 Wireless Dual Band Gigabit ADSL2+ Modem Router User Guide Reset Reset the value of he entry to zero. Operation Delete Delete the existing entry in the table. 4.24 Logout Choose “Logout”, and you will back to the login screen as shown in Figure 4-117. -
Page 120: Appendix A: Specifications
Archer D7 AC1750 Wireless Dual Band Gigabit ADSL2+ Modem Router User Guide Appendix A: Specifications General ANSI T1.413, ITU G.992.1, ITU G.992.3, ITU G.992.5, IEEE 802.11a, IEEE 802.11b, IEEE 802.11g, IEEE 802.11n, IEEE Standards and Protocols 802.11ac, IEEE 802.3, IEEE 802.3u, IEEE802.3ab, TCP/IP, PPPoA, PPPoE, SNTP, HTTP, DHCP, ICMP, NAT Safety &... -
Page 121: Appendix B: Troubleshooting
Archer D7 AC1750 Wireless Dual Band Gigabit ADSL2+ Modem Router User Guide Appendix B: Troubleshooting T1. How do I restore my modem router’s configuration to its factory default settings? With the modem router powered on, press and hold the RESET button on the rear panel for 8 to 10 seconds before releasing it. - Page 122 Archer D7 AC1750 Wireless Dual Band Gigabit ADSL2+ Modem Router User Guide Select Obtain an IP address automatically and Obtain DNS server address automatically. Then click OK. For Windows 8 Move your mouse to the lower right corner and you will see Search icon in the Popups.
- Page 123 Archer D7 AC1750 Wireless Dual Band Gigabit ADSL2+ Modem Router User Guide Now, try to log on to the Web-based configuration page again after the above settings have been configured. If you still cannot access the configuration page, please restore your modem router’s factory default settings and reconfigure your modem router following the instructions in 3.2 Quick...
-
Page 124: Ppendix C: Technical Support
Archer D7 AC1750 Wireless Dual Band Gigabit ADSL2+ Modem Router User Guide ppendix C: Technical Support Technical Support For more troubleshooting help, go to: http://www.tp-link.com/en/support/faq To download the latest Firmware, Driver, Utility and User Guide, go to: http://www.tp-link.com/en/support/download ...
Need help?
Do you have a question about the Archer D7 and is the answer not in the manual?
Questions and answers