BenQ Joybee GP2 User Manual
Hide thumbs
Also See for Joybee GP2:
- Specifications (4 pages) ,
- Limited warranty (3 pages) ,
- Specification (2 pages)
Table of Contents
Advertisement
Advertisement
Table of Contents

Subscribe to Our Youtube Channel
Related Manuals for BenQ Joybee GP2


Summary of Contents for BenQ Joybee GP2
- Page 1 Joybee GP2 Mini Projector User Manual...
-
Page 2: Table Of Contents
Table of contents Important safety Selecting the aspect ratio...... 38 Optimizing the image......39 instructions ....3 Operating in a high altitude environment Introduction....7 ..............41 Adjusting the sound ....... 41 Projector features........7 Playing files with iPhone/iPod....43 Shipping contents ........8 Displaying images with PC and Video Projector exterior view......9 source devices......... -
Page 3: Important Safety Instructions
Important safety instructions Your projector is designed and tested to meet the latest standards for safety of information technology equipment. However, to ensure safe use of this product, it is important that you follow the instructions mentioned in this manual and marked on the product. Safety Instructions Please read this manual before In some countries, the line voltage is... - Page 4 Safety Instructions (Continued) Never replace any electronic When the projector is under components unless the projector is operation, you may sense some unplugged. heated air and odor from its ventilation grill. It is a normal phenomenon and not a product defect.
- Page 5 BenQ to have the Always place the projector on a level, projector serviced. horizontal surface during operation.
- Page 6 Precautions for handing the battery. - Do not use an unapproved battery. It may explode. Only battery approved by BenQ can be applied to this product. - Do not apply a strong force to the battery or attempt to make a hole in the battery.
-
Page 7: Introduction
Introduction Projector features The projector integrates high-performance optical engine projection and a user-friendly design to deliver high reliability and ease of use. The projector offers the following features. • Advanced LED light source Long lasting LEDs provides a longer life span than traditional lamps. •... -
Page 8: Shipping Contents
*The warranty card is only supplied in some specific regions. Please consult your dealer for detailed information. Projector Power cord Multi-input cable AC adapter Joybee GP2 Mini Projector User Manual Safety manual Quick start guide User manual CD Warranty card* Pull the tab before using the remote control. -
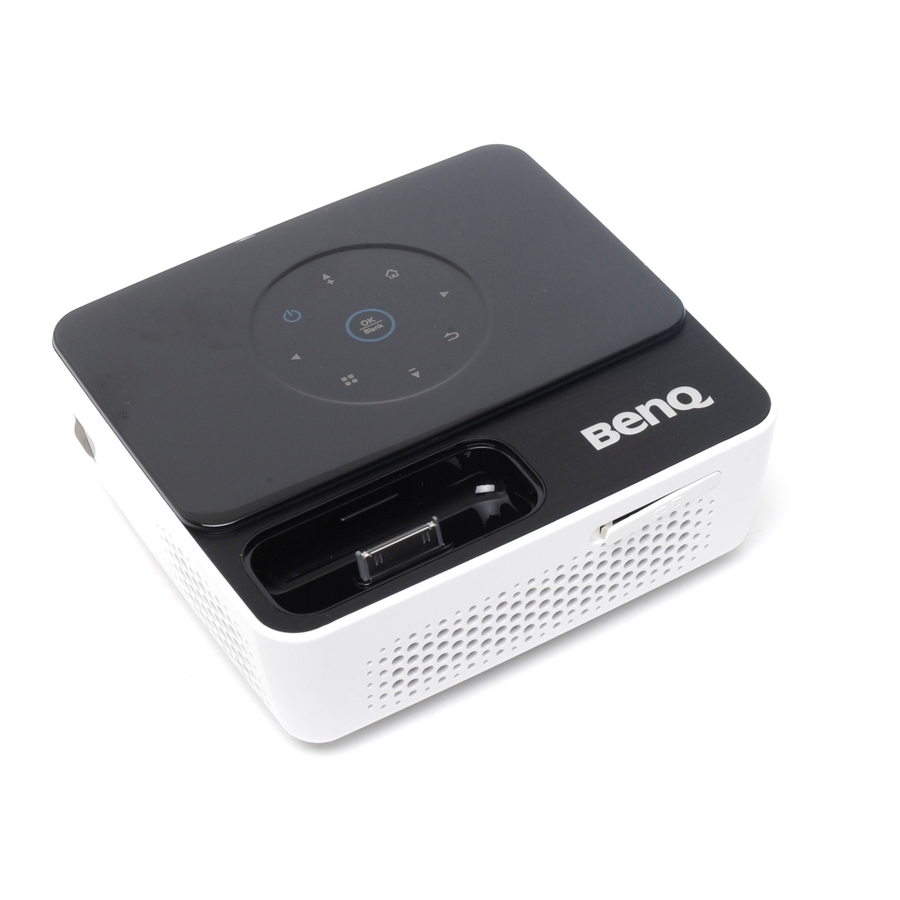
Page 9: Projector Exterior View
Projector exterior view iPhone/iPod docking station Front/upper side External control panel (See "Projector" on page 10 details.) Vent (heated air exhaust) Front IR remote sensor Internal Speakers Focus ring Projection lens SD card slot Type A USB jack Mini-B USB jack Multi-input socket RGB (PC)/Component video (YPbPr/ YCbCr) /Composite video/... -
Page 10: Controls And Functions
Controls and functions Projector OK/Blank Short press: - Confirms a selected function when a menu is displayed. - Plays or pauses a video, music, photo slideshow. (Only applied to SD card, internal memory and USB Drive) Long press (3 seconds): Toggles the Blank. - Page 11 Home Directly returns to home screen from lower level of OSD. Exits application/pop-up message and back to home screen directly. Right key When the On-Screen Display (OSD) menu is on: - Navigate right to select the desired menu items. - Make adjustments. (e.g. brightness, contrast...) When the On-Screen Display (OSD) menu is off: (Only applied to SD card, internal...
-
Page 12: Remote Control
Remote control Auto Automatically determines the best picture timings for the displayed computer image. See "Auto-adjusting the image" on page 34 for details. Menu Turns on the Pop-up setting menu. Mute/unmute Turns on/off volume during video or music playback. (Only applied to SD card, USB Drive, internal memory, iPhone and iPod) Mode... - Page 13 11. Right key iPhone/iPod When the On-Screen Display (OSD) menu Remote control over iPhone or iPod is not only workable in power-on mode but also is on: standby mode in which GP2 acts as a docking - Navigate right to select the desired menu speaker.
-
Page 14: Remote Control Effective Range
Remote control effective range Infra-Red (IR) remote control sensor is located on the front of the projector. The remote control must be held at an angle within 15 degrees perpendicular to the projector's IR remote control sensor to function correctly. The distance between the remote control and the sensor should not exceed 7 meters (~ 23 feet). -
Page 15: Positioning Your Projector
BenQ has provided a table of screen size to assist you in determining the ideal location for your projector. Refer to "Projection dimensions" on page 16 depending on the projector you are using. -
Page 16: Projection Dimensions
2032 2069 All measurements are approximate and may vary from the actual sizes.BenQ recommends that if you intend to permanently install the projector, you should physically test the projection size and distance using the actual projector in situ before you permanently install it, so as to make allowance for this projector's optical characteristics. -
Page 17: Connection
Connection In the connections shown below, some cables may not be included with the projector (see "Shipping contents" on page 8). They are commercially available from electronics stores. Connecting the power Using the provided AC adapter or an optional Lithium-ion rechargeable battery. The projector must be used with the provided AC adapter. - Page 18 Position the projector on the battery. When the battery capacity is between 10% and 100 % , the battery LED indicator turns off. When the battery capacity is lower than 10%, the battery LED indicator blinks red, and the system will shut down.
- Page 19 Battery LED indicator behavior • Battery + Adaptor Status Condition LED color In charge Power on / Standby mode Blue blinking Charging completed Power on / Standby mode Blue solid on • We recommend that you keep the battery connected to the projector even when the projector is connected to a wall outlet.
- Page 20 • Forbid bathing the battery Do not dampen the battery, or even immerse it in the water, which will cause internal protection circuit and its function lost or abnormal chemical reactions, which will lead to heating, smoking, distortion or burning. •...
- Page 21 • Read carefully the manual before use or whenever in need. • Charging method Use the special chargers in the recommended charging method to charge the battery. • First usage When you use the battery for its first time, do not put it into the equipment once you find it in unusual conditions such as unclearness or odors.
-
Page 22: Connecting A Computer
Connecting a computer ® The projector provides a VGA input socket that allows you to connect it to both IBM ® compatibles and Macintosh computers. A Mac adapter is needed if you are connecting legacy version Macintosh computers. To connect the projector to a notebook or desktop computer: •... - Page 23 • Using an HDMI cable Take an HDMI cable and connect one end to the HDMI output jack of the computer. Connect the other end of the HDMI cable to the HDMI jack on the projector. HDMI HDMI • Using a USB cable Take a USB cable and connect the type A end to the USB output jack of the computer.
-
Page 24: Connecting Video Source Devices
To disconnect the projector from a computer: i. Click on the Windows Taskbar. ii. Click the pop-up message. iii. Disconnect the USB cable only when the message says that it is safe to remove the hardware. • Do not disconnect the USB cable while the files are being copied, as this could result in loss of data or damage to the projector. -
Page 25: Connecting An Hdmi Source Device
Connecting an HDMI source device The projector provides a HDMI input jack that allows you to connect it to an HDMI source device like a Blu-Ray player, a DTV tuner or a display. HDMI (High-Definition Multimedia Interface) supports uncompressed video data transmission between compatible devices like DTV tuners, Blu-Ray player and displays over a single cable. -
Page 26: Connecting A Component Video Source Device
Connecting a Component Video source device Examine your Video source device to determine if it has a set of unused Component Video output sockets available: • If so, you can continue with this procedure. • If not, you will need to reassess which method you can use to connect to the device. To connect the projector to a Component Video source device: Take a Component Video to VGA (D-Sub) adaptor cable and connect the end with 3 RCA type connectors to the Component Video output sockets of the Video source... -
Page 27: Connecting A Composite Video Source Device
Connecting a composite Video source device Examine your Video source device to determine if it has a set of unused composite Video output sockets available: • If so, you can continue with this procedure. • If not, you will need to reassess which method you can use to connect to the device. To connect the projector to a composite Video source device: Take a Video cable and connect one end to the composite Video output socket of the Video source device. -
Page 28: Connecting An Iphone/Ipod Device
Connecting an iPhone/iPod device To connect the projector to an iPhone/iPod device: Dock your iPhone/iPod to fit the docking connector. The Universal Dock Adapter is not necessary for operation but does provide the best fit for your particular Apple product. You can purchase it from www.apple.com. -
Page 29: Connecting An External Speaker
Connecting an external speaker You can hear sound through an external speaker instead of the internal speakers built into the projector. To connect the projector to an external speaker source device: Connect an appropriate stereo cable to the external speaker and the audio output jack on the projector. -
Page 30: Connecting To An External Memory Device
Connecting to an external memory device Connecting an SD card To connect the projector to an SD card: Connect an SD card to the SD card slot on the projector. SD CARD • The maximum memory capacity supported for an SD(HC) card is 16 GB. (The maximum capacity supported for external memory is based on our factory test. - Page 31 HDD (Hard Disk Drive). • As the data in the USB storage device can be damaged, please back up important data to avoid loss. The user is responsible for data management. BenQ shall not be held liable for any data loss. •...
-
Page 32: Playing Sound Through The Projector
Playing sound through the projector You can make use of the projector speaker in your presentations, and also connect separate amplified speakers to the audio output jack of the projector. The table below describes the connection methods for different devices, and where the sound is from. -
Page 33: Operation
Operation Starting up the projector Connect the power using the AC adapter or optional battery. The Power LED indicator turns into blue and flashes slowly. Press Power on the projector or remote control to start the projector. The Power, OK and Ring LED indicators light blue when the projector is on. -
Page 34: Adjusting The Projected Image
Adjusting the projected image Adjusting the image height The projector is equipped with 1 adjuster foot. This adjuster changes the image height. To adjust the projector: Screw the adjuster foot to adjust the image height. To retract the foot, screw the adjuster foot in a reverse direction. -
Page 35: Hiding The Image
Correcting keystone Keystoning refers to the situation where the projected image is noticeably wider at either the top or bottom. It occurs when the projector is not perpendicular to the screen. Correcting keystone when an image is displayed on the screen. To correct this, besides adjusting the height of the projector, you will need to manually correct it following one of these steps. -
Page 36: Securing The Projector
3 seconds. The projector will display a coded number on the screen. Write down the number and turn off your projector. Seek help from the local BenQ service center to decode the number. You may be required to Operation... -
Page 37: Changing The Password
provide proof of purchase documentation to verify that you are an authorized user of the projector. Changing the password Go to the Settings > GENERAL > Security Settings > Change password menu. Press OK. The message 'Input Current Password' displays. Enter the old password. -
Page 38: Firmware Upgrade
Firmware upgrade Follow below procedures to upgrade firmware version. • Only an SD Card is supported for a firmware update. • Do not remove the SD Card while an update is in progress. • Do not operate any buttons during the update. •... -
Page 39: Optimizing The Image
Optimizing the image Selecting a picture mode The projector is preset with several predefined picture modes so that you can choose one to suit your operating environment and input signal picture type. To select an operation mode that suits your need, you can follow one of the following steps. -
Page 40: Using Wall Color
Using Wall Color In the situation where you are projecting onto a colored surface such as a painted wall which may not be white, the Wall Color feature can help correct the projected picture’s color to prevent possible color difference between the source and projected pictures. To use this function, press to open the pop-up menu in one of the computer, iPhone/ iPod, composite video, component and HDMI modes. -
Page 41: Operating In A High Altitude Environment
Operating in a high altitude environment We recommend you use the High Altitude Mode when your environment is between 1500 m –3000 m above sea level, and ambient temperature is between 0°C–30°C. Do not use the High Altitude Mode if your altitude is between 0 m and 1499 m and ambient temperature is between 0°C and 35°C. - Page 42 To adjust the sound level, press + or - on the remote control, or: Repeat steps 1-2 above. Highlight Volume and press OK to open the pop- up menu. Press to select a desired sound level. To leave the OSD, follow step 5 above. Setting the keypad tone To set the keypad tone: Repeat steps 1-2 in Muting the sound section.
-
Page 43: Playing Files With Iphone/Ipod
Playing files with iPhone/iPod The projector comes with an all-in-one iPhone/iPod dock which support video projection and music playback through specific apps not only in power-on mode but also in standby mode. <In power-on mode> Projecting videos via iPhone or iPod native app Dock your iPhone or iPod to fit the connector on the projector. - Page 44 The video will be projected on a big screen. When a video is playing, press for Pause/Play. Press for replay or skip to next video. Have long press on to make the playing file rewind or fast-forward. Press to control the volume. Projecting photo slideshow via iPhone or iPod native app Select the “Photos”...
- Page 45 Projecting a 3rd party app • Download and install an app that supports Apps TV-out function. (e.g., Youtube, Netflix, TVOut genie) For a list of apps that support Apple's TV-out function, please refer to TV-Out Enabled Apps for iOS Devices.pdf in internal memory. •...
- Page 46 Dock your iPhone or iPod on the projector. Select the iPod icon in iPhone or iPod main menu. Press Menu on remote control to switch to music-related menu, use select a music in file list and then press OK to start playing music. If the iPhone or iPod is at the Main Menu, pressing Play/Pause will cause the iPhone or iPod to start playing all of its music.
- Page 47 Operation iPhone or iPod during video or music playback You are allowed to use remote control to operate your iPhone or iPod when the projector is in both of power-on and standby mode. For more instructions on iPhone/iPod keys, see "iPhone/iPod"...
-
Page 48: Displaying Images With Pc And Video Source Devices
Displaying images with PC and Video source devices You can connect your projector to a PC and various Video source devices. (e.g. HDMI, composite video, component video) However, you need only connect the projector to an input source device. To display images: Connect the projector to one of the above signal source. -
Page 49: Using Pc/ Video Pop-Up Menus
Using PC/ Video pop-up menus The projector has a multilingual OSD that allows you to make image adjustments and change a variety of settings. This menu is for the settings to be used in computer, iPhone/ iPod, composite video, component and HDMI modes. Using the menu To open the OSD menu, press on the projector or remote control when the... -
Page 50: Description Of Each Menu
Description of each menu FUNCTION DESCRIPTION Corrects the projected picture’s color when the projection surface is Wall Color not white. See "Using Wall Color" on page 40 for details. There are four options to set the image's aspect ratio depending Aspect Ratio on your input signal source. -
Page 51: Displaying Files With Internal Memory, Usb Drive And Sd Card
Displaying files with internal memory, USB Drive and SD card The projector can display files saved in internal memory or external storage like an SD card or a USB Drive when you have connected to projector. To display files: Turn on the power of the projector and the projector displays the home screen. Connect the projector to one of the above external memory devices. -
Page 52: Using The Menu
When playing videos NAME DESCRIPTION Play/Pause Plays or pauses a video. Volume up/down. Volume • Plays the previous video. • Press and hold to rewind the video. Prev - The rewind speed increases to x2, x4, x8 and x16 at 2- second intervals. -
Page 53: Menu System
• See the table for supported subtitle file types. Refer to "Supported file formats" on page Menu system Menu Item Sub-menu Options Off/Light Yellow/Pink/Light Green/ Wall Color Blue/Blackboard Full Screen/4:3/16:9/16:10/Auto/ Aspect Ratio Real Auto Keystone On/Off Keystone Picture Mode Bright/Standard/Cinema/Game/User Reference Mode Bright/Standard/Cinema/Game Brightness... - Page 54 Description of each menu FUNCTION DESCRIPTION Corrects the projected picture’s color when the projection surface is Wall Color not white. See "Using Wall Color" on page 40 for details. There are four options to set the image's aspect ratio depending Aspect Ratio on your input signal source.
- Page 55 When playing music NAME DESCRIPTION Play/Pause Plays or pauses a music. Volume up/down. Volume • Plays the previous music. Prev • Press and hold to rewind the music. • Plays the next music. Next • Press and hold to fast forward the music. Open/close music pop-up settings menu.
- Page 56 Menu system Menu Item Options Play Mode All in folder/One music Play Order Normal / Shuffle Repeat On/Off Description of each menu FUNCTION DESCRIPTION Lets you choose to play one music or all music in a folder. Play Mode Lets you select the playback order of music files. Play Order Lets you select whether to repeat music playback.
- Page 57 When viewing photos NAME DESCRIPTION Play/Pause Plays or pauses a slideshow. Previous photo. Prev Next photo. Next Menu Open/close photo pop-up settings menu. • Return to upper level of OSD. • Close photo pop-up setting menu. Back • Leave current photo player and back to photo file browser.
-
Page 58: Slideshow Mode
Menu system Menu Item Options Slideshow Speed Fast/ Normal/ Slow Slideshow Mode All in folder / One photo Slideshow Order Normal / Shuffle Repeat On/Off Description of each menu FUNCTION DESCRIPTION Lets you select slideshow speed. Slideshow Speed Lets you choose to slideshow one photo or all photos in a folder. Slideshow Mode Lets you select the slideshow order of photo files. - Page 59 When viewing documents NAME DESCRIPTION Play/Pause Enlarge current page. Previous Move to previous page while page is not zoomed. Move the display to the top of the page while zoomed. Next Move to next page while page is not zoomed. Move the display to bottom of the page while zoomed.
-
Page 60: Supported File Formats
Bit rate range : If peak bit rate of a video file is larger than 10MB, it might cause video playback lag. Please visit BenQ.com to know more details about the latest supported formats. Operation... -
Page 61: Using Usb Streaming
Using USB Streaming The projector supports USB streaming for USB display and USB file transfer. USB display The projector can project computer screen via a USB cable instead of a VGA cable. To use USB display: Connect the projector to a computer using a USB cable. Turn on the power of the projector and your source device. - Page 62 Copy & Paste or Drag-N-Drop files from your computer to the removable disk. If you want to display those files, use to select Internal Memory. See "Displaying files with internal memory, USB Drive and SD card" on page 51 details. Press to leave USB File Transfer mode and back to projector home screen.
-
Page 63: Using Settings Menu
Using settings menu This menu is to set the projector’s operating environment. Using the menu To open the OSD menu, press to select Settings icon in home screen.. When the OSD is displayed, press to select any item in the main menu. After selecting the desired main menu item, press OK to enter the feature settings submenu. -
Page 64: Main Menu
Normal/Eco Off/Light Yellow/Pink/Light Green/ Wall Color Blue/Blackboard Auto Keystone On/Off Disable/5 min/10 min/15 min/20 Auto Power Off min/25 min/30 min Splash Screen BenQ/ Black/Blue High Altitude Mode On/Off Mute On/Off GENERAL Volume Audio Settings Keypad tone On/Off Audio in Standby Off/iPhone&... -
Page 65: Function Description
Allows you to select which logo screen will display during projector Splash Screen start-up. Three options are available: BenQ logo, Black screen, or Blue screen. A mode for operation in high altitude areas. See "Operating in a high... - Page 66 FUNCTION DESCRIPTION Shows the current signal source. Source Shows the selected mode. Picture Mode Shows input system format: RGB or YUV. Color System Shows the native resolution of the input signal. Resolution Shows the memory capacity status: Internal Memory. Internal Memory Shows the memory capacity status: SD Card.
-
Page 67: Shutting Down The Projector
Shutting down the projector Press Power and a confirmation message displays prompting you. If you don't respond in a few seconds, the message will disappear. Press Power a second time. The Power LED indicator flashes blue slowly and fans stop. Disconnect the power cord from the wall socket if the projector will not be used in an extended period of time. -
Page 68: Maintenance
Maintenance Care of the projector Your projector needs little maintenance. The only thing you need to do on a regular basis is to keep the lens clean. Never remove any parts of the projector. Contact your dealer if other parts need replacing. -
Page 69: Led Indicators
LED Indicators LED indicators Status / Problems LED Behavior OK & Power Ring Standby Blue Power LED slow flash Light solid on sequence : Power on Blue Blue White Power Ring & OK -> -> Cooling Blue Power LED slow flash Ring &... -
Page 70: Troubleshooting
Troubleshooting The projector does not turn on. Cause Remedy Plug the AC adapter into the DC IN socket on the projector, plug the power cord into the AC inlet There is no power from the power cable. on the AC adapter, plug the power cord into the power outlet. -
Page 71: Specifications
Specifications Projector specifications All specifications are subject to change without notice. General Product name Mini Projector Model name Optical Resolution 1280 x 800 WXGA Display system 1-CHIP DMD Lens F/Number F = 1.928 f = 26.95 mm Lamp Throw Ratio 1.13 (44"... - Page 72 Operating relative 10%-90% (without condensation) humidity Operating altitude • 0–1499 m at 0°C–35°C • 1500–3000 m at 0°C–30°C (with High Altitude Mode on) Specifications...
-
Page 73: Dimensions
56.476 1024 x 768 XGA_75 75.029 60.023 XGA_85 84.997 68.667 1152 x 864 1152 x 864_75 75.00 67.500 BenQ Notebook 1024 x 576 60.0 35.820 Timing BenQ Notebook 1024 x 600 64.995 41.467 Timing 1280 x 720 1280 x 720_60 45.000... -
Page 74: Supported Timing For Hdmi Input
56.476 1024 x 768 XGA_75 75.029 60.023 XGA_85 84.997 68.667 1152 x 864 1152 x 864_75 75.00 67.500 BenQ Notebook 1024 x 576 60.000 35.820 Timing BenQ Notebook 1024 x 600 64.995 41.467 Timing 1280 x 720_60 45.000 1280 x 720 1280 x 720_120 90.000... - Page 75 Video timings: Vertical Horizontal Timing Resolution Frequency (Hz) Frequency (kHz) 480i* 720 (1440) x 480 59.94 15.73 480p 720 x 480 59.94 31.47 576i 720 (1440) x 576 15.63 576p 720 x 576 31.25 720/50p 1280 x 720 37.5 720/60p 1280 x 720 45.00 1080/24P...
-
Page 76: Warranty And Copyright Information
For other information, please visit www.BenQ.com. Copyright © 2011 BenQ Corp. Specification may vary by region, please visit your local stores for details. Actual product’s features and specifications are subject to change without notice. This material may include corporate names and trademarks of third parties which are the properties of the third parties respectively.
Need help?
Do you have a question about the Joybee GP2 and is the answer not in the manual?
Questions and answers