
Related Manuals for Yamaha POCKETRAK PR7


Summary of Contents for Yamaha POCKETRAK PR7
- Page 1 RECORDER Owner’s Manual Bedienungsanleitung Mode d’emploi Manual de instrucciones Manuale di istruzioni Руководство пользователя...
- Page 2 Yamaha Corporation harmful to the operation of other electronic of America or its subsidiaries. * This applies only to products distributed by YAMAHA CORPORATION OF AMERICA. (class B) This device complies with Part 15 of the FCC CAN ICES-3(B)/NMB-3(B) Rules.
- Page 3 2) this device must accept any interference received including interference that may cause undesired operation. See user manual instructions if interference to radio reception is suspected. * This applies only to products distributed by YAMAHA CORPORATION OF AMERICA. (FCC DoC) IMPORTANT Please record the serial number of this unit in the space below.
- Page 4 AC outlet. Then have the device inspected by qualified Yamaha service personnel. If you notice any abnormality • If this device should be dropped or damaged, immediately turn off the power and have the device inspected by qualified Yamaha service personnel. (5)-6 Owner’s Manual...
- Page 5 • Be sure to use the specified battery. About the Battery Do not replace the battery with any battery other than the one specified (the same type or equivalent). Otherwise, the battery may ignite or explode, the battery liquid may spout or leak, or DANGER the unit may heat up.
- Page 6 Before using the microSD card Information for Users on Collection and Disposal of • If you insert the microSD card in the wrong orientation or upside Old Equipment and used Batteries down, the microSD card and/or the card slot may be damaged. These symbols on the products, packaging, and/ •...
-
Page 7: Table Of Contents
Table of contents Table of contents Introduction Thank you for purchasing the Yamaha Introduction ............7 POCKETRAK PR7 recorder. Accessories ............7 The PR7 is well-suited for numerous musical Downloading software ........8 applications. About Manuals ..........8 The PR7 boasts user-friendly operation of Part names and functions ........ -
Page 8: Downloading Software
After the PR7 is recognized as a USB recorded on the PR7. device on the computer, double-click For more information on downloading this “PR7” to open the MANUAL folder. software, refer to the Yamaha Pro Audio The Reference Manual file is called website: “PR7_RM_EN.pdf”. http://www.yamahaproaudio.com/pr7/ Drag and drop the file onto the desk- top. -
Page 9: Part Names And Functions
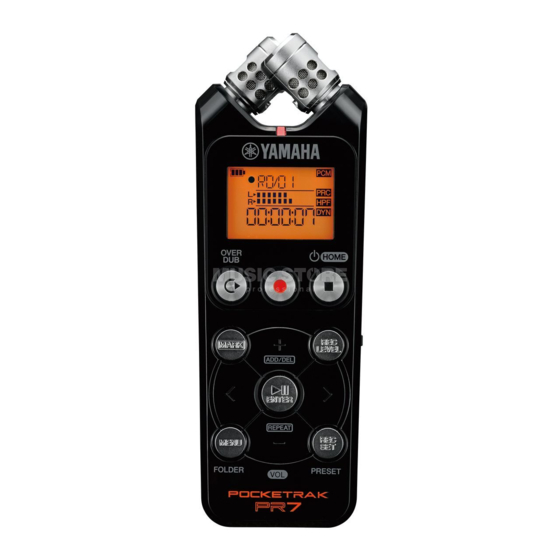
Part names and functions Part names and functions Built-in microphones REC LED LCD screen [OVERDUB] button [MARK] button [MENU] button (Press and hold down this button to display the Folder screen.) [●] (Record) button [■] (Stop) button (Power on/Power off by pressing and holding down this button) [REC LEVEL] button [+]/[–] buttons... -
Page 10: Inserting A Battery And A Microsd Card (Sold Separately)
Inserting a battery and a microSD card (sold separately) Inserting a battery and a Power on/off microSD card Power on (sold separately) Press the [■] (Stop) button. Power off Open the battery compartment cover. Press and hold down the [■] (Stop) button for at least 3 (three) seconds while the PR7 is stopped. -
Page 11: Understanding The Information On The Lcd Screen
Understanding the information on the LCD screen HOME screen After you complete the set- tings, press the [■] (Stop) button. You can select one of four possible The PR7 displays the HOME HOME screens using the [■] screen. (Stop) button. NOTE Option 1 Option 2... -
Page 12: Recording/Playback
Recording/Playback Recording/Playback Playback Press the [ ] (Play) but- Recording ton. Press the [●] (REC) button. The PR7 enters recording standby mode. Use the [+] and [–] but- tons to adjust the play- back level. Press the [REC LEVEL] but- ton. -
Page 13: Changing The Recording Format (Sound Quality)
Changing the recording format (sound quality) Changing the recording Supported formats, sound quality, and data size format (sound quality) 88.2, 44.1 (indicated as 88) (indicated as 44) (WAV) 24,16 Press the [REC SET] button. kbps 320, 192, 128, 64, 32 Sound Better quality... -
Page 14: Specifying The Recording Destination
Specifying the recording destination Specifying the recording Selecting the recording destination folder destination Press and hold down the Switching between the built-in [MENU] button for at least memory and a microSD card two seconds. Press the [REC SET] button. Use the [+] and [–] but- tons to select “rEC”... -
Page 15: Folder Structure
Specifying the recording destination Folder structure • REC folder Stores audio files that were recorded on the The folders in built-in memory are structured unit. as follows: • MUSIC folder The REC folder and MUSIC folder are auto- Stores files that were copied from a computer. matically created on a microSD card when PCM, MP3, and WMA files are supported for the card is inserted into the unit. -
Page 16: Reducing Noise
Reducing noise Reducing noise Preventing excessive input level (Dynamics control) Preventing low-range noise This function prevents excessive input levels (High-pass filter) that could cause audio clipping or noise. The high-pass filter reduces low-range ambi- Press the [REC SET] button. ent noises, such as footsteps or rumbling caused by the wind. -
Page 17: Selecting A Recording Preset
Selecting a recording preset Selecting a recording preset Overdubbing (Layered recordings) The PR7 offers presets that feature predeter- You can layer a recording over an existing mined parameter settings to optimize the audio file and create a new file. This process recording source. -
Page 18: Adding Or Deleting A Marker
Adding or deleting a marker Adding or deleting a marker Repeat playback You can insert a marker into the file to mark You can repeatedly play back between adja- the playback position. cent markers. Press the [MARK] button. Press the [MARK] button. Insert markers at the start While the PR7 is stopped, playing, or and end points of the por-... -
Page 19: Adjusting The Playback Speed
Adjusting the playback speed Adjusting the playback speed Tuner You can decrease or increase the playback You can use the tuner to tune your musical speed, if necessary. instrument. Press the [MENU] button. Press the [MENU] button. Use the [+] and [–] but- Use the [+] and [–] but- tons to select “TUN”, tons to select “SPD”,... -
Page 20: Metronome
Metronome Metronome Press the [<] button to select “SEt” then press the [ ] (Play) Make settings for the metronome used dur- button. ing recording. You can also use the metronome in the met- ronome settings screen (Step 6). NOTE During recording, the metronome sound is output only from the PHONES (headphone) jack. -
Page 21: Deleting A File
Deleting a file Deleting a file Press the [<] button to select “y” (Yes), then press the [ ] (Play) If the available memory space is getting button. small, or if the folders contain the maximum number of files, delete unnecessary files to increase the space. -
Page 22: Dividing A File
Dividing a file Dividing a file Copying a file You can divide the currently-selected file into You can copy files between the built-in mem- two. ory and a microSD card. While playing back the file Select a file to copy, then you wish to divide, press the press the [MENU] button. -
Page 23: Moving A File
Moving a file Use the [+] and [–] buttons to select NOTE • You can divide or copy a file as long as the file is in “trnS” (transfer), then press the [ one of the folders within the REC folder. (Play) button. -
Page 24: File Naming Rules For Dividing, Deleting Or Moving A File
File naming rules for dividing, deleting or moving a file File naming rules for divid- Connecting the PR7 to a ing, deleting or moving a file computer • If file R0/01 is divided, the resultant files will Use the supplied USB cable to connect be named (numbered) R0/01 and R0/02. -
Page 25: System Settings
System settings System settings Resetting the menu Use the [+] and [–] buttons to select Here you can make settings for the device “rESEt” (reset), then press the [ itself. (Play) button. With the power turned off, hold down [REC SET] and turn the power on. 2: Power on (Press and hold down this button.) - Page 26 System settings Formatting (Initializing) the built- After the setting process is complete, press the [■] (Stop) in memory or a microSD card button. The PR7 calls up the HOME NOTE We recommend that you format a microSD card screen. on the PR7 before using the card for the first time. Switching the REC LED on or off Use the [+] and [–] buttons to select “ForMAt”...
-
Page 27: Troubleshooting
Troubleshooting ■ Unable to divide a file. Troubleshooting Not enough memory space Delete a file ➔ page 21 ■ The unit does not operate. ■ Unable to delete a file. Check the remaining battery power ➔ page 10 The file is read-only. ➔... -
Page 28: Error Messages
Error messages Error messages Error Unit status or function Action Messages Initialize the built-in memory. ➔ Power on while pressing and holding down [REC SET] > “ForMAt” > “Int” > “y” (Yes) Built-in memory error Int Error (Reference Manual “System setting menu.”) ➔... -
Page 29: Main Specifications
NiMH battery using the PR7. * Specifications and descriptions in this owner’s manual are for information purposes only. Yamaha Corp. reserves the right to change or modify products or specifications at any time without prior notice. Since specifications, equipment or options may not be the same in every locale, please check with your Yamaha dealer. - Page 30 Owner’s Manual...
- Page 31 Owner’s Manual...
- Page 32 PS Leaflet 23 Owner’s Manual...
-
Page 33: North America
Yamaha Vertragshändlern in den jeweiligen Bestimmungsländern erhältlich. Pour plus de détails sur les produits, veuillez- vous adresser à Yamaha ou au distributeur le Para detalles sobre productos, contacte su plus proche de vous figurant dans la liste tienda Yamaha más cercana o el distribuidor suivante. - Page 34 Maslak Meydan Sokak No:5 Spring Giz Nakazawa-cho 10-1, Naka-ku, Tel: 03-78030900 Plaza Hamamatsu, Japan 430-8650 Bağımsız Böl. No:3, 34398 Şişli İstanbul Tel: +81-53-460-2312 Tel: +90-212-999-8010 HEAD OFFICE Yamaha Corporation, Audio Products Sales and Marketing Division Nakazawa-cho 10-1, Naka-ku, Hamamatsu, Japan 430-8650 PA36...
- Page 35 Yamaha Pro Audio global web site: http://www.yamahaproaudio.com/ Yamaha Manual Library http://www.yamaha.co.jp/manual/ C.S.G., PA Development Division © 2013-2014 Yamaha Corporation Published 04/2014 IP-C0 VQT4V69-3...
Need help?
Do you have a question about the POCKETRAK PR7 and is the answer not in the manual?
Questions and answers
It's stuck 'on hold'
To fix a Yamaha POCKETRAK PR7 that is stuck 'on hold', try the following steps:
1. Turn Off the Device – Press and hold the [■] (Stop) button for at least three seconds while the recorder is stopped.
2. Check the Hold Switch – Ensure that the hold function is not enabled. If the device has a hold switch, slide it to the off position.
3. Remove and Reinsert the Battery – Open the battery compartment, remove the AAA battery, wait a few seconds, then reinsert it.
4. Restart the Device – Turn the power back on by pressing the [■] (Stop) button.
5. Reset the Device – If the issue persists, try replacing the battery with a new one or resetting the device if an option is available in the menu.
If the problem continues, consult Yamaha service personnel for further assistance.
This answer is automatically generated