Pioneer MEP-7000 Operating Instructions Manual
Multi entertainment system
Hide thumbs
Also See for MEP-7000:
- Service manual (286 pages) ,
- Operating instructions manual (72 pages) ,
- Control manual (16 pages)
Table of Contents
Advertisement
Available languages
Available languages
Quick Links
MULTI ENTERTAINMENT PLAYER
DOUBLE LECTEUR MULTI FORMAT
MULTI-ENTERTAINMENT PLAYER
MEP-7000
http://www.prodjnet.com/support/
The Pioneer website listed above provides answers to frequently asked questions, information about
software, and other up-to-date data of assistance to our customers.
http://www.prodjnet.com/support/
Le site Web de Pionner ci-dessus fournit des réponses aux questions souvent posées, des
informations au sujet des logiciels et d'autres données mises à jour afin de venir en aide à notre
clientèle.
http://www.prodjnet.com/support/
Auf der oben angegebenen Pioneer-Website werden unseren Kunden Antworten auf häufig gestellte
Fragen, Informationen über Software und weitere Unterstützung mit neuesten Daten angeboten.
Operating Instructions
Mode d'emploi
Bedienungsanleitung
Advertisement
Chapters
Table of Contents

Related Manuals for Pioneer MEP-7000


Summary of Contents for Pioneer MEP-7000
- Page 1 MULTI-ENTERTAINMENT PLAYER MEP-7000 http://www.prodjnet.com/support/ The Pioneer website listed above provides answers to frequently asked questions, information about software, and other up-to-date data of assistance to our customers. http://www.prodjnet.com/support/ Le site Web de Pionner ci-dessus fournit des réponses aux questions souvent posées, des informations au sujet des logiciels et d’autres données mises à...
-
Page 2: Operating Environment
Thank you for buying this Pioneer product. Please read through these operating instructions so you will know how to operate your model properly. After you have finished reading the instructions, put them away in a safe place for future reference. -
Page 3: Table Of Contents
ABOUT OEL (ORGANIC EL) SCREENS ........66 SWITCHING THE JOG MODE ............. 35 ERROR MESSAGE DISPLAY ............67 JOG DIAL FUNCTION ..............35 MEP-7000 UPDATES..............67 CHANGING THE PLAY SPEED............ 36 SOFTWARE LIMITING CONDITIONS ..........68 APPLYING A MASTER TEMPO ........... 36 SETTING CUE POINTS.............. -
Page 4: Features
On the other hand, the control unit continues the tradition of Pioneer’s CDJ series of players in its panel layout, functions and operations;... - Page 5 FEATURES Normal style Special I/F DJ software MIDI I/F DJ software External Monitor Speaker PIONEER DJS Video EJECT EJECT MASTER TEMPO MASTER TEMPO TIME TEMPO 6/10/16WIDE TIME TEMPO 6/10/16WIDE BROWSE EFFECT UTILITY A.CUE A.CUE CUE/LOOP CUE/LOOP RELOOP/EXIT PITCH BEND RELOOP/EXIT...
- Page 6 MIDI DJ software is also supported. Further, by Furnished with large 80 mm jog dial with scratch function, designating the MEP-7000 as an audio output device, it can be allowing operations with the same sense of touch as an analog also used for audio output, thus eliminating the necessity of turntable.
- Page 7 FADER START BACK CUE When connected to a Pioneer DJ Mixer, the mixer's fader control After storing the Cue point in memory, press the CUE button while can be used to perform quick start and back cue operations.
-
Page 8: Specifications
Model ........ -
Page 9: Comfirm Accessories
USB auxiliary power cable MEMO • MEP-7000 units marketed in China do not include the DJS software set. • Three instruction manuals are furnished (including the one you are reading). Please study these manuals in accord with your manner of use: –... -
Page 10: Regarding Playable Discs And Files
REGARDING PLAYABLE DISCS AND FILES REGARDING PLAYABLE DISCS AND FILES TYPES OF DISCS PLAYABLE ON THIS UNIT • Playable discs will display one of the following logo marks on the disc label, packaging, or jacket: Playable disc types and logos CD-TEXT CD-R CD-RW... -
Page 11: About Mp3/Aac Disc Playback
• When a connected USB storage device contains multiple partitions, only the initial partition can be used. CAUTION Depending on the device used, proper playback may not be possible with all USB storage devices. Pioneer assumes no responsibility for any loss of data resulting from connecting any given USB device to this unit. -
Page 12: About Mp3 Files
AAC data differs in file format and extension depending on the application used to create the data file. ® The MEP-7000 is capable of playing iTunes -encoded AAC files with extension .m4a, as well as .aac and .mp4 files. However, copy- protected files purchased at places like iTunes Music Store cannot be played. -
Page 13: About Wav Files
REGARDING PLAYABLE DISCS AND FILES ABOUT WAV FILES This unit supports WAV files subject to the following formats: Supported formats Supports 16-bit non-compressed PCM, with sampling frequency of 44.1 kHz. Track data Supports LST chunk. Displays title, album name, artist’s name. *1 File extension .wav *1 In order to display characters written in a local code other than Unicode, the UTILITY function must be used to set the language. -
Page 14: Installation Guidelines
Installing the MEP-7000 in an EIA rack The screw holes on the front panel of the MEP-7000 are designed Cleaning the Jog Dial for use in attaching the unit to a 19-inch EIA rack. -
Page 15: Connections
Using the accessory audio cable, connect the white plug to the L (left) channel connector and the red plug to the R (right) channel connector. By connecting the accessory control cord, this unit can be controlled from a Pioneer DJ-mixer so as to allow fader start play and back cue operations (except during relay play). - Page 16 CONNECTIONS 3. Connection to external monitor (pin-jack connector) Use these connections when you wish to output the center display images to a large screen, or when using CD-G Karaoke. After connecting this unit to the external monitor, the unit’s settings must be changed (see the item “MONITOR OUT” in the topic “[1] DISPLAY”...
- Page 17 CONNECTIONS 5. Connecting a computer Make these connections in order to use the accessory DJS or other DJ software program. Drive unit Accessory Do not connect until you have installed the required driver USB cable in your computer. See “ABOUT THE DRIVER PROGRAM” Computer (P .49).
-
Page 18: Manipulator Style Connections
CONNECTIONS MANIPULATOR STYLE CONNECTIONS These connections should be used when you wish to operate the accessory DJS or other DJ software without connecting the drive unit. Use the accessory USB auxiliary power cable and the normal USB cable to connect the control unit to the computer (connect the USB auxiliary power cable first). -
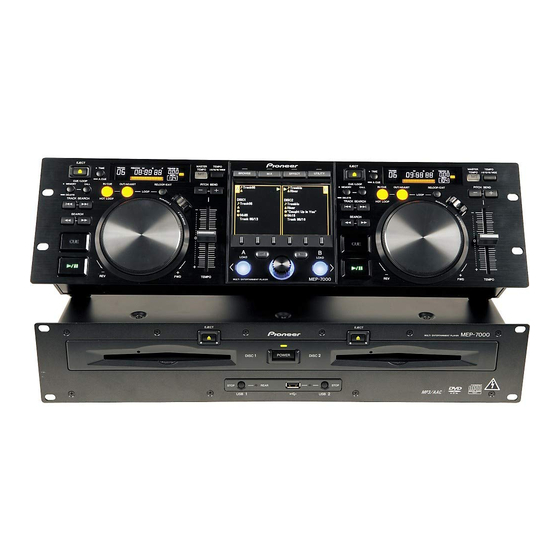
Page 19: Parts And Their Functions
PARTS AND THEIR FUNCTIONS PARTS AND THEIR FUNCTIONS FRONT PANEL Drive Unit EJECT EJECT MEP-7000 MULTI ENTERTAINMENT PLAYER POWER DISC DISC STOP REAR STOP Forced eject hole (P. 23) USB1 STOP button and indicator Press when removing a USB storage device from USB1 port. - Page 20 PARTS AND THEIR FUNCTIONS Time mode/auto cue button (TIME/A.CUE) 17 Function buttons (F1 to F6, from left) Switching between the functions allocated to the six function TIME: buttons can be performed by using the menu shown on the Each time the button is pressed, the display’s time display center display.
- Page 21 PARTS AND THEIR FUNCTIONS Center Display Display A/Display B Track number display Displays the number of the track currently playing. TEMPO control range display (±6, ±10, ±16, WIDE) Displays the selected variable range mode of the TEMPO adjust slider. TEMPO change ratio display Main menu display Displays the change in tempo produced by the operation of the The center display’s menus are changed by using the...
-
Page 22: Rear Panel
When the supplied control cord is used to connect this unit to household AC outlet. a Pioneer DJ mixer, the DJ mixer can be used to control this unit so as to perform fader start play and back cue operations. -
Page 23: Handling Discs And Other Media
HANDLING DISCS AND OTHER MEDIA HANDLING DISCS AND OTHER MEDIA LOADING AND REMOVING DISCS REGARDING FORCIBLE DISC EJECT If the EJECT () button fails to operate and a disc cannot be removed, insert the furnished forcible eject pin into the forcible eject hole on the front panel of the drive unit to allow the disc to be removed. -
Page 24: Writing Management Data To A Usb Storage Device
“PIONEER” (in HFS+ format, named “.PIONEER”). Note that if these data folders and their files are deleted, cue and other information created by the unit will be deleted. - Page 25 Depending on the device used, proper playback may Confirm that the indicator goes out. not be possible with all USB storage devices. Pioneer Confirm on the front panel that the red indicator for the assumes no responsibility for any loss of data connected port has change from flashing to off.
-
Page 26: Start Playback (Using Normal Connections)
(Using normal connections) Using the MEP-7000, track selection can be performed on the center display from up to six kinds of music source, including two discs, two USB storage devices, a personal computer (DJ software), and playlists. The buttons needed for selecting each type of source are illustrated below. -
Page 27: File Browsing And Library Browsing
START PLAYBACK (Using normal connections) Browse icons File Browsing These icons indicate the types of items displayed in the browse Displays as-written structure of folders and files in selected window. source. Track Track (with memory cue) Track (currently playing on Controller A) Track (currently playing on Controller B) Track (currently playing on both ... -
Page 28: Select The Track
The contents display shows the contents of selected M3U FILE folders and track information. The MEP-7000 supports files in the m3u format. Use the select up ()/down () buttons to move up/down Files with the extension m3u are treated the same as folders; when the folder hierarchy. -
Page 29: Using A Keyword To Search For Tracks
START PLAYBACK (Using normal connections) USING A KEYWORD TO SEARCH FOR TRACKS MEMO • Up to 3 000 tracks can be searched. You can search for tracks by inputting the title or name of artist. use the rotary selector dial or USB keyboard to input the •... -
Page 30: Track Selection With A Usb Keyboard
START PLAYBACK (Using normal connections) Keyword search for title and artist name TRACK SELECTION WITH A USB Use the TAB key to select the BROWSE screen. KEYBOARD Use the F11 key or F12 key to select either [ SEARCH] or By attaching a keyboard, track selection can be performed by inputting the initial characters of the track or folder name (track/ SEARCH] . - Page 31 START PLAYBACK (Using normal connections) Back Space [Char input mode] Deletes last character (during [Char input mode] Deletes last character (if only one track/folder name jump, if initial character is deleted, character is present, character is deleted but mode quits mode). does not change).
-
Page 32: Using The Playlist
START PLAYBACK (Using normal connections) When a track’s original storage device (USB memory, CD-ROM/ USING THE PLAYLIST DVD-ROM, etc.) is not currently connected, that track’s name is grayed out on the display. This unit allows the user to prerecord desired tracks in a playlist, thus allowing quick track selection even when using large- capacity discs and USB storage devices. - Page 33 START PLAYBACK (Using normal connections) Changing the playlist’s track order Editing the name of a playlist Select the track you wish to move from the playlist. Select the desired playlist Press the rotary selector dial. Hold the rotary selector dial depressed for one second or •...
-
Page 34: Basic Controller Operations
BASIC CONTROLLER OPERATIONS BASIC CONTROLLER OPERATIONS When the center display is used to select a track and the LOAD A button is pressed to load the track, subsequent play operations are performed with controller A (if LOAD B button is pressed, the track will be loaded into controller B). When a disc is inserted, Auto Play will function. -
Page 35: Track Skip
BASIC CONTROLLER OPERATIONS TRACK SKIP SWITCHING THE JOG MODE Press the SCRATCH or JOG BREAK buttons. Using the TRACK SEARCH (, ) buttons The mode will switch to either the SCRATCH, JOG BREAK, or Press one of the TRACK SEARCH (, ) buttons OFF mode. -
Page 36: Changing The Play Speed
BASIC CONTROLLER OPERATIONS CHANGING THE PLAY SPEED SETTING CUE POINTS By setting a cue point in memory, you can set the track to cue Tempo adjustment standby instantly merely by pressing the CUE button. Slide the TEMPO adjust slider forward or back. ... -
Page 37: Auto Cue Function
BASIC CONTROLLER OPERATIONS AUTO CUE FUNCTION When a track is first loaded or track search is performed, this function automatically sets a cue point immediately before the point that music begins, and then sets the player to cue standby at that point. -
Page 38: Advanced Operations Section
ADVANCED OPERATIONS SECTION ADVANCED OPERATIONS SECTION LOOP PLAY CUE POINT/LOOP POINT MEMORY This unit can store cue points and loop points for future use. When Create a loop. the tracks are on discs, the cue/loop points are stored in the unit’s Press the play/pause () button to start playback. -
Page 39: Scratch Play
ADVANCED OPERATIONS SECTION To delete a cue point or loop information from EFFECT SCREEN memory When the EFFECT button is pressed, the center display will show Press the CUE/LOOP CALL button. the EFFECT screen, providing graphic expression to assist with When the CUE/LOOP CALL button is pressed, the cue point or scratch play and jog break play. - Page 40 ADVANCED OPERATIONS SECTION About SCRATCH About TRANS For more information, refer to the item “SCRATCH PLAY”. This produces an effect like temporarily muting the sound with the mixer’s cross fader. In linkage with the effect, the ball on the screen flashes while rotating. MEMO •...
- Page 41 ADVANCED OPERATIONS SECTION [2] Jog break effect About ROLL In response to the rotation of the jog dial, the pitch and playback When jog mode is set to [JOG BREAK], the screen on the controller time are changed, and effect applied to the playback sound. side switches to jog break effect mode.
-
Page 42: Mix Screen
ADVANCED OPERATIONS SECTION About WAH MIX SCREEN This function applies a filter that changes the cutoff frequency in response to the rotation of the jog dial. When the MIX button is pressed, the MIX screen appears in the In linkage to the effect, the WAH image animation is displayed (the center display, allowing easy mixing and playback of tracks. - Page 43 ADVANCED OPERATIONS SECTION BPM SYNC Instant Change Function Using the instant change function, you can switch from the Sets the BPM SYNC ON/OFF. currently playing track to another desired track at the timing of When BPM SYNC is set to ON, the tempo of the next track is your choice.
-
Page 44: About Fader Start Play
When the accessory control cord is used to connect this unit’s are recorded, alternating between controllers A and B. CONTROL jack to the CONTROL jack of a Pioneer DJ mixer, when Press the MIX button. the DJ mixer’s channel fader lever is raised, the player’s CUE The MIX screen appears in the center display. -
Page 45: About Djs Software
ABOUT DJS SOFTWARE ABOUT DJS SOFTWARE Pioneer DJS is a software program that allows the use of MP3 files to control DJ play from a computer. Load the program into your computer from the supplied CD-ROM disc. MEMO • DJS is not equipped with functions for recording DJ play. -
Page 46: Copyright Warning
128-bit SSL. the copyright laws of individual countries as well as by • When this unit (MEP-7000) is connected to a computer and used international convention. You are solely responsible for the in conjunction with the DJS software, the computer must be lawful use of the recordings you make. -
Page 47: Installing Djs Software
• When using DJS on a computer whose Windows display • When using this unit (MEP-7000) in conjunction with the DJS language is other than one of those listed above, follow the software program, the software driver must be installed in the menu instructions to select [English]. -
Page 48: Regarding Online Support
DJS user’s manual included in the accessory Pioneer shall not be held responsible for reissuing license keys CD-ROM. or registration IDs in the event of loss. Be sure to store your... -
Page 49: About The Driver Program
ABOUT THE DRIVER PROGRAM This unit is designed to control Pioneer DJS and other DJ software when connected to a computer. When connecting this unit to a Windows computer for use with DJ software, the software driver program must first be loaded into the computer. - Page 50 ABOUT THE DRIVER PROGRAM Follow the instructions that appear on the screen. When installation is completed, the [Installation is now • If the [Windows Security] screen appears during complete.] message will appear. Click on the [Finish] button installation, click on [Install this driver software anyway] to complete the process.
- Page 51 Setting the buffer size this unit to operate DJS. The “DJS Control Guide” can be found The MEP-7000’s drive unit has been designed as an audio device under the name [manual_MEP-7000_control_en.pdf] in the compliant with ASIO (Audio Stream Input Output) standards.
-
Page 52: Using Dj Software
Normal Style The playing setup whereby the MEP-7000 operates with the control unit and drive unit as a set is called “normal style.” In normal style play, when using a DJ software program, the MEP-7000’s drive unit is connected to a computer via a USB cable. The DJ software program is allocated as a source on the BROWSE screen the same as discs and USB storage devices, and switching between these sources is performed on the unit’s center display. -
Page 53: Preparing Your Dj Software Program
USING DJ SOFTWARE PREPARING YOUR DJ SOFTWARE PROGRAM Before using your DJ software program, you must prepare your computer and the DJ software. Do not connect the MEP-7000 to your computer until you have loaded the software driver! Dedicated communication-... - Page 54 A/B will show the currently playing track’s time data and title, together with the name of artist. • By designating the MEP-7000 as an audio output device in the For DJS: DJ software, tracks played with the DJ software can be output The center display will show the DJS BROWSE screen.
-
Page 55: Using Midi For Computer Control
CD-ROM). Start the DJ software program. The icon will not change. Designate the MEP-7000 as an audio output device in the DJ software. In “Normal style”, designating the MEP-7000 as an audio output device will enable it to output tracks played from the DJ software. - Page 56 1, and Controller B set to Channel 2). operate the DJ software. MEMO • By designating the MEP-7000 as an audio output device in the DJ software, tracks played with the DJ program can be output from the drive unit.
-
Page 57: Midi Message Table
USING DJ SOFTWARE MIDI MESSAGE TABLE Message Interface Interface Name Comments Type JOG DIAL General Linear value with respect to speeds from stop to 4x, 64 at Purpose stop; FWD direction: 65 (0.06x) to 127 (x4); REV direction: 63 Controller (0.06x) to 0 (4x). - Page 58 USING DJ SOFTWARE Message Interface Interface Name Comments Type ROTARY SELECTOR DIAL General 98 to 127, 1 to 30 (± 1 to ± 30), transmits count value Purpose difference from previous time. When ± 30 or more, becomes Controller ± 30. SELECT DOWN (>) OFF=0, ON=127 SELECT UP (<)
-
Page 59: Enjoying Cd-G Karaoke
ENJOYING CD-G KARAOKE ENJOYING CD-G KARAOKE The MEP-7000 can playback CD-G discs and output images to an external monitor (MONITOR OUT) for Karaoke play. SELECT CD-G PLAY MODE MEMO • The CD-G images from the controller being played To play a CD-G disc, it is necessary to use the UTILITY screen to set corresponding to the lighted LOAD button will be visible on the the CD-G play mode. -
Page 60: Using The Utility
USING THE UTILITY USING THE UTILITY When the UTILITY button is pressed, the UTILITY screen appears, allowing setting of various device parameters, creation of libraries, and backup of user data. Function buttons UTILITY Rotary selector dial Select down ( ) button SETTINGS [1] DISPLAY Brightness, external output settings, etc. - Page 61 USB device after changing the setting. VERSION INFO Displays MEP-7000 version information. *3 The LOAD LOCK function is disabled when a track is set with DJ software other than DJS. *4 See P. 62 “BACKING UP USER DATA”.
-
Page 62: Creating Libraries
• Libraries are created on the USB storage device in folders NOTE named PIONEER (or .PIONEER in the case of HFS+). • Any data stored in this unit will be overwritten, so any • When updating a library, information on deleted or added previously stored information will be lost. -
Page 63: To Perform A Factory Reset
USING THE UTILITY TO PERFORM A FACTORY RESET All unit settings can be restored to their factory default values by using the UTILITY screen (P. 60). The settings on TIME/REMAIN, A.CUE, and TEMPO range will also be restored to their factory default values (REMAIN, OFF, 10%). -
Page 64: Troubleshooting
If the problem in question continues to persist even after checking the troubleshooting table below and taking whatever corrective action is recommended, contact your nearest Pioneer Service Station or contact the store from which you purchased your player for further assistance. - Page 65 TROUBLESHOOTING Description of problem Possible cause of problem Recommended action A large amount of noise is • Disc is seriously warped or scratched. • Replace with new disc. generated when playing back a • Disc is unusually dusty or dirty. •...
-
Page 66: About The Lcd Screen
• The BPM value measured by MEP-7000 may differ from the BPM value recorded on a CD or from our DJ mixer, but this difference is a result of differences in the BPM value measurement method; not a result of a fault with the player. -
Page 67: Error Message Display
If an error code other than any of the error codes listed in the table below is displayed or if the same error code is displayed even after corrective action has been taken, contact your nearest Pioneer Service Station or contact the store from which you purchased your player for assistance. -
Page 68: Software Limiting Conditions
TROUBLESHOOTING SOFTWARE LIMITING CONDITIONS Discs must be recorded in compatibility with ISO9660 file system. When recorded in UDF file system, the ISO9660 file system must be jointly recorded or the disc will not be playable. (For details consult the manufacturer of the applicable software.) On a single disc, no more than 2 000 folders and no more than 3 000 files can be Disc media displayed. -
Page 69: Disclaimer
NOTE • When bringing the unit to your dealer or a Pioneer Service Center, bring all components of the system (drive unit, control unit, cables). • The DJ software program “DJS” not covered by the terms of free repair on the unit Warranty. When installing or using the DJS program, be sure to read and understand the terms of the End User License Agreement (P. - Page 70 Nous vous remercions pour cet achat d’un produit Pioneer. Nous vous demandons de lire soigneusement ce mode d’emploi; vous serez ainsi à même de faire fonctionner l’appareil correctement. Après avoir bien lu le mode d’emploi, le ranger dans un endroit sûr pour pouvoir s’y référer ultérieurement.
- Page 71 SAUT DE PLAGE ................34 AFFICHAGE DE MESSAGES D’ERREUR ........67 COMMUTATION DU MODE JOG..........35 MISES À JOUR DU MEP-7000 ............ 67 FONCTION DE LA BAGUE JOG ..........35 CONDITIONS LIMITANT LE LOGICIEL ........68 CHANGEMENT DE LA VITESSE DE LECTURE ......36 APPLICATION D’UN TEMPO PRINCIPAL........
-
Page 72: Caractéristiques
à un mixeur pour commuter manuellement entre les diverses sources. Par ailleurs, l’unité de contrôle préserve la tradition des lecteurs Pioneer de la série CDJ par l’agencement de son panneau, ses fonctions et son utilisation. En raccordant l’unité de contrôle à votre ordinateur (alimentation bus USB), la musique contenue dans le logiciel DJS accessoire peut être reproduite en faisant appel au véritable “style manipulateur”... - Page 73 CARACTÉRISTIQUES Style Normal Logiciel I/F DJ Spécial Logiciel MIDI I/F DJ Moniteur externe Haut-parleur PIONEER DJS Vidéo EJECT EJECT MASTER TEMPO MASTER TEMPO TIME TEMPO 6/10/16WIDE TIME TEMPO 6/10/16WIDE BROWSE EFFECT UTILITY A.CUE A.CUE CUE/LOOP CUE/LOOP PITCH BEND PITCH BEND...
- Page 74 L’emploi du logiciel MIDI DJ est accepté, scratch, ce qui autorise des opérations avec le même sens du lui aussi. De plus, en désignant le MEP-7000 comme dispositif toucher qu’avec une platine-disque analogique. de sortie audio, il peut aussi être utilisé pour la sortie audio, ce PITCH BEND qui élimine le besoin d’employer le mixeur pour passer d’une...
- Page 75 FADER START (départ en fondu) BACK CUE (retour au point de repérage) Lors d’une connexion à un Mixeur DJ de Pioneer, la commande de Après mémorisation d’un Point de repérage, appuyez sur le fondu du mixeur permet d’effectuer des départs rapides et des bouton CUE pendant la lecture pour repasser au Point de repérage...
-
Page 76: Fiche Technique
Modèle ........ -
Page 77: Vérification Des Accessoires
Câble d’alimentation auxiliaire USB NOTE • Les MEP-7000 destinées au marché chinois ne comprennent pas le logiciel DJS. • Trois modes d’emploi sont fournis (y compris celui que vous êtes en train de lire). Lisez ces manuels selon votre façon d’employer l’appareil :... -
Page 78: À Propos Des Disques Et Fichiers Lisibles
À PROPOS DES DISQUES ET FICHIERS LISIBLES À PROPOS DES DISQUES ET FICHIERS LISIBLES TYPES DE DISQUES LISIBLES SUR CET APPAREIL • Les disques lisibles doiventr porter une des marques suivantes sur leur étiquette, emballage ou pochette. Types et logos des disques utilisables CD-TEXT CD-R CD-RW... -
Page 79: À Propos De La Lecture De Disques Mp3/Aac
Selon le dispositif utilisé, il se peut qu’une lecture correcte soit impossible avec tous les périphériques de stockage USB. Pioneer n’assume aucune responsabilité en cas de perte de données, résultant du branchement d’un périphérique de stockage USB donné sur cet appareil. -
Page 80: À Propos Des Fichiers Mp3
Les données AAC diffèrent en format et extension de fichier, selon l’application utilisée pour créer le fichier des données. ® Le MEP-7000 est capable de lire les fichiers AAC codés iTunes , portant l’extension .m4a, ainsi que les fichiers .aac et .mp4. Cependant, les fichiers protégés contre la copie, acquis, par exemple, chez iTunes Music Stor, ne pourront pas être lus. -
Page 81: À Propos Des Fichiers Wav
À PROPOS DES DISQUES ET FICHIERS LISIBLES À PROPOS DES FICHIERS WAV Cet appareil prend en compte les fichiers WAV des formats suivants : Formats pris en compte Prend en compte le code PCM non comprimé de 16 bits avec fréquence d’échantillonnage de 44,1 kHz. Données de piste Prend en compte LST chunk. -
Page 82: Directives D'installation
Installation du MEP-7000 dans un bâti EIA Les orifices pour vis du panneau avant du MEP-7000 sont réservés Nettoyage de la bague Jog à la fixation de l’appareil dans un bâti EIA de 48 cm (19 pouces). -
Page 83: Connexions
R (droit). En branchant le cordon de contrôle fourni comme accessoire, cet appareil peut être contrôlé depuis un mixeur DJ de Pioneer, de manière à permettre la lecture à départ en fondu et les opérations Back Cue (sauf pendant la lectuer à... - Page 84 CONNEXIONS 3. Connexion à un moniteur externe (connecteur à broches) Utilisez ces connexions si vous souhaitez présenter les images de l’écran central sur un large écran ou si vous utilisez des disques CD-G Karaoké. Après avoir raccordé l’appareil à un moniteur externe, les réglages de l’appareil doivent être changés (cf. la rubrique “SORTIE MONITEUR”...
-
Page 85: Connexions De Style Manipulateur
CONNEXIONS 5. Connexion d’un ordinateur Effectuez ces connexions pour utiliser le logiciel DJS fourni comme accessoire et d’autres logiciels DJ. Lecteur Câble USB fourni Ne connectez pas avant d’avoir installé le pilote requis sur votre ordinateur. Cf. “À PROPOS DU PROGAMME PILOTE” Ordinateur (P .49) REMARQUE... -
Page 86: Les Organes Et Leurs Fonctions
LES ORGANES ET LEURS FONCTIONS LES ORGANES ET LEURS FONCTIONS PANNEAU AVANT Lecteur EJECT EJECT MEP-7000 MULTI ENTERTAINMENT PLAYER POWER DISC DISC STOP REAR STOP Orifice d’éjection forcée (page 22) Bouton et voyant USB1 STOP Appuyez pour retirer un périphérique de stockage USB au Fente d’insertion du disque (page 22) - Page 87 LES ORGANES ET LEURS FONCTIONS Bouton Mode horaire/Auto cue (TIME/A.CUE) 17 Boutons de fonction (F1 à F6 à partir de la gauche) TIME La permutation entre les fonctions allouées aux six boutons de fonction est possible au moyen du menu affiché sur l’écran À...
- Page 88 LES ORGANES ET LEURS FONCTIONS Écran central Écran A/Écran B Affichage du numéro de plage Indique le numéro de la plage en cours de lecture. Affichage de la portée du contrôle TEMPO (±6, ±10, ±16, WIDE) Affiche la portée variable choisie pour le curseur de réglage TEMPO.
-
Page 89: Panneau Arrière
Quand le cordon de contrôle fourni est utilisé pour raccorder prise sur une prise secteur. cet appareil à un mixeur DJ de Pioneer, le mixeur DJ peut servir pour contrôler cet appareil de manière à effectuer des Connecteur PC : Port USB (type B) opérations de Lecture à... -
Page 90: Maniement Des Disques Et Autres Supports
MANIEMENT DES DISQUES ET AUTRES SUPPORTS MANIEMENT DES DISQUES ET AUTRES SUPPORTS INSERTION ET RETRAIT DES DISQUES EJECTION FORCÉE D’UN DISQUE Si le bouton EJECT () ne permet pas d’éjecter un disque hors de l’appareil, insérez la broche d’éjection forcée fournie dans l’orifice d’éjection sur le panneau avant du lecteur pour faire ressortir le disque coincé. -
Page 91: Inscription Des Données De Gestion Sur Un Périphérique De Stockage Usb
“PIONEER” (en format HFS+, appelé “.PIONEER”). Notez que si ces dossiers de données et leurs fichiers sont effacés, les points Cue et autres informations créés par l’appareil seront effacés également. - Page 92 Confirmez que le voyant est éteint. de stockage USB. Pioneer n’assume aucune Confirmez sur le panneau avant que le voyant rouge responsabilité en cas de perte de données, résultant correpondant au port connecté qui clignotait s’est éteint.
-
Page 93: Lancement De La Lecture
(Utilisation des connexions normales) Grâce au MEP-7000, la sélection des plages peut s’accomplir sur l’écran central parmi un maximum de six sortes de sources musicales, dont deux disques, deux périphériques de stockages USB, un ordinateur personnel (logiciel DJ et des listes de lecture. Les boutons nécessaires pour la sélection de chaque type de source sont indiqués ci-après. -
Page 94: Navigation De Fichier Et De Bibliothèque
LANCEMENT DE LA LECTURE (Utilisation des connexions normales) Icones de navigation Navigation de Fichier Ces icones indiquent les types de rubriques affichées sur la fenêtre Pour afficher la structure telle quelle des dossiers et fichiers dans Naviguer. la source sélectionnée. Plage Plage (avec Cue de mémoire) Plage (actuellement en cours de lecture... -
Page 95: Sélection D'une Plage
LANCEMENT DE LA LECTURE (Utilisation des connexions normales) Menu de plage SÉLECTION D’UNE PLAGE Si le sélecteur rotatif est actionné alors qu’une plage est sélectionnée, l’affichage du contenu indique le menu des plages Appuyez sur le bouton BROWSE. et le sélecteur rotatif peut alors servir à exécuter les options du L’écran BROWSE apparaît. -
Page 96: Fichiers M3U
FICHIERS M3U Chiffres Symboles. Appuyez sur le sélecteur rotatif : Le MEP-7000 prend en compte les fichiers en format m3u. Pour confirmer la chaîne de caractères à rechercher, quittez Les fichiers portant l’extension m3u sont traités comme des le mode de saisie et lancez la recherche. -
Page 97: Sélection Des Plages Par Clavier Usb
LANCEMENT DE LA LECTURE (Utilisation des connexions normales) Recherche par clavier pour nom de titre et d’artiste SÉLECTION DES PLAGES PAR CLAVIER Utilisez la touche TAB pour sélectionner l’écran BROWSE. Utilisez la touche F11 ou F12 pour sélectionner soit En raccordant un clavier, la sélection des plages peut s’accomplir RECHERCHER] , soit [ RECHERCHER]. - Page 98 LANCEMENT DE LA LECTURE (Utilisation des connexions normales) Déplacement du curseur vers le haut. Déplacement du curseur vers le haut. Déplacement du curseur vers le bas. Déplacement du curseur vers le bas. Déplacement du curseur vers un niveau inférieur. [Mode saisie caractères] Saisit le même caractère que la dernière entrée et passe à...
-
Page 99: Utilisation D'une Liste De Lecture
LANCEMENT DE LA LECTURE (Utilisation des connexions normales) Si le périphérique de stockage original (mémoire USB, CD-ROM/ UTILISATION D’UNE LISTE DE LECTURE DVD-ROM, etc.) de la plage n’est pas actuellement raccordé, le nom de la plage apparaît en gris sur l’affichage. Cet appareil vous permet de pré-enregistrer une série de plage dans une liste de lecture, ce qui autorise une sélection rapide des plages même à... - Page 100 LANCEMENT DE LA LECTURE (Utilisation des connexions normales) Lecture d’une plage de la Liste de lecture Edition du nom d’une Liste de lecture Ouvrez une Liste de lecture. Sélectionnez la Liste de lecture souhaitée. Servez-vous du sélecteur rotatif pour sélectionner une plage, Maintenez le sélecteur rotatif enfoncé...
-
Page 101: Démarches De Base Sur Le Contrôleur
DÉMARCHES DE BASE SUR LE CONTRÔLEUR DÉMARCHES DE BASE SUR LE CONTRÔLEUR Quand l’écran central est utilisé pour sélectionner une plage et que le bouton LOAD A est actionné pour charger la plage, les démarches ultérieures de la lecture sont exécutées avec le contrôleur A (si le bouton LOAD B est actionné, la plage sera chargée dans le contrôleur B). -
Page 102: A Propos De La Fonction Reprise De Disque
DÉMARCHES DE BASE SUR LE CONTRÔLEUR • De même, si vous continuez d’appuyez sur le bouton A PROPOS DE LA FONCTION REPRISE DE pour sauter à une plage au-delà de la dernière, le saut de plage passera à la première plage (plage No. 1). DISQUE ... -
Page 103: Commutation Du Mode Jog
DÉMARCHES DE BASE SUR LE CONTRÔLEUR COMMUTATION DU MODE JOG Appuyez sur le bouton SCRATCH ou JOG BREAK. Le mode permute au mode SCRATCH, JOG BREAK ou OFF. Quand le côté du voyant LED clignotant est actionné, le voyant LED s’éteint et le mode Jog est désactivé. FONCTION DE LA BAGUE JOG Tournez pendant la lecture (Pitch bend : quand le mode Jog est désactivé). -
Page 104: Changement De La Vitesse De Lecture
DÉMARCHES DE BASE SUR LE CONTRÔLEUR CHANGEMENT DE LA VITESSE DE POSE DES POINTS DE REPÈRE (CUE LECTURE POINTS) En plaçânt un point de repère en mémoire, vous pourrez mettre à Ajustement du tempo l’instant la plage en mode Attente au point de repère simplement Déplacer le curseur de réglage TEMPO vers l’avant ou en appuyant sur le bouton CUE. -
Page 105: Fonction Repère Automatique (Auto Cue)
DÉMARCHES DE BASE SUR LE CONTRÔLEUR FONCTION REPÈRE AUTOMATIQUE (AUTO CUE) Lors du premier chargement d’une plage ou quand une recherche de plage est exécutée, cette fonction défini automatiquement un point de repère juste avant l’endroit ou la musique a commencé, puis elle place le lecteur en mode Attente de repère à... -
Page 106: Démarches Évoluées
DÉMARCHES ÉVOLUÉES DÉMARCHES ÉVOLUÉES LOOP PLAY (Lecture en boucle) MÉMOIRE DE POINT DE REPÈRE/POINT DE BOUCLE Création d’une boucle Cet appareil peut stocker les points de repère et les points de Appuyez sur le bouton Lecture/Pause () pour lancer la boucle en vue d’une utilisation ultérieure. -
Page 107: Lecture Scratch
DÉMARCHES ÉVOLUÉES Pour effacer de la mémoire un point de repère ou une ÉCRAN D’EFFETS boucle Appuyez sur le bouton CUE/LOOP CALL. Par une pression sur le bouton EFFECT, l’écran central affichera l’écran EFFECT ; il fournit une expression graphique qui vous Quand le bouton CUE/LOOP CALL est actionné, le point de aidera à... - Page 108 DÉMARCHES ÉVOLUÉES À propos de SCRATCH À propos de TRANS Pour plus d’informations, reportez-vous à la rubrique “LECTURE Ceci produit un effet comparable à une sourdine temporaire du SCRATCH”. son par le fondu croisé du mixeur. En liaison avec cet effet, la balle sur l’écran clignote en tournant.
- Page 109 DÉMARCHES ÉVOLUÉES [2] Effet Jog break À propos de ROLL En réponse à la rotation de la bague Jog, la hauteur tonale et la Quand le mode Jog est réglé sur [JOG BREAK], l’écran du côté durée de lecture changent et l’effet est appliqué au son de la contrôleur passe au mode d’effet Jog break.
-
Page 110: Mix Screen
DÉMARCHES ÉVOLUÉES À propos de WAH MIX SCREEN Cette fonction applique un filtre qui change la fréquence de coupure en réponse à la rotation de la bague Jog. Quand le bouton MIX est actionné, l’écran MIX apparaît sur En liaison avec cet effet, l’animation d’image WAH est affichée (la l’écran central, permettant un mixage facile et la lecture des ligne glisse de droite à... - Page 111 DÉMARCHES ÉVOLUÉES BPM SYNC Fonction de changement instantané Grâce à la fonction de changement instantané, vous pouvez Pour mettre BPM SYNC en/hors service. permuter de la plage de lecture en cours à une autre plage Quand BPM SYNC est en service, le tempo de la plage suivante souhaitée au moment de votre choix.
-
Page 112: À Propos De La Lecture À Départ En Fondu
CONTROL de cet appareil sur la prise CONTROL d’un Appuyez sur le bouton MIX. mixeur DJ de Pioneer, au moment ou le levier de fondu du canal L’écran MIX apparaît sur l’écran central. du mixeur DJ, le mode Cue Standby du lecteur sera libéré et la Tournez le sélecteru rotatif pour sélectionner une liste de... -
Page 113: À Propos Du Logiciel Djs
À PROPOS DU LOGICIEL DJS À PROPOS DU LOGICIEL DJS Pioneer DJS est un logiciel qui permet d’utiliser des fichiers MP3 pour contrôler la lecture DJ à partir d’un ordinateur. Chargez le logiciel sur votre ordinateur à partir du disque CD-ROM fourni. -
Page 114: Avertissement Sur Les Copyrights
• Il se peut que le programme ne fonctionne pas correctement si les données de cryptage anticopie sont incorporées dans le • Si cet appareil (le MEP-7000) est raccordé à un ordinateur et support enregistré. utilisé en conjonction avec le logiciel DJS, l’ordinateur doit être muni d’un port USB, conforme à... -
Page 115: Installation Du Logiciel Djs
Vous devez vous NOTE relier comme administrateur avant d’installer le logiciel. • Si vous utilisez cet appareil (MEP-7000) avec le logiciel DJS, le Démarches d’installation pilote doit être installé sur l’ordinateur avant de connecter celui-ci au MEP-7000. Pour des détails, cf. page 49. -
Page 116: À Propos De L'aide En Ligne
“Carte d’Inscription Client” et la d’autres produits non-Pioneer, veuillez consulter votre renvoyer chez Pioneer par la poste. Après que la “Carte revendeur ou les fabricants des composants respectifs. d’Inscription Client” dument remplie est reçûe, nous enverrons la “Registration ID”... -
Page 117: À Propos Du Programme Pilote
• A l’emploi d’un ordinateur tournant sur le Système d’exploitation Macintosh OS, téléchargez et installez le logiciel pilote spécial, disponible sur le site web de Pioneer (voir ci-après). Le site web de Pioneer (voir ci-après) fournit des informations à jour au sujet du logiciel pilote. •... - Page 118 À PROPOS DU PROGRAMME PILOTE Suivez les instructions qui apparaissent à l’écran. • Si l’écran [Sécurité de Windows] apparaît pendant l’installation, cliquez sur [Installer ce pilote quand même] pour continuer les démarches d’installation. Connexion de cette unité à l’ordinateur Utilisez les câbles de télécommande spécialisés fournis pour raccorder le lecteur au contrôleur.
- Page 119 [manual_MEP-7000_control_fr.pdf] dans Réglage de la taille de la mémoire tampon le dossier [MEP-7000\French] du CD-ROM fourni comme Le lecteur du MEP-7000 a été conçu comme un composant audio, accessoire. conforme aux normes ASIO (Audio Stream Input Output).
-
Page 120: Utilisation Du Logiciel Dj
La configuration de lecture par laquelle le MEP-7000 fonctionne avec le contrôleur et le lecteur comme un jeu est appelée ici “Style Normal.” À la lecture en Style normal, si vous utilisez un programme informatique DJ, le lecteur du MEP-7000 est raccordé à un ordinateur via un câble USB. -
Page 121: Préparation De Votre Programme Informatique Dj
UTILISATION DU LOGICIEL DJ PRÉPARATION DE VOTRE PROGRAMME INFORMATIQUE DJ Avant d’utiliser votre programme informatique DJ, vous devez préparer votre ordinateur et le logiciel DJ. Ne connectez pas le MEP-7000 à votre ordinateur avant d’avoir chargé le pilote de logiciel. - Page 122 écrans A/B afficheront les données horaires et le titre de la plage en cours de lecture, ainsi que le nom de l’artiste. • En désignant le MEP-7000 comme dispositif de sortie audio dans le logiciel DJ, les plages jouées avec le logiciel DJ peuvent être fournies depuis le lecteur.
-
Page 123: Utilisation De Midi Pour Contrôler L'ordinateur
à gérer la transmission de données entre des instruments de musique électroniques et des ordinateurs. Le MEP-7000 fait appel au format de message MIDI pour fournir les données et l’état d’exploitation à un ordinateur, connecté par un câble USB. En utilisant un programme informatique DJ acceptant USB MIDI pour attribuer les message MIDI fournis par Appuyez sur le bouton LOAD A (ou B). - Page 124 être effectués au Canal 1 et le Contrôleur B au Canal réglage TEMPO pour gérer le logiciel DJ. NOTE • En désignant le MEP-7000 comme dispositif de sortie audio dans le logiciel DJ, les plages jouées avec le programme DJ peuvent être fournies depuis le lecteur.
-
Page 125: Tableau Des Messages Midi
UTILISATION DU LOGICIEL DJ TABLEAU DES MESSAGES MIDI Message Type Nom d’interface Commentaires d’interface JOG DIAL Contrôle Valeur linéaire en relation aux vitesses de Arrêt à 4x, 64 à général Arrêt; Sens AVANT : 65 (0,06x) à 127 (x4); Sens ARR : 63 (0,06x) à... - Page 126 UTILISATION DU LOGICIEL DJ Message Type Nom d’interface Commentaires d’interface ROTARY SELECTOR DIAL Contrôle 98 à 127, 1 à 30 (± 1 à ± 30), transmet la différence de valeur général du compte par rapport à la fois précédente. Quand ± 30 ou plus, devient ±...
-
Page 127: Disques Cd-G Karaoké
DISQUES CD-G KARAOKÉ DISQUES CD-G KARAOKÉ Le MEP-7000 peut lire des disques CD graphiques (CD-G) et fournir les images sur un moniteur externe (MONITOR OUT) en vue de la lecture Karaoké. SÉLECTION DU MODE DE LECTURE CD-G NOTE • Les images du CD-G installé dans le contrôleur en cours de Pour lire un disque CD-G, il est nécessaire d’utiliser l’écran UTILITY... -
Page 128: Utilisation De L'écran Utility
UTILISATION DE L’ÉCRAN UTILITY UTILISATION DE L’ÉCRAN UTILITY Quand le bouton UTILITY est actionné, l’écran UTILITY apparaît, ce qui permet de régler divers paramètres, de créer des musicothèques et de sauvegarder les données utilisateur. Boutons de fonction UTILITY Sélecteur rotatif Bouton de sélection Bas ( ) PARAMÈTRES [1] DISPLAY (Écran) - Page 129 Navigation, sans employer les INFOSURVERSION Pour afficher les infos sur la bibliothèques. version du MEP-7000. *3 Le "Verrouillage en chargement" est désactivé quand une NOTE plage est définie avec un logiciel DJ autre que DJS. • Le réglage du type de navigation s’applique à tout périphérique *4 Cf.
-
Page 130: Creation De Bibliotheques
• Les musicothèques sont créées sur le périphérique USB dans prise en charge pour les supports de disque, mémorisés sur des dossiers, baptisés PIONEER (ou .PIONEER dans le cas de cet appareil. HFS+ = Système à gestion hiérarchique des fichiers). -
Page 131: Réinitialisation Aux Valeurs Par Défaut
UTILISATION DE L’ÉCRAN UTILITY RÉINITIALISATION AUX VALEURS PAR DÉFAUT Il est possible de ramener tous les réglages à leurs valeurs par défaut en se servant de l’écran UTILITY (page 60). Les réglages dans la plage TIME/REMAIN, A.CUE et TEMPO seront également ramenés à... -
Page 132: Guide De Dépannage
Si le problème persiste après l’examen du tableau ci-dessous et la prise des éventuels remèdes recommandés, adressez-vous au service technique Pioneer le plus proche ou au revendeur auprès duquel vous avez acquis votre lecteur. Description du problème Causes possibles du problème... - Page 133 GUIDE DE DÉPANNAGE Description du problème Causes possibles du problème Action recommandée Le son est déformé ou • Le câble audio n’a pas été branché • Raccordez le câble audio sur la prise d’entrée de complètement parasité. correctement. ligne de la table de mixage DJ. Ne le raccordez pas à...
-
Page 134: À Propos De L'écran Lcd (À Cristaux Liquides)
• La valeur BMP mesurée par le MEP-7000 peut être différente de la valeur BMP enregistrée sur un CD ou fournie par notre table de mixage DJ, mais cette différence s’explique par la méthode de mesure des valeurs BMP et il ne s’agit en aucun cas d’une défaillance du lecteur. -
Page 135: À Propos Des Écrans Oel (Diodes Électroluminescentes Organiques)
Si le code d’erreur de l’affichage n’est pas repris dans le tableau ci-dessous ou s’il réapparaît après l’exécution de l’action destinée à remédier au problème, adressez-vous au service technique Pioneer le plus proche ou au revendeur auprès duquel vous avez acquis votre lecteur. Code d’erreur Type d’erreur... -
Page 136: Conditions Limitant Le Logiciel
GUIDE DE DÉPANNAGE CONDITIONS LIMITANT LE LOGICIEL Les disques doivent être engistrés en compatibilité avec le système de fichier ISO9660. S’ils sont enregistrés selon le systàme UDF, le système de fichier ISO9660 doit être enregistré aussi ; faute de quoi le disque ne sera pas lisible. (Pour plus de détails, consultez l’auteur de votre logiciel applicable.) Sur un seul disque, pas plus de 2 000 dossiers et pas plus de 3 000 fichiers peuvent être Support disque... -
Page 137: Décharge De Responsabilité
Fraunhofer IIS et Thomson multimeida. REMARQUE • Lorsque vous confiez cet appareil à votre revendeur ou à un Centre technique de Pioneer, apportez tous les composants du système (lecteur, unité de contrôle, câbles). • Le logiciel “DJS” n’est pas couvert par les termes de la Garantie de réparation gratuite de l’appareil. Avant l’installation et l’utilisation du logiciel DJS, veillez à... - Page 138 Wir danken lhnen für den Kauf dieses Pioneer-Produkts. Lesen Sie sich bitte diese Bedienungsanleitung durch. Dann wissen Sie, wie Sie lhr Gerät richtig bedienen. Bewahren Sie sie an einem sicheren Platz auf, um auch zukünftig nachschlagen zu können. In manchen Ländern oder Verkaufsgebieten weichen die Ausführungen von Netzstecker oder Netzsteckdose u.U.
- Page 139 HINWEISE ZUR DISC-WIEDERGABEAUTOMATIK- HINWEISE ZU OEL-(ORGANISCHEN EL-)BILDSCHIRMEN ..68 FUNKTION..................34 ANGEZEIGTE FEHLERMELDUNGEN ..........69 BEENDEN DER WIEDERGABE UND AKTUALISIERUNG DES MEP-7000 ..........69 AUSWERFEN DER DISC ............. 34 EINSCHRÄNKUNGEN BEIM GEBRAUCH DER SOFTWARE ...70 PAUSIEREN DER WIEDERGABE ..........34 AUSSCHLUSSKLAUSEL ..........71 HINWEISE ZUR FORTSETZUNGSFUNKTION......
-
Page 140: Merkmale
PITCH BEND MEMORY CALL IN/CUE OUT/ADJUST RELOOP/EXIT MEMORY CALL IN/CUE OUT/ADJUST RELOOP/EXIT USB-Bus- LOOP LOOP TRACK SEARCH HOT LOOP TRACK SEARCH HOT LOOP Spannungsversorgung SEARCH SEARCH LOAD LOAD TEMPO TEMPO MEP-7000 MULTI ENTERTAINMENT PLAYER PIONEER DJS Leistungsverstärker Audio-Schnittstellengerät Mischpult Lautsprecher... - Page 141 MERKMALE Normaltyp DJ-Software mit DJ-Software mit Spezialschnittstelle MIDI-Schnittstelle externer Monitor Lautsprecher PIONEER DJS Videosignal EJECT EJECT MASTER TEMPO MASTER TEMPO TIME TEMPO 6/10/16WIDE TIME TEMPO 6/10/16WIDE BROWSE EFFECT UTILITY A.CUE A.CUE CUE/LOOP CUE/LOOP RELOOP/EXIT PITCH BEND RELOOP/EXIT PITCH BEND MEMORY...
- Page 142 80 mm verfügt über eine Scratch-Funktion, die eine Bedienung mit DJ-Software wird ebenfalls unterstützt. Darüber hinaus kann dem gleichen taktilen Gefühl wie bei Scratch-Wiedergabe mit der MEP-7000 als ein Audio-Ausgabegerät vorgegeben und einem Plattenspieler ermöglicht. dann zur Audioausgabe verwendet werden, so dass sich ein TONHÖHENBEUGUNG...
- Page 143 Diese Funktion erlaubt es, durch einfaches Drücken der CUE- FADER-STARTFUNKTION Taste während der Wiedergabe unmittelbar an den gespeicherten Nach Anschluss an ein Pioneer DJ-Mischpult kann der Faderhebel Cue-Punkt zurückzukehren, um die Wiedergabe dort erneut zu des Mischpults betätigt werden, um einen sofortigen beginnen.
-
Page 144: Technische Daten
Allgemeine Daten Modellnummer ....... . . MEP-7000 Bezeichnung .....Multi-Entertainment Player... -
Page 145: Überprüfen Des Mitgelieferten Zubehörs
Bitte lesen Sie diese Bedienungsanleitung zuerst. – MEP-7000 DJS-Steuerungsanleitung (PDF-Datei auf der mitgelieferten CD-ROM) Dies ist die grundlegende Bedienunganleitung bei gemeinsamem Gebrauch der DJS-Software mit dem MEP-7000. – DJS-Benutzerhandbuch (PDF-Datei auf der mitgelieferten CD-ROM) Dieses Handbuch enthält ausführliche Erläuterungen der Funktionen und Bedienung der DJS-Software. -
Page 146: Hinweise Zu Den Abspielbaren Discs Und Dateien
HINWEISE ZU DEN ABSPIELBAREN DISCS UND DATEIEN HINWEISE ZU DEN ABSPIELBAREN DISCS UND DATEIEN MIT DIESEM GERÄT ABSPIELBARE DISC-TYPEN • Discs, die mit diesem Gerät abgespielt werden können, sind mit einem der folgenden Logos auf ihrem Etikett oder ihrer Verpackung gekennzeichnet: Abspielbare Disc-Typen und ihre Logos CD-TEXT CD-R... -
Page 147: Hinweise Zum Abspielen Von Mp3/Aac-Discs
ACHTUNG Bei Verwendung von bestimmten USB-Speichergeräten ist u.U. keine einwandfreie Wiedergabe mit diesem Gerät möglich. Pioneer übernimmt keinerlei Haftung für Datenverluste, die auf den Anschluss eines bestimmten USB- Gerätes an dieses Gerät zurückzuführen sind. • Wenn ein USB-Speichergerät über einen USB-Verteiler an dieses Gerät angeschlossen wird, ist u.U. kein einwandfreier Betrieb möglich. -
Page 148: Hinweise Zu Mp3-Dateien
AAC-Daten weisen je nach der zur Erstellung der Datendatei verwendeten Anwendung unterschiedliche Dateiformate und Dateierweiterungen auf. ® Der MEP-7000 ist zum Abspielen von iTunes -codierten AAC-Dateien mit der Erweiterung „.m4a“ sowie von Dateien mit den Erweiterungen „.aac“ und „.mp4“ im Stande. Kopiergeschützte Dateien, wie sie beispielsweise vom iTunes Music Store vertrieben werden, können nicht abgespielt werden. -
Page 149: Hinweise Zu Wav-Dateien
HINWEISE ZU DEN ABSPIELBAREN DISCS UND DATEIEN HINWEISE ZU WAV-DATEIEN Dieses Gerät unterstützt WAV-Dateien der folgenden Formate: Unterstützte Formate Unterstützung von nichtkomprimierten 16-Bit-PCM-Daten mit einer Abtastfrequenz von 44,1 kHz Titeldaten Unterstützung von LST Chunk Anzeige von Titel-, Album- und Interpretennamen *1 Dateierweiterungen .wav *1 Um Zeichen eines anderen Lokalcodes als Unicode anzeigen zu können, muss die UTILITY-Funktion zur Einstellung der... -
Page 150: Hinweise Zur Aufstellung
CD-Spieler erhältlich; bei ihrem Gebrauch ist jedoch Sorgfalt geboten, da die Linse dabei beschädigt werden kann. Einbau des MEP-7000 in ein EIA-Gestell Die Schraubenbohrungen an der Frontplatte des MEP-7000 Reinigen der Jogscheibe dienen zur Befestigung des Gerätes an einem 19-Zoll EIA-Gestell. -
Page 151: Anschlüsse
Verbinden Sie den weißen Stecker des mitgelieferten Audiokabels jeweils mit der Buchse des linken (L) Kanals, und den roten Stecker jeweils mit der Buchse des rechten (R) Kanals. Nach Anschluss des mitgelieferten Steuerkabels kann dieses Gerät über ein Pioneer DJ-Mischpult gesteuert werden, um Fader-Startwiedergabe und Cue-Rücklauf zu ermöglichen (außer bei Relaiswiedergabe). - Page 152 ANSCHLÜSSE 3. Anschließen an einen externen Monitor (Cinchbuchse) Stellen Sie diesen Anschluss her, wenn das Bild des zentralen Displays an einen großen Bildschirm ausgegeben werden soll, oder wenn eine Karaoke-CD-G abgespielt wird. Nach Anschluss dieses Gerätes an einen externen Monitor müssen die Einstellungen des Gerätes geändert werden (siehe den Absatz „MONITORAUSGANG“...
-
Page 153: Manipulatortyp-Anschlüsse
ANSCHLÜSSE 5. Anschließen eines Personalcomputers Stellen Sie diesen Anschluss her, um die mitgelieferte DJS-Software oder ein anderes DJ-Softwareprogramm zu verwenden. Antriebseinheit mitgeliefertes Stellen Sie diesen Anschluss erst nach Installation des USB-Kabel erforderlichen Treibers auf dem Personalcomputer her. Personalcomputer Siehe „HINWEISE ZUM TREIBERPROGRAMM“ (S. 50). HINWEIS •... -
Page 154: Lage Und Funktion Der Teile
LAGE UND FUNKTION DER TEILE LAGE UND FUNKTION DER TEILE FRONTPLATTE Antriebseinheit EJECT EJECT MEP-7000 MULTI ENTERTAINMENT PLAYER POWER DISC DISC STOP REAR STOP Notauswurfloch (S. 22) USB1 STOP-Taste und -Anzeige Drücken Sie diese Taste, bevor Sie ein USB-Speichergerät von Disc-Ladeschlitz (S. - Page 155 LAGE UND FUNKTION DER TEILE Zeit-Modus-/Cue-Automatik-Taste (TIME/A.CUE) 17 Funktionstasten (F1 bis F6, von links nach rechts) Mit Hilfe des im zentralen Display angezeigten Menüs kann TIME: zwischen den diesen sechs Tasten zugeordneten Funktionen Bei jeder Betätigung dieser Taste wird die Zeitanzeige des umgeschaltet werden.
- Page 156 LAGE UND FUNKTION DER TEILE Zentrales Display Display A/Display B Titelnummern-Anzeigefeld Hier wird die Nummer des momentan abgespielten Titels angezeigt. Tempo-Regelbereichsanzeigen (±6, ±10, ±16, WIDE) Hier wird der momentan für den TEMPO-Gleitbahnregler gewählte Regelbereich angezeigt. Hauptmenübildschirm TEMPO-Änderungsfaktor-Anzeigefeld (%) Mit den Tasten BROWSE, MIX, EFFECT und UTILITY wird Hier wird das aktuelle Ausmaß...
-
Page 157: Rückwand
Verbinden Sie diesen Netzeingang über das mitgelieferte Wenn dieses Gerät über das mitgelieferte Steuerkabel mit Netzkabel mit einer Netzsteckdose. einem Pioneer DJ-Mischpult verbunden wird, kann das DJ- Mischpult zur Steuerung der Funktionen Fader- PC-Buchse: USB-Buchse (Typ B) Startwiedergabe und Cue-Rücklauf an diesem Gerät Verbinden Sie diese Buchse über das mitgelieferte USB-Kabel... -
Page 158: Handhabung Von Discs Und Anderen Datenträgern
HANDHABUNG VON DISCS UND ANDEREN DATENTRÄGERN HANDHABUNG VON DISCS UND ANDEREN DATENTRÄGERN LADEN UND ENTFERNEN VON DISCS NOTAUSWURF EINER DISC Wenn sich eine Disc durch Betätigen der EJECT-Taste () nicht auswerfen lässt, führen Sie den mitgelieferten Notauswurfstift in das Notauswurfloch an der Frontplatte der Antriebseinheit ein, um die Disc aus dem Gerät zu entfernen. -
Page 159: Schreiben Von Verwaltungsdaten Auf Ein Usb-Speichergerät
Prüfen Sie nach, dass die Anzeige der USB-Buchse rot erstellt. Drei verschiedene Typen von Verwaltungsdaten werden leuchtet. erstellt und in dem verdeckten Ordner „PIONEER“ (im HFS+- Vergewissern Sie sich, dass die Anzeige der verwendeten Format wird „.PIONEER“ als Ordnername verwendet) abgelegt. - Page 160 2 Sekunden lang gedrückt. Speichergeräten ist u.U. keine einwandfreie Vergewissern Sie sich, dass die Anzeige erloschen ist. Wiedergabe mit diesem Gerät möglich. Pioneer Vergewissern Sie sich, dass die rote Anzeige der verwendeten übernimmt keinerlei Haftung für Datenverluste, die USB-Buchse an der Frontplatte von Blinken in den auf den Anschluss eines bestimmten USB-Gerätes an...
-
Page 161: Starten Der Wiedergabe (Bei Verwendung Der Normalen Anschlüsse)
STARTEN DER WIEDERGABE (bei Verwendung der normalen Anschlüsse) Beim MEP-7000 können Sie Titel auf dem zentralen Display von bis zu sechs verschiedenen Programmquellen auswählen: zwei Discs, zwei USB-Speichergeräten, einem Personalcomputer (DJ-Software) sowie Playlists. Die zur Wahl der verschiedenen Programmquellen verwendeten Tasten werden in der nachstehenden Abbildung gezeigt. -
Page 162: Dateien Suchen Und Archiv Durchsuchen
STARTEN DER WIEDERGABE (bei Verwendung der normalen Anschlüsse) Suchsymbole Archiv durchsuchen Diese Symbole kennzeichnen den Typ des momentan im Suchfenster Der nachstehend abgebildete Menübildschirm ermöglicht die angezeigten Postens. Wahl von Titeln nach Genre, Interpretenname, Albumname oder Titelname. Titel Track (mit gespeichertem Cue-Punkt) Titel (wird momentan mit Steuergerät A abgespielt) -
Page 163: Wahl Eines Titels
STARTEN DER WIEDERGABE (bei Verwendung der normalen Anschlüsse) Titelmenü WAHL EINES TITELS Wenn ein Titel gewählt ist und das Wahlrad gedrückt wird, erscheint das Titelmenü im Inhaltsanzeigebereich, und das Drücken Sie die BROWSE-Taste. Wahlrad kann zur Ausführung der in der nachstehenden Tabelle Daraufhin erscheint der BROWSE-Bildschirm. -
Page 164: M3U-Dateien
STARTEN DER WIEDERGABE (bei Verwendung der normalen Anschlüsse) M3U-DATEIEN Der MEP-7000 unterstützt die Wiedergabe von Dateien im M3U- Format. Dateien mit der Erweiterung „.m3u“ werden wie Ordner behandelt; nach Auswahl mit dem Cursor erscheinen die registrierten Titel in Form einer Playlist im Inhaltsanzeigebereich. -
Page 165: Suchen Nach Titeln Durch Eingabe Eines Schlüsselbegriffs
STARTEN DER WIEDERGABE (bei Verwendung der normalen Anschlüsse) SUCHEN NACH TITELN DURCH EINGABE EINES SCHLÜSSELBEGRIFFS ZUR BEACHTUNG • Bis zu 3 000 Titel können gefunden werden. SIE können nach Titeln suchen, indem Sie den Titelnamen oder • Um den Suchvorgang vorzeitig abzubrechen, drücken Sie die den Interpretennamen eingeben. -
Page 166: Titelwahl Über Eine Usb-Tastatur
STARTEN DER WIEDERGABE (bei Verwendung der normalen Anschlüsse) Schlüsselbegriff-Suche nach Titel- und TITELWAHL ÜBER EINE USB-TASTATUR Interpretennamen Nach Anschluss einer USB-Tastatur kann die Titelwahl anhand Betätigen Sie die TABULATORTASTE zur Wahl des BROWSE- der Eingabe des ersten Zeichens eines gewünschten Titel- oder Bildschirms. - Page 167 STARTEN DER WIEDERGABE (bei Verwendung der normalen Anschlüsse) Cursor aufwärts Cursor aufwärts Cursor abwärts Cursor abwärts Bewegen des Cursors auf die nächsttiefere Ebene [Zeicheneingabemodus] Erneute Eingabe des zuletzt eingegebenen Zeichens und Bewegen des Cursors auf die nächste Eingabeposition ...
-
Page 168: Verwendung Einer Playlist
STARTEN DER WIEDERGABE (bei Verwendung der normalen Anschlüsse) Wenn das ursprüngliche Speichergerät des Titels (USB-Speicher, VERWENDUNG EINER PLAYLIST CD-ROM/DVD-ROM usw.) momentan nicht angeschlossen ist, erscheint der Titelname in grauer Darstellung auf dem Bildschirm. Dieses Gerät erlaubt es dem Benutzer, gewünschte Titel im Voraus in einer Playlist zu registrieren, um selbst bei Verwendung von Discs und USB-Speichergeräten mit einer hohen Speicherkapazität eine rasche Titelwahl zu ermöglichen. - Page 169 STARTEN DER WIEDERGABE (bei Verwendung der normalen Anschlüsse) Ändern der Titelfolge einer Playlist Bearbeiten des Namens einer Playlist Wählen Sie den Titel, der innerhalb der Playlist verschoben Wählen Sie die Playlist, deren Name bearbeitet werden soll. werden soll. Halten Sie das Wahlrad mindestens 1 Sekunde lang Drücken Sie das Wahlrad.
-
Page 170: Grundlegende Bedienung Der Steuergeräte
GRUNDLEGENDE BEDIENUNG DER STEUERGERÄTE GRUNDLEGENDE BEDIENUNG DER STEUERGERÄTE Wenn das zentrale Display zur Wahl eines Titels verwendet und dann die LOAD A-Taste gedrückt wird, um den Titel zu laden, werden die weiteren Wiedergabeverfahren an Steuergerät A ausgeführt (wird stattdessen die LOAD B-Taste gedrückt, so wird der Titel in Steuergerät B geladen). -
Page 171: Suchlauf Vorwärts/Rückwärts
GRUNDLEGENDE BEDIENUNG DER STEUERGERÄTE SUCHLAUF VORWÄRTS/RÜCKWÄRTS UMSCHALTEN DES JOG-MODUS Drücken Sie die Taste SCRATCH oder JOG BREAK. Gebrauch der SEARCH-Tasten (, ) Daraufhin wird der Jog-Modus SCRATCH oder JOG BREAK Drücken Sie während der Wiedergabe eine der SEARCH- aktiviert. Wenn die Taste, deren LED-Anzeige momentan Tasten (, ). -
Page 172: Ändern Der Wiedergabegeschwindigkeit
GRUNDLEGENDE BEDIENUNG DER STEUERGERÄTE Manuelles Festlegen des Cue-Punktes ÄNDERN DER Drücken Sie während der Wiedergabe die Wiedergabe-/ WIEDERGABEGESCHWINDIGKEIT Pausentaste () in der Nähe der Stelle, an der ein Cue- Punkt festgelegt werden soll, um die Wiedergabe zu Tempoeinstellung pausieren. -
Page 173: Cue-Automatik-Funktion
GRUNDLEGENDE BEDIENUNG DER STEUERGERÄTE CUE-AUTOMATIK-FUNKTION Wenn ein Titel ursprünglich geladen oder ein Titelsprung ausgeführt wird, legt diese Funktion den Cue-Punkt automatisch an einer Position unmittelbar vor der Stelle fest, an der der Ton des Titels einsetzt, wonach das Gerät an der betreffenden Position auf Cue-Bereitschaft schaltet. -
Page 174: Weiterführende Funktionen
WEITERFÜHRENDE FUNKTIONEN WEITERFÜHRENDE FUNKTIONEN SCHLEIFENWIEDERGABE CUE-PUNKT/SCHLEIFENPUNKT-SPEICHER Bei diesem Gerät können Cue-Punkte und Schleifenpunkte Erstellen einer Schleife abgespeichert und später nach Bedarf abgerufen werden. Wenn Drücken Sie die Wiedergabe/Pausentaste (), um die sich die Titel, für die Cue-Punkte/Schleifenpunkte festgelegt Wiedergabe zu starten. wurden, auf Discs befinden, werden die Cue-Punkte/ Schleifenpunkte im internen Speicher des Gerätes abgespeichert;... -
Page 175: Scratch-Wiedergabe
WEITERFÜHRENDE FUNKTIONEN Löschen eines Cue-Punktes oder einer Schleife aus dem EFFECT-BILDSCHIRM Speicher Nach Drücken der EFFECT-Taste erscheint der EFFECT-Bildschirm Drücken Sie die CUE/LOOP CALL-Taste. auf dem zentralen Display, der die Ausführung der Scratch- und Wenn Sie die CUE/LOOP CALL-Taste drücken, wird der Jog Break-Wiedergabe anhand von grafischen Anzeigen gespeicherte Cue-Punkt bzw. - Page 176 WEITERFÜHRENDE FUNKTIONEN Hinweis zum SCRATCH-Effekt Hinweis zum TRANS-Effekt Weitere Informationen hierzu finden Sie im Abschnitt „SCRATCH- Dieser Effekt ähnelt einer vorübergehenden Stummschaltung des WIEDERGABE“. Tons mit dem Kreuz-Faderhebel eines Mischpults. Synchron mit dem Effekt blinkt das rotierende Kugelsymbol auf dem Bildschirm. ZUR BEACHTUNG Hinweis zum BUBBLE-Effekt •...
- Page 177 WEITERFÜHRENDE FUNKTIONEN [2] JOG BREAK-Effekt Hinweise zum ROLL-Effekt Die Tonhöhe und Wiedergabezeit werden entsprechend der Wenn der Jog-Modus auf [JOG BREAK] eingestellt ist, wechselt Jogscheiben-Drehung geändert, und dieser Effekt wird dem die Steuergerät-Hälfte des Bildschirms auf die Anzeige des JOG Wiedergabeton hinzugefügt.
-
Page 178: Mix-Bildschirm
WEITERFÜHRENDE FUNKTIONEN Hinweise zum WAH-Effekt MIX-BILDSCHIRM Bei diesem Effekt wird ein Filter eingesetzt, dessen Grenzfrequenz sich entsprechend der Jogscheiben-Drehung ändert. Nach Drücken der MIX-Taste erscheint der MIX-Bildschirm auf Synchron mit dem Effekt erscheint eine WAH-Animation auf dem dem zentralen Display, der ein bequemes Mischen und Abspielen Bildschirm (die Linie verschiebt sich in Rechts-Links-Richtung von Titeln gestattet. - Page 179 WEITERFÜHRENDE FUNKTIONEN BPM SYNC Sofortumschaltungs-Funktion Die Sofortumschaltungs-Funktion ermöglicht eine sofortige Diese Funktionstaste dient zum Ein- und Ausschalten Umschaltung vom laufenden Titel auf einen anderen Titel zu der BPM SYNC-Funktion. jedem gewünschten Zeitpunkt. Bei eingeschalteter BPM SYNC-Funktion wird das Tempo des nächsten Titels automatisch dem BPM-Wert des laufenden Bereiten Sie während der Wiedergabe eines Titels den Titels angeglichen.
-
Page 180: Hinweise Zur Fader-Startwiedergabe
Titel in der Playlist registriert wurden, Wenn die CONTROL-Buchse dieses Gerätes über das mitgelieferte und Titel abwechselnd mit Steuergerät A und B abgespielt Steuerkabel mit der CONTROL-Buchse eines Pioneer DJ- werden. Mischpults verbunden worden ist und der Kanal-Faderhebel des Drücken Sie die MIX-Taste. -
Page 181: Hinweise Zur Djs-Software
Personalcomputer gestattet. Installieren Sie das Programm von der mitgelieferten CD-ROM auf dem Computer. ZUR BEACHTUNG • DJS ist nicht mit Funktionen zur Aufzeichnung der DJ-Wiedergabe ausgestattet. 2.3 Eigentum. Pioneer oder sein Lizenzgeber behält sich alle SOFTWARE-LIZENZVEREINBARUNG Rechte, Titel und Anteile am gesamten Patent, das Urheberrecht, Warenzeichen, Geschäftsgeheimnis und... -
Page 182: Warnhinweise Zum Urheberrechtsschutz
Verschlüsselungsdaten in Aufzeichnungen auf Datenträgern Schadensersatzforderung vorhersehbar ist. Unter keinen erkannt werden. Umständen wird die Haftbarkeit von Pioneer für alle Urheberrechtlich geschütztes Tonmaterial darf ausschließlich Schadensersatzforderungen den Betrag überschreiten, für den Privatgebrauch aufgezeichnet werden; Verwendung zu den Sie Pioneer oder seinen Tochtergesellschaften für... -
Page 183: Systemanforderungen (Mindestanforderungen An Die Betriebsumgebung)
Web Browser mit Unterstützung von 128-Bit SSL Installationsverfahren • Wenn dieses Gerät (MEP-7000) an einen Personalcomputer Wenn die mitgelieferte CD-ROM-Installations-Disc in das angeschlossen ist und in Verbindung mit der DJS-Software betrieben wird, muss der Personalcomputer über eine USB- DVD/CD-Laufwerk des Personalcomputers eingelegt wird, Buchse gemäß... -
Page 184: Hinweise Zur Probefrist Und Benutzer-Registrierung
Karte“ eintragen und diese an Pioneer einsenden. Nach Erhalt der ausgefüllten „Benutzerregistrierungs-Karte“ schickt Pioneer ZUR BEACHTUNG dem Kunden den zur Freigabe der Software nach Ablauf der • Bei Verwendung dieses Gerätes (MEP-7000) in Verbindung mit Probefrist erforderlichen „Registrierungs-ID“ dem DJS-Softwareprogramm muss der Software-Treiber auf (Installationsschlüssel). Detaillierte Anweisungen zur... -
Page 185: Hinweise Zur Online-Unterstützung
HINWEISE ZUR ONLINE-UNTERSTÜTZUNG AUSSCHLUSSKLAUSEL Bitte lesen Sie das auf der mitgelieferten CD-ROM enthaltene DJS- Im Falle eines Verlusts ist Pioneer nicht dazu verpflichtet, dem Benutzerhandbuch sowie den FAQ-Teil (Häufig gestellte Fragen) Kunden erneut einen Lizenzschlüssel oder Registrierungs-ID auf der DJS-Unterstützungs-Website, bevor Sie sich direkt mit auszustellen. -
Page 186: Hinweise Zum Treiberprogramm
[Arbeitsplatz (oder Computer)], greifen Sie auf die CD-ROM zu, und doppelklicken Sie auf den Ordner [MEP- 7000]. INSTALLATION DES TREIBERS Nach Öffnen des Ordners [MEP-7000] doppelklicken Sie auf das Treiber-Installationsprogramm [MEP-7000[SEP- Vor der Installation (WICHTIG) C1]_#.###.exe]. • Bitte lesen Sie vor der Installation dieses Treibers unbedingt die (Die Treiberversion wird durch #.### vertreten.) - Page 187 HINWEISE ZUM TREIBERPROGRAMM Anschließen dieses Gerätes an den Computer Folgen Sie den Anweisungen, die auf dem Bildschirm erscheinen. Verbinden Sie die Antriebseinheit über das mitgelieferte • Falls der Bildschirm [Windows-Sicherheit] während der Spezial-Fernsteuerungskabel mit der Steuereinheit. Installation erscheint, klicken Sie auf [Diese Treibersoftware trotzdem installieren], um den Installationsvorgang fortzusetzen.
- Page 188 Neueste Treiberversion Informationen zur jeweils neuesten Treiberversion finden Sie auf Einstellen der Puffergröße der folgenden Website: Die Antriebseinheit des MEP-7000 ist als eine Audiogerät http://www.prodjnet.com/support/ ausgelegt, das ASIO-Spezifikationen (Audio Stream Input Output) entspricht. Vor Einsatz dieses Gerätes zur Steuerung der DJS- Um die Puffergröße des Gerätes einzustellen, klicken Sie auf die...
-
Page 189: Verwendung Von Dj-Software
Dieser Player kann über die zwei nachstehend beschriebenen Anschlussmethoden an einen Personalcomputer angeschlossen werden. Normaltyp Die Konfiguration, bei der die Steuereinheit und die Antriebseinheit des MEP-7000 gemeinsam betrieben werden, wird als „Normaltyp“ bezeichnet. Für Normaltyp-Wiedergabe unter Einsatz eines DJ-Softwareprogramms wird die Antriebseinheit des MEP-7000 über ein USB- Kabel mit einem Personalcomputer verbunden. -
Page 190: Vorbereiten Des Dj-Softwareprogramms
VERWENDUNG VON DJ-SOFTWARE VORBEREITEN DES DJ-SOFTWAREPROGRAMMS Vor der Inbetriebnahme eines DJ-Softwareprogramms müssen Sie den Personalcomputer und die DJ-Software wie nachstehend beschrieben vorbereiten. Schließen Sie den MEP-7000 auf keinen Fall an den Computer an, bevor Sie die Treibersoftware installiert haben! DJ-Software mit Spezial-Kommunikati... - Page 191 Zeitdaten und der Name des laufenden Titels zusammen mit dem Interpretennamen auf dem zentralen Display des MEP- 7000 und Displays A/B angezeigt. • Wenn der MEP-7000 in der DJ-Software als Audio- Für DJS: Ausgabegerät vorgegeben wird, können die mit der DJ- Der DJS BROWSE-Bildschirm erscheint auf dem zentralen Software wiedergegebenen Titel über die Antriebseinheit...
-
Page 192: Midi-Steuerung Des Computers
Symbol [PC] des BROWSE- Bildschirms auf aktive Anzeige. Starten Sie das DJ-Softwareprogramm. Das Symbol ändert sich nicht. Geben Sie den MEP-7000 in der DJ-Software als Audio- Ausgabegerät vor. Beim Normaltyp ermöglicht die Vorgabe des MEP-7000 als Audio-Ausgabegerät eine Ausgabe der von der DJ-Software ZUR BEACHTUNG abgespielten Titel. - Page 193 Steuergerät A und dem zentralen Display zugewiesen, und Kanal 2 ist Steuergerät B zugewiesen). ZUR BEACHTUNG • Wenn der MEP-7000 in der DJ-Software als Audio- Ausgabegerät vorgegeben wird, können die mit der DJ- Software wiedergegebenen Titel über die Antriebseinheit ausgegeben werden.
-
Page 194: Midi-Meldungstabelle
VERWENDUNG VON DJ-SOFTWARE MIDI-MELDUNGSTABELLE Meldung Schnitt- Schnittstellenbezeichnung Bemerkungen stellentyp JOG DIAL Allzweck- Lineare Werte entsprechend den Geschwindigkeiten von Controller Stopp bis 4x, 64 bei Stopp; Vorwärtsrichtung: 65 (0,06x) bis 127 (x4); Rückwärtsrichtung: 63 (0,06x) bis 0 (4x). TEMPO ADJUST SLIDER 0 bis 127 0 auf Seite „–“, 127 auf Seite „+“... - Page 195 VERWENDUNG VON DJ-SOFTWARE Meldung Schnitt- Schnittstellenbezeichnung Bemerkungen stellentyp ROTARY SELECTOR DIAL Allzweck- 98 bis 127, 1 bis 30 (±1 bis ±30), überträgt die Controller Zählstanddifferenz gegenüber dem vorigen Mal. Wenn der Wert ±30 oder mehr beträgt, wird ±30 verwendet. SELECT DOWN (>) Schalter Aus = 0, Ein = 127 SELECT UP (<)
-
Page 196: Karaoke-Wiedergabe Mit Cd-G-Discs
KARAOKE-WIEDERGABE MIT CD-G-DISCS KARAOKE-WIEDERGABE MIT CD-G-DISCS Der MEP-7000 kann CD-G-Discs abspielen und das Bild für Karaoke-Wiedergabe an einen externen Monitor (MONITOR OUT) ausgeben. WAHL DES CD-G-WIEDERGABEMODUS ZUR BEACHTUNG • Das CD-G-Wiedergabebild des Steuergerätes, dessen LOAD- Zum Abspielen einer CD-G-Disc muss zunächst der CD-G- Taste leuchtet, erscheint auf dem Display. -
Page 197: Gebrauch Des Utility-Bildschirms
GEBRAUCH DES UTILITY-BILDSCHIRMS GEBRAUCH DES UTILITY-BILDSCHIRMS Nach Drücken der UTILITY-Taste erscheint der UTILITY-Bildschirm, auf dem verschiedene Geräteparameter eingestellt, Archive erstellt und Benutzerdaten gesichert werden können. Funktionstasten UTILITY Wahlrad Taste Ebene abwärts ( ) EINSTELLUNGEN [1] DISPLAY Hier können Einstellungen für Helligkeit, externe Ausgabe usw. vorgenommen werden. - Page 198 Dieser Posten dient zur suchen verwendet, ohne Anzeige der Version des Archive zu verwenden. MEP-7000. *3 Die LADESPERRE-Funktion ist gesperrt, wenn ein Titel mit ZUR BEACHTUNG einer anderen DJ-Software als DJS eingestellt wird. • Die Einstellung des Suchtyps gilt für jedes USB-Speichergerät, *4 Siehe „SICHERN VON BENUTZERDATEN“...
-
Page 199: Erstellen Von Archiven
Informationen über Playlists und Cue-Punkte/Schleifenpunkte von Discs können auf ein USB-Speichergerät kopiert werden, um bei Wählen Sie [BROWSE] auf dem UTILITY-Bildschirm, und Bedarf eine Übertragung dieser Daten an einen zweiten MEP-7000 wählen Sie dann [ARCHIV (USB1)] oder [ARCHIV (USB2)] dem zu ermöglichen. -
Page 200: Ausführen Einer Rückstellung
GEBRAUCH DES UTILITY-BILDSCHIRMS Auslesen von Daten von einem USB-Speichergerät Drücken Sie die UTILITY-Taste. Drücken Sie die Funktionstaste [GENERAL]. Drehen Sie das Wahlrad zur Wahl von [SICHERUNGSMODUS], und drücken Sie dann die Taste Ebene abwärts () oder das Wahlrad. Drehen Sie das Wahlrad zur Wahl von [Von USB auslesen], und drücken Sie dann das Wahlrad. -
Page 201: Störungsbeseitigung
Störungsursache auch bei einem anderen Gerät liegen kann, sollten Sie alle anderen gleichzeitig betriebenen elektronischen Geräte ebenfalls überprüfen. Falls sich eine Störung anhand der in der nachstehenden Tabelle angegebenen Abhilfemaßnahmen nicht beseitigen lässt, wenden Sie sich bitte an eine Pioneer-Kundendienststelle oder Ihren Fachhändler. Störung Mögliche Ursache Abhilfemaßnahme... - Page 202 STÖRUNGSBESEITIGUNG Störung Mögliche Ursache Abhilfemaßnahme MP3- oder AAC-Dateien • Das Format wird nicht von diesem Gerät • Einzelheiten zu den unterstützten Formaten können nicht abgespielt unterstützt. finden Sie im Abschnitt „HINWEISE ZU DEN werden. ABSPIELBAREN DISCS UND DATEIEN“ auf S. 10. •...
- Page 203 Das Versionsinformations-Dienstprogramm 7000 nicht erkannt. Neuinstallation aus. zeigt die Firmware-Version nur dann an, wenn der MEP-7000 einwandfrei an den Personalcomputer angeschlossen ist und mit diesem kommuniziert. Um die Version zu überprüfen, schlagen Sie auf S. 52 dieser Anleitung nach („HINWEISE ZUM TREIBERPROGRAMM, ...
-
Page 204: Hinweise Zum Lcd-Bildschirm
• Aufgrund von statischer Elektrizität oder einer anderen extern verursachten Störeinstreuung kann es vorkommen, dass eine Funktionsstörung beim Betrieb des MEP-7000 auftritt. Schalten Sie den MEP-7000 in einem solchen Fall aus, warten Sie, bis die momentan geladene Disc zum Stillstand gekommen ist, schalten Sie das Gerät dann wieder ein, und überprüfen Sie, ob die Störung dadurch beseitigt worden ist. -
Page 205: Angezeigte Fehlermeldungen
Fehlercodes unter Bezugnahme auf die nachstehende Tabelle, und ergreifen Sie die jeweils empfohlene Abhilfemaßnahme. Falls ein in der Tabelle nicht aufgeführter Fehlercode angezeigt wird oder der gleiche Fehlercode trotz Abhilfemaßnahme weiterhin im Display erscheint, wenden Sie sich bitte an eine Pioneer-Kundendienststelle oder an Ihren Fachhändler.. Fehlercode Fehlertyp Datenträger... -
Page 206: Einschränkungen Beim Gebrauch Der Software
STÖRUNGSBESEITIGUNG EINSCHRÄNKUNGEN BEIM GEBRAUCH DER SOFTWARE Discs müssen unter Verwendung des ISO 9660-Dateisystems bespielt worden sein. Bei Aufzeichnung im UDF-Dateisystem muss das ISO 9660-Dateisystem gleichzeitig aufgezeichnet werden, da die Disc anderenfalls nicht abgespielt werden kann. (Einzelheiten hierzu sind vom Hersteller der jeweils zur Aufzeichnung verwendeten Software erhältlich). -
Page 207: Ausschlussklausel
[Unbekannt] angezeigt. AUSSCHLUSSKLAUSEL • Bei „Pioneer“ und „DJS“ handelt es sich Marken bzw. eingetragene Marken der Pioneer Corporation. • Bei „Microsoft“ und „Windows“ handelt es sich um eingetragene Marken der Microsoft Corporation in den Vereinigten Staaten und anderen Ländern. Die offizielle Bezeichnung von Windows ist „Microsoft Windows Operating System“. - Page 208 178-184 Boundary Road, Braeside, Victoria 3195, Australia TEL: +61-3-9586-6300 PIONEER ELECTRONICS ASIACENTRE PTE. LTD. 253 Alexandra Road, #04-01, Singapore 159936 TEL: +65-6472-1111 PIONEER ELECTRONICS DE MEXICO S.A. DE C.V. Blvd.Manuel Avila Camacho 138 10 piso Col.Lomas de Chapultepec, Mexico, D.F. C.P. 11000 TEL: 52-55-9178-4270 Printed in / Imprimé...
Need help?
Do you have a question about the MEP-7000 and is the answer not in the manual?
Questions and answers