Table of Contents
Advertisement
Please enjoy your new spa, but think safety first. Read your Owner's Manual
in its entirety before installing your spa and encourage all spa users to do
the same. More than just common sense, this Owner's Manual provides
vital safety and operational information.
We sincerely hope your spa life is a pleasant experience. If problems should
arise, contact your authorized dealer. Or contact Marquis Corp. at any of the
following:
Email: service@marquiscorp.com
Web: www.marquisspas.com
Marquis Corp.
596 Hoffman Road
Independence, OR 97351
serial number location
You will find the serial number on the silver tag in the equipment area.
Please Fill out anD KeeP For Future reFerence
Name of Purchaser____________________________________________________
Date of Purchase __________________________________________________
Address ______________________________________________________________
City ____________________________________State _____Zip Code ______________
Signature ___________________________________________________________
Telephone _________________________________________________________
Spa Model/Color ____________________________________________________
Spa Serial # _______________________________________________________
Pack Serial # _______________________________________________________
Dealer's Name ______________________________________________________
Dealer's Address __________________________________________________
City ___________________________________State______Zip Code______________
Telephone ___________________________________________________________
Every effort has been made to ensure the accuracy of this manual. How-
ever, Marquis Corp. reserves the right to improve its product without notice.
This could create a minor variation between this manual and the actual
product you receive. We apologize for any inconvenience this may cause.
1
owner's manual
Advertisement
Table of Contents

Subscribe to Our Youtube Channel
Related Manuals for Marquis 660


Summary of Contents for Marquis 660
- Page 1 More than just common sense, this Owner’s Manual provides vital safety and operational information. We sincerely hope your spa life is a pleasant experience. If problems should arise, contact your authorized dealer. Or contact Marquis Corp. at any of the following: Email: service@marquiscorp.com Web: www.marquisspas.com...
-
Page 2: Table Of Contents
425....................... 21-22 322 ......................23-24 sPa control oPeration All Models....................25-30 Audio Systems................... 30-31 eQuiPment DiaGram 660 and 545....................32 530 and 435....................33 435 2-pump and 425................34 322....................... 35 troublesHootinG ................36 LCD Diagnostic Messages ..............36-37 maintenance ..................38-43 WarrantY.................... -
Page 3: Safety
safety instructions The following instructions contain important safety information. We strong- ly encourage you to read and apply them. imPortant saFetY instructions WHEN INSTALLING AND USING THIS ELECTRICAL EQUIPMENT, BASIC SAFETY PRECAUTIONS SHOULD ALWAYS BE FOLLOWED, INCLUDING THE FOLLOWING: reaD anD FolloW all instructions 2. -
Page 4: All Spa Models
safety instructions equipment. In addition, a bonding terminal (pressure wire connector) is provided on the outside of the control box for bonding to local ground points. To reduce the risk of electric shock, this connector should be bonded with a No. 8 AWG (8.42mm ) (No. -
Page 5: Save These Instructions
safety instructions created by the pump. Should the need arise to replace the suction guard(s) or the pump, be sure that the flow rates are compatible. DanGer: Children are especially sensitive to hot water. At no time should children have unsupervised access to the spa. Children must not be allowed to climb onto the spa cover. - Page 6 safety instructions saFetY instructions For FrencH sPeaKinG sPa oWners aVertissement: Ne pas placer d’appareil électrique (luminaire, télé- phone, radio, téléviseur, etc.) moins de 1.52 m de cette cuve de relaxation. aVertissement: Ne pas laisser les enfants utiliser une cuve de relaxation sans surveillance.
-
Page 7: Safety
safety instructions Personal saFetY Prolonged immersion in hot water can result in HYPertHermia, a dan- gerous condition which occurs when the internal temperature of the body reaches a level above normal (98.6°F, 37°C). The symptoms of hypertherm- ia include dizziness, fainting, drowsiness, lethargy, and a body temperature above 98.6°F (37°C). The physical effects of hyperthermia include unaware- ness of impending hazard, failure to perceive heat, failure to recognize the need to exit the spa, physical inability to exit the spa, fetal damage in preg- nant women, and unconsciousness resulting in a danger of drowning. -
Page 8: Installation Instructions
installation instructions location For your portable spa to function properly and safely, it must be located on a hard, flat, level surface. Inground spas require special installation tech- niques and should be planned in conjunction with your spa dealer. Improper installation can result in structural damage to the spa and the voiding of your spa warranty. -
Page 9: Filter Cartridge
installation instructions Lay a straight piece of lumber across the frame and level any high spots in the gravel by pushing the straight lumber across the frame. Fill in any low areas with more gravel and re-level using the straight piece of lumber. Compact the gravel to make the surface is hard and flat. -
Page 10: Electrical Requirements
installation instructions electrical reQuirements It is the responsibility of the spa owner to ensure that all electrical connec- tions are made by a qualified electrician in accordance with all national, state, and local electrical codes in effect at the time of installation. 240 Volt All connections must be made in accordance with the wiring diagram found on the inside of the control box cover. - Page 11 installation instructions • Rated 120V, 60Hz, 15A (2 wires plus ground) • Circuit breaker or fuse size: 15A • The receptacle must be at least 5 feet (1.52 m) from the spa. • The 15 foot GFCI power cord provided with the spa must be plugged directly into the receptacle. Do NOT use an extension cord or any other adaptor. Actual exposed length of cord will vary by model, but will never be less than 12 feet. convert 120 Volt to 240 Volt 120 Volt spas may be converted to operate on 240V, 50A.
-
Page 12: Starting Your Spa
When the spa is not in use, the spa cover should be kept on the spa. Your Marquis spa must be equipped with a Marquis energy cover to receive full acrylic shell warranty. Other covers may not provide adequate protec- tion. -
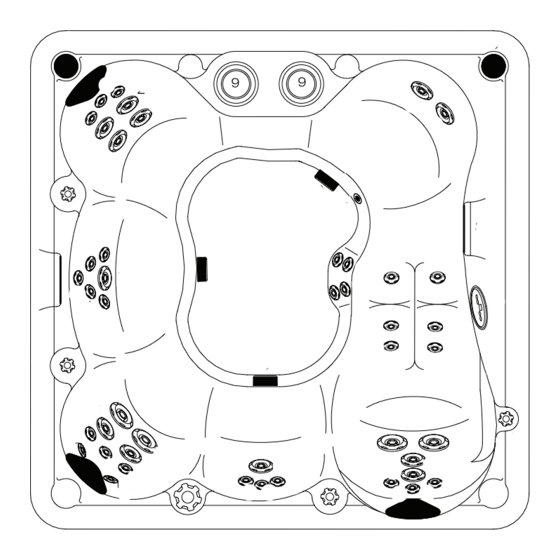
Page 13: Spa Specifications 660
660™ Component Identification Qty. 200 Series Jets 200 Series Neck Jets 300 Series Jets 400 Series Jets Control Panel Jet Selectors Air Control Waterfall Valve Waterfall features Filter Canisters Suction Fittings Floor Drain Light Stereo Speakers (option) Neck Jet Valve... - Page 14 660™ zones PumP 2 PumP 2 Zone 2 Zone 1 PumP 1 PumP 1 Zone 2 Zone 1...
- Page 15 the 545™ Component Identification Qty. 200 Series Jets 200 Series Neck Jets 300 Series Jets 400 Series Jets Control Panel Jet Selector Air Controls Waterfall Valve Waterfall features Filter Canisters Suction Fittings Floor Drain Light Stereo Speakers (option) Neck Jet Valve Physical Specifications Size Dimensions...
- Page 16 the 545™ zones PumP 2 Zone 2 PumP 1 PumP 1 Zone 2 Zone 1...
- Page 17 the 530™ Component Identification Qty. 200 Series Jets 200 Series Neck Jets 300 Series Jets 400 Series Jets Control Panel Jet Selector Air Controls Waterfall Valve Waterfall features Filter Canisters Suction Fitting(s) Floor Drain Light Stereo Speakers (option) Neck Jet Valve Physical Specifications Size Dimensions...
- Page 18 the 530™ zones PumP 2 ZONE A ZONE B ZONE A ZONE B PumP 1...
- Page 19 the 435™ Component Identification Qty. 200 Series Jets 200 Series Neck Jets 300 Series Jets 400 Series Jets Control Panel Jet Selector (option) Air Control Waterfall Valve Waterfall Feature Filter Canister Suction Fittings Floor Drain Light Stereo Speakers (option) Physical Specifications Size Dimensions 77”...
- Page 20 the 435™ zones Zone 2* Zone 1* *Jet selector is optional...
- Page 21 the 425™ Component Identification Qty. 200 Series Jets 200 Series Neck Jets 300 Series Jets 400 Series Jets Control Panel Jet Selector (option) Air Control Waterfall Valve Waterfall Feature Filter Canister Suction Fittings Floor Drain Light Stereo Speakers (option) Physical Specifications Size Dimensions 77”...
-
Page 22: 425 Model Zones
the 425™ zones Zone 1 Zone 2... -
Page 23: 322 Model Product View/Components/Specifications
the 322™ Component Identification Qty. 200 Series Jets 300 Series Jets 400 Series Jets Control Panel Jet Selector Air Control Waterfall Valve Waterfall Feature Filter Canister Suction Fitting Floor Drain Light Stereo Speakers (option) Physical Specifications Size Dimensions 60” x 84” Height 29.5”... - Page 24 the 322™ zones Zone 2 Zone 1...
-
Page 25: Spa Control Operation
spa control operation sYstem controls start-uP 1. At initial power up, the LCD display on the panel will flash “LINK”. Press any on the buttons on the control panel to link the panel to the control box and remove the “LINK” message from the display. 2. -
Page 26: Spa Control Operation
spa control operation Jets 2 (two Pump models only) Press Jets 2 button to turn on pump two high speed. Pressing a second time will turn the pump off. The high speed of pump 2 will run for 15 minutes and then turn off. -
Page 27: Spa Control Operation
spa control operation You exit the programming mode at any time by continuing to press the Light button until you arrive back at the temperature display or by simply pausing for 10 to 20 seconds. Dual temperature range (Factory default “range p" recommended) The system supports the choice of two temperature ranges for controlling heat. -
Page 28: Spa Control Operation
spa control operation “FliP” (invert Display) Your spa will come preset from the factory with the display viewable from inside the spa (recommended). The system will allow the LCD display on the panel to invert or “FLIP” to allow reading the display from outside of the spa if desired. -
Page 29: Spa Control Operation
spa control operation 1. Temp +/- 2. Light: Press until you see “HOLD” in the LCD display. 3. Temp +/- to engage the hold mode. The panel will scroll “HOLD – ING – FOR – 0:60” and continue to count down. LCD display will read “DONE” 4. -
Page 30: Audio Systems
spa control operation 5. Temp +/- To display hour window and change hour in increments of 1 hour intervals 6. Light: To set and move to next screen which will be minutes. 7. Temp +/- To choose the number of minutes to run in 15 minute intervals. 8. -
Page 31: Spa Control Operation
spa control operation speakers Gently push the top of the self-rising speakers to raise them. Hold the speaker top, avoiding the speaker screens, and gradually rotate the speak- ers as desired. To lower the speakers gently push the speaker top until it is completely closed. -
Page 32: Equipment Diagram
660 moDel 545 component Qty. Control box and heater two-speed pump one-speed pump Slice valves Pump unions Pump plugs Motor mounts Hose bib drain Light bulb Ozone fitting Check valve Ozonator Stereo power supply (optional) Stereo MP3 plug (optional) -
Page 33: 530 And 435
equipment diagram moDel 530 moDel 435 component Qty. Control box and heater Two-speed pump Slice valves Pump unions Pump plug Motor mounts Hose bib drain Light bulb Ozonator fitting Check valve Ozonator Stereo power supply (optional) Stereo MP3 plug (optional) Stereo head unit (optional) -
Page 34: 435 2-Pump And 425
equipment diagram moDel 435 2-PumP moDel 425 component Qty. Control box and heater Two-speed pump Slice valves GFCI Pump unions Pump plug Motor mounts Light bulb Hose bib drain Ozonator fitting Ozonator Check valve Stereo power supply (optional) Stereo MP3 plug (optional) Stereo head unit (optional) - Page 35 equipment diagram moDel 322 component Qty. Control box and heater Two-speed pump Slice valves GFCI Pump unions Pump plug Motor mounts Light bulb Hose bib drain Ozonator fitting Ozonator Check valve Stereo power supply (optional) Stereo MP3 plug (optional) Stereo head unit (optional)
-
Page 36: Troubleshooting
troubleshooting guide PLEASE NOTE: The following corrective actions may be performed by the spa owner. If the trouble cannot be corrected in the steps below, please contact your authorized dealer for service. (Improper servicing by an unau- thorized service provider or spa owner could result in damage not covered by the warranty and could cause serious injury.) eQuiPment Will not oPerate • Check the control panel LCD window for diagnostic code. - Page 37 troubleshooting guide HTR MAY BE DRY: There is little to no water flow through the heater. Check that the slice valves are fully open. Contact dealer for service. HTR TOO HOT: One of the sensors has reached 118°F. Do not enter the wa- ter.
-
Page 38: Maintenance
maintenance WeeKlY maintenance 1. removing Debris Remove any debris from the Vortex skimmer and suction guard(s) on the inside of the spa. Blocked intakes can impede the flow of water through the jetting system. 2. Water level Replenish the water level if necessary so that it is approximately two- thirds up the Vortex skimmer opening. - Page 39 maintenance 1. leakage Detection Open the equipment door and check for signs of water leakage around the pump. Pump seals wear out over time, especially with improper water chemistry. Early detection of pump seal failure can significantly reduce repair costs. 2.
-
Page 40: Light Bulb Replacement
maintenance note: Do not leave an empty spa uncovered. Direct sunlight on the spa surface can cause severe damage or blemishing and cause fittings to discolor and can result in the voiding of any surface warranties. 5. excess Debris Grit and debris tracked into the spa should be removed with a spa vacuum. -
Page 41: Water Care
maintenance imPortant cHemical saFetY ProceDures 1. Always keep chemicals out of reach of children. 2. Read product labels carefully prior to use. 3. When dissolving, always add chemicals to water, do not add water to chemicals. Some dry chemicals should be dissolved prior to adding them to the spa. -
Page 42: Cloudy Water
maintenance Water care troublesHootinG P: Problem S: Solution cloudy Water P: Inadequate filtration or dirty filter. S: Ensure that the filter is securely installed. Clean or replace filter. Increase the length of clean up and/or filter cycles. P: Water is not balanced. S: Test water and adjust pH, alkalinity, and sanitizer as needed. -
Page 43: Maintenance
maintenance the test strip and give a false reading. Remove spa cover and activate jets and air control. Allow jets to run for 30 minutes. Test water to see if desired level has been reached. High sanitizer reading P: Too much chlorine or bromine added or dispensed into the spa. s: Remove spa cover and activate jets and air control. -
Page 44: Warranty
Responding authorized dealer may charge additional service and travel fees. In the event that Marquis Corp. or its agent determines that your problem can be ad- dressed by providing a replacement part to you for installation in your... - Page 45 Other costs not associated with the direct repair of the spa, such as phone charges and missed work are not included in this warranty. In the event that the Marquis Corp. serial number tag on the spa has been removed or tampered with, the warranty will be void.
-
Page 46: Stereo Warranty
The stereo system Limited Warranty is made only to the original purchaser of the spa and is not transferable. In no event shall any obligation of Marquis Corp. extend beyond the original period of any applicable warranty determined according to the effective warranty date of the original purchaser. - Page 47 Disclaimers There are no additional warranties, express or implied, which extend beyond the terms of this limited warranty. Marquis Corp. makes no warranty of merchantability of the goods or the fitness of the goods for a particular purpose. No other person or entity has been authorized to make any warranty, representation or promise of performance not included in this express written warranty, and Marquis Corp.
Need help?
Do you have a question about the 660 and is the answer not in the manual?
Questions and answers