Table of Contents
Advertisement
Available languages
Available languages
Advertisement
Table of Contents

Related Manuals for Arcam airDAC


Summary of Contents for Arcam airDAC
- Page 1 Connections and Quickstart Guide Connexions et Guide de démarrage rapide Schnellstartanleitung Aansluitingen en snelstartgids Conexiones y Guía de Inicio Rápido Краткое руководство по подключению и использованию Configurazione e Guida Rapida 快速入门指南...
-
Page 2: Important Safety Instructions
Important Safety Instructions... 1. Read these instructions. 2. Keep these instructions. 3. Heed all warnings. 4. Follow all instructions. 5. Do not use this apparatus near water. 6. Clean only with dry cloth. 7. Do not block any ventilation openings. Install in accordance with the manufacturer’s instructions. - Page 3 This handbook provides guidance for connecting and using your airDAC. Dieses Handbuch bietet eine detaillierte Anleitung zur Bedienung des aairDAC. We hope that your airDAC will give you years of trouble-free operation. In the unlikely event of any fault, or if you simply require further information about Arcam products, Wir hoffen, dass Ihnen das aairDAC viele Jahre lang Freude bereiten wird.
- Page 4 Este manual proporciona una guía para la conexión y utilización del airDAC. Esperamos que su airDAC le entregue años de funcionamiento libre de problemas. En el Ci auguriamo che airDAC le offra anni di attività senza problemi. Nel caso improbabile di un guasto, o se semplicemente desidera ulteriori informazioni sui prodotti Arcam, la caso improbable de que ocurra una falla o que simplemente requiera más información...
- Page 5 Power Adaptor Setup Connectors Coaxial digital input Liaison numérique par câble coaxial Installation de l’adaptateur Connecteurs Digitaler Koaxial-Eingang Coaxiale digitale ingangen Vorbereitung Netzstecker Anschlüsse Entrada digital Coaxial Цифровой коаксиальный вход Set-up van de voedingsadapter Aansluitingen Ingresso coassiale digitale Power connector 同轴数字输入...
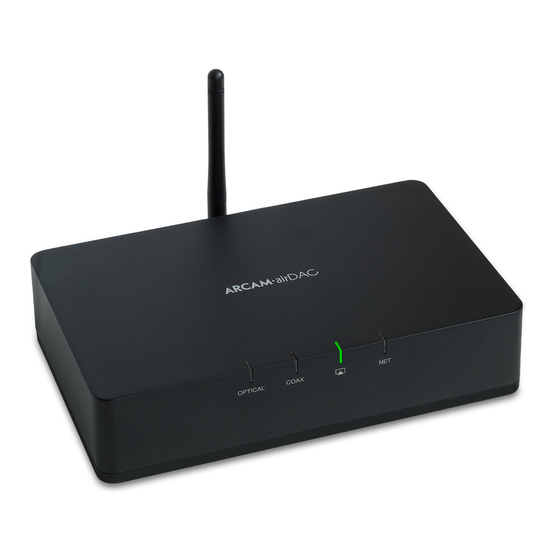
- Page 6 Connections Connexions Anschluss-Schema Aansluitingen Conexiones Соединения AUDIO OUT Connettori VOLTAGE SELECT Amplifier Amplificateur 110 -120V 220 - 240V REMOTE ~60Hz ~50Hz 接口 Verstärker Versterker Amplificador Усилитель Amplificatore 放大器 POWER 12V DC 1.5A OUTPUT DIG. OUT COAX RESET DIGITAL AUDIO OUT AV Processor / CD / DVD Processeur AV / CD / DVD COAX...
-
Page 7: Operation
Ethernet connection and the device is configured to do this by default. Simply plug one end of the Ethernet cable into the airDAC, and the other end into a spare Ethernet port on your network and power on. Once the device is booted and has been assigned an IP address by the network, the network state LED will show green indicating the airDAC is ready for use. -
Page 8: Listening To Music
1) Power off the airDAC, and connect the device directly to the Ethernet port on your computer using the provided Ethernet cable. 2) Power on the airDAC, and wait 90 seconds for the unit to turn on and the network status LED to glow green indicating direct connection mode is ready. -
Page 9: Led Function
Ethernet pour laquelle l'appareil a été configuré par défaut. Branchez simplement une extrémité du 1) Power off the airDAC. câble Ethernet à l'airDAC, et l'autre extrémité du câble à un port Ethernet libre de votre réseau et allumez 2) Press and hold the RESET button on the rear of the device. - Page 10 1) Éteignez l'airDAC et connectez l'appareil directement au port Ethernet de votre ordinateur à l'aide du câble Ethernet fourni. 2) Allumez l'airDAC et attendez 90 secondes pour que l'appareil s'allume et que le voyant lumineux de l'état du réseau devient vert indiquant ainsi que le mode de connexion directe est prêt.
- Page 11 MAC de votre appareil). Votre appareil iOS va mémoriser le réseau sélectionné et se connecter à 4) Relâchez le bouton au bout de 10 secondes et l’appareil va redémarrer avec tous les paramètres l'airDAC dès qu'il est à sa portée. L’icône AirPlay apparaît alors en rouge, lorsqu’elle apparaît en blanc cela d’origine.
-
Page 12: Betrieb
Netzwerkstatus-LED grün; der airDAC ist nun einsatzbereit. Access Point-Modus Der „AP-Modus“ ist eine Funktion, mit der der airDAC als ein drahtloser Access Point funktioniert. Er erstellt wirkungsvoll sein eigenes drahtloses Netzwerk, damit Sie den Komfort einer drahtlosen Verbindung genießen können, ohne dass ein bestehendes Netzwerk oder zusätzliche Hardware vorhanden sein muss. -
Page 13: Musik Hören
1) Schalten Sie den airDAC aus und schließen Sie das Gerät mit dem mitgelieferten Ethernetkabel direkt an den Ethernet-Port Ihres Computers an. 2) Schalten Sie den airDAC ein und warten Sie 90 Sekunden, bis das Gerät sich eingeschaltet hat. Die Status-LED des Netzwerks leuchtet grün auf und zeigt damit an, das der direkte Verbindungsmodus bereit ist. - Page 14 Werkseinstellungen wurden wiederhergestellt. Toegangspuntmodus De “AP Mode” is een functie die de airDAC in staat stelt om als een draadloos toegangspunt te werken, waardoor in feite een eigen draadloos netwerk wordt gecreëerd die de gebruiker in staat stelt om zonder...
- Page 15 1) Schakel de airDAC uit en sluit het apparaat met de meegeleverde Ethernet-kabel rechtstreeks op de Ethernet-poort op uw computer aan. 2) Schakel de airDAC in en wacht 90 seconden voor het apparaat om in te schakelen en de netwerkstatus-LED groen brandt om aan te geven dat de directe verbindingsmodus gereed is.
- Page 16 3) Schakel de airDAC in terwijl u de “RESET”-knop ingedrukt blijft houden. het MAC-adres van uw apparaat). Het iOS-apparaat zal het netwerk nu herinneren en met de airDAC 4) Laat de knop na 10 seconden los, het apparaat zal normaal opstarten met de fabrieksinstellingen verbinding maken wanneer deze binnen bereik is.
- Page 17 El cambio de conexión a la red entre cable o inalámbrica, requiere apagar y encender la unidad ya que la selección del interfaz de red se realiza cuando se enciende el airDAC. Si usa una red por cable, el cable debería estar conectado durante el periodo de arranque y del mismo modo, si usa una red inalámbrica el...
-
Page 18: Configuración De La Conexión Inalámbrica
1) Apague el airDAC, y conecte el dispositivo directamente al puerto Ethernet de su PC usando el cable Ethernet suministrado. 2) Encienda el airDAC, y espere 90 segundos a que arranque la unidad y se ilumine en verde el LED de estado indicando que el modo de conexión directa está listo. - Page 19 а конфигурация устройства предусматривает делать это по умолчанию. Просто подключите один 1) Apague el airDAC. конец кабеля Ethernet к системе airDAC, а второй – в резервный порт Ethernet сети и включите 2) Mantenga pulsado el botón RESET en la parte trasera del dispositivo.
- Page 20 повторное подключение, используя вышеописанные методы, проверьте настройки. Прямое подключение (только для доступа к сетевому интерфейсу) 1) Выключите систему airDAC и подключите устройство к порту Ethernet компьютера напрямую, с помощью поставляемого в комплекте кабеля Ethernet. 2) Включите систему airDAC и подождите 90 секунд, пока устройство включится, а индикатор...
-
Page 21: Прослушивание Музыки
из шести последних цифр MAC–адреса устройства. Теперь ваше устройство iOS запомнит сеть 4) Через 10 секунд отпустите кнопку, устройство загрузится обычным способом с полностью и подключится к системе airDAC, как только появится диапазон. Это будет отображаться в виде восстановленными заводскими настройками. -
Page 22: Funzionamento
Ethernet, per la quale il dispositivo è già configurato. Basta inserire un’estremità del cavo Ethernet nell’airDAC e l’altra estremità in una porta Ethernet libera della sua rete e procedere con l’accensione. Una volta che il dispositivo si è avviato e gli è stato assegnato un indirizzo IP dalla rete, il LED di stato della rete diventerà... -
Page 23: Aggiornamento Del Firmware
1) Spenga l’airDAC e colleghi il dispositivo direttamente alla porta Ethernet del suo computer utilizzando il cavo Ethernet fornito. 2) Accenda l’airDAC e attenda 90 secondi affinché l’unità si accenda e il LED di stato della rete diventi verde, indicando che la modalità di connessione diretta è pronta all’uso. - Page 24 通过在网络界面的“Network Config”(网络配置)部分从检测到的网络列表中选择您的 SSID,然 Funzionamento 后输入相关的安全详细信息,可以将 airDAC 连接至您现有的网络。请参阅下面的“访问网络界面” L’airDAC seleziona automaticamente l’input in base al tipo di fonte in riproduzione. 以了解详细信息。 L’ordine di priorità (dalla prima all’ultima) è AirPlay, Coassiale e infine Ottico. Quando viene avviato un flusso AirPlay, l’airDAC passerà automaticamente all’input AirPlay.
- Page 25 无线连接设置 如要针对您现有的无线网络配置 airDAC,我们建议通过接入点模式访问网络界面以进行最初的设置 (上文有详细描述)。另外,可以使用随附的以太网线缆通过直接连接至您的计算机来完成设置, 请参阅下面的“直接连接”以了解详细信息。 在此处,您可以将您无线网络的详细信息输入“Network Config”(网络配置)部分,并在将以太 网线缆断开和开关机之前保存设置。启动时,airDAC 将会自动尝试使用提供的详细信息加入无线网 络,连接成功将会使网络 LED 呈绿色,指示设备已就绪可随时使用。如果网络状态 LED 呈红色,则 表示输入的网络设置不正确,或者发生了网络故障。在这种情况下,请使用上述的任意连接方式重 新连接,并重新检查您的设置。 直接连接(仅供网络界面访问) 1) 关闭 airDAC,使用附带的以太网线缆将设备直接连接至您计算机上的以太网端口。 2) 打开 airDAC,等待 90 秒,以便设备启动,网络状态 LED 发出绿光,指示直接连接模式已就绪。 3) 通过将 http://169.254.123.124 键入连接的计算机的网络浏览器,启动设置网页。 固件更新 我们会不时发布固件更新,以便改善功能、增加功能或维持与最新计算平台和移动设备的互操作性。 使用网络界面的“Firmware Update”(固件更新)部分,可以执行固件更新。未来的更新将会在 www.arcam.co.uk 提供下载。...
- Page 26 在您的 iOS 设备(iPhone、iPad 或 iPod touch)上,转到“Settings”(设置)并确保选择的网络与 可以执行以下步骤来恢复出厂默认设置: airDAC 连接到的网络相同。 1) 关闭 airDAC。 在 iOS 设备上启动音乐应用程序,并选择屏幕上出现的 airDAC 选项卡。为设备提供的名称是唯一的 2) 按住设备背面的 RESET 按钮。 (包括设备 MAC 地址的最后 6 位数)。您的 iOS 设备将会记住该网络,每当 airDAC 进入连接范围时, 3) 在持续按住 RESET 按钮的同时打开 airDAC。 iOS 设备就会连接到 airDAC。此时将显示红色的唱片图标;白色的唱片图标表示唱片设备可用。 4) 10 秒后松开该按钮,设备将正常启动,并完全恢复出厂设置。 点击播放图标即可收听音乐。 POWER 12V DC 1.5A...
- Page 27 AirPlay, the AirPlay logo, iPhone, iPad and iPod touch are trademarks of Apple Inc., registered in the U.S. and other countries. IMPORTANT ANTENNA INFORMATION The airDAC is only designed to operate with the supplied antenna. Any other antenna are strictly prohibited for use with the airDAC.
-
Page 28: Worldwide Guarantee
Arcam dealer. The manufacturer can take no responsibility de la date d’achat si votre appareil a été acheté auprès d'un revendeur agréé Arcam. Le fabricant ne sera for defects arising from accident, misuse, abuse, wear and tear, neglect or through unauthorised en aucun cas tenu responsable des défauts résultant d’un accident, utilisation inadéquate, abus, usure,... -
Page 29: Wereldwijde Garantie
Deze apparatuur dient in de originele verpakking te worden verpakt en te worden geretourneerd naar Verschleiß, Vernachlässigung oder unautorisierte Veränderungen bzw. Reparaturen entstehen. de dealer bij wie u het hebt gekocht of anders rechtstreeks naar de Arcam-distributeur in het land waar Außerdem wird keinerlei Verantwortung für Schäden oder Verlust des Gerätes während des Transports het product werd gekocht. - Page 30 Stirling House, Waterbeach, CAMBRIDGE, CB25 9QE, England ¿Problemas? или через www.arcam.co.uk. Si su distribuidor Arcam no es capaz de responder alguna pregunta acerca de este u otro producto Arcam, por favor, póngase en contacto con el Departamento de Asistencia al Cliente de Arcam, en la Проблемы? dirección de más arriba, y haremos todo lo posible por ayudarle.
-
Page 31: Garanzia In Tutto Il Mondo
如果您的Arcam经销商无法解答有关本设备或其他任何Arcam产品的咨询,请通过上述地址联系 Arcam客户支持部,我们将尽力为您提供帮助。 Se il rivenditore Arcam non è in grado di rispondere a una domanda per quanto riguarda questo o qualsiasi altro prodotto Arcam, si prega di contattare il supporto clienti all'indirizzo Arcam di cui sopra e noi faremo del nostro meglio per aiutarvi. - Page 32 WATERBEACH, CAMBRIDGE, CB25 9QE, ENGLAND SH245 issue 3...
Need help?
Do you have a question about the airDAC and is the answer not in the manual?
Questions and answers