JTS UR-816D Instruction Manual
Miniature music instruments wireless system
Hide thumbs
Also See for UR-816D:
- Instruction manual (15 pages) ,
- Manual (17 pages) ,
- Instruction manual (14 pages)
Table of Contents
Advertisement
Quick Links
See also:
Manual
Advertisement
Table of Contents

Related Manuals for JTS UR-816D


Summary of Contents for JTS UR-816D
- Page 1 music Miniature instruments Lighter Smaller More Powerful wireless system GUITAR / ACCORDING / WINDS / BRASS Instruction Manual 1856 59508-033-03...
- Page 2 Thank you for choosing the JTS wireless system. In order to obtain the best efficiency from the system, you are recommended to read this instruction manual carefully.
-
Page 3: Table Of Contents
1. Important Caution 2. Features 3. Specification 3-1 Receiver// UR-816D (DB) 3-2 Miniature Transmitter// UT-16GT/UT-16GTP 4. Part Identification & Accessories 4-1 Receiver// UR-816D (DB) 4-2 Miniature Transmitter// UT-16GT/UT16GTP 4-3 Accessories 5. Preparing Procedures & Basic Operation 5-1 Receiver 5-2 Battery Insertion of The Transmitter 5-3 Install The Transmitter 6. -
Page 4: Important Caution
1. Important Caution Always make all connections before plugging the unit into an AC power outlet. Do not leave the devices in a place with high temperature or high humidity. Do not handle the power cord with wet hands! Keep the devices away from fire and heat sources. This is a general user’... -
Page 5: Specification
3. Specification 3-1 Receiver// UR-816D (DB) Frequency Preparation... PLL Synthesized Control Carrier Frequency Range 502~960 MHz S/N Ratio....> 105dB T.H.D......<0.6%@1KHz Display....... Display Contents... Antenna A/B, RF/AF Status Controls...... Power On/Off, Channel Selecting, Audio Level Audio Output Level..-12dB AF Output Impedance.. -
Page 6: Part Identification & Accessories
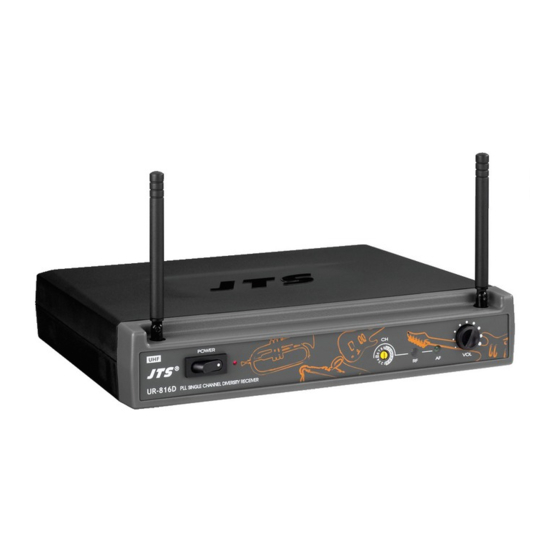
4. Parts Identification & Accessories 4-1 Receiver// UR-816D(DB) Front panel Antenna Power On/Off Switch Power LED Channel selector RF indicator AF indicator Volume control (UR-816D) (UR-816DB) 4 5 6 VOL. PLL SINGLE CHANNEL DIVERSITY RECEIVER UR-816DB POWER MIN. MAX. AF OUTPUT... - Page 7 4-2 Miniature Transmitter UT-16GT/UT-16GTP Power On/Mute/Off switch LED indicator for power On/Off, battery status and mute Channel selector Input gain Antenna 6.3GT plug: Jack plug 516GT: Accordion microphone module 508GT: Winds & Brass microphone module 16GT Adapter 516 Bracket 16GT Clip: Winds clip Battery Lid (Color ID): Orange / White / Silver included CLP-UT (508GT)
-
Page 8: Accessories
4-3 Accessories AC/DC adaptor Switching Power Supply (100~240V, 50~60Hz) Linear Power Supply (220V , 50Hz) Option Linear Power Supply (220V , 60Hz) Option AF output cable Screwdriver Sucker Holder DR-900 dual rack adaptor Option RP-900 panel cover Option MINIATURE MUSIC INSTRUMENT WIRELESS SYSTEM... -
Page 9: Preparing Procedures & Basic Operation
5. Preparing Procedures & Basic Operation 5-1 Receiver (1) Connect to the subsequent unit (e.g. mixer, or amplifier) Connect one end of a proper AF cable to the AF Output or Balanced XLR Output socket, then plug another end to the “MIC IN” input socket of a mixer or a amplifier (Step 1) (2) Connect the power supply unit Plug in one end of AC/DC adaptor cable to Power Supply Jack in the rear... -
Page 10: Battery Insertion Of The Transmitter
5-2 Battery Insertion Of The Transmitter (1) Press Down the battery lid and slide it out. (2) Insert or replace with a new battery according to the polarity indication. (3) Switch the ON/MUTE/OFF switch to ON. If the battery is in good condition the LED indicator will light in Green constantly. -
Page 11: Install The Transmitter
5-3 Install the transmitter (1) Use the UT-16GT+6.3GT plug for guitar application 1. Insert the plug to the transmitter and turn it to the end. 2. Plug the transmitter into the instrument to be used. 3. Push down the transmitter towards the instrument. The step positioning mechanism will hold the transmitter firmly on the instrument. - Page 12 (2) Use the 516GT/508GT microphone module for accordion/winds/brass application 1 Insert the 516GT/508GT to the transmitter and turn it to the end. 2 Slide the 16GT Adapter/16GT CLIP/CLP-UT into the transmitter and push it to the end. 3 Fix the 16GT Adapter + 516 Bracket to the accondion by double-sided adhesive tape.
- Page 13 (3) Setting Levels 1. Set a common frequency for both the receiver and transmitter by turning the Channel Selector with supplied screw driver. 2. Turn the input gain control on the transmitter to a position halfway between the left and right stops. 3.
-
Page 14: System Operation
6. System Operation Be sure to mute the audio signal of a mixer or amplifier before turning on the receiver and transmitter. (1) Power on Turn AF level on the receiver completely counter-clockwise to the minimum level, and switch on the receiver. As soon as you turn power of the receiver on, the power LED lights red, meanwhile the RF... -
Page 15: Rack Mounting
7. Rack Mounting (1) Before mount receivers onto DR-900 rack adaptor, please release any cables from the rear of the receiver. (2) Turn over receiver and DR-900 rack adaptor simultaneously, there are 4 threaded holes at the bottom of receiver and rack adaptor for inserting screws. -
Page 16: Recommendation
8. Recommendation (1) In order to achieve the optimum reception condition and also extend the operating distance, please leave on “open space” between the receiver and transmitter. (2) Keep the devices away from the metal objects or any interference sources at least 50 cm. - Page 17 9. Important Notice (1) JTS offers wireless systems in a selection of bands that conform to the different government regulations of specific nations or geographic regions. These regulations help limit radio frequency (RF) interference among different wireless devices and prevent interference with local public communications channels, such as television and emergency broadcasts.
Need help?
Do you have a question about the UR-816D and is the answer not in the manual?
Questions and answers