
Related Manuals for Oricom AM900

Summary of Contents for Oricom AM900
- Page 1 Oricom AM900 Amplified Digital Answering System Keep this user guide for future reference Always retain your proof of purchase in case of warranty service and register your product on line at:- www.oricom.com.au...
-
Page 3: Table Of Contents
Table of contents General Information ...............2 Location of Controls ...............4 Getting Started ..............6 Operation ................8 Remote Access ..............13 Warranty ................16... -
Page 4: General Information
General Information General Information It is very important that you read the User Guide carefully as it contains detailed information on setup WARNING and operational issues which you will need to be aware of to ensure this product operates properly. Following is a list of some of the important issues and important warnings which you need to be aware of. -
Page 5: Notes For Operation In New Zealand
General Information Notes for operation in New Zealand The grant of a Telepermit for any item of terminal equipment indicates only that Telecom has accepted that the item complies with minimum conditions for connection to its network. It indicates no endorsement of the product by Telecom, nor does it provide any sort of warranty. -
Page 6: Location Of Controls
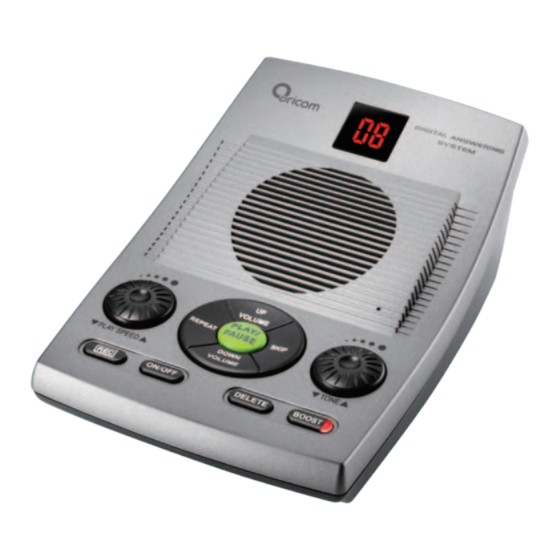
Location of controls Location of controls 7 8 9 10 11 18 19 20... - Page 7 Location of controls 1. Message LED 12. SKIP button 2. Microphone 13. TONE switch 3. PLAY SPEED Switch 14. UP VOLUME button 4. REPEAT button 15. Speaker 5. REC button 16. Telephone Line Socket 6. ON/OFF button 17. Ringer 2/6/TS Switch 7. DOWN VOLUME button 18. ANS/ANS ONLY switch 8.
-
Page 8: Getting Started
These are available from electronics stores. Warning. Use only the AC adaptor supplied with this product. Incorrect adaptor polarity or voltage can seriously damage the AM900 and or be dangerous. AC adaptor part number #: S005CS0900030, Input: 100-240V, 50/60 Hz, Output: DC9V 300mA 1. - Page 9 Getting Started 3. Press the REPEAT button. You will hear an announcement of the hour. 4. Press the SKIP button repeatedly until you hear the correct hour announced. 5. Press the REPEAT button. You will hear an announcement of the minutes currently set.
-
Page 10: Operation
Operation Operation Recording, changing or deleting the greeting message For your outgoing greeting message (OGM), you can either use the pre- recorded greeting or you can record your own message. If you do not record a message, the standard greeting will be used automatically. Before recording your greeting, you should write down the text that you want to record. The length of your own greeting must be at least 5 seconds and must not exceed 5 minutes. - Page 11 Operation Using the Announcement Only Feature Announce only feature lets you record an announcement for the caller, then, the system hangs up without letting the caller leave a message. This is ideal for business use where you need to make a service type announcement to callers but do not want to record incoming messages.
-
Page 12: Setting Up The Answering System
Operation Setting up the answering system On the rear of the answering system you will find a slide switch with which you can set to select how many times the phone rings before incoming calls are answered. 2 The call will be answered after 2 rings. 6 The call will be answered after 6 rings. -
Page 13: Listening To Messages
Operation Interrupting the answering system You can personally intervene at any time while the caller is leaving their message. Simply lift the receiver of a parallel phone or press ON/OFF button on the answering machine. The answering system will stop recording and you can speak directly to the caller. -
Page 14: Deleting A Single Message
Operation Repeating previous message Press and hold the REPEAT button until you hear a tone to repeat the previous message. Repeating current message Press the REPEAT button to repeat the message currently playing. Skipping to next message Press the SKIP button once to skip the message currently playing. The answering system now starts with the next message. -
Page 15: Remote Access
Remote Access Remote access Remote access authorisation code Your answering system has 3 digit personal access authorisation (Remote Code) so that only you can listen to incoming messages using the remote access facility. The authorisation code can be found on a label located on the underside of your unit. Toll Saver If you choose the Toll Saver option, and there are new messages, the system answers after two rings. - Page 16 Remote Access Replay all recorded messages Press 2 and # Replay newly recorded messages Press 2 and 5 Room mornitoring Press 0 and # While playing back, you have the following options: Skip next message Press 7 and # Repeat current message Press 8 and # Repeat previous message Press 6 and #...
-
Page 17: Switching On Remotely
Remote Access Switching on remotely Imagine that you have left your office or your house and have forgotten to switch on your answering system. Using the remote access facility, you can switch on the answering system from another telephone. 1. Call your number and let it ring until your call is answered by your answering system (ca. 10 times). -
Page 18: Warranty
Warranty. Any implied warranties that may be imposed by law are limited in duration to the Warranty Period. Oricom warrants that the product is free from defects in materials or workmanship during the Warranty Period. This Warranty does not extend to any product from which the serial number has been removed or was purchased outside of Australia. - Page 19 No change to the conditions of this Warranty is valid unless it is made in writing and signed by an authorised representative of Oricom. Oricom will not be in breach of a warranty expressly set out in this User Guide or under the Competition and Consumer Act 2010 and excludes...
-
Page 20: Customer Support
Please retain your purchase receipt and attach to the back page of this user guide as you will need to produce this if warranty service is required. Take a few moments to register your product online: www.oricom.com.au New Zealand Australia Email: support@oricom.co.nz...
Need help?
Do you have a question about the AM900 and is the answer not in the manual?
Questions and answers