Table of Contents
Advertisement
Quick Links
Advertisement
Table of Contents

Subscribe to Our Youtube Channel
Related Manuals for Syspine A50

Summary of Contents for Syspine A50
-
Page 2: Important Notices
This section describes basic information to consider before using the Syspine Phone System. All recommendations are based on a general configu- ration of the phone system. However, every small business is unique. Evaluate the specific configurations of the office setup when using the Syspine Phone System. - Page 3 phone) in case of a power failure, telephone service outage, or other prob- lem that may inhibit you from using Response Point. • Calling emergency services using a VoIP service provider: Please note that not all VoIP service providers enable users to call emergency services. Such requirements vary by country.
-
Page 4: Privacy Considerations
The personal information entered in the User Properties dialog box is stored on the Syspine Digital Operator System A50 (DOS-A50) and is not encrypted. Any user who has access to the DOS-A50 password (for example, the phone sys- tem administrator) can modify this information, which includes: •... - Page 5 Privacy of Backups The Syspine Phone System administrator may choose to make a backup of the data on the DOS-A50. Data saved in the backup file is not encrypted. There- fore, it is recommend that the Syspine Phone System administrator store back-...
-
Page 6: Security Considerations
Consider the following issues in creating a secure phone system: Change Default Passwords The first step toward securing the Syspine Phone System is to change the default password of the DOS-A50. The default DOS-A50 password is admin, used from Administrator to connect to the DOS-A50. -
Page 7: Security Certificates
Occasionally, at log on, a security error may display, denying connection to a DOS-A50. This can occur if the certificate exchange has been corrupted, for example. In this case, try connecting again, or restart the DOS-A50 so that the certificate can be reinitialized. If the error reoccurs, a program or other device on the LAN might be trying to fool or intercept DOS-A50 data. - Page 8 Neither this publication, nor any of the material contained herein, may be reproduced with- out written consent of the manufacturer. Microsoft, Windows XP, Windows Vista, and Response Point are trademarks of the Microsoft group of companies. © Copyright July 2008 http://www.syspine.com...
-
Page 9: Table Of Contents
................2 Additional Advantages Unpacking the Syspine Phone System ............3 ..................3 Package Contents ..................4 Optional Contents Tour of the Syspine Phone System ............5 ..................5 Syspine DOS-A50 ....................5 Front View ....................6 Rear View .................... 7 Bottom View .................... - Page 10 ............22 Connecting the DOS-A50 to the LAN ............. 24 Connecting the DOS-A50 to the PSTN ................25 Locating IP Phone 310s ............26 IP Phone 310 Cable Connections ............. 27 Connecting IP Phone 310s to the LAN Response Point Software Installation ............28 ................
- Page 11 Using the Connect Menu ..............140 Using the Parked Calls Menu ............... 141 Using the Settings Menu ................155 Using the Help Menu Advanced Features ................... 157 Syspine DOS-A50 Module Configuration ..........158 ............160 Restarting the System or Modules...
- Page 12 Resetting Factory Defaults ..............168 ..............168 Resetting DOS-A50 Defaults ............ 169 Resetting the Administrator Password Quick Reference Guides................171 Phone Calls Quick Guide ............... 172 Voicemail Quick Guide ................174 DOS-A50 Wall Mounting Template ............175 Index ......................176...
-
Page 13: Introduction
The IP Phone 310 combines ease of use with advanced functionality and ergo- nomic design. Combined with a low Total Cost of Ownership (TCO), the Syspine Phone System becomes the ideal communication tool. -
Page 14: Product Info And Advantages
IT/Telecommunications knowledge. • Easy to manage—Microsoft Response Point Administrator provides a sim- ple and effective web page tool for managing DOS-A50. • Easy to use—voice activated commands eliminate complex key strokes and the powerful Click to Call feature provides one-click dialing through Assistant and the fifty entry Call History page. -
Page 15: Unpacking The Syspine Phone System
Introduction Unpacking the Syspine Phone System 1.2.1 Package Contents Verify all contents are present and in good condition. If any items are missing or dam- aged, contact the dealer immediately. DOS-A50 DC Adapter Power Cable 1 x 3M RJ-45 Male... -
Page 16: Optional Contents
Optional Contents Optional Cradle (for upright installation) 1 x 3M RJ-45 Male Ethernet 4 x 3M RJ-11 Male Phone Cable (blue) Line Cable Included with the Optional Included with Optional ATA Security Gateway Module Module Unpacking the Syspine Phone System... -
Page 17: Tour Of The Syspine Phone System
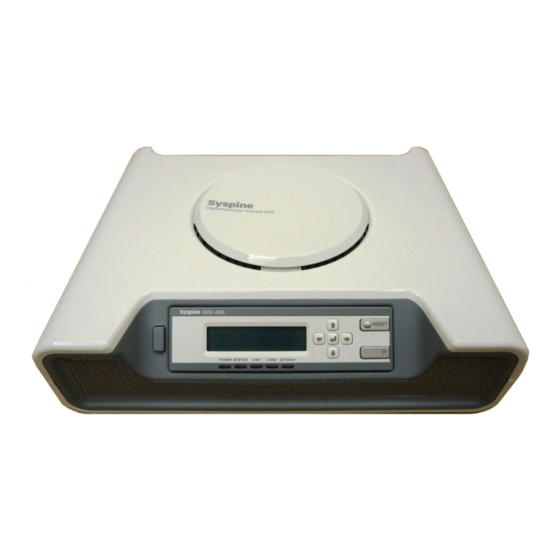
Introduction Tour of the Syspine Phone System 1.3.1 Syspine DOS-A50 1.3.1.1 EATURES VERVIEW • Simplified administration featuring phone and service configuration wizards • Voice commands and Click to Call functionality • Detailed Call History and Speed Dialing • Microsoft Outlook integration •... -
Page 18: Rear View
Connect USB devices to these ports LAN Port Connect an Ethernet RJ-45 to the LAN Optional WAN Connect an Ethernet RJ-45 to the wide area Port network (WAN) if the optional Security Gateway module is installed Tour of the Syspine Phone System... -
Page 19: Bottom View
Introduction 1.3.4 Bottom View No. Item Description Module Feet Desktop non-skid feet Wall Fixing Slots Attach to wall using wall mounting template (see DOS-A50 Wall Mounting Template on page 175) Tour of the Syspine Phone System... -
Page 20: Lcd Panel
Hold for 5 seconds to enter Admin Mode Down Button Scroll down through options in Admin Mode Up Button Scroll up through options in Admin Mode Right Button View lower line message Select option in Admin Mode Tour of the Syspine Phone System... -
Page 21: Led Behavior
Mode (enabled or disabled) Reset Button Hold for 5 seconds to reset the system (see Powering Down the DOS-A50 on page 49) The DOS-A50 is set to DHCP client enabled as default and cannot be changed. 1.3.6 LED Behavior Behavior/Color Description... -
Page 22: Syspine Ip Phone 310
Introduction Syspine IP Phone 310 1.4.1 Front View IP Phone 310 PQRS WXYZ HOLD No. Item Description Handset High quality telephone handset Transfer Transfers the current call Conference Start Conference call Call History Display call history menu Redial Dial last number entered... -
Page 23: Ip Phone 310 Operation
Voice Dial call. During a call, press to park the call. The Call Park system assigns the call a number and says Call <parked call number> parked. Call Press and say Retrieve call <parked call Retrieve number>. Syspine IP Phone 310... - Page 24 Voicemail default password is 9999. Press 1 to listen to the new message or follow the prompts for more options. Check IP Press # *47 (# *IP) to display the phone IP address. address Syspine IP Phone 310...
-
Page 25: Rear View
PC, hub, or other Ethernet device AC Power Connect AC power adapter Connection Jack Wall Mount Stand Attach the wall mount stand to these slots Slots See Locating IP Phone 310s on page 25 for installation instructions. Syspine IP Phone 310... - Page 26 This page left blank intentionally.
-
Page 27: Installation
Installation This section contains details on how to install the Syspine Digital Operator Phone System (Syspine Phone System) and connect and configure the supplied Syspine IP Phone 310s. Terms used in this chapter: • DHCP—Dynamic Host Configuration Protocol (DHCP) is used by net- worked devices (clients) to obtain IP addresses and other parameters from a DHCP server. -
Page 28: Hardware Installation
Installation Hardware Installation 2.1.1 Typical LAN Setup The diagram describes typical LAN architecture without the Security Gateway using the Syspine Phone System. The standard unit does not contain the Security Gateway (WAN). Typical LAN Set Up PSTN INTERNET LAN Switch... -
Page 29: Typical Wan Setup
The diagram describes typical WAN architecture with the optional Security Gateway using the Syspine Phone System. The Security Gateway module (WAN) is optional and must be purchased before the Syspine Phone System can be setup as follows. Typical WAN Set Up PSTN... -
Page 30: Recommended Installation Process
Locate the DOS-A50 (desktop, upright, or wall mount). See Locating the DOS-A50 on page 19. Connect the DOS-A50 to the LAN and power outlet. See Connecting the DOS-A50 to the LAN on page 22. Connect the DOS-A50 to the PSTN. See Connecting the DOS-A50 to the PSTN on page 24. -
Page 31: Locating The Dos-A50
Desktop Installation QUANTA COMPUTER POWER SYSTEM LINE1 LINE2 GATEWA Y The DOS-A50 is setup in the upright position by using the upright cradle (optional). See Optional Contents on page 4. 2.1.4.1 ESKTOP NSTALLATION Place the DOS-A50 on a flat, stable surface in a well ventilated area. - Page 32 The DOS-A50 wall mounting solution is designed to reduce clutter by locating the DOS-A50 in an otherwise unused area. There are two wall mounting slots on the underside of the DOS-A50 (see Bot- tom View on page 7) for mounting purposes.
- Page 33 The screws are designed to project out from the wall for mounting pur- poses. Align the wall mounting slots on the underside of the DOS-A50 with the screws. Place the DOS-A50 on the wall and pull down to locate the screws securely. Hardware Installation...
-
Page 34: Connecting The Dos-A50 To The Lan
After locating the DOS-A50, connect to the LAN by performing the following steps: Insert the cable pin into the left-hand side of the DOS-A50 case as shown. DC IN Connect the AC adapter to the DOS-A50 and secure it in place as shown. - Page 35 Installation Use one of the supplied Ethernet cables (yellow) to connect the LAN port of the DOS-A50 to the LAN switch and plug in the AC adapter into a standard electrical outlet. Before continuing, make sure the display shows SERVICE READY.
-
Page 36: Connecting The Dos-A50 To The Pstn
Connect to Public Telephone Network Check that the telephone line module LED on the back of the DOS-A50 lights green (see Rear View on page 6 for location). If the telephone line status LED does not light for any active phone line, check the public telephone line and Voice Services. -
Page 37: Locating Ip Phone 310S
Installation 2.1.7 Locating IP Phone 310s The IP Phone 310 provides two distinct setup options—desktop and wall mounted. 2.1.7.1 ESKTOP NSTALLATION Insert the two locating tabs (1) into the slots as shown. Push the stand (2) toward the top of the IP Phone 310 until it clicks into place. -
Page 38: Ip Phone 310 Cable Connections
Installation Align the wall-mounting slot on the underside of the IP Phone 310 with the screw. Place the IP Phone 310 on the wall and pull down to locate the screw securely. 2.1.8 IP Phone 310 Cable Connections Connect the IP Phone 310 cables as shown in the diagram: Connect the white Ethernet cable to the LAN port. -
Page 39: Connecting Ip Phone 310S To The Lan
2.1.9 Connecting IP Phone 310s to the LAN After connecting the DOS-A50 to the LAN and a suitable power outlet, connect all the required IP Phone 310s at once to the LAN. The IP Phone 310 supports daisy-chain connection for limited port access using the supplied Ethernet cable. -
Page 40: Response Point Software Installation
Two types of installation are provided by Response Point software—Adminis- trator and Assistant. • The Administrator is a Windows front end application to configure and uti- lize the DOS-A50’s many features from the administrator’s computer. • The Assistant provides access to personal settings from users computers. 2.2.1... -
Page 41: Installing Response Point On The Administration Computer
English Text-to-Speech software is also included for Windows XP. ® Administrator should only be installed on an administrator’s computer. Administrator privilege is required to configure the DOS-A50 settings. 2.3.1 Installing with Windows XP Insert the Installation CD provided. The Auto-run Interface starts automati- cally and the following screen displays. - Page 42 Installation The Select the Microsoft Response Point 1.0 SP1 Components to install screen displays. The Administrator software does not install by default. Ensure that all the check boxes are selected, including Install Microsoft Response Point Administrator 1.0 SP1. Click Next. Follow the on-screen prompts to install the software.
-
Page 43: Installing With Windows Vista
If the Auto-run Interface does not start automatically, access the CD using Windows Explorer and manually execute CDRun.exe in the root directory to begin installation. Click Install Syspine Tools. If a security screen displays, click the appropriate response to allow the installation to continue. - Page 44 Installation Follow the on-screen prompts to install the software. The Assistant is installed first, followed by the Administrator. For both the Assistant and Administrator installation, a license screen must be accepted before installation can continue. Once installation is complete, go to Start All Programs Microsoft Response Point Administrator to launch Microsoft Response Point...
-
Page 45: Logging On To Response Point Administrator
Take a moment to read the information, then click OK. The Select the base unit screen displays. Select the desired DOS-A50 (only one entry is present in the previous image), and click Connect. The connection process can take a few seconds. If the required DOS- A50 is not present, see Troubleshooting on page 163. - Page 46 The following screen dis- plays. Compare the media access control (MAC) address on screen with the MAC address attached to the DOS-A50. Ensure the MAC addresses are identi- cal and click Yes to continue. View the certificate by clicking View Certificate if required.
- Page 47 Installation Once connection is established, a password prompt displays. Enter the default password admin (all lower case) and click Connect. The main Administrator - Microsoft Response Point screen displays. Logging on to Response Point Administrator...
-
Page 48: Changing The Dos-A50 Password
After logging in, change the password to prevent any security issues. The default password for the DOS-A50 is admin. To change the DOS-A50 password, perform the following steps: On the Base Unit tab, click Change Password in the Properties panel. -
Page 49: Setting The Dos-A50 Date And Time
2.4.2 Setting the DOS-A50 Date and Time To set the DOS-A50 date and time values, perform the following steps: On the Base Unit tab, click Change Date/Time in the Properties panel. The Change Date and Time on Base Unit screen displays. -
Page 50: Configuring The Ip Phone 310S
Installation Configuring the IP Phone 310s After logging on to the Administrator, the installed IP Phone 310s must be detected and new users added. Perform the following steps to detect the phones and add new user information. 2.5.1 Adding a Phone and New User Go to Start All Programs Microsoft Response Point Administrator... - Page 51 Installation The Have you connected your phone screen displays. Confirm that the phones are properly connected and the power cord is plugged in. Click Next. The What phone do you want to add screen displays. Highlight the required phone and click Next. Configuring the IP Phone 310s...
- Page 52 Installation The Who will receive calls on this phone screen displays. Click the Assign User button. A warning message displays. This message is only displayed if there are no users currently on the system. Click OK to proceed. Configuring the IP Phone 310s...
- Page 53 Installation The New User screen displays. The default tab is the Identification tab. From the User type drop down menu, select Person if it is not already selected. Fill in the Name fields. Ensure information easily identifies the user. Enter the user information as a caller would say it. Change the Extension number and password field if desired.
- Page 54 Installation The Who will receive calls on this phone screen re-displays. Notice that the new user is assigned to the Primary User with the specified extension number. See Using the Phones Menu on page 71 for more infor- mation. Click Next. The What do you want to name this phone screen displays.
- Page 55 Installation Click Finish. The DOS-A50 automatically configures the phone and displays a confirma- tion message screen. Click Close to complete the installation. Repeat steps 2 through 16 to configure the second and subsequent phones. Configuring the IP Phone 310s...
-
Page 56: Installing Response Point Assistant On A User's Computer
If the Auto-run Interface does not start automatically, access the CD using Windows Explorer and manually execute CDRun.exe in the root directory to begin installation. Click Install Syspine Tools. Installing Response Point Assistant on a User’s Computer... -
Page 57: Installing With Windows Vista
Installation The Select the Microsoft Response Point 1.0 SP1 Components to install screen displays. : • By default, the Install Microsoft Response Point Administrator 1.0 SP1 check box is clear. For security reasons, Response Point Adminis- trator must only be installed on an administrator's computer. •... - Page 58 If the Auto-run Interface does not start automatically, access the CD using Windows Explorer and manually execute CDRun.exe in the root directory to begin installation. Click Install Syspine Tools. If a security screen displays, click the appropriate response to allow the installation to continue.
-
Page 59: Logging On To Response Point Assistant
The following screen dis- plays. Compare the MAC address on screen with the MAC address attached to the DOS-A50. Ensure the MAC addresses are identical and click Yes to continue. View the certificate by clicking View Certificate if required. - Page 60 Installation The following password reminder screen displays. Click OK to complete login. For more information on Response Point Assistant, refer to Microsoft Response Point Assistant Features on page 137. Installing Response Point Assistant on a User’s Computer...
-
Page 61: Powering Down The Dos-A50
To power off the DOS-A50, perform the following steps: Exit any active Administrator and Assistant sessions. Press and hold the Reset button on the DOS-A50 front panel for 5 seconds and release. The DOS-A50 enters a Standby state and the LCD panel displays UNPLUG POWER CORD for 15 seconds. - Page 62 This page left blank intentionally.
-
Page 63: Basic Features
Basic Features This chapter contains information on basic Syspine Digital Operator Phone System (Syspine Phone System) operation using Microsoft Response Point™ phone system software. Topics include ® making and receiving internal and external calls, parking and retrieving calls, transferring calls, using a Public Address (PA) system, and voicemail functions. -
Page 64: Making Calls To Extensions
Basic Features Making Calls to Extensions Extension calls are calls placed to other Syspine IP Phones. Using Response Point, calls can be made even if a user's number is unknown. EXTENSION CALLS IP Phone EXT.100 JOHN SMITH LAN Switch DOS-A50... -
Page 65: Making External Calls
EXT.100 JOHN SMITH PSTN External Call LAN Switch e.g. 425 555 2000 PSTN No. DOS-A50 425 555 1000 IP Phone EXT.101 JANE MONROE 3.2.1 Using the Response Point Button To make an external call using Response Point, perform the following steps: To use voice dialing to external numbers, the contact must be added to the user’s contact list using the Assistant. -
Page 66: Using The Keypad
Basic Features 3.2.2 Using the Keypad To make an outgoing call using the keypad, perform the following steps: Lift the handset of the IP Phone. • Press 9 (or 8 if both PSTN and VoIP voice services are configured) to spec- ify an outbound call. -
Page 67: Receiving Incoming Calls
The Automated Receptionist (default) asks the caller to say the name of the required contact. The DOS-A50 handles the call as defined in the Call Routing Plan (see Choosing How to Answer Calls on page 121). The external caller says the name of the contact person, Dials the extension number using the keypad. -
Page 68: Using Call Park And Retrieve
Call Park is used to hold a call in the system until another system extension or user is free to respond. While Parked, a caller hears the default DOS-A50 music or a custom audio file played through the Line In jack on the rear of DOS- A50. -
Page 69: Retrieving A Parked Call
RETRIEVED IP Phone EXT.100 JOHN SMITH LAN Switch DOS-A50 Press the Response Point button. Say Retrieve Call 1. The call is retrieved from the parked status. If more than one call is parked, retrieve the call in the order it was saved, for example: say Retrieve Call 2 or Retrieve Call 3. -
Page 70: Transferring Calls
Only phones and users added to Response Point Administrator are accessible for transfer. Transferring a Call IP Phone EXT.100 JOHN SMITH CALL PSTN External Call LAN Switch DOS-A50 e.g. 425 555 2000 PSTN No. 425 555 1000 Response Point IP Phone EXT.101 JANE MONROE 3.5.1... -
Page 71: Using The Keypad
Basic Features 3.5.2 Using the Keypad To Transfer a call using the keypad, perform the following steps: Ask the calling party to wait while you transfer the call. Press the Transfer button on the IP Phone. Dial the required extension, press Dial / Enter ( ) and hang up the phone. -
Page 72: Using A Public Address System
Basic Features Using a Public Address System The DOS-A50 supports connection to a Public Address system (PA) or to speakers directly attached to the DOS-A50. To connect the PA to the DOS-A50, refer to the following diagram: DOS-A50 Line-Out Line-In Public Addr e ss System See Rear View on page 6 for the location of the Line-Out jack. -
Page 73: Using Voicemail
Basic Features Using Voicemail The term voicemail is used for mobile, cellular, and desktop computerized tele- phone answering systems that digitize incoming voice messages and stores them on disk or flash memory. Incoming calls are diverted to voicemail when the user is unavailable or the phone is powered off. The voicemail button flashes red to indicate the receipt of a message. -
Page 74: Configuring Voicemail Options
Basic Features The Automated Receptionist supplies the number of new messages and saved messages available then plays the first new message recorded. After listening to the message, the following options are available: • Repeat—press 1 to replay the previous message. •... - Page 75 Basic Features • Record Personal Greeting—press 2 to record the personal greeting mes- sage for the current user. • Change Greeting Type—press 3 to change the type of voicemail greeting for the current user. Select from System Greeting (default) and Personal Greeting (custom). •...
-
Page 76: Voicemail To E-Mail Forwarding
Basic Features Voicemail to E-mail Forwarding Voicemail to e-mail is an extension of the voicemail service providing another point of access for messages. When enabled, voicemail to e-mail sends an alert e-mail to the target user including a WAV file attachment containing the recorded voicemail message. - Page 77 Basic Features The Configure E-mail Server screen displays. Select Allow sending voicemail in e-mail to access the options on the screen. Enter the Outgoing e-mail server (SMTP) address and the user E-mail address. Voicemail to E-mail Forwarding...
-
Page 78: Configuring User Information
Basic Features Enter the user name and password used for access to the e-mail server Select Connect to the server anonymously if no log on information is required to access the E-mail server. Click OK. The following warning screen displays. Click OK to complete the E-mail server configuration. - Page 79 Basic Features The User Properties screen displays. Select the Voicemail tab as shown. Ensure that Enable voicemail and Receive messages as attachments to e-mail are selected. Enter the recipient’s e-mail address as shown and click OK to complete the process. 3.8.2.1 ESTING THE OICEMAIL TO...
- Page 80 Basic Features • If no event is logged, the test is successful and voicemail to E-mail is cor- rectly setup. Wait an appropriate amount of time for the E-mail to be delivered to the destination E-mail address. Timeline to receive E-mail varies depending on the performance of the mail system in use.
-
Page 81: Microsoft Response Point Administrator
Microsoft Response Point Administrator to launch Microsoft Response Point Administrator. The Select the base unit screen displays. Select the desired DOS-A50 (only one entry is present in the previous image). Click Connect. The detection process can take a few seconds. If the required DOS-A50 is not present, see Troubleshooting on page 163. - Page 82 Index, and Search tabs on the top of the left-hand panel. About—displays the version of Administrator installed and the version of the DOS-A50 to which Administrator is connected. The Summary panel—shows a brief summary of configured items. Microsoft Response Point Administrator...
-
Page 83: The Phone System Tab
Basic Features 3.10 The Phone System Tab The Phone System tab provides access to various tasks such as adding phones and users to the system, and configuring voice services. There is also a brief summary panel showing added phones, users, and services. 3.10.1 Using the Phones Menu The Phones menu in the task panel is used to add phones, edit existing phones, and delete phones no longer required. - Page 84 If no users exist, the Add Phone procedure directs the administrator to add a new user first. New phones cannot be added until at least one user is added to the DOS-A50. To add a new phone, perform the following steps: In Phone System Phones, click Add Phone.
- Page 85 Basic Features Click Next. The What phone do you want to add screen displays. The available phones display. Highlight the phone entry and click Next. The Who will receive calls on this phone screen displays. The Phone System Tab...
- Page 86 Basic Features Click the Assign User button, and select the appropriate user from those available. Click OK to proceed. The selected name is assigned to the added phone. Up to 4 users can share an extension number (phone). The order of the users is determined by moving a user up or down the displayed list by using the Move User Up or Move User Down buttons.
- Page 87 Basic Features The What do you want to name this phone screen displays. Click Finish to add the phone. The Configuring the phone screen displays. Click Close to complete the process. The Phone System Tab...
- Page 88 Basic Features 3.10.1.2 DITING HONE ESCRIPTIONS To edit an existing phone, perform the following steps: In Phone System Phones, click Edit Phone. The Select the phone you want to edit screen displays. Select the required phone and click OK. The Phone System Tab...
- Page 89 Basic Features The Confirm the identity of the phone screen displays. Check the information displayed to confirm the identity of the selected phone, then click Next to continue. The Advanced button at the bottom left-hand side of the screen is used for IP Phone troubleshooting and requires a user id and password to access.
- Page 90 3.10.1.3 EMOVING A HONE To remove an existing phone, perform the following steps: Removing a phone deletes it permanently from the DOS-A50. The phone must be added again to reconnect it. In Phone System Phones click Remove Phone. The Select the phone you want to remove screen displays.
-
Page 91: Using The Users Menu
Basic Features 3.10.2 Using the Users Menu The Users menu in the task panel is used to add users, edit existing users, and delete users no longer required. 3.10.2.1 DDING A To add a new user, perform the following steps: In Phone System Users, click Add User. - Page 92 Basic Features The New User screen displays. Select User type from the drop down menu. The following options for user type are available: • Person—a person with his or her own extension number, for example, Jane Munroe. • Group—people in a group who share the same extension, for example, shipping or marketing.
- Page 93 Basic Features • Job Role—an extension number belonging to a job title shared by different people, for example, receptionist. • Location—an extension belonging to a specific location, for example, can- teen or lobby. Fill in the Name fields. Ensure information easily identifies the user. Enter the user information as a caller would say it.
- Page 94 Basic Features • Use audio recorded on a phone—record a custom message using the IP Phone handset or headset. Click Record New and follow the onscreen prompts. • Use a prerecorded sound file uploaded to the base unit—click Choose New File... and follow the onscreen prompts to upload a prerecorded WAV file.
- Page 95 Basic Features Click the Call Forwarding tab to display the following screen. Set Call Forwarding behavior as desired. • Within—set the ring time before call forwarding takes over. • Do the following—specify how the call is forwarded and to whom using the Forward to: fields.
- Page 96 Basic Features 3.10.2.2 DITING ESCRIPTIONS To edit an existing user, perform the following steps: Users can edit these details themselves using the Assistant once their profile has been created. See Using the Settings Menu on page 141 for more details. In Phone System Users click Edit User.
- Page 97 Basic Features 3.10.2.3 EMOVING A To remove an existing user, perform the following steps: In Phone System Users click Remove User. The Select a user to remove screen displays. Select the user, group, job role, or location to remove from the list and click The Phone System Tab...
- Page 98 See Editing Phone Descriptions on page 76 for more information. • If the user is not assigned to a phone on the system, the following warning screen displays. Click Yes to remove the selected user from the DOS-A50. The Phone System Tab...
-
Page 99: Using The Voice Services Menu
In the example above, only Port1 on Module 1 is connected to an active phone line. DOS-A50 supports Plug and Play connection to traditional analog voice ser- vices through the built in ATA modules or VoIP connected through the Internet, each requiring no extra hardware. - Page 100 Not all VoIP service providers provide access to 911 emergency ser- vices. Check the service provider documentation to determine whether 911 dialing is supported. DOS-A50 provides support for a single VoIP voice service. Attempting to add a second VoIP voice service displays the Edit Voice Service screen.
- Page 101 Basic Features The Who is your VoIP service provider screen displays. DOS-A50 searches for existing service provider automatically. Select an existing provider, If none are found, select Other service provider from the drop down menu. The screen refreshes displaying a link to the Response Point website.
- Page 102 Basic Features The What information did your service provider give you screen dis- plays. Enter the required information supplied by the service provider in the fields provided and click Next. Contact your service provider for more information. The Do you want to assign direct-dial numbers to users screen dis- plays.
- Page 103 Basic Features Click Add to setup DID to a specific number and enter the desired number on the following screen. Check Yes and select the user to receive the DID number from the drop down list. Phone numbers not configured for direct dial or listed here are automati- cally routed to the receptionist or Automated Receptionist.
- Page 104 Basic Features The What caller information do you want to display screen displays. Enter the information displayed when people receive a call from the VoIP voice service in the Caller ID display name or number field. The information supplied may not appear as entered depending on your VoIP service provider.
- Page 105 Basic Features Dialing external numbers requires that a prefix is added to the number to determine which voice service is used for the call. Select the prefix to associate with VoIP service. Selecting the prefix 9 for VoIP causes the default analog voice service to change to prefix 8.
- Page 106 Basic Features The Phone System screen displays. Check that the VoIP voice service is added to the services list. The Phone System Tab...
- Page 107 Basic Features 3.10.3.2 DITING NALOG OICE ERVICES To edit an existing voice service, perform the following steps: In Phone System Voice Services click Edit Voice Service. The Select the voice service you want to edit screen displays. Select the module to modify and click OK. The Phone System Tab...
- Page 108 Check the adapter description to ensure the correct information is dis- played, then click Next. Click the Advanced button to access the Syspine Module URL. See Syspine DOS-A50 Module Configuration on page 158 for more details. The What are the properties of the phone service lines screen displays.
- Page 109 Basic Features Enter the phone number associated with the port in the Description field for identification purposes. Only alphanumerics, dashes, brackets, and periods are acceptable for port descriptions. The description must not contain spaces and cannot be left blank. For example, check Line 1 and Line 2 to reserve the lines for incoming calls only;...
- Page 110 Basic Features The Configuring the voice service screen displays. Click Close to complete the procedure. 3.10.3.3 IP V DITING OICE ERVICES To edit and existing VoIP voice service, perform the following steps: In Phone System Voice Services click Edit Voice Service. The Phone System Tab...
- Page 111 Basic Features The Select the voice service you want to edit screen displays. Select the VoIP service and click OK. The What information did your service provider give you screen dis- plays. Make any necessary changes to the account information and click Next to continue through the setup screens.
- Page 112 Basic Features The Configuring the VoIP service screen displays. Ensure all the green check marks appear as shown and click Close to complete the VoIP voice service edit. 3.10.3.4 IP V EMOVING OICE ERVICES To remove an existing VoIP voice service, perform the following steps: In Phone System Voice Services click Remove Voice Service.
- Page 113 The Select the voice service you want to remove screen displays. Select the voice service to remove from the list and click OK. A warning screen displays. Click Yes to remove the selected voice service from the DOS-A50. The Phone System Tab...
-
Page 114: Using The Other Menu
Basic Features 3.10.4 Using the Other Menu The Other menu in the task panel is used to view detailed call history, upgrade device firmware, and refresh the Administrator main page to display setting changes. The Phone System Tab... - Page 115 Basic Features 3.10.4.1 IEWING ISTORY The Call History screen enables the administrator to view all system call activ- ity, whether incoming, outgoing, and internal. The Call History screen is composed of the following areas: Filters—filter the Call History by time scale, call type, and user. Call Direction—displays traffic flow, incoming, outgoing, or internal.
- Page 116 Basic Features The screen refreshes with all the available upgrades associated with the .rpu file and the number of devices, or candidates, to which the upgrades apply. In the example, two upgrades are available and each upgrade applies to two candidates. Select the desired upgrade method: •...
- Page 117 Basic Features The Warnings and confirmation screen displays. The screen displays a list of devices that require upgrades. IMPORTANT! Read the warnings displayed in the lower panel before continuing. Click Upgrade to start the upgrade process. The Upgrading device firmware screen displays. The Phone System Tab...
- Page 118 Click OK to re-display the upgrading screen. All the selected devices show a green check when the upgrades have completed successfully. After upgrading modules, DOS-A50 displays a prompt to create a new system backup. Click Yes to perform a backup now, or click No to backup the system later.
- Page 119 From time-to-time, new firmware becomes available to correct reported bugs or enhance functionality. These firmware files can be downloaded from www.syspine.com and placed on the administrator’s PC ready for application to the base unit. To upgrade a DOS-A50 module, perform the following steps: Click Upgrade Device Firmware.
-
Page 120: The Base Unit Tab
E-mail server, and backing up and restoring voicemail and configuration settings. There is also a brief sum- mary panel showing DOS-A50 status, remaining storage space, and Proper- ties. The summary screen is the default view in the Base Unit tab and shows at a glance any system issues that need attention. -
Page 121: Using The Status Menu
Basic Features 3.11.1 Using the Status Menu The Status menu in the task panel is used to view system events, warnings, and errors, and to review storage conditions. The Base Unit Tab... - Page 122 Basic Features 3.11.1.1 IEWING THE VENT The Event Log shows all errors, warnings, and informational messages. To access the Event Log, click View Event Log in the Status panel. The View Event Log screen displays. No. Item Description Message Displays the total number of messages and message Count panel status.
- Page 123 Basic Features 3.11.1.2 IEWING TORAGE PACE ETAILS The Storage Space Detail screen shows a summary of total system storage space and a breakdown of system storage space by user. To access the storage summary, click View Storage Space Detail in the Status panel.
-
Page 124: Using The Properties Menu
After logging in and setting up the phones and users required, it is recom- mended that the DOS-A50 password is changed. The default password for the DOS-A50 is admin. To change the DOS-A50 password, perform the following steps: Click Change Password in the Properties panel. The Change Password screen displays. - Page 125 3.11.2.2 TRONG ASSWORD A maximum of 256 characters can be entered for the DOS-A50 Administrator password. Due to the way passwords are encrypted, the most secure pass- words are 7 or 14 characters long. For a password to be strong, it should: •...
- Page 126 The following warning displays. Click Yes to save the changes and restart the DOS-A50. The DOS-A50 only reboots if the time zone is changed. All other changes are updated immediately. Verify the new date and time in the summary panel.
- Page 127 To customize the parked call music, perform the following steps: Prepare the desired music on an audio device with analog output. Connect the device to the audio in jack on the rear of DOS-A50 as shown. DOS-A50 Line-Out Line-In...
-
Page 128: Using The Backup Menu
Basic Features 3.11.3 Using the Backup Menu The Backup menu in the task panel enables the backup and retrieval of config- uration and voicemail files for disaster recovery or security purposes. IMPORTANT! Configuration and voicemail files may contain the names of users, per- sonal phone calls, or other confidential information and therefore it is important to store backups in a secure location on the LAN or on removable media. - Page 129 Basic Features Enter the filepath to the secure area of the network or removable media or browse to the desired location. Enter a meaningful backup name or use the supplied name as shown. Click OK. The following warning screen displays. Check the filepath and file name are correct and click Yes.
- Page 130 Combine the current voicemail with the voicemail restored from the backup — configuration and voicemail files are restored from the backup. Backup voicemail is combined with existing voicemail on the DOS-A50. • Replace the current voicemail with the voicemail restored from the backup —...
- Page 131 Basic Features Click Restore. The following warning screen displays. Click Yes. The configuration files are restored, and the DOS-A50 restarts. Once the DOS-A50 restarts, the voicemail option chosen in step 4 exe- cutes. The Base Unit Tab...
- Page 132 Basic Features In the example, the Keep the current voicemail and do not restore voicemail from the backup option is specified so no voicemail is restored. Click Close to complete the restore process. The Base Unit Tab...
-
Page 133: The Call Routing Tab
3.12 The Call Routing Tab The Call Routing tab is used to determine how incoming calls are handled when they enter the Syspine Phone System. Choose how calls are answered and configure Automated Receptionist properties using this tab. There is also a brief summary panel showing details of the current call routing plan and Auto- mated Receptionist properties. - Page 134 Basic Features To select how calls are handled, perform the following steps: If no plan is selected, the default Automated Receptionist Plan is used. Click Choose How to Answer Calls, as shown. The Choose How to Answer Calls screen displays. Select Automated Receptionist Plan or Receptionist Plan.
-
Page 135: Using The Automated Receptionist Plan
Automated Receptionist is the default Call Routing Plan. Incoming Call DOS-A50 The Automated Receptionist greeting consists of two parts: Welcome Greeting—the opening sentence heard by callers can take any form, but should conform to the guidelines set out in Tips for Recording Greetings and Prompts on page 127. - Page 136 Basic Features Click Configure Automated Receptionist Properties. The Configure Automated Receptionist Properties screen displays. Check Callers can ask for a directory... to enable the Directory of Response Point registered users. An activation warning screen displays. The Call Routing Tab...
- Page 137 If an audio source is not available, the Play button is disabled. • Use a pre-recorded sound file uploaded to the base unit—use a sound file uploaded to the DOS-A50. IMPORTANT! The file format uploaded must be 8kHz, 16bit, mono WAV. All other file types are not supported.
- Page 138 Basic Features Audio quality is important for the recording. The Automated Receptionist may be the first experience a customer has of a company. See Tips for Recording Greetings and Prompts on page 127. Click OK. The Configure Automated Receptionist Properties screen is re-dis- played.
-
Page 139: Tips For Recording Greetings And Prompts
Basic Features 3.12.3 Tips for Recording Greetings and Prompts Greetings and prompts create the first impression that callers have of a busi- ness, so it's important to keep in mind these basic tips when making custom recordings. 3.12.3.1 REETING • Be polite and gracious—the cornerstone of a good voice interface. -
Page 140: Using The Receptionist Plan
3.12.4 Using the Receptionist Plan All incoming calls are answered by a receptionist using this plan. The recep- tionist is responsible for call routing. Incoming Call Receptionist DOS-A50 3.12.4.1 SING THE ULTIPLE HONE The Multiple Phones Ring Plan is a type of Receptionist plan. It allows many or all phones to ring when there is an incoming call. - Page 141 Basic Features This plan usually involves some sort of social agreement among coworkers. For example, if the receptionist doesn’t pick up an incoming call in four rings, someone else will answer one of the other phones that are ringing. A Job Role user is a good method of setting up a multiple phone ring plan. This method creates a generic user called, in this case, Receptionist.
- Page 142 Basic Features In the Tasks pane, click Edit Phone. Select a phone to assign to the Multi- ple Phone Ring Plan and click OK. The Confirm identity of the phone screen displays. Click Next. The Who will receive calls on this phone screen displays. Select an unassigned shared extension and click Assign User.
- Page 143 Basic Features The Administrator - Select screen displays. Click Receptionist in the list and click OK. Click Next and follow the on-screen prompts to complete the wizard and update the phone. When the configuration is complete, the following screen displays. Repeat steps 4 through 9 for each phone that is used to answer incoming calls.
-
Page 144: Using The Bypass Receptionist Feature
Basic Features 3.12.5 Using the Bypass Receptionist Feature The administrator can enable this feature to allow users to bypass the recep- tionist for selected incoming calls using the Assistant. The Configure Bypass Receptionist screen is also used by the administrator to avoid duplicate entries by different users. - Page 145 Basic Features Check Allow calls to bypass the receptionist based on the caller ID phone number. Click OK. Users can enter customer numbers into the Phone Numbers field using Response Point Assistant. Numbers entered here bypass the receptionist and are routed directly to the user. See Using the Contacts Tab on page 146 for more information.
-
Page 146: Configuring External Access
Basic Features 3.12.6 Configuring External Access Enter external phone numbers of users who use the Syspine Phone System. After entering their Assistant password, the system treats the incoming call as if the user pressed the Response Point button on a phone in the office. Users can call internal extensions, voice dial contacts, and check voicemail from the phone numbers specified. - Page 147 Basic Features The Configure External Access screen displays. Click Add and enter the external number and internal contact from the drop-down menu. Click OK to return to the Configure External Access screen. Select an entry and click Edit or Remove, or click Add to include more entries or Remove All to delete all entries shown.
- Page 148 UMBERS Once an external number is entered by the administrator in the Configure External Access screen, the DOS-A50 treats any calls from the specified num- ber as if the user had pressed the Response Point button in the office. External Access Calls...
-
Page 149: Microsoft Response Point Assistant Features
All Programs Microsoft Response Point Assistant to launch Microsoft Response Point Assistant. The log in screen displays. Enter the user extension number and the default password 9999. The DOS-A50 is automatically detected. Click Log On. Microsoft Response Point Assistant Features... - Page 150 Basic Features The main Assistant screen displays. The Assistant screen is composed of the following items: Menu bar—access Assistant functions from the drop down menus. Current user panel—displays the current Assistant user information. Member status indicator—displays registered user status. Indicates the member is assigned to a phone and is available. Indicates the member is assigned to a phone and is busy.
-
Page 151: Using The Connect Menu
Incoming calls are indicated above the icon, even when the Assistant main page is closed. • Log Off—disconnects the Assistant from the DOS-A50 and logs off the current user. • Exit—logs off of Assistant and exits the program. Assistant does not run in the notification area of your desktop, and incoming call notifications are not available. -
Page 152: Using The Parked Calls Menu
Basic Features 3.13.2 Using the Parked Calls Menu Call Park is used to hold a call in the system until another system extension or user is free to respond. There are a total of nine slots available for call parking. Any IP Phone can retrieve a Parked call by using the Response Point button on the phone or by using the Parked Calls menu in Assistant. -
Page 153: Using The Settings Menu
Basic Features 3.13.3 Using the Settings Menu The Settings menu is designed for user’s to customize their individual Response Point settings. Five shortcut options are available to quickly access the phone Properties screen, as well as the Phone Settings web page. •... - Page 154 Basic Features 3.13.3.1 SING THE DENTIFICATION The Identification screen is used to modify user personal details, reset user passwords, and whether or not an user’s extension is accessible to external callers. User type and Extension number can not be changed using Assistant. •...
- Page 155 Basic Features 3.13.3.2 SING THE OICEMAIL The Voicemail screen is used to specify how voicemail is reviewed and to cus- tomize the voicemail greeting if required. • Enable or disable voicemail for this user account. • Enable or disable voicemail retrieval from IP Phones. •...
- Page 156 Basic Features 3.13.3.3 SING THE ORWARDING The Call Forwarding screen is used to specify call forwarding rules for users. • Select the amount of time the phone rings before call forwarding activates from the Within: drop-down menu. The available range is 0 (0 rings) to 20 seconds (approximately 8 rings).
- Page 157 Basic Features 3.13.3.4 SING THE OTIFICATIONS The Notifications screen is used to specify call notification rules and how call- ers are identified in notifications. • By default, users are notified of incoming calls by an Assistant pop-up in the notification area and a sound played by the system. If notifications are not required, or the sound is not required, deselect the Incoming call notifications check boxes.
- Page 158 Basic Features 3.13.3.5 SING THE ONTACTS The Contacts screen is used to manually add or import user personal contacts for voice dialing and Bypass Receptionist. This service is only available if the administrator has enabled the Bypass Receptionist option (see Using the Bypass Receptionist Feature on page 132).
- Page 159 Basic Features Adding Contacts Manually To add a contact manually, perform the following steps: Click Add. The Add a Contact screen displays. Enter the contact name and telephone number(s). Select the default Voice Service to call this contact. If no VoIP Voice Service is connected, the Voice service drop down menu is grayed out.
- Page 160 Basic Features Importing Contacts Automatically To import contacts from address books such as Outlook, Windows Address Book (for Microsoft Windows XP), or Windows Contacts (for Microsoft Windows Vista), perform the following steps: Click Import. The Import Contacts screen displays. Select where to import from using the drop-down menu. Users can import from Outlook and Windows Address Book for Windows XP or Windows Contacts for Windows Vista.
- Page 161 Select the required contacts or check the box in the Name bar to select (or deselect) all entries. Only add frequently used contacts. Adding large numbers of contacts to the DOS-A50 can degrade the accuracy of the speech recognition sys- tem and takes up memory space. Click OK.
- Page 162 Basic Features Check the Bypass Receptionist box for each contact as required. Use the buttons on the right-hand side of the screen to manage the con- tacts list: • Click Edit to display the edit screen. Make any changes required and click •...
- Page 163 Basic Features 3.13.3.6 SING THE HONE ETTINGS The Phone Settings web page is used to review user call history, set phone preferences, and enter speed dial numbers. From Assistant, select Settings Phone Settings. The username and password screen displays. Enter the default username user and password 9999. Click OK.
- Page 164 Basic Features Call History Quickly review call history using this panel. Up to 50 missed, received, and dialed numbers are recorded here, including the caller name, number, and time of call. Click Dial on the desired contact to use the Click to Call feature. Phone Setting Click Preferences to view or modify phone settings.
- Page 165 Basic Features • Call Waiting—enable or disable the call waiting tone. When enabled, if the line is in use when another call tries to connect, the user hears the Call Waiting tone. The default is Enable. • Do Not Disturb—enable or disable Do Not Disturb. When enabled, the user’s phone doesn’t ring and all calls are diverted according to the Call Forwarding rules.
- Page 166 Basic Features • Add speed dial numbers—enter the item (0 to 49) the contact name, and the number to dial and click Add. The number is added to the speed dial list. If the speed dial entry already exists, clicking Add overwrites the old number with the current entry.
-
Page 167: Using The Help Menu
Basic Features 3.13.4 Using the Help Menu Microsoft Response Point wizards and menus usually contain context sensitive help which provide a good starting place for help and tips. The Help menu pro- vides in depth information on a wider range of subjects. Three options are available through the drop-down Help menu. - Page 168 Refer to Did You Know for general operational tips and general advise. 3.13.4.3 BOUT ESPONSE OINT SSISTANT Click About Response Point Assistant to display the current version of the Assistant and DOS-A50. Version information may differ to that shown. Microsoft Response Point Assistant Features...
-
Page 169: Advanced Features
This chapter contains information on advanced DOS-A50 operation using Microsoft Response Point™ phone system software. Topics include restarting ® individual modules or the system and changing the Syspine Module page pass- word. For more information on Syspine Module configuration, see the Service Manual and Security Gateway User’s Manual. -
Page 170: Syspine Dos-A50 Module Configuration
Advanced Features Syspine DOS-A50 Module Configuration The DOS-A50 uses a dedicated URL for Module Configuration. The administra- tor perform limited administration functions from this page. For more information on Syspine Module configuration, see the Service Manual and Security Gateway User’s Manual. - Page 171 Select Administrator Mode and enter the password admin (lower case). In Administrator Mode, the Syspine Module screen has limited function- ality. For more information on Debug Mode and Syspine Module configu- ration, see the Service Manual and Security Gateway User’s Manual.
-
Page 172: Restarting The System Or Modules
Restarting the System or Modules The Restart System/Module task is used to reboot modules installed in DOS- A50 and reboot the base unit without access to the LCD panel on DOS-A50. IMPORTANT! Do not reboot multiple modules at the same time. Select items one-at- a-time and reboot individually. - Page 173 Advanced Features To restart the base unit, perform the following steps: Click Restart System/Module. The Restart System/Module screen displays. Select Restart Base Unit and click APPLY. Refresh the page until the Syspine Module main page displays correctly. Syspine DOS-A50 Module Configuration...
-
Page 174: Changing The Syspine Module
Advanced Features 4.1.2 Changing the Syspine Module Page Password To change the Syspine Module access password, perform the following steps: Click Change Password. The Would you like to change password screen displays. Enter a new password in the Password field and confirm. -
Page 175: Troubleshooting
Why can't I log on to my organization's DOS-A50? If a security certificate was successfully downloaded and confirmed, but prob- lems are still experienced logging on to the DOS-A50, there may be a number of reasons, including hardware or software problems. - Page 176 The DOS-A50 is not responding, and it probably needs to be restarted. Why can't I see the Syspine IP Phone on the Phone System page that I just configured? If the phone is securely plugged in to both an outlet and the LAN, try reinitializ- ing the phone so that it appears on the Phone System page.
- Page 177 If the network is working, reboot the computer with Administrator on it and try to connect to the network again. If still unable to connect to the DOS-A50, make sure that the DOS-A50 is connected, plugged in, and then restart it. Remember that while restarting the DOS-A50, the phone system can’t receive or place calls, and existing...
- Page 178 Look for the message in the Junk E-Mail or Deleted Items folder. Add the sending E-mail address to the list of approved senders so that messages from the DOS-A50 do not get filtered in the future.
- Page 179 How do I upgrade the Firmware on my DOS-A50? The DOS-A50 firmware is only upgradable by service personnel. See the DOS- A50 Service Manual for more information. The DOS-A50 boots from USB as priority. When upgrading firmware ensure that the USB key is removed before rebooting the DOS-A50.
-
Page 180: Resetting Factory Defaults
Copy the ResponsePointEraseData.exe file to an empty USB flash drive (also known as USB key) with activity light. Insert the USB key in to the USB port on the DOS-A50 (see Rear View on page 6 for location). When the activity light on the USB key stops blinking, the process is com- plete. -
Page 181: Resetting The Administrator Password
Copy the ResponsePointPasswordReset.exe file to an empty USB flash drive (also known as USB key) with activity light. Insert the USB key in to the USB port on the DOS-A50 (see Rear View on page 6 for location). Verify the password is reset by logging into the Administrator using the default password. - Page 182 This page left blank intentionally.
-
Page 183: Quick Reference Guides
Quick Reference Guides This appendix contains quick reference guides to making phone calls and using voicemail. The information supplied here is also available in the Microsoft Response Point™ Assistant Help menu. ®... -
Page 184: Phone Calls Quick Guide
Appendix A Phone Calls Quick Guide Task Action Call an internal Dial the three-digit extension number of the contact. extension number using manual dialing. Call an internal Press the Response Point button, and say the name of extension number the contact. For example, say John Smith or Sales. using voice dialing. - Page 185 Appendix A Task Action Transfer a parked Hang up the phone, and press 7 * 0 followed by the call using manual extension number. dialing. For example, press 7 * 0 202 to transfer the call to exten- sion 202. When multiple calls are parked, hang up the phone, and press 7 * followed by the call number.
-
Page 186: Voicemail Quick Guide
Appendix A Voicemail Quick Guide Review voice messages whether in or out of the office using Response Point. The password used to access voicemail and the Assistant program are the same. The default password is 9999. To access voicemail in the office, press the Response Point button, and say Voicemail or dial 886. -
Page 187: Dos-A50 Wall Mounting Template
DOS-A50 Wall Mounting Template Horizontal Guide Line Ensure 100 mm between guides Drill Guide Drill Guide IMPORTANT: This template MUST be printed full size on A4 size paper (or greater). Ensure that the distance between the drill guides is 100 mm (3.94 inches). -
Page 188: Index
Voicemail 116 WAN 24 Backup Voicemail 116 DID 90 Bypass Receptionist Direct-Inward-Dial Using 132 Using 90 DOS-A50 Call Plans Bottom View 7 Automated Receptionist 123 Date and Time 37, 113 Choosing 121 Features 5 Multiple Phone Ring 128 Front View 5... - Page 189 Index Wall Mount 20 Module Configuration 158 Password 36, 112 Typical Setup 16 Rear View 6 LCD Panel 8 LED Behavior 9 Event Logs Viewing 110 PA. See Public Address System External Access Password Configuring 134 Tips 36, 113 Using 136 Phone Calls Quick Guide 172 Factory Defaults...
- Page 190 VoIP Voice Services Settings 118 Adding 88 Voicemail 118 Editing 98 Storage Space Details 111 Typical Setup 17 Syspine Phone System Windows Vista System Tour 5 Administrator Installation 31 Assistant Installation 45 Troubleshooting Windows XP Common Issues 163 Administrator Installation 29...
- Page 191 Index...
Need help?
Do you have a question about the A50 and is the answer not in the manual?
Questions and answers