
Summary of Contents for Tectrix ClimbMax 1000
- Page 1 LT-03070 A PDF file was made for this manual, (see additional pages) but the quark files are NOT in the released directory. P:\eco~xfer\logs&forms\Form no doc.doc...
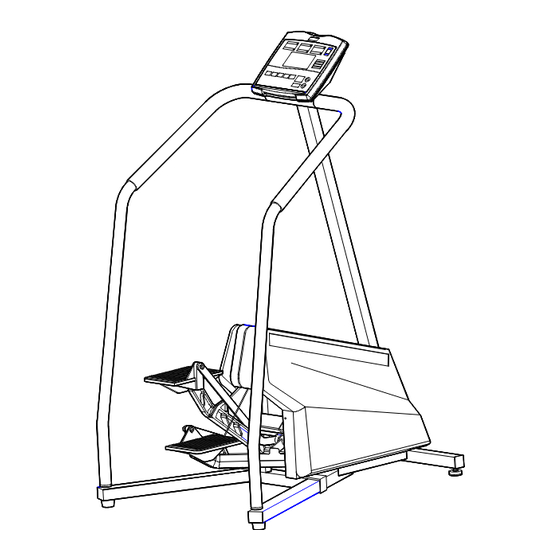
- Page 2 ® ClimbMax 1000 Owner’s Manual Tectrix Fitness Equipment 68 Fairbanks Irvine, California 92618 (800) 767-8082 (714) 380-8082...
- Page 3 FIGURE A - Grounded Outlet Parts of ClimbMax 1000 are covered by U.S. patent numbers: 4,938,474 and 4,949,993. Tectrix and ClimbMax are registered trademarks of Tectrix Fitness Equipment, Irvine California.
-
Page 4: Table Of Contents
ClimbMax 1000 Owner’s Manual Table of Contents CHAPTER 1 - INTRODUCTION About This Book CHAPTER 2 - ASSEMBLY AND SETUP Assembly Overview Unpacking ClimbMax 1000 Parts List Assembling the ClimbMax 1000 Attach the Feet to the Base Attach the Display Upright... -
Page 6: Chapter 1 - Introduction
CHAPTER 1 - INTRODUCTION Welcome to ClimbMax 1000, the perfect climber for your fitness facility or other group exercise environment. ClimbMax’s durability, ease of use, and flexible programming make it ideal for both individual and partnered workouts. ClimbMax’s features include: •... - Page 7 Page 2 Chapter 1 - Introduction Chapter 4 - The Heart Rate Program How to use the optional heart rate monitoring and programming features. Chapter 5 - Testing How to make sure your ClimbMax is operating properly. Appendix A How ClimbMax’s level settings translate into climbing speeds. Appendix B Speed and energy conversion chart.
-
Page 8: Chapter 2 - Assembly And Setup
CAUTION: Do not stand the display console upright tube on its end! Lay it flat instead. Standing it on end could damage the display ribbon cable. Parts List Your ClimbMax 1000 includes these parts: Description Part Number Item #... -
Page 9: Attach The Feet To The Base
5/16” x 2.5” Button Cap Screw 41138 Bracket, Handrail Clamp 52078 #10 x 3/4” Phillips-head Screw 41009 The console and related materials for the ClimbMax 1000 are packed in the Configuration Kit included with the unit. This box contains: Description Part Number Warranty Card 03006 Owner’s Manual... -
Page 10: Attach The Display Upright
ClimbMax 1000 Owner’s Manual Page 5 Attach the Display Upright Attach the display upright (5) to the base (1) using two 5/16” by 2” screws (8) and washers (10) as shown in Figure 2. Be sure the ribbon cable goes through... -
Page 11: Attach The Handrails
Page 6 Chapter 2 - Assembly and Setup Attach the Handrails Slip the left (6) and right (7) handrails over the plugs on the top of the rear feet. They will probably fit tightly; if necessary, use a spray cleaner as a lubricant. Rotate the handrails into the clamp bracket at the top of the display console upright (5). -
Page 12: Plug In The Display Cable
Then, tighten the lock nuts on the front foot. Plugging in the ClimbMax The ClimbMax 1000 has both power in and power out sockets. You can plug a ClimbMax into either a wall outlet or the power out socket on another ClimbMax. Using the correct cord, plug one end into the “in”... -
Page 13: Drive Cable Maintenance
ClimbMax drive cables. These cables will eventually wear out. We recommend drive cables be inspected regularly for signs of wear and replaced every 6 to 8 months with Tectrix-supplied replacement cables. Failure to perform drive cable maintenance procedures could lead to cable... -
Page 14: Chapter 3 - Let's Climb
CHAPTER 3 - LET’S CLIMB So far, we’ve discussed what the facility owner needs to do to get the ClimbMax ready to use. This chapter describes how to use it; what each climber can do to get the most out of his or her ClimbMax workout. -
Page 15: Your Workout
Page 10 Chapter 3 - Let’s Climb When climbing, you should have a smooth, stair-climbing action. The pedals should not hit the floor at the bottom of each stroke, or their upper limit at the top of the stroke. If they do, either climb faster or adjust the ClimbMax’s speed setting as described later in this chapter. -
Page 16: Using The Preset Programs
ClimbMax 1000 Owner’s Manual Page 11 2. The light next to “Program” now flashes. Press the Manual program key. 3. Start climbing! If the speed is too fast or slow, press the up or down arrow key to adjust it until you’re comfortable. -
Page 17: The Workout Display
Page 12 Chapter 3 - Let’s Climb When you change the length of a program, ClimbMax intelligently adjust the program’s profile to match your setting. For the fat burning and strength programs, it adds or removes repetitions of the center section; for the endurance program, it increases or decreases the length of the center section. - Page 18 ClimbMax 1000 Owner’s Manual Page 13 • The three Progress Indicators show six categories of information. At the beginning of a workout the three top categories are shown. Pressing the Switch Display button at the right of the fields switches between categories; the lights over and under each field indicate which information is currently displayed.
-
Page 19: Workout Summary
Page 14 Chapter 3 - Let’s Climb The three bottom categories are: If you have the heart rate monitor option, this is your Heart Rate or Level current heart rate in beats per minute. Without a heart rate monitor, this shows the level setting for the climber. In manual mode, this is your vertical speed;... -
Page 20: Chapter 4 - The Heart Rate Program
CHAPTER 4 - THE HEART RATE PROGRAM As an option, the ClimbMax includes a heart rate monitor harness you can wear during a workout to continuously monitor your heart rate. In either manual or program mode, the heart rate monitor merely gives you more information—it lets you see your current heart rate at any time. - Page 21 Page 16 Chapter 4 - The Heart Rate Program While you’re climbing, the fields at the top of the console show statistics about your workout. For details about this display, see the section “The Workout Display,” in Chapter 3. The workout graph shows a horizontal line representing your target heart rate.
-
Page 22: Chapter 5 - Testing Climbmax Performance
Not used Calories/Hour Not used The Elapsed Time field shows “CL1,” indicating this is a ClimbMax 1000; Calories shows the version number of the ClimbMax’s internal software; Speed shows the state of the slack switch (either “On” or “Off”). While the climber is in test mode, some of the console keys have special functions: Displays the odometer reading and RPM sensor data. - Page 23 Page 18 Chapter 5 Testing ClimbMax Performance To leave test mode, press Clear. For more information about maintaining and servicing your ClimbMax, see the ClimbMax 1000 Maintenance and Repair Manual.
- Page 24 APPENDIX A - CLIMBER LEVEL TO SPEED CONVERSION When you adjust the speed during a ClimbMax program, you’re really adjusting the “level” you have the climber set to. While the climbing speed does increase as you raise the level, there is not a direct relationship between the level number shown in the Progress Indicator area and your vertical speed.
-
Page 26: Appendix B - Speed And Energy Conversions
APPENDIX B - SPEED AND ENERGY CONVERSIONS The table below shows approximate values for energy used at various speeds during a ClimbMax workout. The values shown are for a 150 pound climber. Ft/Min M/min Km/H METS KPM/S Watts Cal/Hour 10.4 10.7 12.1 12.2... -
Page 28: Declaration Of Conformity
Directive : EMC 89/336/EEC Standards : IEC335-1, EN55014, EN50082-1 Product Name : ClimbMax (Series) Model Numbers : 91000-91999 European Contact : Tectrix International, U.K. Ltd, 20 Hornsby Square, Southfields Industrial Park, Laindon, Basildon, Essex, SS15 6SD, UK Phone 011-44-1268-412292 03090... - Page 29 Tectrix Fitness Equipment P/N 03070...
Need help?
Do you have a question about the ClimbMax 1000 and is the answer not in the manual?
Questions and answers