Table of Contents
Advertisement
Available languages
Available languages
Quick Links
Advertisement
Table of Contents

Related Manuals for Akai MPC Renaissance


Summary of Contents for Akai MPC Renaissance
- Page 1 QUICKSTART GUIDE ENGLISH ( 3 – 10 ) GUÍA DE INICIO RÁPIDO ESPAÑOL ( 11 – 19 ) GUIDE D'UTILISATION RAPIDE FRANÇAIS ( 20 – 28 ) GUIDA RAPIDA ITALIANO ( 29 – 37 ) SCHNELLSTART-ANLEITUNG DEUTSCH ( 38 – 46 )
-
Page 3: Box Contents
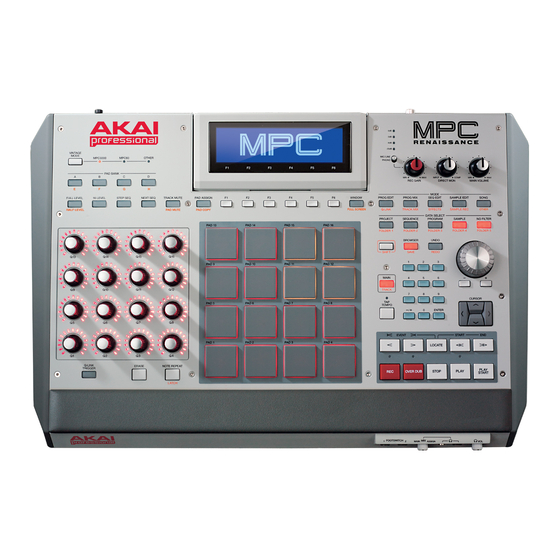
Fusing Akai Professional’s legendary MPC layout and workflow with the power of your computer, MPC Renaissance is an unrivaled instrument for music production. MPC Renaissance allows you to create music using classic hardware controls and an integrated pop-up display, while its exclusive MPC Software empowers you with unprecedented, expandable production capabilities on your Mac or PC. -
Page 4: System Requirements
Follow this sequence of steps whenever you use MPC Renaissance with your computer: 1. Connect MPC Renaissance to a power source. 2. Connect MPC Renaissance's COMPUTER USB PORT to a free USB port on your computer, using a standard USB cable. -
Page 5: Mpc Software Overview
This is just a broad overview of the MPC software's features. Virtually all of the software elements can be accessed and controlled by MPC Renaissance. Please also refer to the in-depth Reference Manual (in the Help menu). The Reference Manual contains a quick tutorial on how to get started making a song so you can use MPC's features right away –... -
Page 6: Assign Samples To The Pads
GET STARTED 1. CONNECT, OPEN & CONFIGURE 1. Connect MPC Renaissance to a power source and to a USB port on your computer, as shown in the CONNECTION DIAGRAM. 2. Power on MPC Renaissance and open MPC software. 3. In the software, go to Edit Preferences, and click the Audio &... -
Page 7: Top Panel
FEATURES MPC Renaissance is hardware specifically designed to control the MPC software. This section describes all the hardware controls. For a complete explanation of the software, please see the MPC Reference Manual in the software in the Help menu. TOP PANEL... - Page 8 PAD / Q-LINK KNOB CONTROLS Q-LINK KNOBS – Use these touch-sensitive knobs to adjust various parameters and settings. The LEDs surrounding each knob indicate the knob's current position. Q-LINK TRIGGER – Hold this button down, then touch one of the Q-LINK KNOBS to make that knob's parameter's value jump to its minimum or maximum (depending on the Trig parameter in the software).
-
Page 9: Front Panel
WINDOW / FULL SCREEN – When this button is lit, it means the selected field in the display contains additional functions; press this button to access them. Use the F-BUTTONS, CURSOR BUTTONS, and DATA DIAL or -/+ buttons to execute (or cancel) these additional functions. Hold SHIFT and press this button to switch between Full Screen and Half Screen modes. -
Page 10: Rear Panel
MIDI IN – Use a five-pin MIDI cable to connect the MIDI OUT of an optional external MIDI device to the MIDI IN of MPC Renaissance. MIDI OUT – Use a five-pin MIDI cable to connect the MIDI OUT of MPC Renaissance to the MIDI IN of an optional external device. -
Page 11: Guía De Inicio Rápido (Español)
GUÍA DE INICIO RÁPIDO (ESPAÑOL) INTRODUCCIÓN Combinando la disposición y el flujo operativo del legendario MPC de Akai Professional con la potencia de su computadora, MPC Renaissance es un instrumento sin igual para la producción musical. MPC Renaissance le permite crear música usando controles de hardware clásicos y una pantalla emergente integrada, mientras su exclusivo software MPC pone en sus manos unas capacidades de producción sin precedentes y... -
Page 12: Requisitos De Sistema
Siga esta secuencia de pasos toda vez que use MPC Renaissance con su computadora: 1. Conecte el MPC Renaissance a una fuente de alimentación eléctrica. 2. Conecte el PUERTO USB COMPUTER del MPC Renaissance a un puerto USB de la computadora, con un cable USB estándar. -
Page 13: Descripción General Del Software Mpc
Transporte Nivel maestro Ésta es solo una descripción general amplia de las características del software MPC. El MPC Renaissance puede acceder y controlar virtualmente todos los elementos del software. Consulte también el Manual de referencia con mayor profundidad (en el menú Help (Ayuda)). El Manual de referencia contiene un tutorial rápido sobre cómo comenzar a hacer un tema, de modo que pueda usar inmediatamente las características... -
Page 14: Cómo Asignar Muestras A Los Pads
PARA COMENZAR 1. CÓMO CONECTAR, ABRIR Y CONFIGURAR Conecte el MPC Renaissance a una fuente de alimentación y a un puerto USB de su computadora, como se muestra en el DIAGRAMA DE CONEXIÓN. Encienda el MPC Renaissance y abra el software MPC. -
Page 15: Panel Superior
CARACTERÍSTICAS El MPC Renaissance es un equipo diseñado específicamente para controlar el software MPC. En esta sección se describen todos los controles de hardware. Para una explicación completa del software, consulte el Manual de referencia de MPC en el menú Help del software. - Page 16 CONTROLES DE PAD / PERILLAS Q-LINK 8. PERILLAS Q-LINK – Use estas perillas sensibles al tacto para ajustar diversos parámetros y valores. Los LED que rodean a cada perilla indican la posición actual de la misma. 9. DISPARADOR Q-LINK – Mantenga pulsado este botón y toque una de las PERILLAS Q-LINK para hacer que el valor del parámetro de esa perilla salte a su mínimo o máximo (dependiendo del parámetro Trig del software).
- Page 17 23. TEMA / OTROS – Pulse este botón para ver la pantalla Song (Tema) en la pantalla y en el software. Mantenga pulsado SHIFT y pulse este botón para entrar al modo Other (Otros) que le permite ajustar: el número mínimo de golpecitos para el botón TAP TEMPO, el umbral, la sensibilidad y la curva del pad, los mensajes de los interruptores de pedal y el destinatario de Program Change (Cambio de programa).
-
Page 18: Panel Frontal
PUERTO USB DE LA COMPUTADORA – Use el cable USB incluido para conectar este puerto a un puerto USB disponible en la computadora. Esta conexión permite que el MPC Renaissance envíe y reciba datos MIDI hacia y desde el software MPC. -
Page 19: Soporte Y Actualizaciones
ENTRADA MIDI – Use un cable MIDI de cinco pines para conectar la SALIDA MIDI de un dispositivo MIDI externo opcional a MIDI IN (Entrada MIDI) del MPC Renaissance. SALIDA MIDI – Use un cable MIDI de cinco pines para conectar MIDI OUT (Salida MIDI) del MPC Renaissance a la ENTRADA MIDI de un dispositivo externo opcional. -
Page 20: Contenu De La Boîte
GUIDE D’UTILISATION SIMPLIFIÉ (FRANÇAIS) PRÉSENTATION La fusion entre la disposition des commandes et du flux de production légendaire du MPC d'Akai Professional avec la puissance d’un ordinateur, le MPC Renaissance est un instrument incomparable pour la production de musique. Le MPC Renaissance vous permet de créer de la musique en utilisant des commandes matérielles classiques et un affichage intégré, alors que son logiciel MPC exclusif vous offre des possibilités de... -
Page 21: Configuration Requise
Suivez ces étapes dans l’ordre toutes les fois que vous employez le MPC Renaissance avec votre ordinateur : 1. Branchez le MPC Renaissance à une source d'alimentation. 2. Utilisez un câble USB standard pour brancher le port USB pour ordinateur du MPC Renaissance au port USB d'un ordinateur. 3. Mettez le MPC Renaissance sous tension. -
Page 22: Présentation Du Logiciel Mpc
Cette section se veut un bref aperçu des fonctions du logiciel MPC. Pratiquement tous les éléments du logiciel peuvent être accédés et commandés par le MPC Renaissance. Veuillez également consulter le guide de référence détaillé (menu Help). Le guide de référence contient un tutoriel rapide sur comment faire une chanson afin que vous puissiez commencer à... -
Page 23: Assigner Des Échantillons Aux Pads
MISE EN ROUTE 1. RACCORDEMENT, OUVERTURE ET CONFIGURATION Branchez le MPC Renaissance à une prise secteur et au port USB de votre ordinateur tel qu’indiqué sur le SCHÉMA DE CONNEXION. Mettez le MPC Renaissance sous tension et lancez le logiciel MPC. -
Page 24: Caractéristiques
CARACTÉRISTIQUES Le MPC Renaissance est spécialement conçu afin de commander le logiciel MPC. Cette section décrit toutes les commandes matérielles. Pour une explication complète du logiciel, veuillez consulter le guide de référence MPC dans le menu d'aide du logiciel. PANNEAU SUPÉRIEUR... - Page 25 COMMANDES DES PADS ET Q-LINK 8. BOUTONS Q-LINK – Utilisez ces boutons afin d'ajuster les divers paramètres et sensibles à la dynamique configurations. Les DEL entourant chaque bouton indiquent la position actuelle du bouton. 9. Q-LINK TRIGGER – Maintenez cette touche enfoncée tout en appuyant sur un des boutons Q-LINK afin d’ajuster les valeurs de paramètre de ce bouton au minimum ou au maximum (selon le paramètre Trig sélectionné...
- Page 26 23. TOUCHE SONG/OTHER – Appuyez sur cette touche afin d’afficher la fenêtre Song à l’écran et du logiciel. Maintenez la touche SHIFT enfoncée tout en appuyant sur cette touche afin d’accéder à Other mode d'où vous pouvez configurer : le nombre minimum de frappes de la touche TAP TEMPO; le seuil, la sensibilité...
-
Page 27: Panneau Avant
4. PORT USB – Utilisez le câble USB inclus pour relier ce port au port USB d’un ordinateur. Ce raccordement permet au MPC Renaissance d’envoyer/de recevoir des données MIDI à/du logiciel MPC. 5. SORTIES USB HUB – Ces sorties permettent de brancher des périphériques USB supplémentaires (contrôleurs, disques durs, etc.) En plus d’être une interface audio, ces ports permettent au MPC... -
Page 28: Soutien Technique Et Mises À Jour
15. MIDI IN – Branchez un câble MIDI doté de cinq broches de raccordement à la sortie MIDI d’un appareil MIDI externe optionnel et l’extrémité du câble à l’entrée MIDI IN du MPC Renaissance. 16. MIDI OUT – Branchez un câble MIDI doté de cinq broches de raccordement à la sortie MIDI OUT du MPC Renaissance et l’extrémité... -
Page 29: Guida Rapida (Italiano)
GUIDA RAPIDA (ITALIANO) INTRODUZIONE Grazie alla fusione dei leggendari layout MPC e flussi di lavoro di Akai Professiona con la potenza del vostro computer, MPC Renaissance è uno strumento impareggiabile per la produzione musicale. MPC Renaissance consente di creare musica servendosi di comandi hardware classici ed un display a pop-up integrato, mentre il suo software MPC esclusivo vio offre capacità... -
Page 30: Requisiti Di Sistema
Found New Hardware (trovato nuovo hardware). Questo indica che l'MPC Renaissance è stato riconosciuto dal computer per la prima volta e sta installando i giusti driver. Attendere fino a quando le finestre di dialogo non scompaiono prima di continuare. -
Page 31: Panoramica Software Mpc
Questa è solo una panoramica a grandi linee delle caratteristiche del software MPC. Praticamente è possibile accedere e controllare tutti gli elementi del software dall'MPC Renaissance. Fare inoltre riferimento al manuale di riferimento approfondito (nel menu Help (Aiuto)). Il manuale di riferimento contiene una breve guida su come iniziare a creare una canzone in modo da poter utilizzare immediatamente le funzioni dell'MPC, nonché... -
Page 32: Assegnare Campioni Ai Pad
PRIMI PASSI 1. COLLEGARE, APRIRE E CONFIGURARE Collegare l'MPC Renaissance ad una fonte di alimentazione e ad una porta USB del computer, come illustrato nello SCHEMA DEI COLLEGAMENTI. Accendere l'MPC Renaissance e aprire il software MPC. Nel software, recarsi su Edit Preferences, e cliccare sulla scheda Audio &... -
Page 33: Pannello Superiore
CARATTERISTICHE L'MPC Renaissance è un hardware concepito specificamente per controllare il software MPC. Questa sezione descrive tutti i comandi hardware. Per una spiegazione completa del software, si veda il manuale di riferimento del software MPC nel menu Help. PANNELLO SUPERIORE... - Page 34 COMANDI PAD / MANOPOLE Q-LINK 8. MANOPOLE Q-LINK – Servirsi di queste manopole sensibili al tatto per regolare i vari parametri e le configurazioni. I LED intorno ad ogni manopola indicano la posizione corrente della manopola stessa. 9. INTERRUTTORE Q-LINK – Tenere premuto questo tasto, quindi toccare una delle MANOPOLE Q-LINK per far saltare il valore dei parametri della manopola al suo valore minimo o massimo (a seconda del parametro Trig nel software).
- Page 35 22. SAMPLE EDIT / SAMPLE REC – Premere questo tasto per visualizzare la schermata Sample Edit (modifica campione) a display e nel software. Tenere premuto SHIFT e premere questo tasto per visualizzare la schermata Sample Record a display e nel software. 23.
-
Page 36: Pannello Anteriore
MIDI da/verso il software MPC. USCITE HUB USB – Si possono collegare ulteriori dispositivi USB (controller, hard drive, ecc.) a queste porte USB. Oltre ad essere un'interfaccia audio, queste porte consentono all'MPC REnaissance di funzionare come un hub USB quando è acceso. -
Page 37: Assistenza E Aggiornamenti
INGRESSO MIDI IN – Servirsi di un cavo MIDI a cinque poli per collegare l’uscita MIDI OUT di un dispositivo MIDI esterno opzionale all’ingresso MIDI IN dell'MPC Renaissance. USCITA MIDI – Servirsi di un cavo MIDI a cinque poli per collegare l’uscita MIDI OUT dell'MPC Renaissance all’ingresso MIDI IN di un dispositivo esterno opzionale . -
Page 38: Deutsch
EINLEITUNG MPC Renaissance ein unvergleichliches Instrument für die Musikproduktion und kombiniert den legendären MPC-Workflow mit der Rechenleistung Ihres Computers. Mit dem MPC Renaissance können Sie Musik mit klassischen Hardware-Controls und einem integrierten Pop-up-Display erstellen, während Sie mit der exklusiven MPC-Software beispiellose, erweiterbare Produktionskapazitäten auf Ihrem Mac oder PC nutzen können. - Page 39 4. Befolgen Sie die Anweisungen am Bildschirm, um die Software und die Treiber zu installieren. (Sie werden aufgefordert, MPC Renaissance während der Installation an Ihren Computer anzuschließen.) 2. ANSCHLIESSEN Wenn Sie das MPC Renaissance mit Ihrem Computer verbinden möchten, folgen Sie immer dieser Abfolge von Schritten: 1. Verbinden Sie das MPC Renaissance mit einer Stromquelle.
-
Page 40: Mpc-Software Übersicht
Gesamtlautstärke Dies ist nur ein grober Überblick über die Funktionen der MPC-Software. Praktisch alle Software-Elemente können über das MPC Renaissance gesteuert werden. Bitte beachten Sie auch das ausführliche Referenzhandbuch im Help Menu (Hilfe-Menü). Das Referenzhandbuch enthält neben detaillierteren Informationen für erfahrene Benutzer auch eine kurze Anleitung mit ersten Schritten, damit Sie die MPC- Funktionen sofort nutzen können. -
Page 41: Zuweisen Der Samples
Bewährten MPC-Workflow - mit Software: Das MPC Renaissance und die MPC-Software greifen nahtlos ineinander und behalten dabei den ursprünglichen, legendären MPC-Workflow bei. Sie werden lernen, wie Sie Ihr MPC Renaissance verwenden können, um die MPC-Software zu steuern und dabei effizient und optimal zu produzieren und zu performen! - Page 42 FUNKTIONEN Das MPC Renaissance ist eine Hardware, die speziell für die Steuerung der MPC-Software konzipiert wurde. Dieser Abschnitt beschreibt alle Hardware-Controls. Eine vollständige Erklärung der Software finden Sie im MPC-Referenzhandbuch im Software-Menü Help (Hilfe). OBERSEITE 43 44 11 11 2 2 2 2 2...
- Page 43 PAD / Q-LINK REGLER Q-LINK REGLER – Mit diesen berührungsempfindlichen Reglern können Sie verschiedene Parameter und Einstellungen anpassen. Die LEDs, die jeden Regler umgeben, zeigen die aktuelle Reglerposition an. Q-LINK TRIGGER – Halten Sie diese Taste gedrückt und berühren Sie dann einen der Q-Link Regler, damit die Parameterwerte dieses Reglers auf den Minimal- oder Maximalwert springen (je nach Trig-Parameter in der Software).
- Page 44 SAMPLE BEARBEITEN / SAMPLE AUFNEHMEN - Drücken Sie diese Taste, um den Bildschirm Sample Bearbeiten am Display und in der Software zu sehen. Halten Sie UMSCHALTEN gedrückt und drücken Sie diese Taste, um den Bildschirm Sample Aufnehmen am Display und in der Software zu sehen. SONG / VERSCHIEDENES- Drücken Sie diese Taste, um den Bildschirm Song am Display und in der Software anzuzeigen.
- Page 45 3. NETZSCHALTER- Schaltet das MPC Renaissance Ein/Aus. 4. USB-ANSCHLUSS-Verwenden Sie das mitgelieferte USB-Kabel, um diesen Anschluss mit einem freien USB-Anschluss Ihres Computers zu verbinden. Über diese Verbindung kann das MPC Renaissance MIDI-Daten mit der MPC-Software austauschen. 5. USB-HUB-AUSGÄNGE – Sie können zusätzliche USB-Geräte (Controllers, Festplatten etc.) mit diesen stromversorgten USB-Anschlüssen verbinden.
- Page 46 15. MIDI IN – Verwenden Sie ein handelsübliches, fünfpoliges MIDI-Kabel, um MIDI OUT eines optionalen, externen MIDI-Geräts mit dem MIDI IN des MPC Renaissance zu verbinden. 16. MIDI OUT - Verwenden Sie ein fünfpoliges MIDI-Kabel, um MIDI OUT des MPC Renaissance mit MIDI IN eines optionalen, externen Geräts zu verbinden.
-
Page 47: Specifications
SPECIFICATIONS HARDWARE 360 x 96 dot graphic LCD w/backlight Display 19.75" x 12.9" x 2.75" (4.9" at max display angle) Dimensions 502 mm x 328 mm x 70 mm (124 mm at max display angle) 10.5 lbs. / 4.8 kg Weight Power Supply External, 12V DC, 3A, center pin positive... - Page 49 WWW.AKAIPRO.COM 7-51-0381-E...
Need help?
Do you have a question about the MPC Renaissance and is the answer not in the manual?
Questions and answers