Table of Contents
Advertisement
This service information is designed for experienced repair technicians only and is not designed for use by the general public.
It does not contain warnings or cautions to advise non-technical individuals of potential dangers in attempting to service a product.
Products powered by electricity should be serviced or repaired only by experienced professional technicians. Any attempt to service or
repair the product or products dealt with in this service information by anyone else could result in serious injury or death
SERVICE MANUAL
ON/OFF
MODE
SPEED
TIMER
TEMP/TIME
TEMP/TIME
WARNING
All right reserved .Unauthorized copying and distribution is a violation of law
Haier Group
Model No. ESA410
Feature
Top Discharge Airflow Pattern
Modern Family-look Design
3 Cool Settings, 3 Fan Settings
Easy-to-ins tall Mounting Kit
Easy-Access Washable Filter
Digital Time & Temperature Display
24 Hour on/off Timer
©2010 (Qingdao Haier Air Conditioner General corp.,Ltd)
Advertisement
Table of Contents

Related Manuals for Haier ESA410K


Summary of Contents for Haier ESA410K
-
Page 1: Service Manual
©2010 (Qingdao Haier Air Conditioner General corp.,Ltd) All right reserved .Unauthorized copying and distribution is a violation of law... -
Page 2: Table Of Contents
ESA410K Table of Contents Table of Contents 1. Product Code Illumination and Series introduction........2. Specifications....................3. Safety and Precaution..................4 4. Warning and Cautions..................5 5. Installation and Accessory Parts..............6 6. Parts and Functions..................14 7. Abnormity Diagnose..................18 8. -
Page 3: Product Code Illumination And Series Introduction
ESA410K Table of Contents 1. Product Code Illumination and Series Introduction 1). Model identification: A: Abbre viation of Energy Star B: The type of refrigerant 4:R410A C: Nominal cooling capacity (BTU/h) with the first two numbers based on one thousand unit... -
Page 4: Specifications
ESA410K Specification 2. Specification Item Unit ESA410 Cooling capacity BTU/h 10000 Heating capacity BTU/h Power supply Ph,V, Hz 1, 115, 60 Power input Cooling Running current BTU/(h.w) 10.8 Power input Heating Running current BTU/(h.w) ndoor side dB(A) Sound Level Outdoor side... -
Page 5: Safety And Precaution
ESA410K Safety and Precaution 3. Safety and Precaution WARNING: Following these basic precautions will reduce the risk of fire ,electrical shock ,injury or death when using your air conditioner . 1) Air conditioner must be connected to proper electrical outlet with the correct electrical supply . -
Page 6: Warning And Cautions
ESA410K Warning and Cautions 4.Warning and Cautions WARNINGS: Following the safety messages is very important. These messages can save you from being injured or killed. Warning symbols alert you to be careful and means Danger . Always follow instructions to be safe and reduce chances of injury or death . -
Page 7: Installation And Accessory Parts
ESA410K Installation and Accessory Parts 5. Installation and Accessory Parts IMPORTANT: Observe all governing codes and ordinances. Check the location where the air conditioner will be installed. Make sure you have everything necessary for correct installation. The location should provide: ■... -
Page 8: Window Installation
ESA410K Installation and Accessory Parts Window Installation Window opening measurements: A. Width B. Height ESA410K ESA410K-L ESA406K ESA406K-L MODEL ESA408K ESA408K-L ESA412K ESA412K-L ESA406K-T ESA408K-T ESA410K-T Dimension ESA410K-E ESA408K-E A(inch) Min 25”(63.5cm) 24 ”(62.2cm) 36”(91.4cm) 38”(96.5cm) A(inch) Max B(inch) Min ”(34cm) - Page 9 ESA410K Installation and Accessory Parts Install Side Curtains NOTE: Attach curtains to the air conditioner before placing the air conditioner in window. 1. Place the tabbed side of the side curtain in the track on the right-hand side of the air conditioner cabinet.
- Page 10 Installation and Accessory Parts ESA410K 4. Slide the side curtain frame as close to the air conditioner as necessary to lock the side curtain to the frame. Repeat above steps for the left-hand side curtain and frame. Prepare Window for Installation Measure the width of the window opening.
- Page 11 Installation and Accessory Parts ESA410K A. Side curtain against window channel B. Window sash behind top channel C. Bottom channel in behind windowsill 2. Loosen the screw on the right-hand side of the air conditioner cabinet near the bottom. Slide the side bracket over the screw.
- Page 12 Installation and Accessory Parts ESA410K 5. Use ” drill bit to drill a starter hole through the holes in the side bracket and windowsill. 6. Using two ” screws, attach the side bracket to the windowsill. 7. Repeat for side bracket installation on the left-hand side of the air conditioner.
- Page 13 Installation and Accessory Parts ESA410K Top View Bottom View Complete Installation 1. Insert the foam seal behind the top of the lower window sash and against the glass of the upper window. A. Top of lower window sash B. Foam seal 2.
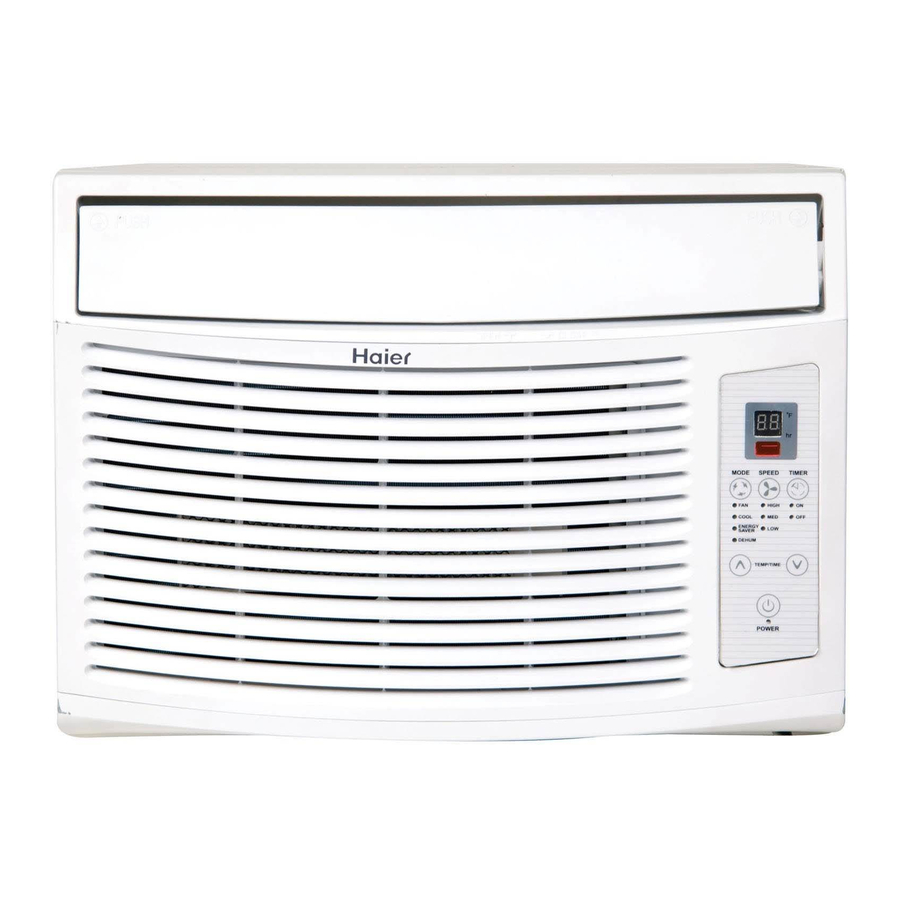
- Page 14 ESA410K Installation and Accessory Parts Parts Check that all parts are included in parts package. ON/OFF MODE SPEED TIMER TEMP/TIME TEMP/TIME A. Top channel ESA408K,ESA408K-L(3) B. Foam seal ESA406K-T,ESA408K-T(3) C. Side brackets (2) ESA408K-E(3) D.Window lock bracket ” screws (9) ”...
-
Page 15: Parts And Functions
ESA410K Parts and Functions 6.Part and Functions Mode Press MODE until you see the indicator light glow for the desired setting. 2. Choose Fan, Cool, Energy Saver or Dehum. ■ Fan—Only the fan runs. Press SPEED to select High, Med or Low fan speed. The display shows the current room temperature. - Page 16 ESA410K Parts and Functions ■ Press the TEMP/TIME down arrow button to lower the temperature. Each time you press or hold the TEMP/TIME down arrow button, the temperature will go down 1ºF until it reaches 61°F (16°C). NOTE: After 5 seconds, the display will show the current room temperature.
- Page 17 ESA410K Parts and Functions Timer On : 1. Display on the air conditioner control panel will show remaining time. 2. While the display is showing the remaining time, press the TEMP/TIME up or down arrow button to increase or decrease the time.
- Page 18 ESA410K Parts and Functions Timer To set the Timer for a 1-hour to 24-hour delay before the air conditioner is turned off (the air conditioner must be On): 1. Press TIMER. Timer Off indicator light on the air conditioner control panel will flash.
-
Page 19: Abnormity Diagnose
ESA410K Abnormity Diagnose 7. Abnormity Diagnose 1. Sensor Diagnose: 2 seconds after the sensors open circuit or short circuit, the unit will turn off automatically and the LED will show E0 until the sensors resume. Firstly check whether Terminal CN2 on... - Page 20 ESA410K Abnormity Diagnose 2. Keystroke circuit error diagnose: When power on for the first time, the PCB will check the keystroke circuit, is the sampling value is defferent with the theory value, the LED will show E1, which means failed keystroke circuit. The keyboard is locked and so invalid, but the remote control is working normally.
-
Page 21: System Flow Chart
ESA410K System Flow Chart 8. System Flow Chart Domestic Air Conditioner... -
Page 22: Circuit Diagram
ESA410K Circuit Diagram 9. Circuit Diagram Domestic Air Conditioner... - Page 23 ESA410K Circuit Diagram Domestic Air Conditioner...
-
Page 24: Wiring Diagram
ESA410K Wiring Diagram 10. Wiring Diagram WIRING DIAGRAM 0010519540 COMPRESSOR TRANSFORMER MOTOR HEAT PROTECTOR CAPACITOR HERM R BL L M H COMPRESSOR B(NO RIBBED) LIGHT G(Y/G) GR: GRAY BR: BROWN W(RIBBED) BL: BLUE R: RED B: BLACK POWER SUPPLY W: WHITE...
Need help?
Do you have a question about the ESA410K and is the answer not in the manual?
Questions and answers