
Related Manuals for Honda HRX217TDA


Summary of Contents for Honda HRX217TDA
- Page 1 Owner’s Manual Rotary Mower HRX217TDA See page 57 for instructions on setting up your Lawn Mower. © 2003-2006 American Honda Motor Co., Inc.—All Rights Reserved...
- Page 2 Keep this owner’s manual handy, so you can refer to it at any time. This owner’s manual is considered a permanent part of the lawn mower and should remain with the lawn mower if resold. The information and specifications included in this publication were in effect at the time of approval for printing.
- Page 3 INTRODUCTION Congratulations on your selection of a Honda lawn mower! We are certain you will be pleased with your purchase of one of the finest lawn mowers on the market. We want to help you get the best results from your new mower and to operate it safely.
-
Page 4: A Few Words About Safety
Of course, it is not practical or possible to warn you about all the hazards associated with operating or maintaining a lawn mower. You must use your own good judgment. You will find important safety information in a variety of forms including: •... -
Page 5: Table Of Contents
COMPONENT & CONTROL LOCATIONS ...7 DESCRIPTION OF CONTROLS ...8 BEFORE OPERATION ...11 ARE YOU READY TO GET STARTED? ...11 IS YOUR LAWN MOWER READY TO GO? ...11 CHECK YOUR WORK AREA ...12 GET THE MOWER READY ...13 OPERATION ...19 MOWING PRECAUTIONS ...19 STARTING THE ENGINE ...19... -
Page 6: Lawn Mower Safety
LAWN MOWER SAFETY IMPORTANT SAFETY INFORMATION Most accidents with walk-behind mowers can be prevented if you follow all instructions in this manual and on the mower. The most common hazards, according to accident statistics, are discussed below, along with the best way to protect yourself and others. -
Page 7: Important Message To Parents
YOUR CHILDREN’S SAFETY IS VERY IMPORTANT to Honda. That’s why we urge you to read this message before letting your child operate this lawn mower. Lawn mowers are tools, not toys. As with any equipment, bad judgments can result in serious injuries. You can help prevent accidents by making good decisions about if, when, and how your child operates this equipment. -
Page 8: Safety Label Locations
LAWN MOWER SAFETY SAFETY LABEL LOCATIONS These labels warn you of potential hazards that can cause serious injury. Read them carefully. If a label comes off or becomes hard to read, contact an authorized Honda servicing dealer for a replacement. -
Page 9: Controls & Features
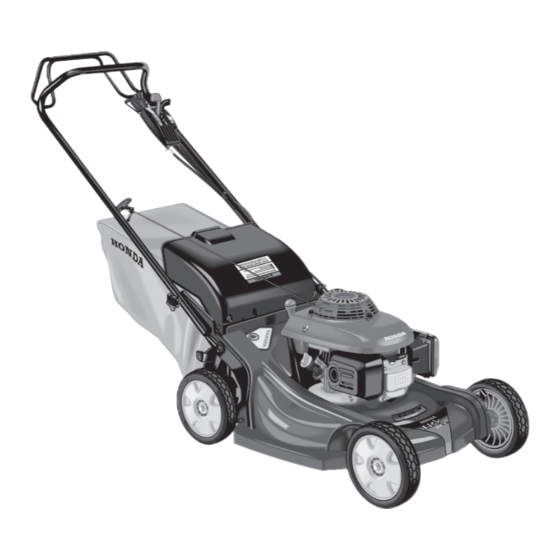
COMPONENT & CONTROL LOCATIONS GRASS BAG REAR CUTTING HEIGHT ADJUSTMENT LEVER (2) OIL FILLER CAP RECOIL STARTER GRIP SPARK PLUG CAP CARBURETOR FRONT CUTTING HEIGHT ADJUSTMENT LEVERS CONTROLS & FEATURES HANDLEBAR SHIFT LEVER THROTTLE LEVER DISCHARGE GUARD FUEL TANK CAP MUFFLER AIR CLEANER FLYWHEEL BRAKE... -
Page 10: Description Of Controls
CONTROLS & FEATURES DESCRIPTION OF CONTROLS Fuel Valve The fuel valve opens and closes the fuel passage from the fuel tank to the carburetor. Throttle Lever The throttle lever controls engine speed and opens and closes the choke. THROTTLE LEVER CHOKE Closes the choke;... - Page 11 CONTROLS & FEATURES Flywheel Brake Lever This lever is connected to the engine flywheel brake and the ignition switch. The engine will not start unless this lever is pushed forward. FLYWHEEL BRAKE LEVER Drive Clutch Lever The drive clutch lever engages and disengages the transmission that drives the rear wheels.
- Page 12 CONTROLS & FEATURES Shift Lever The shift lever selects and controls the mower’s drive speed. 1 (slow) For mowing thick grass or maneuvering in small areas. 2 (medium) For intermediate self-propelled mowing speed. 3 (fast) For maximum self-propelled transport speed. Cutting Height Adjustment Levers Each wheel of the mower can be adjusted to one of seven...
-
Page 13: Before Operation
Read and understand this manual. Know what the controls do and how to operate them. Familiarize yourself with the lawn mower and its operation before you begin using it. Know how to quickly shut off the lawn mower in case of an emergency. IS YOUR LAWN MOWER READY TO GO? -
Page 14: Check Your Work Area
BEFORE OPERATION Check the General Condition of the Lawn Mower • Look around and underneath the lawn mower for signs of oil or gasoline leaks. • Look for signs of damage. • Check each control for proper operation. • Check the blades for wear. Replace as necessary (page 32). -
Page 15: Get The Mower Ready
GET THE MOWER READY Handlebar Height Adjustment 1. Loosen the handlebar locking knobs (2). 2. Spread the lower ends of the handlebar to release the locating pins and move the handlebar up or down so the locating pins engage other holes on the handlebar mounting brackets. 3. - Page 16 BEFORE OPERATION Clip Direction Clip Director® Knob Adjustment Adjust the Clip Director knob in any one of ten positions to achieve the desired mowing results. To adjust the Clip Director knob, pull the knob downward and towards the rear of the mower. The knob adjusts a sliding door from the fully open BAG position to the fully closed MULCH position (see the following page).
- Page 17 Sliding Door Position The sliding door can be positioned to produce different mowing results. If the preferred sliding door position is unknown, install the grass bag (page 17) and begin mowing with the Clip Director knob all the way to the BAG position.
- Page 18 BEFORE OPERATION Rear Discharge To discharge clippings to the rear, remove the grass bag and position the Clip Director knob in the BAG range. Maximum rear discharge will occur when the Clip Director knob is all the way to the left (BAG) position. As the Clip Director knob is moved toward the right (MULCH) position, less grass will be discharged though the rear discharge guard.
- Page 19 Grass Bag A lawn mower works like a vacuum cleaner; it blows air through the bag, which traps the grass clippings. Always empty the grass bag before it becomes filled to the limit of its capacity. Bagging performance will diminish after the bag becomes about 90% filled.
- Page 20 BEFORE OPERATION Cutting Height Move all four adjustment levers to the ADJUSTMENT LEVERS same position. To adjust cutting height, pull each ADJUSTMENT LEVER adjustment lever toward the wheel, and move it into another notch. If you are not sure what cutting height to select, start with a high setting and check the appearance of the lawn after mowing a small area.
-
Page 21: Operation
MOWING PRECAUTIONS Before operating the mower for the first time, please review IMPORTANT SAFETY INFORMATION (page 4) and BEFORE OPERATION (page 11). Even if you have operated other mowers, take time to become familiar with how this mower works and practice in a safe area until you build up your skills. - Page 22 OPERATION 3. Release the drive clutch lever. If the drive clutch lever is engaged, the mower will move forward when you operate the starter. 4. Push forward on the flywheel brake lever and hold it against the handlebar. 5. Pull the starter grip lightly until you feel resistance, then pull briskly. Return the starter grip gently.
-
Page 23: Operating The Controls For Mowing
OPERATION OPERATING THE CONTROLS FOR MOWING Throttle Lever For best cut quality, always mow THROTTLE LEVER with the throttle lever in the FAST position. When the blades rotate at the preset fast speed, it creates a strong fan action that lifts and cuts grass more efficiently. - Page 24 OPERATION Drive Clutch Lever Push the drive clutch lever FLYWHEEL BRAKE LEVER forward and hold it against the handlebar to propel the mower forward. Release the drive clutch lever to stop the mower’s forward movement. Always release the drive clutch lever before starting the engine.
-
Page 25: Stopping The Engine
STOPPING THE ENGINE 1. Move the throttle lever to the SLOW position. 2. Release the flywheel brake lever and the drive clutch lever. 3. When the mower is not in use, turn the fuel valve to the OFF position. OPERATION THROTTLE LEVER FLYWHEEL BRAKE LEVER... -
Page 26: Safe Mowing Practices
OPERATION SAFE MOWING PRACTICES For your safety, keep all four wheels on the ground, and be careful to avoid losing your footing and your control of the mower. Keep a firm grip on the handlebar, and walk, never run, with the mower. Be very careful when mowing uneven or rough ground. - Page 27 OPERATION Obstacles Use the side of the mower to cut close to large obstacles, such as fences or walls. Release the drive clutch lever to disengage the drive when mowing around trees and other obstacles. Push the mower around obstacles for better directional control.
-
Page 28: Mowing Tips
OPERATION MOWING TIPS When to Mow Most grasses should be mowed when they have grown 1/2 to 1 inch above their recommended height. More frequent mowing is required for mulching than for bagging. For best results, you may need to mow the lawn twice a week during the growing season. - Page 29 OPERATION Blade Sharpness A sharp blade cuts cleanly. A dull blade tears the grass, leaving shredded ends that turn brown. When your blade doesn’t cut cleanly anymore, have it sharpened or replaced. Dry Grass If the ground is too dry, mowing will stir up a lot of dust. Besides being unpleasant to work in, too much dust will clog the air filter.
- Page 30 OPERATION Mowing Patterns Your Honda mower will work most efficiently if you use the following mowing patterns as much as possible. Mower deck and equipment design, and the direction in which the blade rotates, cause these mowing patterns to give the best results. Mulching Use a counterclockwise mowing pattern when the Clip Director knob...
-
Page 31: Servicing Your Lawn Mower
SERVICING YOUR LAWN MOWER THE IMPORTANCE OF MAINTENANCE Good maintenance is essential for safe, economical, and trouble-free operation. It will also help reduce air pollution. Improper maintenance, or failure to correct a problem before operation, can cause a malfunction in which you can be seriously hurt or killed. -
Page 32: Maintenance Safety
SERVICING YOUR LAWN MOWER MAINTENANCE SAFETY Some of the most important safety precautions follow. However, we cannot warn you of every conceivable hazard that can arise in performing maintenance. Only you can decide whether or not you should perform a given task. -
Page 33: Maintenance Schedule
Refer to the Honda shop manual for service procedures. Failure to follow this maintenance schedule could result in non-warrantable failures. SERVICING YOUR LAWN MOWER REGULAR SERVICE PERIOD First Before First... -
Page 34: Blades
If the blades are found to be bent, take the lawn mower to an authorized Honda servicing dealer for inspection. 4. A torque wrench must always be used when installing the blades. - Page 35 2. Remove the two blade bolts with a 14 mm socket wrench. Use a wooden block to prevent the blades from turning when removing the bolts. Remove the blades. UPPER BLADE BLADE BOLT (2) SPECIAL WASHER (2) SERVICING YOUR LAWN MOWER LOWER BLADE...
- Page 36 SERVICING YOUR LAWN MOWER Blade Installation 1. Clean dirt and grass from around the blade mounting area. 2. Install the blades using the two blade bolts and special washers as shown. Be sure to install the special washers with the concave side toward the blades and the convex side toward the bolts.
-
Page 37: Grass Bag Cleaning And Replacement
2. Remove the bag from the frame. Bag Installation 1. Insert the bag frame into the bag, as shown. 2. Clip the plastic edges of the bag onto the frame, as shown. SERVICING YOUR LAWN MOWER PLASTIC EDGE FRAME PLASTIC EDGE... -
Page 38: Engine Maintenance
SERVICING YOUR LAWN MOWER ENGINE MAINTENANCE Engine Oil Level Check 1. Unscrew and remove the filler cap/dipstick and wipe it clean. 2. Insert and remove the dipstick without screwing it into the filler neck. Check the oil level shown on the dipstick. - Page 39 4. Fill with the recommended oil. Do not overfill. Measure the oil level as shown on page 36. NOTICE Using nondetergent oil can shorten the engine’s service life, and using 2-stroke oil can damage the engine. SERVICING YOUR LAWN MOWER...
- Page 40 SERVICING YOUR LAWN MOWER Air Cleaner Service A dirty air filter will restrict air flow to the carburetor, reducing engine performance. If you operate the mower in very dusty areas, clean the air filter more often than specified in the MAINTENANCE SCHEDULE (page 31).
- Page 41 2. Remove the spark plug with a 13/16 in (21 mm) spark plug wrench. 3. Inspect the spark plug. Replace it if the electrodes are worn, or if the insulator is cracked or chipped. SERVICING YOUR LAWN MOWER REGULAR BP6ES W20EP-U SPARK PLUG RESISTOR*...
- Page 42 SERVICING YOUR LAWN MOWER 4. Measure the spark plug electrode gap with a suitable gauge. The gap should be 0.028 ~ 0.031 in (0.7 ~ 0.8 mm). Correct the gap, if necessary, by carefully bending the side electrode. 5. Install the spark plug carefully, by hand, to avoid cross-threading.
- Page 43 Spark Arrester Service (optional equipment) Your lawn mower engine is not factory-equipped with a spark arrester. In some areas, it is illegal to operate an engine without a spark arrester. Check local laws and regulations. An optional USDA approved spark arrester is available from an authorized Honda servicing dealer.
-
Page 44: Control Cable Adjustments
SERVICING YOUR LAWN MOWER CONTROL CABLE ADJUSTMENTS Flywheel Brake Cable Adjustment Measure free play at the top of the flywheel brake lever. Free play should be 1-3/16 ~ 1-3/8 in (30 ~ 35 mm). If adjustment is necessary: 1. Loosen the lock nuts with a 10 mm wrench, and move the adjuster up or down as required. - Page 45 If the drive clutch does not operate as it should, with correct cable adjustment, take the mower to an authorized Honda servicing dealer for repair. 1/16 ~ 3/16 in (1 ~ 5 mm) DRIVE CLUTCH LEVER SERVICING YOUR LAWN MOWER LOCK NUTS ADJUSTER...
- Page 46 SERVICING YOUR LAWN MOWER Shift Cable Adjustment Shift cable adjustment is necessary if the shift lever will not smoothly select each gear. 1. Starting from 3rd gear, cycle the shift lever through all three gears and listen for the transmission detent click sound for each gear.
-
Page 47: Throttle Cable Inspection
10 mm wrench. Move the adjuster up or down as required to obtain the proper clearance. Tighten the lock nuts. SERVICING YOUR LAWN MOWER THROTTLE LEVER CONTROL CHOKE ARM 0 ~ 0.040 in (0 ~ 1 mm) -
Page 48: Fuel System
SERVICING YOUR LAWN MOWER FUEL SYSTEM Refueling Fuel tank capacity: 0.29 US gal (1.1 l) If the fuel level is low, refuel in a well-ventilated area with the engine stopped. If the engine has been running, allow it to cool first. - Page 49 SERVICING YOUR LAWN MOWER Fuel Recommendations Use unleaded gasoline with a pump octane rating of 86 or higher. This engine is certified to operate on unleaded gasoline with a pump octane rating of 86 or higher. Unleaded gasoline produces fewer engine and spark plug deposits and extends exhaust system life.
-
Page 50: Storage
Cleaning 1. Wash the lawn mower, including the underside of the mower deck. Engine Wash the engine by hand, and be careful to prevent water from entering the air cleaner. - Page 51 4. Stop the engine and allow it to cool. 5. After the lawn mower is clean and dry, touch up any damaged paint (touch-up paint part numbers are on page 64), and coat other areas that may rust with a light film of oil.
- Page 52 STORAGE Fuel Gasoline will oxidize and deteriorate in storage. Old gasoline will cause hard starting, and it leaves gum deposits that clog the fuel system. If the gasoline in your mower deteriorates during storage, you may need to have the carburetor and other fuel system components serviced or replaced.
- Page 53 Draining the Carburetor and Fuel Tank 1. Make sure the fuel valve is OFF (page 8). Remove the carburetor drain bolt with a 10 mm wrench, and drain the fuel from the carburetor bowl into an approved container. Gasoline is highly flammable and explosive. You can be burned or seriously injured when handling fuel.
- Page 54 STORAGE Engine Cylinder Remove the spark plug (see page 39). Pour a tablespoon (5 ~ 10 cc) of clean engine oil into the cylinder. Pull the starter rope several times to distribute the oil in the cylinder. Reinstall the spark plug. Pull the starter rope slowly until resistance is felt then return the starter grip gently.
-
Page 55: Placing In Storage
STORAGE PLACING IN STORAGE If your mower will be stored with gasoline in the fuel tank and carburetor, it is important to reduce the hazard of gasoline vapor ignition. Select a well-ventilated storage area away from any appliance that operates with a flame, such as a furnace, water heater, or clothes dryer. -
Page 56: Transporting
TRANSPORTING BEFORE LOADING If the engine has been running, allow it to cool for at least 15 minutes before loading the mower on the transport vehicle. A hot engine and exhaust system can burn you and can ignite some materials. 1. -
Page 57: Taking Care Of Unexpected Problems
TAKING CARE OF UNEXPECTED PROBLEMS ENGINE WILL NOT START Possible Cause Fuel valve is OFF Throttle lever is in the wrong position Flywheel brake lever is not engaged Out of fuel Bad fuel; mower stored without treating or draining gasoline, or refueled with bad gasoline. -
Page 58: Vibration Problems
Clear out the mower deck (page 27). Tighten loose blades bolts. (page 34). If blades are found to be bent or damaged, take the lawn mower to an authorized Honda servicing dealer for inspection (page 32). Take the mower to an authorized Honda service dealer for repair. -
Page 59: Set-Up
SET-UP Unpacking Remove all the cardboard from around the handlebar. Handlebar Setup Loosen the two knobs on the lower handlebar enough LOCKING to raise the handlebar into KNOB (2) the mowing position. Depress the flywheel brake HEIGHT lever while raising the ADJUSTMENT handlebar (page 13). - Page 60 SET-UP Engine Oil The mower is shipped WITHOUT OIL in the engine. A bottle of oil is included in the box with your mower. Add the entire contents of the oil bottle into the oil filler opening. Check that the oil level is between the upper and lower limit marks on the dipstick as shown.
- Page 61 GRASS BAG BAG FRAME Lift the discharge guard and install the grass bag. Before Operation Before using the lawn mower, all mower operator’s must read the following chapters and sections: • LAWN MOWER SAFETY (page 4) • CONTROLS & FEATURES (page 7) •...
-
Page 62: Technical & Consumer Information
You will need these serial numbers when ordering parts and when making technical or warranty inquiries (page 69). Engine serial number:______________________________________ Frame serial number: ______________________________________ Date of purchase: _________________________________________ MODEL NAME AND FRAME SERIAL NUMBER HRX217TDA MAGA –– XXXXXXX AMERICAN HONDA MOTOR CO., INC. ALPHARETTA, GA 30005-8847... - Page 63 High altitude performance can be improved by specific modifications to the carburetor. If you always operate your lawn mower at altitudes above 5,000 feet (1,500 meters), have your servicing dealer perform this carburetor modification.
- Page 64 TECHNICAL & CONSUMER INFORMATION Oxygenated Fuels Some conventional gasolines are being blended with alcohol or an ether compound. These gasolines are collectively referred to as oxygenated fuels. To meet clean air standards, some areas of the United States and Canada use oxygenated fuels to help reduce emissions.
-
Page 65: Emission Control System
TECHNICAL & CONSUMER INFORMATION EMISSION CONTROL SYSTEM Source of Emissions The combustion process produces carbon monoxide, oxides of nitrogen, and hydrocarbons. Control of hydrocarbons and oxides of nitrogen is very important because, under certain conditions, they react to form photochemical smog when subjected to sunlight. Carbon monoxide does not react in the same way, but it is toxic. - Page 66 TECHNICAL & CONSUMER INFORMATION Replacement Parts The emission control systems on your new Honda engine were designed, built, and certified to conform with EPA, California and Canadian emission regulations. We recommend the use of genuine Honda parts whenever you have maintenance done. These original-design replacement parts are manufactured to the same standards as the original parts, so you can be confident of their performance.
- Page 67 TECHNICAL & CONSUMER INFORMATION Air Index An Air Index Information hang tag/label is applied to engines certified to an emission durability time period in accordance with the requirements of the California Air Resources Board. The bar graph is intended to provide you, our customer, the ability to compare the emissions performance of available engines.
-
Page 68: Specifications
TECHNICAL & CONSUMER INFORMATION SPECIFICATIONS Mower Model HRX217TDA Honda rotary mower, grass bag, 21 inch mower deck, 6.5 bhp, Clip Director, three-speed transmission, flywheel brake, USA market Dimensions, Weights and Capacities Overall Length [Cutting height adjusters set to 1-1/4 in (32 mm)]... - Page 69 TECHNICAL & CONSUMER INFORMATION Transmission Design and Performance Transmission Type Mower Ground Speed (with engine at 3,100 rpm) Maintenance Fuel Engine Oil Spark Plug Type Maximum Governed Speed Flywheel Brake Cable Drive Clutch Cable Shift Cable Throttle Cable Blade Bolt Torque Tuneup Spark Plug Gap Idle Speed...
-
Page 70: Consumer Information
TECHNICAL & CONSUMER INFORMATION CONSUMER INFORMATION Replacement Parts, Optional Equipment, and Service Items Contact an authorized Honda servicing dealer to purchase any of these (or other) genuine original Honda items. Replacement Parts Item Spark plug Air filter Lower blade Upper blade Grass bag Front wheel/tire Rear wheel/tire... -
Page 71: Customer Service Information
Customer Service Information Honda Power Equipment dealership personnel are trained professionals. They should be able to answer any question you may have. If you encounter a problem that your dealer does not solve to your satisfaction, please discuss it with the dealership's management. - Page 72 TECHNICAL & CONSUMER INFORMATION Distributor's Limited Warranty This warranty is limited to the following Honda Power Equipment products when distributed by American Honda Motor Co., Inc., Power Equipment Division, 4900 Marconi Drive, Alpharetta, Georgia 30005-8847. PRODUCTS COVERED BY THIS WARRANTY...
- Page 73 To Obtain Warranty Service: You must take the Honda Power Equipment product, accessory, replacement part, apparel or the power equipment on which the accessory or replacement part is installed, and proof of purchase, at your expense, to any Honda Power Equipment dealer in the United States, Puerto Rico, or the U.S.
- Page 74 Apparel will be repaired or replaced under warranty without any charge. To Obtain Warranty Service: You must take the Honda Power Equipment accessory, replacement part, apparel or the power equipment on which the accessory or replacement part is installed, and proof of purchase, at your expense, to any Honda Power Equipment dealer in the United States, Puerto Rico, or the U.S.
-
Page 75: Your Warranty Rights And Obligations
You are responsible for presenting your power equipment engine to a Honda Power Equipment dealer as soon as a problem exists. The warranty repairs should be completed in a reasonable amount of time, not to exceed 30 days. -
Page 76: Warranty Coverage
To Obtain Warranty Service: You must take your Honda Power Equipment engine or the product on which it is installed, along with your warranty registration card or other proof of original purchase date, at your expense, to any Honda Power Equipment dealer who is authorized by Honda to sell and service that Honda product during his normal business hours. - Page 77 TECHNICAL & CONSUMER INFORMATION Emission Control System Warranty Parts: SYSTEMS COVERED BY THIS WARRANTY: Fuel Metering Exhaust Air Induction Ignition Miscellaneous Parts * Covered up to the first required replacement only. See the Maintenance Schedule on page 31. DESCRIPTION: Carburetor assembly, Fuel injection pump, Fuel injection nozzle, Fuel regulator, Intake manifold Catalyst, Exhaust manifold Air filter housing, Air filter element*, Crankcase breather tube...
-
Page 78: Index
Accessories warranty ... 72 Air cleaner service ... 38 Air Filter Part Number ... 68 Air index ... 65 Altitude, high altitude operation ... 61 Before operation ... 11 Blade Inspection ... 32 Installation ... 34 Part Numbers ... 68 Cable adjustments Drive clutch lever ... - Page 79 Paint, Part Number ... 68 Parts Catalog ... 68 Replacement list ... 68 Publications ... 68 Safety A few words ... 2 Information ... 4 Label locations ... 6 Message definitions ... 2 Safe mowing practices ... 24 Set-up instructions ... 57 Shift lever Cable adjustment ...
-
Page 80: Quick Reference Information
QUICK REFERENCE INFORMATION Fuel Type Engine oil Type Spark plug Type Before each use Maintenance First 5 hours Subsequent Unleaded gasoline with a pump octane rating of 86 or higher (page 46) SAE 10W-30, API SJ or later (page 36) Regular: NGK BP6ES DENSO W20EP-U... - Page 81 POM53619-A XXXXX.2006.04 31VH7001 Printed on 00X31-VH7-0010 PRINTED IN U.S.A. Recycled Paper...
Need help?
Do you have a question about the HRX217TDA and is the answer not in the manual?
Questions and answers