Table of Contents
Advertisement
Advertisement
Table of Contents

Related Manuals for SAGEMCOM RM50

Summary of Contents for SAGEMCOM RM50
- Page 1 Internet Radio RM50 User Guide English...
- Page 2 WELCOME Dear customer: Thank you for purchasing a SAGEMCOM WiFi IP Radio; we appreciate your trust in us. This product was manufactured with the upmost care, should you encounter any difficulties during its use, we recommend that you refer to this user guide. You can also find information on the following site: http://www.sagemcom.com/faq...
- Page 3 SAGEMCOM accepts no liability if the regulations in force on the installation site are notcomplied with. Some sensitive medical equipment and safety equipment may be affected by the radio-frequency transmissions of your radio.
-
Page 4: Table Of Contents
Table of Contents 1. Your IP Radio Main Features Unpacking Front Panel Rear Panel Remote Control Menu Structure 2. Getting Started Turning On The Device for The First Time Adjusting The Volume Text Entry Standby Mode 3. Listening To Music Listening To Internet Radio Listening To FM Radio Listening To The Music In Your Computer (UPnP) - Page 5 Table of Contents Backlight Brightness Volume limitation Network Config Scan For Networks View Config Edit Config 5. Appendix Care And Maintenance Problems 6. Specifications 7. Environment Packaging Batteries The Product...
-
Page 6: Your Ip Radio
Your IP Radio 1. Your IP Radio This product is an IP Radio that, once connected to an Internet gateway, will allow you to access worldwide Internet radio stations and to listen to your digital music files stored on your PC, or on a multimedia UPnP server. It can also be used as an alarm clock for wake-up and important appointments. -
Page 7: Front Panel
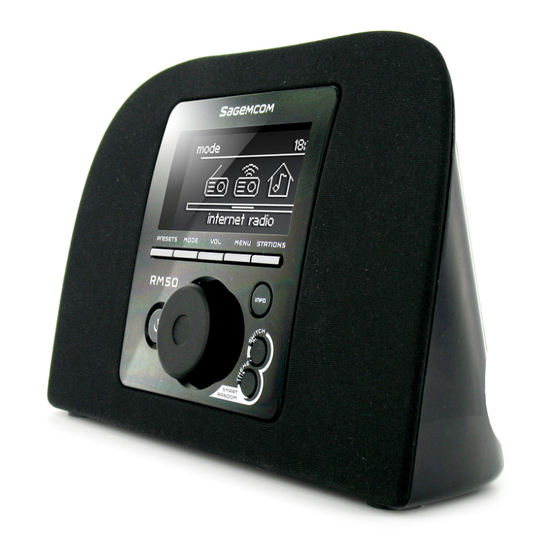
Your IP Radio 1.3 Front Panel 1. Display Screen Displays contents on the screen. 2. PRESETS [1] Press and hold to display a list of available FM stations. [2] Press to activate auto/manual scan. 3. MODE Displays the Mode menu. 4. -
Page 8: Rear Panel
Your IP Radio 1.4 Rear Panel AUDIO 5V DC 1. POWER [1] Press to shut off the music source currently playing and put the device into the Standby mode. [2] Press and hold to put the device in the Power off mode. 2. - Page 9 Your IP Radio 1. Mode Displays the Mode menu. 2. Snooze/Sleep Timer [1] Snooze - When the alarm is on, press to shut the alarm off and reactivate again later. [2] Sleep Timer - Set a screen off period of time and stop the current music source then enter the Standby mode.
-
Page 10: Menu Structure
Your IP Radio 1.6 Menu Structure Press MODE to enter the menu: (1) Internet radio, (2) FM radio, (3) UPnP, (4) Podcast. Mode Podcast Internet Radio FM Radio UPnP > Search by theme > Search by theme > Search by region >... -
Page 11: Getting Started
Getting Started 2. Getting Started 2.1 Turning On The Device for The First Time 2.1.1 Network Environment Please confirm that your wireless router or Access Point (AP) is connected to the broadband network. The diagram below describes the network environment that should be established to use your IP Radio. Internet Wireless Router... - Page 12 Getting Started After the device is turned on, a welcome screen appears. Note: Turning on the device for the first time will require you to set up the Network, Language and Time Zone for your device. Please follow the setup guide for proper setup.
- Page 13 Getting Started AP List (1) Press the Wheel to select the AP list menu. (2) Select a desired network from the list. Note: If you have selected a network with a lock icon at the front, you must enter the password for the selected network. On the text entering screen, rotate the Wheel to choose the characters or numbers from the list at the bottom of the screen.
- Page 14 Getting Started PS PIN (Personal Identification Number): Use the PIN code to connect to the (1) Select WPS PIN on the menu. (2) The PIN code is generated automatically or you can choose Refresh if you need to change the PIN code. (3) Open the WPS configuration page of your AP on your computer, and then enter the PIN code to establish a connection.
- Page 15 Getting Started Time Zone Select your time zone in the device to synchronize the date and time with the Internet. The device will automatically set up the local Time one. Choose YES to confirm the Time zone selection. (1) Choose NO to continue the Time zone setting. (2) Rotate the Wheel to choose your time zone.
-
Page 16: Adjusting The Volume
Getting Started 2.1.6 Demo Mode If no action has been taken from the Network Configuration menu for 5 minutes, the device will display the Demo Mode with music. Press any button on the device, except the Wheel for volume adjustment, to quit the demo mode. 2.2 Adjusting the Volume While the device is playing music from any source, press the VOL. -
Page 17: Standby Mode
Getting Started 2.4 Standby Mode While the device is playing from any music source, press Power on the device or On/Off on the remote control to stop playing from the music source and enter the Standby mode. In the Standby mode, rotate the Wheel or press SELECT on the remote control will have no effects on the status of the device. -
Page 18: Listening To Music
Listening to Music 3. Listening To Music This IP Radio device is a high-performance audio player that can play music from various types of sources. You can use it to listen to Internet radio from all over the world, local FM broadcasting services, and music files in your computer. The following explains how to listen to music using this IP Radio device. - Page 19 Listening to Music 2. Search by name: When you choose to search by name, a text edit screen will appear. (1) Rotate the Wheel to choose characters or numbers from the list at the bottom of the screen. Press the Wheel to select the character. (2) Choose End to quit the edit screen.
- Page 20 Listening to Music 3.1.2 The Playback Screen The playback screen of the Internet Radio (see diagram below). Press the INFO button to display the program information you are listening to, the start time, the ending time and the program content. Press and hold to set auto tune, which allows you to set a tuned station to play again at a certain time.
-
Page 21: Listening To Fm Radio
Listening to Music 3.2 Listening To FM Radio With the FM Radio function, you can listen to music or programs broadcast from FM radio stations. Rotate the Wheel to choose and press the Wheel to activate the FM Radio function in the main menu. 3.2.1 Search For A Station (1) Press PRESETS on the device to start AUTO/MANUAL scan. - Page 22 Listening to Music 3.2.3 Key (and remote control) command on the playback screen 1. Press to stop the music source currently playing and put the Power ( device in the Standby Mode. 2. Press and hold to connect to the AP automatically and then start to play the last tuned station.
-
Page 23: Listening To The Music In Your Computer (Upnp)
Listening to Music 3.3 Listening To The Music In Your Computer (UPnP) With the UPnP function, you can listen to music or programs that are stored in your computer. Rotate the Wheel to select and then press the Wheel to activate the UPnP function in the main menu. - Page 24 Listening to Music 3.3.2 The Playback Screen The playback screen of the UPnP (see the diagram below). The screen displays the artist name, album name, the playing time and duration time. 3.3.3 Key (and remote control) command on the playback screen 1.
-
Page 25: Listening To Podcast
Listening to Music 3.4 Listening To Podcast With the Podcast function, you can listen to music or programs that broadcast from Podcast. Rotate the Wheel to choose and press the Wheel to activate the Podcast function in the main menu. 3.4.1 Search For A Station Before listening to programs, you will need to search for the stations first. -
Page 26: Favorite List
Listening to Music 3.4.2 The Playback Screen The playback screen of the Podcast (see diagram below). The screen displays the program type, show description, Show format/ language and country. 3.4.3 Key (and remote control) command on the playback screen PRESETS Press to see the Podcast list or search engines. -
Page 27: Setup
Setup 4. Setup In this menu, you can adjust IP Radio settings according to your own preferences. See sections below for more setting details. Press Menu on the device to access this menu. 4.1 Audio profile In this section, you can set up an Audio profile. In the Audio Profile list, rotate the Wheel to choose a setting and then press the Wheel to select an item. -
Page 28: Time Setup
Setup Rotate the Wheel to adjust the equalizer value and then press the Wheel to confirm the adjustments. 4.2 Time setup In this section, you can set up the Sleep timer or Alarm. 4.2.1 Sleep Timer Sleep Timer function is used to set a screen off period of time and allows the device to enter the Standby mode. -
Page 29: Alarm 1&2
Setup 4.2.3 Alarm 1&2 Alarm function is for you to set up wake-up Alarms or to remind you of important dates or times. You can set up 2 Alarms. Both Alarm 1 and Alarm 2 have the same set up method. Alarm 1 settings are as follows: Time settings: (1) Rotate the Wheel to choose, and then press the Wheel to select On. -
Page 30: Advanced Setup
Setup 4.3 Advanced Setup The IP Radio provides more detailed settings for you to adjust according to your preferences. Press Menu on the device to access this menu. 4.3.1 Language The IP Radio supports different languages. Select your preferred display language on the device. -
Page 31: Clock
Setup 4.3.3 Clock You can choose whether to set the clock manually or synchronize automatically with your IP Radio . The default method is Auto snyc (NTP). Please confirm that you have the correct time zone set (refer to Time Zone section for settings). -
Page 32: F/W Version
Setup 4.3.6 F/W Version This section displays F/W version information of your device. 4.3.7 Demo Mode This section allows you to set the Demo Mode to On or Off. Rotate the Wheel to choose, and then press the Wheel to select an option. Note: Refer to Getting Started chapter for Demo Mode details. -
Page 33: Eco
Setup 4.4 ECO In this menu, you can select energy saving related (ECO) settings for your IP Radio. Press Menu on the device to access this menu. 4.4.1 Backlight This section allows you to adjust the backlight duration time for your device. (1) Rotate the Wheel to choose whether to adjust for Playback screen or Standby screen. -
Page 34: Volume Limitation
Setup 4.4.3 Volume limitation If you select volume limitation to On, when you adjust the volume, it will not increase till the loudest but to a certain volume limit. This helps to prevent a sudden loud sound. Rotate the Wheel to choose On or Off and press the Wheel to activate. 4.5 Network config As mentioned in the chapter Turning On The Device For The First Time, the device will automatically connect to the set network each time the device is... -
Page 35: Edit Config
Setup 4.5.3 Edit Config This section allows you to adjust your network settings manually. Rotate the Wheel to select Edit config. You will be asked to choose whether to enable auto DHCP or not. DHCP allows the network connection to establish itself automatically each time you use your IP Radio. - Page 36 Setup After setting up the network manually, you will be asked “Auto (DHCP)?” again. Rotate the Wheel to select No, and then press the Wheel to activate the new settings.
-
Page 37: Appendix
Appendix 5. Appendix 5.1 Care and Maintenance Turn off your IP Radio. Use a smooth and dry cloth to wipe. Do not use a rough cloth, powerful liquid cleaners, thinner painting, alcohol nor other solvents to clean. These products can damage your IP Radio. 5.2 Problems Refer to the table presented below in case of an operational malfunction: Problems... - Page 38 Appendix Access denied to the Internet Confirm the WiFi router, Livebox or the line connections. Access denied to the Radio Check that your Radio is not encoded or you from a personal computer as must have the encoding key to access. an access point (Media Server).
- Page 39 Appendix In case of non receiving on the Internet, refer to the table here under: What has been done with success What could be the trouble ? The IP Radio is booted normally. The IP Radio does not obtain an IP address.
-
Page 40: Specifications
Specifications 6. Specifications Hardware and Port Characteristic Dimensions 31(H) x 200(W) x 69(T)mm Unit Weight 470gm CPU Memory 128MB NAND flash embedded 32MB SDRAM embedded Front Panel Display 128x64 Graphic-based & Back-lighted LCD Remote Control IR function remote control Audio Jack 2x 3.5mm mini-jack Audio output jack USB Port 1x mini Type B... -
Page 41: Environment
Environment 7. Environment 7.1 Packaging Preservation of the environment is an essential concern of SAGEMCOM. The desire of SAGEMCOM is to operate systems observing the environment and consequently it has decided to integrate environmental performances in the life cycle of its products, from manufacturing to commissioning, use and elimination.
Need help?
Do you have a question about the RM50 and is the answer not in the manual?
Questions and answers