
Subscribe to Our Youtube Channel
Related Manuals for Mede8er Med1000X3D


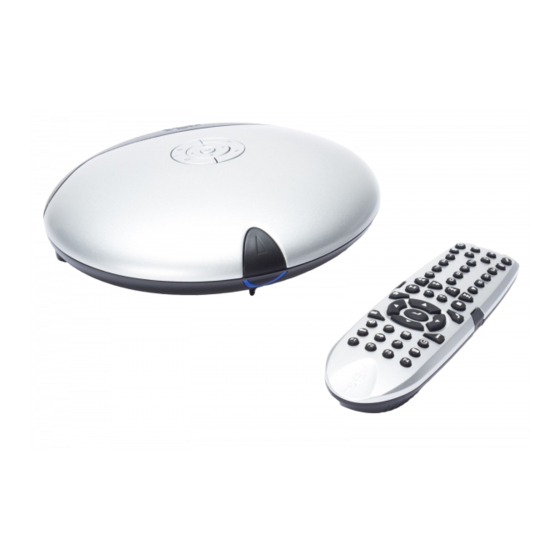
Summary of Contents for Mede8er Med1000X3D
- Page 1 High Definition 3D Multimedia Player User Manual V1.0.1 July 2012 High Definition Multimedia Player...
-
Page 2: Table Of Contents
INDEX page 1 Index page 2 Introduction page 3 Unpacking / Contents page 4 General Overview page 5 Installing a Hard Drive page 6 Connections page 7 Connections continued page 8 Power Up & Standby page 9 TV Output / Audio Settings page10 Formatting the Hard Drive / USB Connection to PC page11... -
Page 3: Important Safety Instructions
Earth. The Mede8er has some very unique features so we suggest you read this guide and visit the Mede8er forum for additional help and information. The firmware is always “work in progress” so we suggest you regularly check the Mede8er forum for updated firmware releases and updated User Manuals. -
Page 4: Unpacking / Contents
UNPACKING / CONTENTS Contents: - X3 Remote, European Region only - AC/ DC Adapter 2 Pin Euro with slot in UK Plug, International Region - 2 Pin Euro AC/DC Adapter, USB3.0 Cable, HDMI 1.4 Cable, AV Cable, Zip Bag with Hard Drive Securing Screws, User Manual. -
Page 5: General Overview
GENERAL OVERVIEW Top Navigation Buttons Return TV System Front View Setup Menu Navigation Buttons Cover Cover Release Button IR Receiver On/Off Switch YUV - Component Video Rear View Page4... - Page 6 Heat Transfer Pad Do Not Remove 3.5" HDD 2.5" HDD Most 3.5" or 2.5" SATA Hard Drive can be installed into the X3. If the unit is going to be moved around or transported we strongly suggest you use the supplied Hard Drive securing screws. Use the Silver screw for 3.5"...
-
Page 7: Connections
CONNECTIONS HDMI 1.4 Cable HDMI offers the best picture quality and should be used in preference of any other connection. Use the supplied HDMI 1.4 Cable for use with the X3. The HDMI can be connected to a AV Amplifier or directly to a TV. Component YUV Component Video offers the next best picture quality to HDMI so if your system does not have a HDMI input we suggest you use the Component Video Connection. -
Page 8: Connections Continued
CONNECTIONS CONTINUED SD Card Slot SD / SDHC / Sony Pro Due Memory Cards supported. DC Power Jack DC input is specified at 12 Volt 2 Amp DC. Important-- Only use the supplied AC DC Adapter. 2 X USB Host Ports Host up to two external ‘Type A’... - Page 9 Plug the AC/DC adapter into the mains outlet and plug the DC Jack into the DC IN at the rear of the X3. DO NOT USE ANY AC/DC ADAPTER AND ONLY USE THE ONE SUPPLIED otherwise you may cause damage to the unit. The Navigation Pad LED will light up ‘RED’. Press the On/Off button on the X3 front panel and the Navigation Pad LED will turn to Blue.
-
Page 10: Tv Output Settings
TV OUTPUT SETTINGS If you do not get to see the X3 GUI on your TV you will need to toggle the X3 TV output until you get a picture TV SYS Toggle Procedure The X3 has three video output options ie Composite Video (yellow RCA connector), Component Video (Red - Green- Blue connectors) and HDMI. -
Page 11: Formatting The Hard Drive
FORMATTING THE HARD DRIVE The X3 has a built in Hard Drive format feature that formats the internal hard drive. Once the Hard Drive is formatted in the X3 it will have a main NTFS partition and two small internal Linux partitions for propriety use. -
Page 12: Remote Functionality
REMOTE FUNCTIONALITY Audio Mute DVD Angle Favourites Shortcut button Setup On / Off TV System Media Library ‘Devices Page’ Shortcut θ Numbers Repeat Shuffle Video Slow Fast Forward / Rewind Next / Previous Volume Up/Down Active Backlight Learn Function Button Stop Play / Pause Return... - Page 13 PLACEMENT The X3 is designed to be placed on the top of a TV cabinet so that the IR Receiver can receive reflected IR signals from the ceiling and walls - ‘A’ diagram above. The X3 should not be placed to close to the front edge as it uses the front surface to receive the reflected signals.
-
Page 14: Wired Network Connection And Setup
USB Keyboard Function Keys (based on MEDX2KEY) Optional Extra Back Play/ Light Pause ’Ctrl’ - ZOOM Return Enter YouTube, Internet Browser Info/ About ESC: RETURN SPACE: PLAY 'F(f)': Favourite 'E(e)': EDIT ENTER: SELECT(ENTER) 'M(m)': MENU 'S(s)': Setup '0': 0 '1': 1 '2': 2 '3': 3 '4': 4 '5': 5 '6': 6 '7': 7 '8': 8 '9': 9 'V(v)': View 'L(l)': AB '-': VOL_DOWN '+': VOL_UP '\(|)': SLOW '’... - Page 15 SAMBA (Network Setup) If your PC or NAS has Share’s setup to specific users then you will need to setup a shortcut on the X3 to each User Share and specify the IP, Username and Password Setting up Samba shortcuts on the X3 Select ‘Network’...
- Page 16 WIRELESS NETWORK CONNECTION Plug the WiFi Dongle into the USB extension base that was supplied with the MED10WFB. Plug the USB cable into one of the USB host ports on the side of the X3. Extend the cable and place the base in a position that is away from any metal object that could effect the Radio Frequency signal strength.
-
Page 17: Wireless Setup
WIRELESS SETUP Open Setup Menu then ‘Wireless Setup’ and you should see a list of available SSID’s with signal strength info. Press the ‘Zoom button to refresh the list. Select the SSID you want to connect to and press ‘Enter’ If the WiFi Router has password protection enabled then you will be required to enter the security key of your WiFi router. - Page 18 Download the latest X3 Firmware from www.mede8erforum.com. UnZIP or UnRAR or join with HJ Split and will find a file named install.img. Copy this file to the root directory of a Flash Drive. Plug the USB Flash drive into one of the USB Host Ports on the X3. DO NOT REMOVE POWER DURING THE EMERGENCY RECOVERY PROCEDURE.
-
Page 19: Home Network Samba Server
NAS servers it performs well if speed is not your major requirement. You can also use the X3 as a Media Server and stream content to other Mede8er’s on your home network. The Samba function is enabled or disabled in the ‘Network’ menu under ‘Samba Process’. -
Page 20: Home Page
HOME PAGE The X3 Home Page is the central point where you can launch all the user applications. Press the Right/Left/Up/Down Navigation buttons on the remote to navigate the Home Page and press “Enter” to launch the selected page. FAVOURITES Create, manage, apply Genre cover art to local and network folder shortcuts. -
Page 21: Media Library
MEDIA LIBRARY The X3 Media Library has five built in standard views ie Movie, Music, Picture, List, and Preview. The Media Library has been designed so that the ‘View’ can be easily changed. In the Media Library you have the option of changing the Views Manually or you can enable the ‘Auto View’ option in the Setup Menu. If the ‘Auto View’... -
Page 22: Media Library Continued
MEDIA LIBRARY CONTINUED To change the View of the Media Library press the “View” button on the remote and the View Icons will show. Press the ‘View’ button again and the focus will change to the next View Icon. Repeat pressing the ‘View’... -
Page 23: Media Library Metadata
To create the xml files in Windows use Y2M (YAMJ to Mede8er) or Thumbgen and for Apple Mac we suggest you use DunX2Mede8er. Pls check the Mede8er Forum for more details on these PC Programs. -
Page 24: Adding Custom Backdrops
The skin option is community driven and you can find some unique designs available for download from the Mede8er Forum. To load a skin -- download the file and unzip /unrar it to a folder. In X3 navigate to this folder and press the ‘Menu’... -
Page 25: Movie Jukebox - Xml Search
Library Preparation for XML Search operation The Media Library must conform to the Mede8er standard with all the relevant movie file information in it’s own folder. A typical folder will contain - Video File - Folder.jpg - About.jpg - XML File - Subtitle file. Once you have arranged your Video Collection into individual folders you can use Windows - Y2M (YAMJ To Mede8er) or Thumbgen / Mac - DunX2Mede8er to scan the folders to make the requires images and xml files. -
Page 26: Jukebox View
JukeBox View In the Setup menu under ‘Misc Options’ you can select JukeBox View -- on/off JukeBox View ‘off’ - Favourite Links to a Jukebox will be presented in a normal structure and you can navigate the scanned Folders and Sub Folders folder as you normally would in the Media Library. JukeBox View ‘on’... -
Page 27: Media Library Music Player
Press the ‘Audio’ button to take you back to the Currently Playing music. Music Jukebox Pls visit the Mede8er website for the Online Guide www.mede8er.com/mede8er_music_jukebox_user_guide.html Repeat All - Repeat all tracks in the folder. Shuffle off Shuffle - Shuffle all tracks in the current folder... -
Page 28: Music Jukebox
Works on local drives and Network shares Displays Tag information in the Music Player Screensaver with Album Artwork Supports .cue files play function (Album based) QPL (Quick Play List) Function Make and Save Mede8er m3u Playlists on the GUI Supports Playlist Creator 3 - 'Non extended information' m3u Playlists Search Album Year, Artist by drop list or Text... -
Page 29: Music Jukebox Continued
MUSIC JUKEBOX - Continued Root of Collection The 'Root' of the music collection is the folder that will be scanned and linked to the Favourites Page The music collection 'Root' will contain the Tracklist.xml (if used), Music.db and m3u files eg Music Collection <------------------ Root Folder Music Collection/Music Folder1... -
Page 30: Music Jukebox Continued
Press the 'F4' button on the remote to go to the Favourite Page. Focus on the Favourite Shortcut and press the 'menu' button and you see options Scan Folder - Scan the folder to make a Mede8er database (Music.db). Remove - Remove the Favourite Link. This option just removes the link and does not delete the source files. -
Page 31: Music Jukebox Continued
'All' mode on the Repeat button and then select the Track. Also if you want to change back to Shuffle/Random Play mode you need to start at Track1 and then select it. We suggest you visit the Mede8er Website for a more detailed User Guide Online Version - http://www.mede8er.com/mede8er_music_jukebox_user_guide.html... -
Page 32: Cover Art Preview In Media Library
‘folder.jpg’ size 160 x 237 pixels to each folder. You can download Movie / DVD cover art directly from the Internet or can use a free program like YAMJ to Mede8er. Y2M will additionally make the movie sheet image named ‘about.jpg’ that contains the content information such as Synopsis, Cover, Rating, Year, Actors etc etc Y2M is available for download from the Mede8er Forum - www.mede8erforum.com. -
Page 33: Play Folder
PLAY FOLDER X3 allows you to play a video file within a folder without the need to open the folder. Just focus on the folder and press the ‘Play’ button. The first video file found in the folder will be played. The folder play will only work with video files. -
Page 34: Lock Facility
LOCK FACILITY X3 has a built in Lock facility designed to restrict access. Pin Protection - Hard Drive Format / File Manager. Folder Protection - User Folders You can enable or disable these options in the Setup menu CHANGE PIN CODE - The default 4 digit Pin Code is 0000 To change the Pin Code go to Setup -- Misc -- Password -- You will be prompted to enter the existing pin code. -
Page 35: Favourites Manager
FAVOURITES MANAGER The MED1000X3D is equipped with a desktop function called Favourites. The Favourite screen is a list of ‘Shortcuts’ created by the user. The Favourite Link will work as a shortcut link to shared folders on the internal Hard Drive, USB Drives, Samba and NFS Network Shares. - Page 36 ADDING GENRE ARTWORK TO FAVOURITES Genre thumbnail artwork can be applied to a Favourite link. To add the cover artwork, focus on the Favourite thumbnail and press the “Menu” button on the remote control. The menu dialogue screen will open and select the “Genre” option. A new screen will open with a thumbnail view of Genre cover options.
- Page 37 VIDEO INFO SEARCH The Info Search allows you to easily jump to any part of the video. While viewing a Video File press the Left/Right Navigation button and the Info Screen will appear on the top of the screen. Now press the Left/Right Nav and a red bar will move left or right and with the corresponding Time position displayed in number text on the left side.
- Page 38 3D MENUS The X3 supports 3D BSISO, Side by Side, Top & Bottom, Frame Sequential, Frame Packing (3D BDISO Menus are not supported). Enable 3D playback on your TV. Select a 3D Video and Play it and then press the Menu button on the X3 remote for more 3D setting options.
-
Page 39: Subtitles
SUBTITLES X3 supports various types of subtitle files. If the subtitle is embedded into the video file it will automatically be available on the Subtitle Dialogue Screen. External Subtitles must be placed into the same folder as the video file and must be named to be exactly the same name as the video file eg Cloudy.With.A.Chance.Of.Meatballs.2009.720p.BluRay.HebDub.x264-WiKi.mkv Cloudy.With.A.Chance.Of.Meatballs.2009.720p.BluRay.HebDub.x264-WiKi.srt To access the Subtitle screen press the Subtitle button on the remote during video play. -
Page 40: File Manager
FILE MANAGER The X3 has a built in File Manager to manage and transfer files between your media sources. The File Manager is launched by pressing the “Edit” button on the remote Control while you are Media Library. To Copy, Delete, Move or Rename a single file focus on the file (that you require to perform the action on) and press the “Edit”... -
Page 41: File Manager Multiple Files
FILE MANAGER - MULTIPLE FILES To Copy, Delete, Move or Rename multiple files press the “Edit” button on the remote control while you are in Media Library view. Select “Multiple Select” and a new dialogue screen will open. Navigate to the files or folders on the left screen “A”. Press the “Play/Pause” button to select and add the files to the File List “B”. -
Page 42: Pictures
PICTURES Press the “View” button on the remote and the Icon strip will light up. Now select the Picture Icon. The page will re-arrange into a image grid that is optimized for image thumbnail viewing. The X3 supports full Slideshow functions and you must enable the ‘Slideshow’... -
Page 43: Internet Media
PLASMA MODE / VIDEO SCREEN TRANSPARENCY The Plasma Mode has been designed for use with Plasma TV’s that are susceptible to still image “burn in”. The Plasma control will change the transparency level of the GUI screens and will not have any effect on the screens during Video Play. - Page 44 NFS (Network File System) X3 by default uses Samba to stream content on a local network and this should be more than sufficient for all users. NFS can be used when streaming on a local network but you may need take care of ‘Flow Control problems by using a managed switch.
-
Page 45: Transmission Bt
Transmission BT Downloader WARNING: BT Downloader can use a lot of system resources we suggest you switch it off while using the X3. In order to use the Transmission BT downloader you will require as foll 1) Internal hard drive that have been formatted in the X3. 2) Valid Internet Connection 3) PC or Mac with Wired / Wireless Network connection to the X3 Navigate to the X3 Setup and select the “Network”... - Page 46 Setup Main Page Menu Language Menu Language. Text Encoding Text Encoding for Subtitles. Time Set the Time / Time Zone and daylight saving. DVD Auto-Play Option for USB DVD drive. If enabled the DVD will Auto Play when inserted. Screen Saver Set the Screen Saver time period and type of Screen Saver.
- Page 47 Mede8er_med1000x3d_user_rev2 High Definition 3D Multimedia Player www.mede8erforum.com www.mede8er.com www.mede8er.eu For more information or support please visit www.mede8er.eu/support/ or call +31(0)10-7142861 during business hours.
Need help?
Do you have a question about the Med1000X3D and is the answer not in the manual?
Questions and answers