Table of Contents
Advertisement
Advertisement
Table of Contents

Related Manuals for Fujitsu PRIMERGY SX05 S1


Summary of Contents for Fujitsu PRIMERGY SX05 S1
-
Page 1: Primergy Sx05 S1
User Guide - English PRIMERGY SX05 S1 User Guide Edition January 2012... -
Page 2: Copyright And Trademarks
The contents of this manual may be revised without prior notice. Fujitsu assumes no liability for damages to third party copyrights or other rights arising from the use of any information in this manual. No part of this manual may be reproduced in any form without the prior written permission of Fujitsu. - Page 3 It has not been designed or manufactured for uses which demand an extremely high level of safety and carry a direct and serious risk to life or body if such safety cannot be ensured. User Guide PRIMERGY SX05 S1...
- Page 4 Please consult the sales staff of Fujitsu if intending to use this product for high safety use. Measures against momentary voltage drop This product may be affected by a momentary voltage drop in the power supply caused by lightning.
-
Page 5: Table Of Contents
Hardware Options ..... . . 15 PRIMERGY SX05 S1 ..... . 16 2.5.1... - Page 6 Italian recycling notice ..... . 46 5.3.13 Latvian recycling notice ..... . 46 User Guide PRIMERGY SX05 S1...
- Page 7 Grounding methods to prevent electrostatic discharge . . . 49 Specifications ......51 User Guide PRIMERGY SX05 S1...
- Page 8 Contents User Guide PRIMERGY SX05 S1...
-
Page 9: About This Guide
Related documentation More information on your PRIMERGY SX05 S1 can be found in the following documents: – "Safety Notes and Regulations" manual "... - Page 10 Internet. The overview page showing the online documentation available on the Internet can be found using the URL (for EMEA market): http://manuals.ts.fujitsu.com. The PRIMERGY server documentation can be accessed using the Industry standard servers navigation option. For the Japanese market: Please refer to the following URL for the latest product manuals: http://jp.fujitsu.com/platform/server/primergy/manual/...
-
Page 11: Document Conventions And Symbols
Indicates that failure to follow directions could result in bodily harm or death. CAUTION: Indicates that failure to follow directions could result in damage to equipment or data. IMPORTANT: Provides clarifying information or specific instructions. NOTE: Provides additional information. User Guide PRIMERGY SX05 S1... -
Page 12: Rack Stability
PRIMERGY’s web site. Before contacting technical support, collect the following information: Product model names and numbers ● Product serial numbers ● Error messages ● Operating system type and revision level ● Detailed questions ● User Guide PRIMERGY SX05 S1... -
Page 13: Introduction
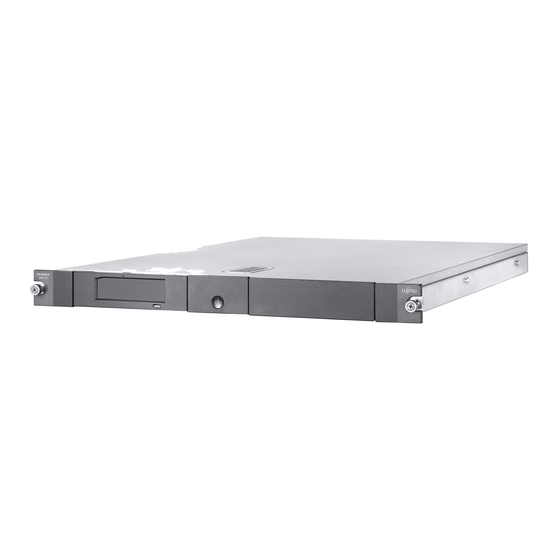
Introduction The PRIMERGY SX05 S1 is a rack-mountable storage system capable of holding up to two half-height 5.25 inch drives. It is compatible with most standard 19 inch racks. Figure 1: PRIMERGY SX05 S1 Standard features The standard features of the PRIMERGY SX05 S1 are summarized below: Supports one or two 5.25 inch half-height tape drives or RDX removable... -
Page 14: Cabling
PRIMERGY SX05 S1 supports two types of interfaces. One is SAS interface, another is USB interface. In the case of SAS interface model, PRIMERGY SX05 S1 connects with a server with an external SAS cable via SAS interface board. CAUTION High quality external SAS cables rated at the transfer rate of the tape drive are required. -
Page 15: Usb Cabling Recommendations
USB cable is connected to the device on the left. Hardware Options For a list of currently supported hardware options, such as tape drives and RDX removable hard drives and media, visit the PRIMERGY's website. User Guide PRIMERGY SX05 S1... -
Page 16: Primergy Sx05 S1
Introduction PRIMERGY SX05 S1 2.5.1 PRIMERGY SX05 S1 front panel components Figure 3: PRIMERGY SX05 S1 front panel components No. Description Backup device Expansion drive bay Power switch/LED LED status Dark Turn off. AC power is not provided. Amber AC power is provided. Power-off. -
Page 17: Primergy Sx05 S1 Rear Panel Components
Introduction 2.5.2 PRIMERGY SX05 S1 rear panel components Figure 4: PRIMERGY SX05 S1 rear panel components No. Description AC Power Connector USB Connector/cable (USB models) Another USB connector/cable is on left side. SAS Connector (SAS models) User Guide PRIMERGY SX05 S1... -
Page 18: Drive Enclosure Internal Components (Sas Version)
Introduction 2.5.3 Drive enclosure internal components (SAS version) Figure 5: Drive enclosure internal components (SAS version) No. Description Drive Drive blank Power supply Fan assemblies (2) SAS Interface Board (SAS Models only) User Guide PRIMERGY SX05 S1... -
Page 19: Drive Installation
Drive installation A 3/16” (5mm) flat-blade screwdriver may be required to install a drive in the PRIMERGY SX05 S1. CAUTION! To avoid damaging the equipment due to electrostatic discharge, be ● sure to review and practice the procedures in Electrostatic discharge before handling the drives. - Page 20 Ê Remove the mounting brackets from the drive blank. Figure 8: Removing the mounting brackets from the drive blank Ê Install the mounting brackets to the sides of the drive. With tape drives, always use the screws provided with the tape drive. User Guide PRIMERGY SX05 S1...
- Page 21 Ê Attach the following cables: NOTE Power for all LTO-4 and LTO–5 tape drives is supplied through the SAS cable. For all LTO-2 and LTO-3 models of LTO tape drive, plug the power cable directly into the drive. User Guide PRIMERGY SX05 S1...
- Page 22 Figure 11: Attaching the cables No. Description Power Data NOTE Fold excess cable length and secure with the clips provided in the tape enclosure. Ê Replace the top access panel as shown. Figure 12: Replacing the access panel User Guide PRIMERGY SX05 S1...
-
Page 23: Cabling With Two Devices
Drive installation Cabling with two devices The PRIMERGY SX05 S1 supports operation of two devices. 3.1.1 SAS devices Each device must be connected directly to a dedicated SAS channel that supports it. (For example, when connecting a tape drive device, be sure to check that the SAS channel supports tape.) The SAS interface does not support... - Page 24 Drive installation User Guide PRIMERGY SX05 S1...
-
Page 25: Primergy Sx05 S1 Rack Installation
Rail mounting kit The rack rails supplied with the PRIMERGY SX05 S1 can be used to install the unit in racks that have round, square, or threaded holes in the vertical mounting columns. The rails will fit racks with 23 - 34 inches (58 - 86 cm) separation between the front and rear vertical mounting columns. -
Page 26: Tools Required
PRIMERGY SX05 S1 rack installation 4.1.1 Tools required If you are installing the tape enclosure in a rack with unmarked holes in the vertical mounting columns the following items will make the rack installation easier: Pencil ● Tape measure ●... -
Page 27: Before You Begin
PRIMERGY SX05 S1 rack installation 4.2.1 Before you begin If you are installing the tape enclosure in a rack with unmarked holes in the vertical mounting columns, identify and mark the correct mounting holes in the rack before you begin rail installation. -
Page 28: Installing The Outer Rack Rails
PRIMERGY SX05 S1 rack installation CAUTION! If you are returning the PRIMERGY SX05 S1 for service, be sure to remove and save the component rail. 4.2.3 Installing the outer rack rails Installation procedures vary depending on the rack type. The rails are shipped ready for installation in racks with round or square holes. - Page 29 PRIMERGY SX05 S1 rack installation Figure 16: Mounting cage nut Ê Mount the cage nut on the support bracket. Only for PCR-M1 asymmetrical racks! Figure 17: Fixing the cage nut Ê Position the support bracket at the corresponding height on the vertical mounting bar, (place knob in corresponding hole (1).
-
Page 30: Installation In Racks With Round Or Square Holes
PRIMERGY SX05 S1 rack installation If you have not done it before, mount the cage nut on the support bracket (see figure 16 on page 29). Ê Fix the cage nut with the screw (3). Ê Extend the rack rails past the rear vertical mounting bar and insert the pins in the mounting bracket into the previously marked holes in the rack. -
Page 31: Installation In Racks With 10-32 Threaded Holes
PRIMERGY SX05 S1 rack installation Ê Extend the rack rails past the rear vertical mounting bar and insert the pins in the mounting bracket into the previously marked holes in the rack. The rack rails will lock securely into place when the end of the rails are pushed forward. - Page 32 PRIMERGY SX05 S1 rack installation Figure 20: Removing the pins and threaded plates NOTE: The ends of the rack rails are marked FRONT and REAR for proper orientation. Ê Attach the front mounting plate of each outer rail to the rack using four 10- 32 screws in the previously marked holes in the front vertical mounting columns of the rack.
-
Page 33: Completing The Installation
PRIMERGY SX05 S1 rack installation Ê Extend the rack rails past the rear vertical mounting columns and attach the back mounting plate of each outer rail to the rack using four 10-32 screws in the previously marked holes. Figure 22: Attaching the back mounting plate 4.2.4... - Page 34 PRIMERGY SX05 S1 rack installation Figure 23: Sliding the unit into the rack CAUTION Be sure to keep the enclosure parallel to the floor when sliding the component rails into the rack rails. Tilting the enclosure up or down could damage the rails.
- Page 35 PRIMERGY SX05 S1 rack installation Figure 24: Connecting the power cord (USB tape drive installed) Ê Install the cable support clip(s) at the back of the rack rail(s) on one or both sides of the enclosure. Figure 25: Installing the cable support clips Ê...
- Page 36 PRIMERGY SX05 S1 rack installation User Guide PRIMERGY SX05 S1...
-
Page 37: Regulatory Compliance Notices
Class B devices have an FCC logo or ID on the label. Class A devices do not have an FCC logo or ID on the label. After you determine the class of the device, refer to the corresponding statement. User Guide PRIMERGY SX05 S1... -
Page 38: Class A Equipment
● Connect the equipment into an outlet on a circuit that is different from that to ● which the receiver is connected. Consult the dealer or an experienced radio or television technician for help. ● User Guide PRIMERGY SX05 S1... -
Page 39: Declaration Of Conformity For Products Marked With The Fcc Logo, United States Only
This Class B digital apparatus meets all requirements of the Canadian Interference-Causing Equipment Regulations. Cet appareil numérique de la class B respecte toutes les exigences du Règlement sur le matériel brouilleur du Canada. 5.2.6 European Union notice This product complies with the following EU directives: User Guide PRIMERGY SX05 S1... -
Page 40: Japanese Notices
Conformity issued by Hewlett-Packard for this product or product family. This compliance is indicated by the following conformity marking placed on the product: This marking is valid for non-Telecom products and EU harmonized Telecom products (e.g., Bluetooth). 5.2.7 Japanese notices Japanese VCCI-A notice User Guide PRIMERGY SX05 S1... -
Page 41: Japanese Notices
Regulatory compliance notices 5.2.8 Japanese notices Japanese VCCI-B notice 5.2.9 Japanese power cord statement 5.2.10 Korean notices Class A equipment User Guide PRIMERGY SX05 S1... -
Page 42: Taiwanese Notices
Regulatory compliance notices Class B equipment 5.2.11 Taiwanese notices BSMI Class A notice Taiwan battery recycle statement 5.2.12 Turkish recycling notice Türkiye Cumhuriyeti: EEE Yönetmeliðine Uygundur User Guide PRIMERGY SX05 S1... -
Page 43: Recycling Notices
Regulatory compliance notices Recycling notices 5.3.1 English recycling notice 5.3.2 Bulgarian recycling notice 5.3.3 Czech recycling notice User Guide PRIMERGY SX05 S1... -
Page 44: Danish Recycling Notice
Regulatory compliance notices 5.3.4 Danish recycling notice 5.3.5 Dutch recycling notice 5.3.6 Estonian recycling notice 5.3.7 Finnish recycling notice User Guide PRIMERGY SX05 S1... -
Page 45: French Recycling Notice
Regulatory compliance notices 5.3.8 French recycling notice 5.3.9 German recycling notice 5.3.10 Greek recycling notice 5.3.11 Hungarian recycling notice User Guide PRIMERGY SX05 S1... -
Page 46: Italian Recycling Notice
Regulatory compliance notices 5.3.12 Italian recycling notice 5.3.13 Latvian recycling notice 5.3.14 Lithuanian recycling notice 5.3.15 Polish recycling notice User Guide PRIMERGY SX05 S1... -
Page 47: Portuguese Recycling Notice
Regulatory compliance notices 5.3.16 Portuguese recycling notice 5.3.17 Romanian recycling notice 5.3.18 Slovak recycling notice 5.3.19 Spanish recycling notice User Guide PRIMERGY SX05 S1... -
Page 48: Swedish Recycling Notice
Regulatory compliance notices 5.3.20 Swedish recycling notice User Guide PRIMERGY SX05 S1... -
Page 49: Electrostatic Discharge
±10 percent resistance in the ground cords. To provide proper ground, wear the strap snug against the skin. Use heel straps, toe straps, or boot straps at standing workstations. Wear ● the straps on both feet when standing on conductive floors or dissipating floor mats. User Guide PRIMERGY SX05 S1... - Page 50 If you do not have any of the suggested equipment for proper grounding, have an authorized reseller install the part. For more information on static electricity or assistance with product installation, contact an authorized reseller. User Guide PRIMERGY SX05 S1...
-
Page 51: Specifications
* Input power and Heat dissipation specifications are maximum values and apply to worst-case conditions at full rated power supply load. The power/heat dissipation for your installation will vary depending on the equipment configuration. Table 3: Specifications User Guide PRIMERGY SX05 S1... - Page 52 Specifications User Guide PRIMERGY SX05 S1...
Need help?
Do you have a question about the PRIMERGY SX05 S1 and is the answer not in the manual?
Questions and answers