Keurig B200 Use & Care Manual
Gourmet single cup brewing system
Hide thumbs
Also See for B200:
- Quick start manual (2 pages) ,
- Quick start manual (2 pages) ,
- Quick start manual (2 pages)
Chapters
Table of Contents

Related Manuals for Keurig B200


Summary of Contents for Keurig B200
- Page 1 USE & CARE GUIDE B200 SINGLE-CUP BREWING SYSTEM BREWING EXCELLENCE ONE CUP AT A TIME ™ Please read and save these instructions. Pour des directives en français, veuillez vous reporter à la page 19.
-
Page 2: Save These Instructions
SAVE THESE INSTRUCTIONS KEURIG ® GOURMET SINGLE CUP COMMERCIAL BREWING SYSTEM Model B200 Use & Care Guide SAFE OPERATION & USE IMPORTANT SAFEGUARDS When using electrical appliances, basic safety malfunctions or is damaged in any manner. precaution should be followed, including the Contact your Keurig Authorized Dealer to arrange for replacement. -
Page 3: Table Of Contents
K-Cup ® portion pack, one above the K-Cup ® Holder and the other in Model B200 Use & Care Guide the bottom of the K-Cup ® Holder. TABLE OF CONTENTS To avoid risk of injury, do not put your fingers in the K-Cup Chamber. -
Page 4: Set-Up & Operation
2. Remove the Quick Start Guide, Use & Care turned ‘ON’ all the time. Guide and other literature if included. 2. Keurig requires the use of filtered water 3. Reach into the box and grasp the plastic on this brewer. Contact your Keurig bag that contains the Brewer. -
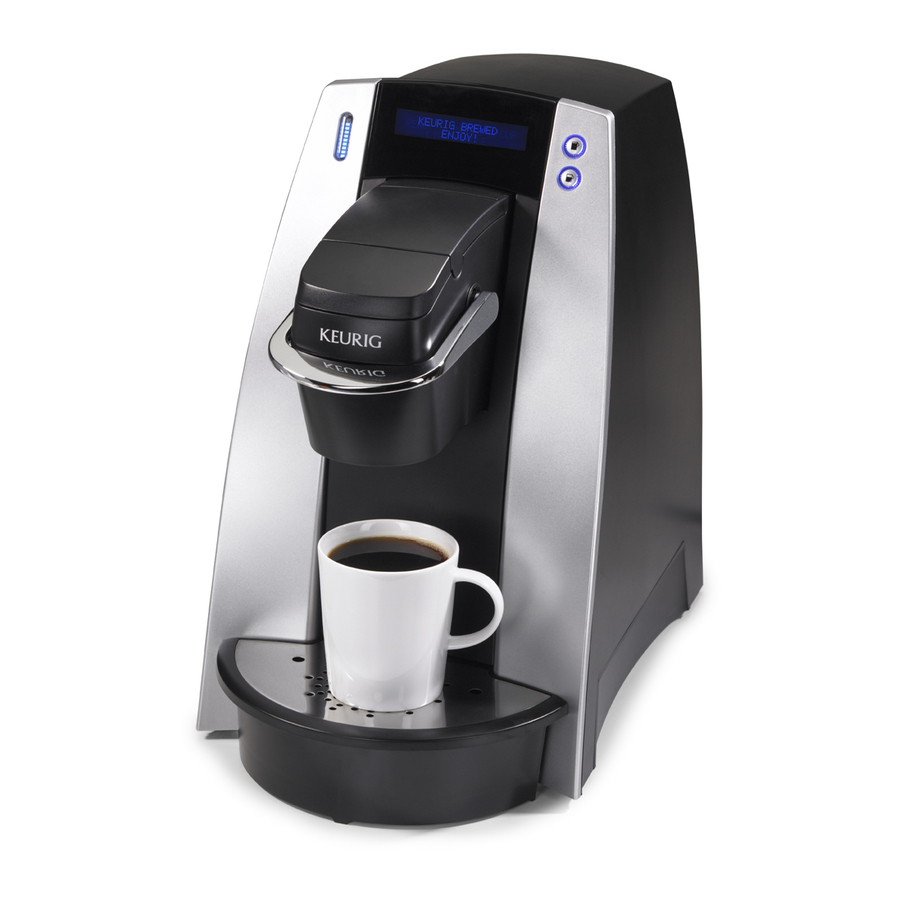
Page 5: Features
• User instructions displayed on the LCD action needed screen • Plumbed and Pour-Over Modes • Accepts US 25¢, 10¢, 5¢, and Keurig token • Water level indicator • Accepts Canadian $1, 25¢, 10¢ and 5¢ • Removable drip tray with 'Full" level indicator... -
Page 6: K-Cup ® Portion Pack Holder
Features Model B200 Commercial Brewer 6 – K-CUP ® PORTION PACK HOLDER 7 – FUNNEL 8 – K-CUP ® PORTION PACK ASSEMBLY HOUSING Fig. 2 9 – FILL DOOR 10 – REMOVABLE FILL SCREEN Fig. 4... - Page 7 Features Model B200 Commercial Brewer 11 – DRAIN PLUGS 12 – POWER SWITCH 13 – MAINTENANCE MENU BUTTON 14 – WATER PLUMBING INLET 15 – POUR OVER/PLUMBED SWITCH 16 – CIRCUIT BREAKER 17 – COMM PORT 18 – ACCESS DOOR 19 –...
- Page 8 Omnipure 8. Turn off water supply. KQ8A, available from Keurig Incorporated. 9. Cut the long length tubing connected to the exit of the filter assembly to proper length 1.
-
Page 9: Set-Up & First Brew
Set-Up & First Brew 8. After the Brewer steps you through the priming process and cleansing brew, it will IMPORTANT: You cannot use your Keurig ask you to discard the cleansing brew liquid. brewer until it has been primed for its first use 9. -
Page 10: Adding Water
K-Cup ® . CAUTION: K-Cup ® will be hot. 10. Enjoy your first cup of Keurig Brewed ® NOTE: If the Brewer is in plumbed mode, it gourmet coffee or tea! will refill the cold water tank completely after every six brews of either size. -
Page 11: Draining The Brewer
Water Level Indicator. If you are experiencing any problems with B) Shut off water supply to the Brewer. your Brewer, please contact your Keurig Authorized Distributor. C) Turn off power switch. D) Wait three seconds, turn on power Fig. -
Page 12: Cleaning & Maintenance
SECTION 2 CLEANING & MAINTENANCE ® Cleaning & Sanitizing the Cleaning the K-Cup Portion Pack Entrance Needle Area Holder Assembly Regular cleaning of the Brewer’s external components is recommended. The needle, K-Cup Holder Fig. 9 entrance needle gasket, and surrounding Assembly puncture mechanism should be wiped clean using a clean cloth. -
Page 13: De-Scaling Your Brewer
PLEASE CONTACT YOUR cycle. We suggest using the largest brew KEURIG AUTHORIZED DEALER size to speed the process. Remember to FOR ALL SERVICE RELATED open and close the brew handle between each cycle so the blue Brew lights will flash. -
Page 14: Menu Functions
This item allows the user to enter the phone proceed through all the menu items including number of the Keurig Authorized Dealer. This each digit of the service phone number to exit will appear on the screen under any of the the menu or maintenance menu. -
Page 15: Maintenance Menu Functions
‘SELF CALIBRATION’ Keurig, Inc. (Used only for Pour-Over Mode) 8. Use the lower brew button to step through This is the only item changeable in the mainte- the remainder of the menu items until you nance menu. -
Page 16: Troubleshooting
SECTION 5 TROUBLESHOOTING SITUATION SOLUTION Brewer does not • Plug Brewer into an independent outlet. have power • Check to be sure that it is plugged in securely. • Plug into a different outlet. • Reset the power outlets’ circuit breaker if necessary. •... -
Page 17: Coin Mechanism Accessory
If a Coin Acceptor Accessory kit is ordered The Coin Acceptor accessory will accept US with this Brewer, the accessory package will 25¢, 10¢, 5¢ and Keurig token and Canadian include an Installation Guide. To activate the $1, 25¢, 10¢ and 5¢ coins. -
Page 18: Warranty
THIS WARRANTY IS EXCLUSIVE AND IS IN workmanship under normal use for one year LIEU OF ANY OTHER EXPRESS WARRANTY, from the date of purchase. Keurig will, at its WHETHER WRITTEN OR ORAL. THE DURA- option, repair or replace the Brewer without... - Page 19 été endom- base, y compris les suivantes : magé. Communiquer avec votre distribu- teur Keurig autorisé pour tout produit de 1. Lire toutes les directives avant l’utilisation. remplacement. 2. Ne pas toucher les surfaces chaudes.
- Page 20 SYSTÈME D'INFUSION GOURMET ATTENTION : Le godet K-Cup est perforé UNE TASSE À LA FOIS DE KEURIG ® par deux aiguilles, une au-dessus du sup- Manuel d'utilisation et d'entretien du port à K-Cup et l'autre au fond du support modèle B200 à...
-
Page 21: Réglages Et Fonctionnement De La Cafetière
Communiquez avec votre distribu- 4. Tirez doucement le sac de plastique (et les teur Keurig autorisé pour obtenir le numéro de matériaux d’emballage) vers vous pour sortir pièce du filtre B200. la cafetière de la boîte. La cafetière est encas- 3. -
Page 22: Caractéristiques
Dimensions : 40,6 H x 26 L x 45,7 P cm (16 H x 10,25 L x 18 P po) Électricité : 1 400 W, 120 V CA Caractéristiques de la cafetière B200 : Accessoires : • Deux formats d’infusion : 237 ml (8 oz) et •... - Page 23 Caractéristiques Modèle de cafetière commerciale B200 6 – SUPPORT À GODET K-CUP 7 – ENTONNOIR 8 – BOÎTIER DE L’ASSEMBLAGE DU SUPPORT À GODET K-CUP Fig. 2 9 – PORTE DE REMPLISSAGE 10 – FILTRE DE REMPLISSAGE AMOVIBLE Fig. 4...
- Page 24 Caractéristiques Modèle de cafetière commerciale B200 11 – BOUCHONS DE DRAINAGE 12 – COMMUTATEUR DE MISE EN MARCHE (POWER) 13 – BOUTON DU MENU D’ENTRETIEN 14 – ORIFICE D’ENTRÉE D’EAU 15 – COMMUTATEUR DE REMPLISSAGE MANUEL/PLOMBERIE 16 – DISJONCTEUR 17 – SORTIE COMMUNE 18 –...
- Page 25 AVERTISSEMENT : Cette cafetière doit être utilisée avec un filtre à eau externe comme le 8. Fermez l’alimentation en eau. filtre Omnipure KQ8A de Keurig, Inc. 1. Un filtre externe (KQ8A) peut être fixé à 9. Coupez le long tuyau branché à l’orifice de sortie du filtre d’une longueur appropriée et...
-
Page 26: Réglages Et Première Infusion
Réglages et première infusion 8. Une fois le cycle de préparation et d’infusion de nettoyage terminé, la cafetière indique de jeter IMPORTANT : N’utilisez pas votre cafetière Keurig le liquide d’infusion de nettoyage. avant de l’avoir préparée pour une première utili- 9. - Page 27 Vous pouvez enlever le filtre de remplissage pour le nettoyer. (Fig. 4) 10. Il ne vous reste plus qu’à savourer votre pre- mière tasse de café gourmet ou de thé Keurig REMARQUE : Si la cafetière est en mode Brewed plomberie, le réservoir d’eau froide se remplira...
-
Page 28: Vidange De La Cafetière
Pour tout problème avec votre cafetière, apparaîtra : veuillez communiquer avec votre distributeur CAFETIÈRE VIDANGEE? OUI NON Keurig autorisé. Répondez OUI pour activer la valve d’arrivée d’eau et faire chuter la pression dans les tuyaux. Fig. 8 E) Éteignez la cafetière et débranchez le cordon d’alimentation. -
Page 29: Nettoyage Et Entretien
SECTION 2 NETTOYAGE ET ENTRETIEN Nettoyage et désinfection de la Nettoyage de l’assemblage du zone de l’aiguille d’entrée support à godet K-Cup Il est recommandé de nettoyer et de désin- fecter régulièrement la zone de l'aiguille Assemblage du support à K-Cup d'entrée. -
Page 30: Détartrage De Votre Cafetière
Jetez ensuite le contenu de la tasse dans l’évier. COMMUNIQUER AVEC VOTRE Étape 3 : Répétez le processus d’infusion jusqu’à ce que le message DISTRIBUTEUR KEURIG AJOUTER DE L’EAU POUR CONTINUER AUTORISÉ POUR TOUTES apparaisse sur l’afficheur de messages à... -
Page 31: Fonctions Du Menu
« TÉL. SERVICE CLIENT » Cet élément permet à l’utilisateur d’entrer le vous passez d’un élément du menu à un numéro de téléphone du distributeur Keurig autre). Pour sortir du menu ou du menu d’entretien, vous devez passer tous les autorisé. -
Page 32: Fonctions Du Menu D'entretien
Cet élément permet au technicien Keurig, Inc et d’autres produits à venir. d’étalonner au besoin les voyants à DEL de l’indi- 8. Utilisez le bouton d’infusion du bas pour faire cateur de niveau d’eau du réservoir d’eau froide :... -
Page 33: Dépannage
SECTION 5 DÉPANNAGE SITUATION SOLUTION La cafetière ne • Branchez la cafetière séparément. fonctionne pas • Vérifiez que la cafetière est bien branchée. • Branchez la cafetière dans une autre prise. • Réenclenchez le disjoncteur au besoin. • Réenclenchez le bouton du disjoncteur de la cafetière situé sur le panneau d’entretien. -
Page 34: Monnayeur
Le mécanisme à monnaie accepte les pièces de cette cafetière, l’ensemble comprendra un Guide 25 ¢, 10 ¢ et 5 ¢ US, ainsi que les jetons Keurig, d’installation. Pour activer le monnayeur, accédez de même que les pièces de 1 $, 25 ¢, 10 ¢ et 5 ¢... -
Page 35: Garantie
GARANTIE mauvaise utilisation, une mauvaise alimenta- tion en électricité ou des catastrophes Keurig garantit que chaque cafetière B200 est naturelles. exempte de tout défaut de pièces ou de fabri- cation, sous réserve d’une utilisation normale, Autres limitations pendant un an à partir de la date d’achat. - Page 40 Made in China / Fabriqué en Chine 1-888-CUP-BREW (287-2739) Keurig, Keurig Brewed, Brewing Excellence One Cup at a Time, and K-Cup are trademarks or registered trademarks of Keurig, Incorporated. Keurig, Keurig Brewed, l’infusion par excellence une tasse à la fois et K-Cup sont des marques de commerce ou des marques déposées de Keurig, Inc.
Need help?
Do you have a question about the B200 and is the answer not in the manual?
Questions and answers