
Related Manuals for Ideal Air 700899


Summary of Contents for Ideal Air 700899
- Page 1 CG2 Commercial Grade Dehumidifier Model: 700899 Owner’s Manual PLEASE READ AND SAVE THESE INSTRUCTIONS...
-
Page 2: Unpacking The Dehumidifier
After removing packaging ensure the contents are intact and complete. In the unlikely event of missing parts, contact Ideal Air Support directly at (877) 9-IDEAL-1 or support@Ideal-Air.com. DO NOT leave children unattended with any of the packaging since it is a potential source of danger. -
Page 3: Safety Instructions
7. The use of attachments or accessories not recommended or sold by Ideal Air may cause injury to persons or damage to property. 8. Do not attempt to dismantle the appliance. 9. Do not operate the appliance on a metal surface. -
Page 4: Getting Started
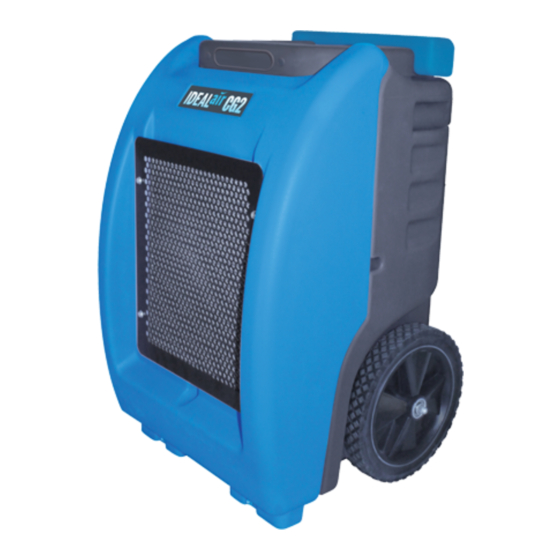
GETTING STARTED Unit Features: 1. Digital Control Panel 6. Hose/Cord Caddy 2. Air Filter 7. Wheel 3. Air Intake Grill 8. Power Cord 4. Handle 9. Drain Hose 5. Air Outlet Place dehumidifier in the upright position. When transporting the dehumidifier, allow it rest still for 30 minutes before switching ON. -
Page 5: Setting Up The Dehumidifier
GETTING STARTED Setting up the dehumidifier PLACE IN ENCLOSED AREA: For best results, operate the dehumidifier in an enclosed area to create a "drying chamber." Close all doors and windows that open to external areas to maximize the dehumidifier’s water removal efficiency. Keep traffic through the drying chamber to a minimum. -
Page 6: Operation
OPERATION Digital Control Panel LCD Screen ADJUSTMENT KEYS These 2 keys allow you to adjust humidity values and time settings up or down. NOTE: To cycle through menu functions, you must press BOTH Adjustment Keys at the same time. FUNCTION Displays menu of unit functions. -
Page 7: Starting The Unit
OPERATION Starting the unit 1. Plug in the electrical cord This dehumidifier must be plugged into a grounded, polarized 115 VAC outlet rated at least 15 amps. Make sure the drain hose is connected and routed to a safe location. 2. -
Page 8: Setting The Humidity
OPERATION Setting the humidity The unit is set at the factory for CONTINUOUS OPERATION (”CO”) if no humidity adjustments are made, or if you set a humidity level below 26%. To adjust the relative humidity level from 26% to 90% press once. -
Page 9: Purging The Unit
OPERATION Purging the unit During normal operation the pump purges the condensate reservoir automatically when it is full. However, use “PURGE” before moving the machine to avoid water spillage. The pump will shut off automatically after 40 seconds of continuous operation. Press the key to empty water from the pump reservoir. -
Page 10: Cleaning The Air Filter
MAINTENANCE Cleaning the air filter Ensure the dehumidifier is turned OFF and plug is removed from the power outlet before performing maintenance. NOTE: The working performance of the dehumidifier will be greatly reduced if the filters are clogged. 1. Remove the filter as shown. 2. -
Page 11: Troubleshooting
TROUBLESHOOTING – IMPORTANT – Do not return the unit to the store from which it was purchased. Contact Ideal Air Support at (877) 9-Ideal-1 or at support@ideal-air.com. FAULT CAUSE SOLUTION Unit does not No power to machine. Plug in unit; check power at operate Unit not switched on. -
Page 12: Fault Codes
Make sure air sensor is not touching coil. 4. Check resistance of pipe sensor and room air sensor (contact Ideal Air for data tables). If these solutions do not correct the error, contact Ideal Air Support at (877) 9-Ideal-1 or support@Ideal-Air.com... -
Page 13: Specifications
SPECIFICATIONS Dehumidifying Capacity (86°F / 80% RH): 170 pints / day Dehumidifying Capacity 100 pints / day (AHAM Conditions – 80°F / 60% RH): Rated Power Input / Current (86°F / 80% RH): 1300W / 12A Rated Power Input / Current (80°F / 60% RH): 1045W / 9.5A Power Supply 110V-120V / 60Hz... -
Page 14: Power Consumption
SPECIFICATIONS Dehumidifying Capacity 90˚F 86˚F 80˚F 80˚F 90% RH 80% RH 80% RH 60% RH Power Consumption 1600 1500 1400 1300 1200 1100 1000 90˚F 86˚F 80˚F 80˚F 90% RH 80% RH 80% RH 60% RH All temperatures shown represent ambient room temperature. -
Page 15: Warranty
Any technical advice, information, and/or service to Owner in connection with the System. b. Under no circumstances shall Ideal Air be held liable for: (i) damages to person or property; (ii) loss of revenue or profit; (iii) removal or disposal of system, resulting from any product defect. - Page 16 5408 NE 88th St., Bldg. A Vancouver, WA 98665 www.ideal-air.com A division of Sunlight Supply All design and specifications herein are subject to change without notice for product improvement. Contact Ideal Air for details, updates and other information.
Need help?
Do you have a question about the 700899 and is the answer not in the manual?
Questions and answers