Advertisement
Available languages
Available languages
Quick Links
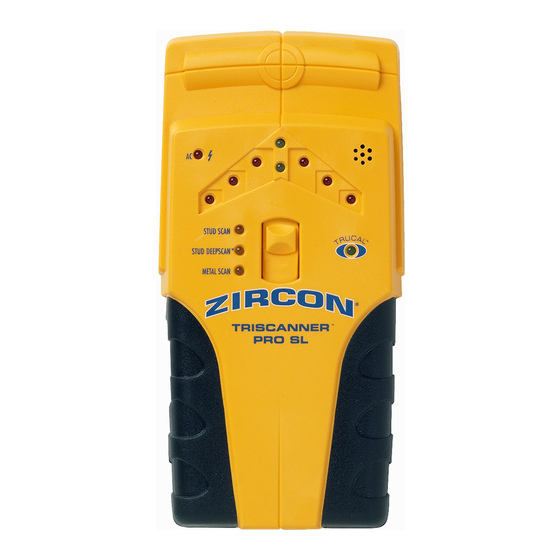
TriScanner
Stud & Metal Locator with AC Warning
The Zircon TriScanner
®
Pro SL
scanner detects wood or metal
studs, metal pipes, and hot
Metal Sensor
electrical wires in interior walls,
floors, and ceilings, as well as
AC LED
rebar in concrete. It features
the SpotLite
®
Pointing System,
Stud Scan
three different scanning modes
Mode LED
plus continuous hot electrical
wire detection.
Stud DeepScan
Mode LED
Metal Scan
Mode LED
On/Off Button
(Side of unit)
LIMITED 1 YEAR WARRANTY
Zircon Corporation, ("Zircon") warrants this product to be free from defects
in materials and workmanship for one year from the date of purchase. Any
in-warranty defective product returned to Zircon*, freight prepaid with proof
of purchase date and $5.00 to cover postage and handling, will be repaired or
replaced at Zircon's option. This warranty is limited to the electronic circuitry
and original case of the product and specifically excludes damage caused by
abuse, unreasonable use or neglect. This warranty is in lieu of all other
warranties, express or implied, and no other representations or claims of any
nature shall bind or obligate Zircon. Any implied warranties applicable to this
product are limited to the one year period following its purchase.
IN NO EVENT WILL ZIRCON BE LIABLE FOR ANY SPECIAL, INCIDENTAL OR
CONSEQUENTIAL DAMAGES RESULTING FROM POSSESSION, USE OR
MALFUNCTION OF THIS PRODUCT.
In accordance with government regulations, you are advised that:
(i) some states do not allow limitations on how long an implied warranty lasts
and/or the exclusion or limitation of incidental or consequential damages, so
the above limitations and/or exclusions may not apply to you, and further (ii)
SCANNING IN METAL MODE
Metal can be detected up to 1
1
⁄
in. (38 mm) deep
2
in walls and up to 3 in. (77 mm) deep in concrete.
While holding in On/Off
12
button, slowly move unit
on surface, to locate targets.
Reverse directions to locate other
edge of target. Lights will indicate
metal in the same way as in find-
ing studs. When tone sounds,
LEDs light up, and SpotLite comes on, you are close
to metal. Mark this spot to help ensure that you're
not nailing into a pipe.
CONTINUOUS AC VOLTAGE
DETECTION
The TriScanner Pro SL detects from 90 to 250 V
13
at 50 to 60 Hz AC in a HOT unshielded
electrical wire that is within 1
1
⁄
in. (38 mm) of
2
wall surface. The voltage detection feature works
continuously in all modes. The sensor is located in the
center of the back of the unit.
Caution: The TriScanner Pro SL will not detect hot
wires inside metal pipe or metal conduit, behind
metallic wall covering, or behind some plywood or
other dense materials. Use extra caution in these
construction situations. Always turn the power
off when nailing, cutting, or drilling near
electrical wires.
VERIFYING IF THE UNIT WORKS
Turn unit on in the air.
14
If the LEDs light when
you bring your hand up to the
back, then the unit is working
properly.
The AC LED should
15
light with an electrical
cord an inch or two away.
®
Pro SL
®
SpotLite
Pointing System
®
TRISCANNER
PRO SL
this warranty gives you specific legal rights and you may also have other
rights which vary from state to state.
Return product freight prepaid with proof of purchase date (dated sales
receipt) and $5.00 to cover postage and handling, to:
Zircon Corporation
*Attn: Returns Department
2390 Boswell Road, Suite 300
Chula Vista, CA 91914-3510 USA
Be sure to include your name and return address. Out of warranty service and
repair, where proof of purchase is not provided, shall be returned with repairs
charged C.O.D. Allow 4 to 6 weeks for delivery.
Customer Service, 1-800-245-9265 or 1-408-866-8600
Monday–Friday, 8 a.m. to 5 p.m. PST
E-mail: customer.service@zircon.com
U.S. Patent #4464622, 5352974, 5619128, 6023159, 6249113, 6259241,
D419546, D419149, D419545, D427166, and D419544
Canada Patent #1106932 • G.B. Patent #2117909B, 2159630B
©2002 Zircon Corporation • P/N 58756 • Rev B 11/02
OPERATING CAUTIONS
Depending on the proximity of electrical wiring
16
or pipes to the wall surface, the scanner may
detect them in the same manner as studs. Caution
should always be used when nailing, cutting, or
drilling in walls, floors, and ceilings that may contain
these items.
To avoid surprises, remember that studs or joists are
normally spaced 16 in. (406 mm) or 24 in. (610 mm)
apart and are 1
1
⁄
in. (38 mm) in width. Anything
2
closer together or a different width may not be a
stud, joist, or firebreak. Always turn off the power
when working near electrical wires.
WORKING WITH DIFFERENT MATERIALS
Wallpaper: TriScanner Pro SL functions normally on
walls covered with wallpaper or fabric, unless the
materials are metallic foil, contain metallic fibers, or
are still wet after application.
Textured Ceilings: When scanning on an uneven
surface, place thin cardboard on ceiling and scan over
the cardboard. Calibrate with cardboard in place.
Note: TriScanner Pro SL cannot scan through
carpeting and pad or, in most cases, lath and plaster.
If you are having difficulty scanning through any of
these or other materials, use the Metal mode to
locate nails in the stud or joist. Try to locate several
nails to get a better idea of how the stud is oriented.
FCC Part 15 Class B Registration Warning
This equipment has been tested and found to comply with the
limits for a Class B digital device, pursuant to Part 15 of FCC
Rules. These limits are designed to provide reasonable protection
against harmful interference when the equipment is operated in
a residential installation. This equipment generates, uses, and
can radiate radio frequency energy and, if not installed and used
in accordance with the instructions, may cause harmful interfer-
ence to radio communications. However, there is no guarantee
that interference will not occur in a particular installation. If this
equipment does cause harmful interference to radio or television
reception, which can be determined by turning the equipment
off and on, the user is encouraged to try to correct the interfer-
ence by one or more of the following measures:
(1) Reorient or relocate the receiving antenna.
(2) Increase the separation between the equipment and receiver.
(3) Connect the equipment into an outlet on a circuit, different
from that which the receiver is connected (if applicable).
(4) Consult the dealer or an experienced radio/TV technician
for help.
INSTALLING THE BATTERY
Press battery door release with a coin and
1
remove door.
Stud Edge
Groove
Connect battery to cable and place inside
2
battery compartment. Replace battery door
LED Sensing
and snap shut. Battery will last approximately two
Display
years under normal conditions.
®
TruCal
LED
TURNING THE POWER ON/OFF
ON: Press and hold ON/OFF button on the left
3
side. OFF: Release ON/OFF button.
Mode Selector
Switch
Note: the Triscanner Pro SL will automatically turn
off after 15 minutes of continuous use (in case
battery button is accidently held down in a toolbox.)
Battery Door
(Back of unit)
SELECTING MODE: STUD SCAN,
STUD DEEPSCAN
®
Use Stud Scan mode for depths to about
(19 mm) and Stud DeepScan for depths up to
1
1
⁄
in. (38 mm) or double layers.
2
Slide the Mode selector switch until you reach
4
desired scanning mode. The mode can be
selected with the unit on or off.
CALIBRATING IN STUD SCAN OR
STUD DEEPSCAN MODES
Keep unit flat against wall
during calibration or scanning.
5
Position the TriScanner
Pro SL flat against the
wall. Select mode. Press and
hold On/Off button.
HELPFUL HINTS
Situation
Over-the-Stud Indicator.
• Scan began over a stud.
(Flashing lights)
• Unit not flat against wall.
• Unit tilted or lifted during
Working in DeepScan
• You may have calibrated over
mode and can't detect
studs.
• You may be holding the unit
Detects other objects
• Electrical wiring and metal/
besides studs in stud
Scan and DeepScan
modes.
You suspect electrical
• If wires are shielded behind
wires, but do not
detect any.
• The wires may not be HOT.
• Wires may be too deep to
Area of voltage
• Static charge may develop on
detection is too large.
Red LEDs light but center
• Wall is particularly thick
pair of green LEDs don't.
Difficulty detecting
• Unit calibrated over metal.
metal.
• Metal targets are too deep.
Image of metal stud
• Metal has greater density
appears wider than
actual size.
Red LEDs do not light up
• Battery voltage is low.
as you test the unit with
your free hand moving
toward the back of the
TriScanner Pro SL.
Questions? Check our Web site at www.zircon.com and click "Product Support."
Mode LED and TruCal
6
quickly and then stay lit. TriScanner Pro SL
automatically calibrates in less than one second.
SCANNING IN STUD SCAN OR STUD
DEEPSCAN MODES
Slowly slide unit
7
horizontally across wall,
9 VOLT
BATTERY
left or right.
When center pair of
8
green LEDs light,
steady tone sounds, and the
SpotLite
®
Pointing System
shines, you have found the
stud edge. Mark this spot.
Continue holding
9
On/Off button in and
scan beyond marked spot until
the center green and 3 pairs
of red LEDs go out.
, OR METAL SCAN
Without releasing On/Off
10
3
⁄
in.
4
button, slide unit in reverse
direction to locate the other edge
of stud. Mark this second spot.
Middle of stud is centered
between the two marks.
CALIBRATING IN METAL MODE
Select Metal mode. Press
11
and hold ON/OFF button.
Calibrate TriScanner Pro SL in air,
away from metal objects. Position
unit flat against wall.
Probable Causes
• Turn unit off, move over a few inches, and start again.
• Hold unit with thumb and index finger no higher than
handgrips.
scan. (All these factors affect
• On rough surfaces, place a piece of paper on wall,
proper calibration.)
scanning through it to help slide unit more smoothly.
• In Stud Scan or DeepScan modes, hold unit parallel to
and move perpendicular to object you're trying to locate.
• Move TriScanner Pro SL over a few inches and recalibrate.
a stud. (The error condition is
disabled in DeepScan mode
because it is twice as
sensitive as Stud Scan.)
• Hold the TriScanner Pro SL so that the two Velcro™ strips
like a TV remote, aiming it at
on the back make contact with the wall.
the wall.
• Switch to Metal mode, where combined with continuous
plastic pipes may be near or
AC detection, pipes and electrical wiring should be
touching back surface of
detected adequately.
wall.
• Use CAUTION when nailing, cutting, or drilling in walls,
metallic wall coverings, or in
floors, and ceilings that may contain wiring.
metal conduit, TriScanner Pro
• Use extra caution if the area has plywood, thick wood
SL will not be able to find
backing behind drywall, or thicker than normal walls.
them.
• Remember that studs or joists are normally spaced
16 in. (406 mm) or 24 in. (610 mm) apart and are 1
(38 mm) wide.
sense.
• If a switch controls an outlet, make sure it is ON for detection.
• To narrow detection, turn unit off and on again at the edge
drywall, spreading voltage
of where wire was detected and scan again.
detection as much as 12 in.
• Place free hand flat against wall near tool to discharge
(305 mm) from each side.
static.
• Interpret pair of red LEDs closest to center as stud edge.
or dense.
• Switch to DeepScan to locate the stud.
• Always calibrate in the air for best sensitivity and to avoid
calibrating over metal.
• Scan in both horizontal and vertical directions. Sometimes
metal sensitivity is greater when metal object is parallel to
sensor, which is along top of unit.
• To narrow image, scan and mark first indications and then
than wood and is sensed
calibrate TriScanner Pro SL over either of the first two marks.
farther from edge.
Scan again and mark the new, narrowed detection points.
Repeat if necessary.
• Replace battery to maintain sensitivity.
®
LED will flash
Solutions
1
⁄
in.
2
Advertisement

Related Manuals for Zircon TriScanner Pro SL


Summary of Contents for Zircon TriScanner Pro SL
-
Page 1: Helpful Hints
Mark this spot to help ensure that you’re • You may be holding the unit • Hold the TriScanner Pro SL so that the two Velcro™ strips when working near electrical wires. like a TV remote, aiming it at on the back make contact with the wall. - Page 2 Si la luz de LED se metal aparece más ancha indicaciones y luego calibre el TriScanner Pro SL sobre una de las dos que la madera y es detectado puede determinarse encendiendo y apagando el equipo, se que el tamaño real.
Need help?
Do you have a question about the TriScanner Pro SL and is the answer not in the manual?
Questions and answers