Advertisement
INTRODUCTION
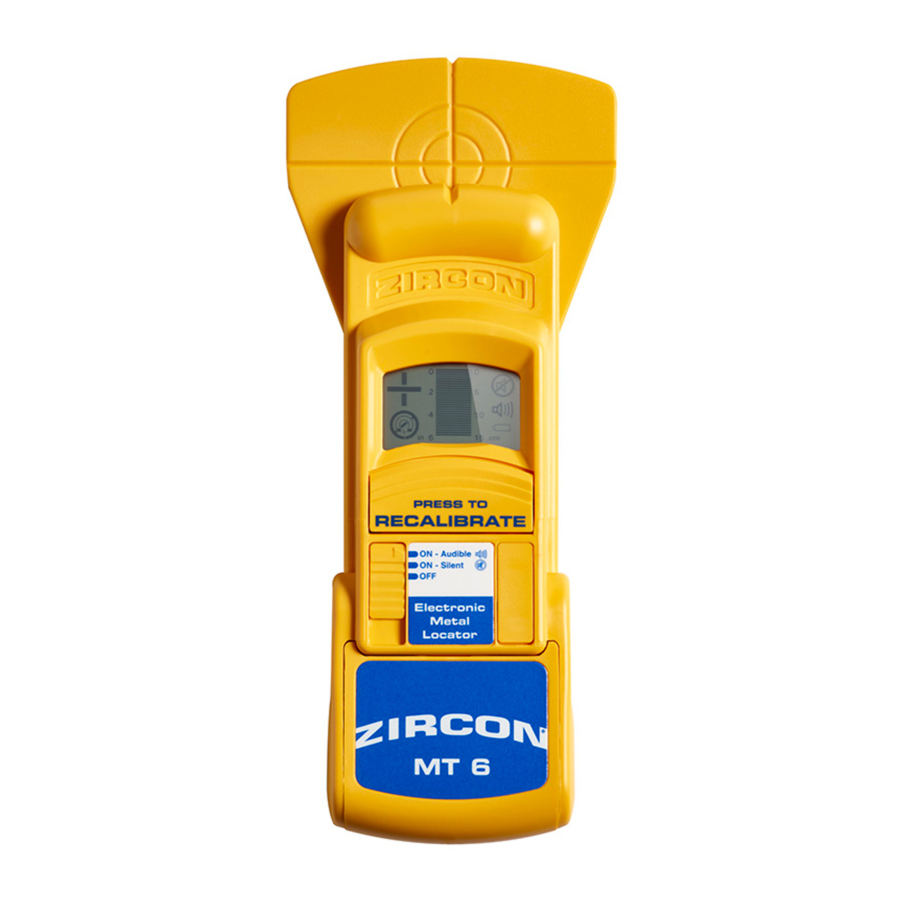
MetalliScanner™ MT 6 locates, and differentiates between, ferrous and non-ferrous metal up to 15.2 cm deep in concrete and other non-metallic surfaces. The easy-toread display screen indicates target depth in both centimeters and inches.
PARTS AND FEATURES

INSTALLING THE BATTERY
Push in the battery door tab and open the door. Insert a new 9V alkaline battery, matching the positive (+) and negative (-) terminals and replace the door.

Zircon stud finders and detectors, particularly those with LCD screens, require and consume a great deal of current from batteries. For optimal performance, brand-new, recently purchased alkaline batteries are strongly recommended for use in these tools. If you are experiencing any trouble with your tool, contact your Zircon dealer or email info@zircon.com.
GETTING FAMILIAR WITH THE DISPLAY

The display has indicators that indicate status and show information about detected objects (targets).
There are 3 status indicators: low battery, audible, and silent icons. The low battery icon is displayed when the battery has less than five hours of use remaining. The AUDIBLE icon will always be on when the unit is in the AUDIBLE mode. In the SILENT mode, the SILENT icon will be active.
The remaining icons indicate information about a target:
- The magnetic icon is displayed whenever the unit detects magnetic material, such as iron. If non-magnetic material (copper, for example) is detected, the icon will show a line through the magnet. Neither icon is displayed until the MT 6 detects metal at less than 15 cm deep.
- The depth bars represent the depth of the target. Depth is indicated in both inches and centimeters. The bars begin from the bottom of the display and sequentially turn on as the MT 6 gets closer to the metal. The depth numbers correspond to the depth to the top surface of the metal target.
- The plus sign indicates that you are moving toward metal, while the minus sign indicates movement away from it. If the unit is stationary, the icon indicates the most recent movement. When a target is passed, the plus sign changes to the minus sign and the MT 6 beeps (in the AUDIBLE mode).
Low Battery Indicator:
The Low Battery Indicator icon displays when the battery level is getting low. While the tool will still operate, the battery will need to be replaced soon. When the battery icon begins to flash and is the only icon displayed on the screen, the battery level is too low and not sufficient to power the tool for proper operation. Please replace the 9V battery with a brand new battery immediately.
TURNING THE MT 6 ON AND OFF
The 3 position mode select switch turns the MT 6 on and off and selects either AUDIBLE or SILENT operation.
- Turn the unit on by moving the mode switch to either the AUDIBLE or SILENT position. This should be done in air and away from any metal.
- The MT 6 performs a calibration immediately after it is turned on.
![warning]() Note: If the unit fails to calibrate, you will hear a long, low-pitched tone and all the depth bars will be displayed. If this happens, check the area for any large metal objects and remove them or move the unit to a different location. Then try turning the unit on again.
Note: If the unit fails to calibrate, you will hear a long, low-pitched tone and all the depth bars will be displayed. If this happens, check the area for any large metal objects and remove them or move the unit to a different location. Then try turning the unit on again.
- To turn the MT 6 off, move the mode switch to the OFF position.
- The auto power off feature turns off the MT 6 after five minutes of inactivity. After it turns off, the unit loses its calibration.
PRESCANNING THE TARGET AREA
 Note:
Note:
- Before scanning, wipe the area to be scanned clean of sand and pebbles.
- If the scanning surface is fairly rough, place a thin piece of cardboard between the surface and the unit. The thickness of the cardboard must be subtracted from the depth reading to determine the actual depth to the target when using this procedure.
- Turn on the unit away from the surface to be scanned.
- Place the unit on the scanning surface and move from side to side. As a target is approached, an increasing number of depth bars will show. At the point closest to metal, the plus sign will change to a minus sign and there will be a beep (in AUDIBLE mode.)
- The type of metal detected will be indicated by the magnetic/nonmagnetic icon.
- Once you have located a target, reposition the MT 6 over it and scan perpendicular to your original scanning direction to be sure you have determined the extent of the target. If the target is a rod or pipe, the depth indicator will remain constant as you scan along the length.
- Continue scanning to determine if there are multiple targets. If precise depth is important, determine an area that is free of metal for recalibration (See next section).
- If desired, mark target locations. Crosshairs on the top and front of the unit show where sensitivity is maximum.
RECALIBRATION FOR MAXIMUM DEPTH ACCURACY
The MT 6 automatically calibrates when turned on. However, depth accuracy is dependent on the materials in the vicinity of the measurement, in particular, when the materials may contain metal or metallic minerals, as is common with various mixes of concrete. Thus, it is often beneficial to recalibrate after prescanning targets before making a final determination of depth. Recalibration will not affect the positioning accuracy.
To recalibrate:
- Locate an area on the surface where there is no indication of metal.
![warning]() Note: If a grid pattern exists, such as may occur with rebar in concrete, there may be no area free of metal. In this case, best results may be obtained by calibrating midway between targets. However, accuracy may be affected and recalibration may not improve overall depth accuracy.
Note: If a grid pattern exists, such as may occur with rebar in concrete, there may be no area free of metal. In this case, best results may be obtained by calibrating midway between targets. However, accuracy may be affected and recalibration may not improve overall depth accuracy.
- Press and release the PRESS TO RECALIBRATE switch. All icons on the display will light momentarily during calibration.
- Rescan target areas. A final determination of depth can now be obtained from the depth indicator.
DEPTH ACCURACY AND TARGET SIZE
The depth readings are specifically tuned for measuring 13 mm copper pipe or #4 rebar. For any other metal object, the depth reading of the MT 6 will be less accurate.
- Small objects such as nail heads will be shallower than indicated.
- For rebar other than #4, the depth reading is accurate to about ±25.4 mm.
- For 6.4 mm copper pipe, actual depth will be about 30% shallower than indicated.
- For 19 mm copper pipe, actual depth may be about 20% deeper than indicated.
- Large metallic objects, such as pieces of sheet metal, at very shallow depths may give erroneous indications of metal type (magnetic vs. non-magnetic).

- Always turn off power when working near electrical wires.
- n situations involving multiple, closely spaced targets, the MT 6 may be unable to detect the exact location and/or depth of each piece of metal. Always use caution and wear safety glasses when nailing, cutting, or drilling in walls, floors, and ceilings that may contain metal objects.
- If a magnetic and non-magnetic object (ex., rebar and copper pipe) are positioned side-by-side or on top of each other, the MT 6 may have difficulty locating them.
- Avoid wearing any jewelry, including watches, when using this product. The metal may cause inaccurate results.
SPECIAL CONSIDERATIONS
- Temperature Changes: MT 6 is designed to operate at approximately 21ºC. Sensitivity decreases slightly at higher temperatures, but is not noticeably affected at lower temperatures.
- Non-metallic Objects: MT 6 will only locate metal objects. Non-metallic objects such as wood studs and ceramic or PVC pipe cannot be located with this product.
HELPFUL HINTS
| Situation | Probable Causes | Solutions |
| Difficulty detecting metal accurately. |
|
|
| Inaccurate calibration and/or depth reading because magnetic/nonmagnetic objects positioned side-by-side or on top of each other. |
|
|
| Calibration is lost. |
|
|
| Beep doesn't seem relative to targets. |
|
|
| Unit makes long, low-pitched tone and display does not return to normal. |
|
|
| Low battery indicator. |
|
|
MetalliScanner and Zircon are registered trademarks or trademarks of Zircon Corporation.
E-mail: info@zircon.com
Site: www.zircon.com
 ZirconCorporation
 ZirconTV
 ZirconTools | ZirconToolPro
 ZirconTools

Documents / Resources
References
Download manual
Here you can download full pdf version of manual, it may contain additional safety instructions, warranty information, FCC rules, etc.
Download Zircon MetalliScanner MT 6 - Electronic Metal Locator Manual
Advertisement


Need help?
Do you have a question about the MetalliScanner MT 6 and is the answer not in the manual?
Questions and answers