Zircon MetalliScanner m40 User Manual
Electronic metal detector
Hide thumbs
Also See for MetalliScanner m40:
- Operating instructions (2 pages) ,
- Manual (3 pages) ,
- User manual
Table of Contents
Advertisement
Quick Links
MetalliScanner
™
m
40
Electronic Metal Detector
The MetalliScanner
™
m40 electronic metal detector locates metal through concrete and most nonmetallic materials.
The wide and pinpoint scanning positions allow you to quickly and easily find plumbing, ductwork, rebar, nails, and
screws in your walls, floors, and ceilings. Find studs in lath and plaster walls by locating the row of nails attaching the
wood lath to the studs. MetalliScanner
™
m40 is also great for scanning reclaimed or recycled lumber to find hidden
metal before sawing and planing.
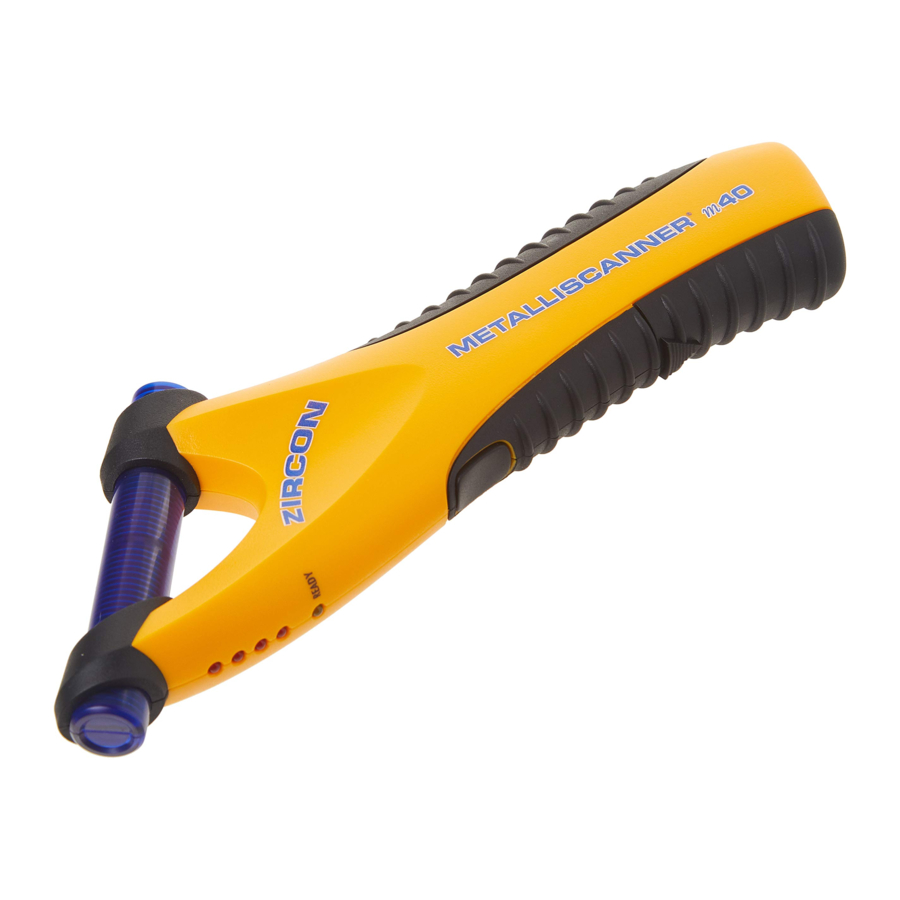
Blue Sensor
LED Display (both sides)
Power Button
Battery Cover
™
m
MetalliScanner
40
elektronisk metalldetektor
MetalliScanner
™
m40 är en elektronisk metalldetektor som lokaliserar metallobjekt genom betong och de flesta andra
icke metallbaserade material. Med två sökpositioner, vidvinkel (Wide Scan) och precisionsläge (Pinpoint) kan rör,
armeringsjärn, spik, skruv och ventilationskanaler enkelt och snabbt lokaliseras i väggar, tak och golv. Detektera reglar
i putsade väggar genom att finna den rad med skruv eller spik som fäster putsläkt och träribbor mot reglarna
undertill. MetalliScanner
™
m40 är perfekt även för att söka igenom återvunnet trä efter metallobjekt.
Blå sensor
LED-display (på båda sidorna)
Strömbrytare
Batterilucka
WIDE AREA SCANNING
1. Grasp the tool with your thumb over the power button.
2. Hold the tool in the air with the blue sensor parallel
to the scanning surface away from any known metal.
3. Press and hold power button. The READY light
indicates that calibration is complete and you are
ready to search for metal.
4. Move the unit near the surface and scan while
continuing to hold the power button. Do not rotate
the tool, see Tip #3.
5. As you approach a metal object the red LEDs will light
progressively from the bottom up. The closer the illuminated
lights get to the top, the closer you are to a metal object. The
illuminated blue sensor and audio tone indicate a strong target.
Small targets or targets deep within the surface may only illuminate
some of the red LEDs and not the blue sensor or audio tone. In this
case, use the highest LED indication to determine the metal position.
6. Mark the point where you get the highest LED indication, continue scanning,
and mark the point where the LED indication decreases. Halfway between
these points is the logical center of the metal field. To further refine this
position, see Tip #1.
PINPOINT SCANNING
1. Grasp the tool with your index finger over power button.
2. Hold the tool in the air with the blue sensor perpendicular
to the scanning surface away from any known metal.
3. Press and hold power button. The READY light indicates
that calibration is complete and you are ready to search
for metal.
4. Move the unit near the surface and scan while
continuing to hold the power button. Do not rotate
the tool, see Tip #3.
5. As you approach a metal object the red LEDs will
light progressively from the bottom up. The closer the
illuminated lights get to the top, the closer you are to
a metal object. The illuminated blue sensor and audio
tone indicate a strong target. Small targets or targets
deep within the surface may only illuminate some of
the red LEDs and not the blue sensor or audio tone.
In this case, use the highest LED indication to determine
the metal position.
6. Mark the point where you get the highest LED indication;
continue scanning and mark the point where the LED
indication decreases. Halfway between these points is
the logical center of the metal field. To further refine this
position, see Tip #1.
7. Scan the surface both vertically and horizontally to
pinpoint the metal target location.
VIDVINKELSKANNING (WIDE AREA SCANNING)
1. Greppa verktyget med tummen över strömbrytaren.
2. Håll verktyget i luften med den blå sensorn parallellt mot ytan
som ska avsökas, undan från kända metallobjekt.
3. Tryck och håll inne strömbrytaren. Indikatorn Ready tänds då
kalibreringen av verktyget har utförts, och avsökningen av ytan
kan påbörjas.
4. Håll inne strömbrytaren och för verktyget mot ytan för att
påbörja avsökningen. Sök över ytan utan att rotera verktyget.
Se även tips nr 3.
5. Då verktyget närmas ett metallobjekt kommer de röda lysdioderna
att tändas, nerifrån och uppåt. Ju närmare metallobjektet verktyget
är, desto högre blir stapeln av tända lysdioder. En stark indikering visas
av att den blå sensorn tänds och en tonsignal hörs. Objekt som ligger
djupt under ytan eller är små kanske bara tänder upp ett par av de röda
lysdioderna (ingen blå sensor eller tonsignal). I dessa fall lokaliseras
metallobjektet där stapeln av röda lysdioder är som störst.
6. Märk ut den punkt på ytan där stapeln av röda lysdioder är som störst. Fortsätt
sedan att skanna av ytan tills stapeln av lysdioder avtar. Mitt emellan dessa
punkter är den logiska mittpunkten på metallobjektet. För att ytterligare förfina
resultatet, se tips nr 1.
PRECISIONSSKANNING (PINPOINT SCANNING)
1. Greppa verktyget med pekfingret över strömbrytaren.
2. Håll verktyget i luften, med den blå sensorn vinkelrätt
mot ytan som ska avsökas. Håll verktyget undan från
kända metallkällor.
3. Tryck och håll inne strömbrytaren. Då Ready-indikatorn
tänds är verktyget kalibrerat, och avsökningen av ytan
kan påbörjas.
4. Håll inne strömbrytaren och för verktyget mot ytan för
att påbörja avsökningen. Sök över ytan utan att rotera
verktyget. Se även tips nr 3.
5. Då verktyget närmas ett metallobjekt kommer de röda
lysdioderna att tändas nedifrån och upp. Ju fler lysdioder
som tänds, desto närmare metallobjektet är man. Då
den blå sensorn tänds, och en tonsignal hörs, visas en
stark indikering. Mindre objekt kanske bara tänder upp
ett par av de röda lysdioderna, och inte den blå sensorn
eller tonsignalen. I dessa fall lokaliseras metallobjektet
där stapeln av röda lysdioder är som störst.
6. Märk ut punkten på ytan där stapeln av röda lysdioder
är som störst. Fortsätt sedan att skanna av ytan tills
stapeln av lysdioder avtar. Mitt emellan dessa punkter
är den logiska mittpunkten på metallobjektet. För att
ytterligare förfina mätresultatet, se tips nr 1.
7. Avsök ytan både vertikalt och horisontellt för en exakt
positionering av metallobjektet.
LOCATING STUDS IN LATH & PLASTER
1. Scan across the wall using the Wide Area Scanning procedure outlined
READY Light
previously to locate the nails that attach the wood lath to the studs.
2. To help confirm you have found a stud and not a pipe or other metal
object, scan the target area located in Step #1 again, this time using
Pinpoint Scanning, and scan the area vertically. The LEDs may move up
and down on the display, indicating the nail pattern of the small nails
attaching the wood lath to the stud. (In contrast, a pipe or other solid
metal will typically be indicated by a consistent signal.)
3. To help verify your findings, scan your work area thoroughly and mark
the location of every object indicated by the tool. Do not assume
everything is a stud.
• Studs are normally spaced 16 in. (40 cm) or 24 in. (60 cm) apart,
not odd intervals.
• Studs normally run from floor to ceiling, except above and below
windows, and above doors.
• Pipes and other large metal objects will give a consistent, strong
signal in either scanning mode. The nails in a stud will likely show
some variance in the strength of the signal.
• Be aware of walls that are likely to contain plumbing. For example,
a living room wall may be common to a bathroom and contain
plumbing for the sink, shower, or toilet.
Tips:
1. If the unit indicates metal over a large area, you can refine the scanning area to
more accurately locate the metal target. After scanning the area as indicated
above, mark the edges of the area where you get the strongest metal signal.
Starting over one of the marks, press and hold the power button; this will
recalibrate the tool and decrease the sensitivity. While holding the power button,
scan the area again. The area indicated should become smaller so you can more
precisely identify the metal location. This procedure can be repeated to narrow
the field even further.
2. Because the unit uses signal strength to determine position, large deep objects
and small shallow objects will give similar indications.
3. The unit should be turned on in the same orientation that will be used when
scanning. If the tool is twisted or rotated during use, you may get a temporary
indication of metal where none is present. Wait until ONLY the READY light is on
before scanning.
4. MetalliScanner
™
m40 finds ferrous (magnetic) metal such as
1
⁄
in. (12 mm)
2
rebar to 4 in. (102 mm) deep and non-ferrous (non-magnetic) metal such as
1
⁄
in. (12 mm) copper pipe up to 2 in. (51 mm) deep. Targets found at the
2
maximum depth may only be indicated by the first red LED on the display.
5. When scanning concrete, the tool will indicate the presence of the metal mesh
that is usually found in driveways and slab foundations, but due to the size
variety of metal mesh, the tool may not indicate the exact location of the wires.
6. Magnetized materials may cause false unstable indications.
LOKALISERA REGLAR BAKOM GIPSPUTS OCH PUTSLÄKT
1. Använd proceduren för vidvinkelskanning som beskrivs ovan för att söka
igenom ytan efter spik som fäster putsläkten eller träribborna mot
Ready indikator
reglarna undertill.
2. För att bekräfta att det är en regel om detekterats, och inte ett rör eller
annat metallobjekt, gå över till precisionsläget och avsök samma yta
vertikalt. Om stapeln med LED-indikatorer vandrar upp och ned på
displayen är det en rad av spik eller skruv som detekteras. Om LED-
stapeln däremot är på en konstant höjd är det troligtvis ett metallrör eller
annan solid metall som påträffats.
3. För att få ett säkert mätresultat bör ytan sökas igenom mycket noggrant,
och alla objekt som detekteras av verktyget märkas ut. Utgå inte från att
de objekt som detekteras är reglar.
• Reglar är normalt placerade med ett jämt avstånd på ca
40 cm eller 60 cm.
• Reglar går normalt från golv till tak, förutom runt fönster eller
ovanför dörrar.
• Rör och andra stora metallobjekt ger en stark och kontinuerlig
indikering i båda sökpositionerna. Spik eller skruv i en regel kommer
normalt att visa en varierande indikering på LED-displayen.
• Var medveten om att väggar ofta innehåller rör. Ett exempel kan vara
en vägg i vardagsrummet som är gemensam med en badrumsvägg, och
därför innehåller rörledningar till tvättställ, toalett eller dusch.
Tips:
1. Om verktyget indikerar metall över en större yta kan man få ett mer noggrant
mätresultat genom att märka ut de punkter där indikeringen är som starkast. Håll
sedan verktyget över en av dessa punkter och tryck och håll inne strömbrytaren. Detta
gör att verktyget kalibreras om, med minskad känslighet. Fortsätt att hålla
strömbrytaren inne, och sök sedan igenom ytan igen. Arean som indikeras bör nu vara
mindre, vilket gör det lättare att detektera metallobjektet. Proceduren kan upprepas för
att förfina mätresultatet ytterligare.
2. Eftersom verktyget använder signalstyrka för att bestämma metallobjekts positioner,
kommer ett stort objekt som är djupt under ytan att ge samma indikation som ett
mindre objekt som ligger närmare ytan.
3. Enheten ska slås på i samma position som den ska användas. Om verktyget roteras
eller vrids under användning kan det ibland felaktigt indikera metallobjekt. Vänta tills
enbart Ready-indikatorn är tänd innan mätningen påbörjas.
4. MetalliScanner
™
m40 detekterar ferromagnetisk metall, till exempel halvtums
armeringsjärn på upp till 102 mm djup, och icke ferromagnetisk metall, till exempel
kopparrör, på upp till ca 51 mm centimeters djup. Objekt som befinner sig på maximalt
sökdjup kommer bara att indikeras med den första röda LED-indikatorn
på displayen.
5. Då armerad betong genomsöks kommer verktyget att detektera de metallnät som ofta
används som förstärkning, exempelvis vid anläggning av bottenplattor till hus. Då dessa
metallnät varierar i storlek, kan det hända att dessa inte lokaliseras exakt av verktyget.
6. Magnetiska material kan orsaka felaktiga avläsningar.
CHANGING THE BATTERY
1. Remove the battery cover located below the power button by pressing in on the arrow
and sliding the cover towards the bottom of the tool.
2. Holding the tool upside down, tilt the battery out of the cavity.
Visit www.zircon.com/support for the most current instructions.
LIMITED 2 YEAR WARRANTY
Zircon Corporation, ("Zircon") warrants this product to be free from defects in
Return product freight prepaid with proof of purchase date (dated sales receipt)
materials and workmanship for 2 years from the date of purchase. Any in-
and $5.00 to cover postage and handling, to:
warranty defective product returned to Zircon*, freight prepaid with proof of
UPS SCS C/O ZIRCON RETURNS
purchase date and $5.00 to cover postage and handling, will be repaired or
Lohstrabe 30a
replaced at Zircon's option. This warranty is limited to the electronic circuitry and
85445 Schwaig
original case of the product and specifically excludes damage caused by abuse,
Munich, Germany
unreasonable use or neglect. This warranty is in lieu of all other warranties,
Be sure to include your name and return address. Out of warranty service and
express or implied, and no other representations or claims of any nature shall
repair, where proof of purchase is not provided, shall be returned with repairs
bind or obligate Zircon. Any implied warranties applicable to this product are
charged C.O.D. Allow 4 to 6 weeks for delivery.
limited to the one year period following its purchase. IN NO EVENT WILL ZIRCON
BE LIABLE FOR ANY SPECIAL, INCIDENTAL OR CONSEQUENTIAL DAMAGES
E-mail: info@zircon.com
RESULTING FROM POSSESSION, USE OR MALFUNCTION OF THIS PRODUCT.
In accordance with government regulations, you are advised that: (i) some states
do not allow limitations on how long an implied warranty lasts and/or the exclusion
or limitation of incidental or consequential damages, so the above limitations and/or
Patent Pending
exclusions may not apply to you, and further (ii) this warranty gives you specific
legal rights and you may also have other rights which vary from state to state.
©2007 Zircon Corporation • P/N 62821 Rev A 09/07
Tip #4
MetalliScanner and Zircon are registered trademarks or trademarks of Zircon Corporation.
BATTERIBYTE
1. Lossa batteriluckan nedanför strömbrytaren genom att trycka inåt vid pilmarkeringen
och skjuta luckan nedåt, mot botten av verktyget.
2. Håll verktyget upp och ned, och vinkla ut batteriet
ur batterifacket.
Besök www.zircon.com/support för senaste instruktionerna till din produkt.
2 ÅRS BEGRÄNSAD GARANTI
Zircon Corporation ("Zircon") garanterar att produkten är fri från material- och
Vid eventuella garantiärenden returneras produkten tillsammans med daterat
fabrikationsfel vid leverans. Garantin täcker fel på produkten som beror på material-
inköpsbevis till inköpsstället.
och/eller fabrikationsfel inom 24 månader från inköpsdatum. En produkt som under
UPS SCS C/O ZIRCON RETURNS
garantitiden på köparens bekostnad lämnas till inköpsstället tillsammans med daterat
Lohstrabe 30a
inköpskvitto repareras eller byts ut efter Zircon's eget gottfinnande. Garantin är
85445 Schwaig
begränsad till de elektroniska kretsarna och höljet på produkten, och gäller inte om felet
Munich, Germany
uppstår på grund av vanvård, ingrepp, onormalt slitage eller olyckshändelse. Garantin
Reparationer och service som inte omfattas av garantin kan skickas till ovanstående
ersätter alla andra garantier, bestämmelser och villkor avseende produkten, oavsett om
adress. Var noga med att uppge namn och fullständig returadress. Ärenden hanteras
sådana lämnats uttryckligen eller underförstått. Utöver dessa garantiåtaganden kan
normalt inom 4-6 veckor, och returneras mot kontant betalning vid leverans.
inga andra krav ställas på zircon. Garantin gäller under 24 månader från inköpsdatum.
ZIRCON TAR INTE UNDER NÅGRA OMSTÄNDIGHETER ANSVAR FÖR SKADOR
E-mail: info@zircon.com
ELLER PROBLEM SOM UPPSTÅR DIREKT ELLER SOM EN KONSEKVENS AV
INNEHAV, ANVÄNDNING AV ELLER FELAKTIG FUNKTION PÅ PRODUKTEN.
I enighet med myndigheters beslut gäller följande: (i) vissa stater och länder
tillåter inte begränsningar i omfattning av garantitid eller garantiåtagande, vilket
kan innebära att ovanstående begränsade garantivillkor inte gäller. (ii) denna
Patent Pending
garanti ger dig lagliga rättigheter. Du kan även ha andra rättigheter som varierar
från stat till stat, och från land till land.
©2007 Zircon Corporation • P/N 62821 Rev A 09/07
Tips nr 4
MetalliScanner och Zircon är registrerade varumärken eller varumärken som tillhör Zircon Corporation.
Advertisement
Table of Contents

Subscribe to Our Youtube Channel
Related Manuals for Zircon MetalliScanner m40


Summary of Contents for Zircon MetalliScanner m40
- Page 1 C.O.D. Allow 4 to 6 weeks for delivery. the metal position. limited to the one year period following its purchase. IN NO EVENT WILL ZIRCON ⁄ in. (12 mm) copper pipe up to 2 in. (51 mm) deep. Targets found at the BE LIABLE FOR ANY SPECIAL, INCIDENTAL OR CONSEQUENTIAL DAMAGES E-mail: info@zircon.com...
- Page 2 Should your Zircon product need replacement or is of no further use to Om din Zircon produkt behöver ersättas eller om den inte längre används Jos hävität käytetyn Zircon tuotteen tai sillä ei ole enää käyttöä, niin älä...
Need help?
Do you have a question about the MetalliScanner m40 and is the answer not in the manual?
Questions and answers