Table of Contents
Advertisement
Available languages
Available languages
Quick Links
Advertisement
Table of Contents

Related Manuals for Dell Venue


Summary of Contents for Dell Venue
- Page 1 Dell Venue Getting Started Guide Panduan Pengaktifan...
- Page 3 Dell Venue Getting Started Guide...
-
Page 4: About Notes
Information in this document is subject to change without notice. © 2011 Dell Inc. All rights reserved. Trademarks used in this text: Dell™ and the DELL logo are trademarks of Dell Inc. 03 - 2011 P/N W0CPP... -
Page 5: About Your Phone
About Your Phone Power/Lock 3.5 mm Headset button connector Press and hold to turn on/off Volume Ring/Silent buttons button Slide-up to silence ringer Camera button Back Home Micro-USB Menu connector... -
Page 6: Setting Up Your Phone
Setting Up Your Phone 1. Remove the back cover. 2. Insert the SIM card and microSD card (optional). NOTE: The SIM card and microSD card may be pre-installed. - Page 7 3. Insert the battery. 4. Close the back cover and charge the phone.
-
Page 8: Lock Screen
Lock Screen The phone enters sleep mode automatically after a preset duration of inactivity. To wake up the phone from sleep mode, press the power/lock button. The lock screen appears when you wake up the phone from sleep mode. To unlock the screen, touch and drag to the right. -
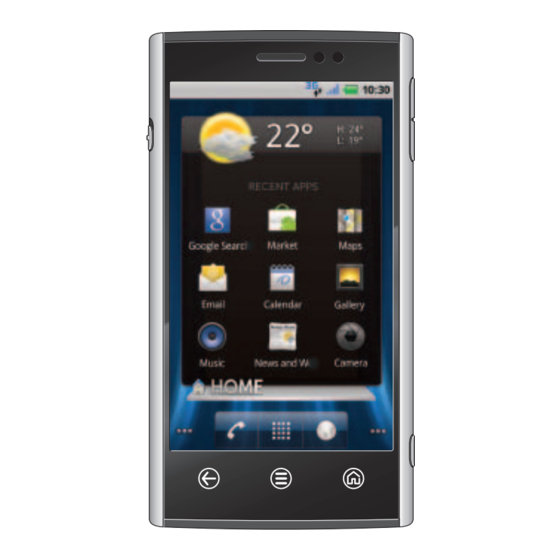
Page 9: Dell Stage
Dell Stage Your phone has seven Home screens that you can customize. The Dell Stage widgets appear on the Home screens and provide quick access to recently used applications, contacts, music, pictures, and so on. To navigate across the Home screens, flick your finger to the right or left on the screen. - Page 10 Home screen, and follow the instructions on the screen. NOTE: For more information on the Dell Stage widgets, see the User’s Manual available on the microSD card or support.dell.com/ manuals.
-
Page 11: Status Bar
Status Bar The status bar appears at the top of every screen. It displays icons to indicate the notifications you have received, the phone’s status, and the current time. Notification area Status area Notification area – Displays icons for missed calls, new e-mail, messages, and so on. -
Page 12: Making Calls
Making calls You can make a call by selecting a contact from the contacts list, call log, favorites, or by using the onscreen dialpad. Touch on the Home screen to open the phone application. Dial the number using the onscreen dialpad and touch to make the call. - Page 13 Answer or Reject Calls When you receive a call, the Incoming call screen displays the caller ID. The Incoming call screen will display additional information if the caller is available on your contacts list. To answer a call, touch drag it to the right of the screen. To reject a call, touch drag it to the left of the screen.
-
Page 14: Launch Applications
Launch Applications The Launcher displays all the available applications on your phone, including any applications that you downloaded and installed from Android Market or other sources. To open the Launcher, touch on the Home screen. Flick the Launcher screen to the left or right to view all the available applications. -
Page 15: Touchscreen Gestures
Touch Screen Gestures The multi-touch screen on your phone allows you to use your finger to move the screen content, scroll through menus, view photos, and so on. Flick – Allows you to scroll through menus or pages, and move sideways in screens. Slide a finger quickly in the direction you want the screen content to move. -
Page 16: Text Input
Text Input The onscreen keyboard allows you to enter text. Your phone may support the Swype feature that allows you to type a word by sliding your finger continuously over the keys on the screen. To type a word using Swype, touch the first letter of the word and slide to the following letters of the word without lifting your finger. - Page 17 Messaging You can use the Messaging feature to exchange text (SMS) and multimedia (MMS) messages. To send a new message: 1. Touch Messaging on the Home screen or in the Launcher. 2. Touch New message. 3. Type a name or mobile phone number in the To field.
-
Page 18: Wi-Fi And Bluetooth
Wi-Fi and Bluetooth To turn on Wi-Fi and connect to a network: 1. Touch to go to the Home screen. 2. Touch and then touch Settings 3. Touch Wireless & networks→ Wi-Fi. The phone scans and lists the available Wi-Fi networks. 4. - Page 19 Internet The Browser allows you to view web pages and search for information on the Internet. You can open up to eight browser windows at a time and switch between them. To open the browser, touch Browser on the Home screen or in the Launcher.
- Page 20 Search You can search for information and items on your phone or on the Internet using Google Search. To start a search: 1. Touch Google Search on the Home screen or in the Launcher. 2. In the search box, type the keyword you want to search.
- Page 21 Camera The camera allows you to capture photos and videos and save them to the microSD card. To use the camera, press the camera button on the side of your phone. To capture a picture: 1. Touch and drag to the camera position 2.
-
Page 22: Android Market
Android Market The Android Market provides access to applications and games you can download and install on your phone. Open the Android Market to browse for free and paid applications. NOTE: Ensure that you are connected to the Internet before you open the Android Market. To open the Android Market, touch Market on the... -
Page 23: Additional Information
You can sync contacts and personal content such as music and pictures between your phone and a computer using the Dell Mobile Sync tool. To install the Dell Mobile Sync tool, run the Sync installer available on the microSD card or download it from support.dell.com. - Page 25 Dell Venue Panduan Pengaktifan...
- Page 26 Informasi di dalam dokumen ini dapat diubah tanpa pemberitahuan sebelumnya. © 2011 Dell Inc. Semua hak dilindungi undang-undang. Merek dagang yang digunakan dalam teks ini: Dell™ dan logo DELL adalah merek dagang dari Dell Inc. 03 - 2011 No. Komp. W0CPP...
- Page 27 Tentang Telepon Anda Tombol Daya/ Konektor Headset Kunci 3,5 mm Tekan dan tahan untuk mengaktifkan/ menonaktifkan Tombol volume Tombol Dering/Senyap Geser ke atas untuk mematikan dering Tombol kamera Belakang Home (Awal) Konektor Menu micro-USB...
- Page 28 Menyiapkan Telepon Anda 1. Lepaskan penutup belakang. 2. Masukkan kartu SIM dan kartu microSD (opsional). CATATAN: Kartu SIM dan kartu microSD mungkin sudah dipasang sebelumnya.
- Page 29 3. Masukkan baterai. 4. Tutup penutup belakang dan isi daya baterai telepon.
- Page 30 Kunci Layar Telepon masuk ke modus tidur secara otomatis jika tidak ada aktivitas setelah jangka waktu tertentu yang telah ditetapkan sebelumnya. Untuk membangunkan telepon dari modus tidur, tekan tombol daya/kunci. Kunci layar muncul ketika Anda membangunkan telepon dari modus tidur. Untuk membuka layar yang terkunci, sentuh dan seret ke kanan.
- Page 31 Dell Stage Telepon Anda memiliki tujuh layar Home yang dapat Anda ubahsuaikan. Widget Dell Stage muncul pada layar Home dan memberi akses cepat ke aplikasi yang belum lama ini dipakai, kenalan, musik, gambar, dan lain-lain. Untuk menavigasi di layar Home, colek jari Anda ke kanan atau kiri layar.
- Page 32 Untuk menambah widget, pintasan, atau folder, sentuh dan tahan jari Anda di area kosong di layar Home, dan ikuti petunjuk pada layar. CATATAN: Untuk informasi selengkapnya tentang widget Dell Stage, lihat Panduan Pengguna yang tersedia pada kartu microSD atau support.dell.com/ manuals.
- Page 33 Bilah Status Bilah status muncul di atas setiap layar. Bilah ini menampilkan ikon untuk menunjukkan pemberitahuan yang telah Anda terima, status telepon, dan waktu saat ini. Area pemberitahuan Area status Area pemberitahuan – Menampilkan ikon untuk panggilan tak terjawab, email baru, pesan, dan seterusnya. Area status –...
-
Page 34: Melakukan Panggilan
Melakukan panggilan Anda dapat melakukan panggilan dengan memilih kontak dari daftar kontak, catatan panggilan, favorit, atau dengan menggunakan dialpad pada layar. Sentuh pada layar Home untuk membuka aplikasi telepon. Tekan nomor menggunakan dialpad pada layar dan sentuh untuk melakukan panggilan. Untuk beralih ke aplikasi yang terakhir dipakai saat melakukan panggilan, sentuh... - Page 35 Menjawab atau Menolak Panggilan Saat Anda menerima panggilan, layar Incoming call menampilkan ID penelepon. Layar Incoming call akan menampilkan informasi tambahan jika penelepon ada dalam daftar kontak Anda. Untuk menjawab panggilan, sentuh dan seret ke bagian kanan layar. Untuk menolak panggilan, sentuh dan seret ke bagian kiri layar.
- Page 36 Meluncurkan Aplikasi Launcher menampilkan semua aplikasi yang ada di telepon Anda, termasuk semua aplikasi yang telah Anda unduh dan pasang dari Android Market atau sumber lain. Untuk membuka Launcher, sentuh ikon Launcher, sentuh pada layar Home. Colek layar Launcher ke kiri atau kanan untuk melihat semua aplikasi yang tersedia.
- Page 37 Gerakan Sentuhan Layar Layar multi-sentuh pada telepon Anda memungkinkan penggunaan jari untuk memindahkan isi layar, menggulir menu, melihat foto, dan lain-lain. Colek – Memungkinkan Anda untuk menggulir melalui menu atau halaman, dan berpindah ke samping pada layar. Geser jari dengan cepat ke arah perpindahan konten layar.
- Page 38 Masukan Teks Keyboard layar memungkinkan Anda untuk memasukkan teks. Telepon dapat mendukung fitur Swype yang memungkinkan Anda untuk mengetik kata dengan terus menerus menggeser jari Anda di atas tombol pada layar. Untuk mengetik satu kata menggunakan Swype, sentuh huruf pertama dari kata dan geser ke huruf berikutnya dari kata tanpa mengangkat jari Anda.
- Page 39 Perpesanan Anda dapat menggunakan fitur perpesanan untuk berkirim SMS dan MMS. Untuk mengirim pesan baru: 1. Sentuh Messaging pada layar Home atau pada Launcher. 2. Sentuh New message. 3. Ketik nama atau nomor telepon seluler pada bidang To. 4. Ketik pesan dalam bidang Type to compose.
- Page 40 Wi-Fi dan Bluetooth Untuk menyalakan Wi-Fi dan menyambung ke jaringan: 1. Sentuh untuk menuju ke layar Home. 2. Sentuh lalu kemudian sentuh Settings 3. Sentuh Wireless & networks→ Wi-Fi. Telepon memindai dan mencantumkan jaringan Wi-Fi yang tersedia. 4. Sentuh jaringan yang ingin disambungkan. Untuk menyalakan Bluetooth dan membuat telepon Anda dapat ditemukan: 1.
- Page 41 Internet Browser memungkinkan Anda untuk melihat halaman web dan mencari informasi di Internet. Anda dapat membuka hingga delapan jendela browser sekaligus dan beralih-alih di antara jendela tersebut. Untuk membuka browser, sentuh Browser pada layar Home atau pada Launcher. Untuk membuka halaman web, masukkan alamat pada bidang Search or type URL, lalu sentuh...
- Page 42 Menelusuri Anda dapat menelusuri untuk mencari informasi dan komponen di telepon atau Internet menggunakan Google Search. Untuk mulai penelusuran: 1. Sentuh Google Search pada layar Home atau pada Launcher. 2. Pada kotak penelusuran, ketik kata kunci yang ingin ditelusuri. Daftar hasil yang cocok muncul pada layar.
- Page 43 Kamera Kamera memungkinkan Anda untuk mengambil gambar dan menyimpannya ke dalam kartu microSD. Untuk menggunakan kamera, tekan tombol kamera pada sisi telepon Anda. Untuk mengambil gambar: 1. Sentuh dan seret ke posisi kamera 2. Tekan tombol kamera setengahnya untuk memfokuskan, lalu kemudian tekan sepenuhnya untuk menangkap gambar.
- Page 44 Android Market Android Market memberi akses ke aplikasi dan game yang dapat diunduh dan dipasang di telepon Anda. Buka Android Market untuk menelusuri dan mendapatkan aplikasi gratis dan berbayar. CATATAN: Pastikan bahwa Anda tersambung ke Internet sebelum membuka Android Market. Untuk membuka Android Market, sentuh Market pada layar Home atau pada...
-
Page 45: Informasi Tambahan
Informasi Tambahan Anda dapat menyelaraskan kenalan dan isi pribadi seperti musik dan gambar di antara telepon Anda dan komputer menggunakan alat Dell Mobile Sync. Untuk memasang alat Dell Mobile Sync, jalankan penginstal Sync yang tersedia pada kartu microSD atau unduh dari support.dell.com. - Page 46 Printed in China. Dicetak di China. www.dell.com | support.dell.com...
Need help?
Do you have a question about the Venue and is the answer not in the manual?
Questions and answers