Table of Contents
Advertisement
Quick Links
Download this manual
See also:
Manual
Advertisement
Table of Contents

Related Manuals for Targus Ergo D-Pro


Summary of Contents for Targus Ergo D-Pro
- Page 1 Ergo D-Pro™ desktop stand for notebooks USER GUIDE Visit our Website at www.targus.com Features and specifications subject to change without notice. © 2006 Targus Group International, Inc. and Targus, Inc. AWE05US / 410-0260-001A...
-
Page 2: Table Of Contents
Table of Contents Introduction ............3 Setting Up The D-Pro........4 Cable Management.......... 7 Connecting a Security Cable ......9 Port Replicator Module (Optional)....10 Outlining the Height ........11 Using the Hook & Loop Fasterners....13 Ergonomic Guidelines........14 Technical Support .......... -
Page 3: Introduction
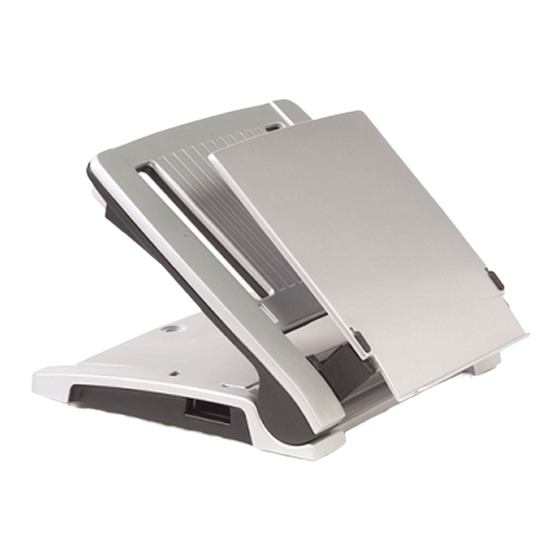
DESKTOP STAND FOR NOTEBOOK Introduction Congratulations on your purchase of the Targus Ergo D-Pro Desktop Stand for Notebook. The D-Pro is a unique, ergonomically correct desktop notebook stand that allows a notebook computer to be comfortably used as a desktop replacement. -
Page 4: Setting Up The D-Pro
Targus Ergo D-PRO™ Desktop Stand for Notebook Setting Up The D-Pro 1 Press buttons (A) on both sides to raise or lower the D- Pro to desired angle. - Page 5 Targus Ergo D-PRO™ Desktop Stand for Notebook 2 Open the document holder and flip it towards you. 3 Check that the D-Pro is assembled correctly and carefully place your notebook on the stand as shown.
- Page 6 Targus Ergo D-PRO™ Desktop Stand for Notebook 4 Fold the document holder up into place. Adjust the inclination of the document holder by using the shift buttons (B). Attach your external mouse and keyboard and you’re ready to work efficiently and ergonomically.
-
Page 7: Cable Management
Targus Ergo D-PRO™ Desktop Stand for Notebook Cable Management Without Targus Port Replicator 1 Remove compartment cover (A). 2 Guide cables through as indicated and reinstall compartment cover. -
Page 8: With Targus Port Replicator
Targus Ergo D-PRO™ Desktop Stand for Notebook With Targus Port Replicator 1 Place the replicator in the cavity. 2 Guide cables through (B) and connect them to the replicator. 3 Guide cables through (B) and connect them to the replicator. -
Page 9: Connecting A Security Cable
Targus Ergo D-PRO™ Desktop Stand for Notebook Connecting a Security Cable The D-Pro offers two options for securing your notebook and peripherials; a slot lock or video port lock . Follow the usage instructions included with your security cable. Slot lock... -
Page 10: Port Replicator Module (Optional)
Targus Ergo D-PRO™ Desktop Stand for Notebook Port Replicator Module (Optional) The Port Replicator Module (PRM) allows you to mount your OEM port replicator or docking station to the D-Pro. Attention IBM & Toshiba Users Your docking station/ port replicator may be positioned and attached to the PRM with the screw rivets that are provided. -
Page 11: Outlining The Height
Targus Ergo D-PRO™ Desktop Stand for Notebook 2 Connect your notebook first to your docking station/port replicator and place them together onto the D-Pro, making sure your notebook is supported at (B) and centered. 3 Use the knobs to position the PRM after determining the proper position to attach the docking station/port replicator according to the outlining instructions below. - Page 12 Targus Ergo D-PRO™ Desktop Stand for Notebook Toshiba Advanced port replicator ll and lll: Line up the top of your port replicator with the indication lines on the PRM at (F). Port Replicator Module (PRM) Once the position of the docking station/ port replicator has been determined, you are now ready to secure your docking station/ port replicator to the PRM.
-
Page 13: Using The Hook & Loop Fasterners
Targus Ergo D-PRO™ Desktop Stand for Notebook Using the Hook & Loop Fasterners 1 Remove the plastic covers from the hook & loop fasteners and align the pads accordingly to ensure your docking station/ port replicator fits flush with the PRM. -
Page 14: Ergonomic Guidelines
Targus Ergo D-PRO™ Desktop Stand for Notebook NOTE: the position of the port replicator can be adjusted to suit smaller or larger notebooks by adjusting the height of the PRM using the two knobs at (H). Ergonomic Guidelines The following guidelines will help you to create a... - Page 15 Targus Ergo D-PRO™ Desktop Stand for Notebook 1 Adjust the armrest of your chair such that it is level with the height of the table or keyboard. In this position, your shoulders should be relaxed; 2 Adjust the screen distance; usually between 20-35 inches (50-90 cm), so that you can comfortably read the display;...
-
Page 16: Technical Support
(if applicable). Warranty Targus warrants this product to be free from defects in materials and workmanship for one year. If your Targus accessory is found to be defective within that time, we will promptly repair or replace it. This warranty does not cover accidental damage, wear and tear, or consequential or incidental loss.
Need help?
Do you have a question about the Ergo D-Pro and is the answer not in the manual?
Questions and answers