Table of Contents

Subscribe to Our Youtube Channel
Related Manuals for 3M Digital Media System 700P


Summary of Contents for 3M Digital Media System 700P
- Page 1 Digital Media System 700P Operator and Product Safety Guide Guía para el operador Betriebsanleitung Guide de l’utilisateur Guida dell’operatore June 2007 • 78-6971-1361-7-A • Copyright © 2007, 3M Company. All Rights Reserved.
-
Page 3: Table Of Contents
™ Digital Media System 700P Contents Contents Introduction Thank You for Choosing 3M .........................5 Safety Information INTENDED USE............................8 SAVE THESE INSTRUCTIONS ........................8 Trademarks ..............................8 Warranty; Limited Remedy; Limited Liability....................9 Shipping Contents Contents of Shipping Box ...........................10 Optional Accessories ...........................10 Installing or replacing batteries ........................10 Keep Your Packing Materials ........................11... - Page 4 Contents ™ Digital Media System 700P Maintenance Replacing Projection Lamp .........................32 ™ Digital Media System 700P Bottom View..................32 Specifications Optical................................33 System Specifications ..........................33 Sound System ..............................33 DVD Player..............................33 Other Features..............................34 Dimensions ..............................34 Weight ................................34 Other Care Caring For The Inside Of The Projector ....................35 Caring For The Lens ...........................35...
-
Page 5: Thank You For Choosing 3M
Introduction Thank You for Choosing 3M Thank you for choosing 3M equipment. This product has been produced in accordance with 3M’s quality and safety standards to provide smooth and trouble free use in the years to come. For optimum performance, please follow the operating instructions carefully. We hope you will enjoy using this high performance product in your home, meetings, presentations, and training sessions. -
Page 6: Safety Information
Please read, understand, and follow all safety information contained in these instructions prior to the use of this ™ Digital Media System 700P. Retain these instructions for future reference. ™ Multimedia projectors are designed to operate in a normal office and home environment. - Page 7 See www.lamprecycle.org or call 1-800-328-1371. • To reduce the risk associated with lamp rupture related hazards: - In event of lamp rupture, call 3M authorized service provider for repair. Ruptured lamp repair is not user serviceable. - Wash your hands thoroughly if contact with ruptured lamp debris has taken place.
-
Page 8: Intended Use
The information contained in this manual will help you operate and maintain your 3M Digital Media System 700P. Trademarks The 3M logo and 3M are registered trademarks of 3M Company. Vikuiti is a trademark of 3M Company. Digital Light Processing is a trademark or registered trademark of Texas Instruments. © 3M 2007. All Rights Reserved. -
Page 9: Warranty; Limited Remedy; Limited Liability
3M's option, to replace or repair the 3M product or refund the purchase price of the 3M product. Except where prohibited by law, 3M will not be liable for any indirect, special, incidental or consequential loss or damage arising from this 3M product, regardless of the legal theory asserted. -
Page 10: Shipping Contents
The 3M ™ Digital Media System 700P is shipped with the necessary cables required for standard VCR, PC or laptop computer connections. Carefully unpack and verify that you have all of the items shown below in Figure 1–1. If any of these items are missing, please contact your place of purchase. -
Page 11: Keep Your Packing Materials
Digital Media System 700P Introduction Keep Your Packing Materials Save the shipping box and packing materials in the event the Digital Media System 700P should require shipping to a 3M Service Center for repair. Use packing material to protect projector. What’s Next? Take a few minutes to review Section 2 to familiarize yourself with the Digital Media System 700P machine characteristics and then turn to Section 3 to set up the projector. -
Page 12: Product Description
Digital Media System 700P is designed to meet the needs of both home and business users. This easy to use unit utilizes the powerful features of 3M’s state of the art Vikuiti™ Super Close Projection (SCP) technology. SCP allows you to fully utilize the space available while still projecting a large, high quality image. -
Page 13: Parts Identification List
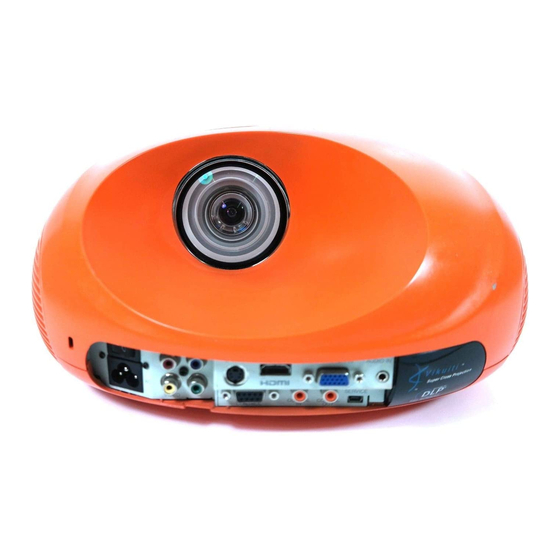
Parts Identification List Lens Remote Control Sensor Built–In Speakers (stereo) Height Adjustment Feet Power Cord Connection Input Terminals Main Power Switch Control Panel Keypad Slot for Kensington ™ Lock Standby Menu Keystone Enter Left Right Down © 3M 2007. All Rights Reserved. -
Page 14: Projector Terminal Connections
Turn off all power to the projector and input sources during cable hook up. Connect cables being careful not to bend any pins in the cable plug or input terminal. Start up projector then start up input sources. © 3M 2007. All Rights Reserved. -
Page 15: Digital Media System 700P Setup
™ Digital Media System 700P Connection Digital Media System 700P Setup S-Video In HDMI In VGA In Audio In SPr/Cr Pb/Cb COMPUTER COMPUTADOR / ORDINATEUR / CALCOLATORE Min USB COMPUTADORA / DATOR / Video Coaxial In Coaxial Out RS232 VIDEO... -
Page 16: Remote Control Functions
Enter button for confirmation of selection Keystone; Adjust the shape of image Volume +: Increase Speaker Volume Subtitle Volume -: Decrease Speaker Volume Magnify +: Increase size of the displayed image Magnify -: Decrease size of the displayed image © 3M 2007. All Rights Reserved. -
Page 17: Remote Control Notes
• Since the remote control uses infrared light to send signals to the projector (Class 1 LED), be sure to use the remote control in an area free from obstacles that could block the remote control’s output signal to the projector. 60° 10' (3 m) Subtitle © 3M 2007. All Rights Reserved. -
Page 18: Basic Operations
49.5" (125.8 cm) Projector Start Up Read the Important Safeguards before operating the Digital Media System 700P. After all cable connections have been completed, the projector can be powered up. For best results, please observe the following start up sequence. -
Page 19: Stand By Mode
Direction Knob to move through the menu. Click the Enter button to change a menu item. Change the menu item by using the Menu Keypad or Direction Pad and then click Enter to return back to menu navigation. © 3M 2007. All Rights Reserved. - Page 20 Adjusts the image to make it look sharper of softer. (At higher values, will switch to Detail Enhancement). Detail Brings out the detail of the image, Enhance Position Adjusts the vertical and horizontal position of the projected image. Only VGA, DVI-D and DVI-A is Active. © 3M 2007. All Rights Reserved.
- Page 21 1) Full Screen 2) Standard 3) Letter Box 4) Theatre-Wide(16:9) Advanced Allows the user to navigate into the advanced picture settings menu. Reset Resets values in this sub-menu only. Picture Sub Menu Function Description Table 1: © 3M 2007. All Rights Reserved.
- Page 22 Adjusts the amount of Mosquito and MPEG noise reduction in the system BLOCK NR Turns MPEG Block noise reduction On or Off Reset Resets values in this sub-menu only Table 2: Advanced sub menu function description © 3M 2007. All Rights Reserved.
- Page 23 6) Composite Audio Allows the user to select which Audio Input is to be processed: Input 1) DVD 2) HDMI Input 3) SPDIF Input 4) Analog Input Table 3: Input sub menu function description © 3M 2007. All Rights Reserved.
- Page 24 Tint Adjusts the balance of red-to-green necessary for realistic representation of video signals. Color Adjusts the intensity of the Color in the image. Table 4: PIP sub menu function description © 3M 2007. All Rights Reserved.
- Page 25 5) Stadium Audio Adjusts the amount of time delayed in audio (on top of T2 delay). Delay Subwoofer Allows User to adjust Subwoofer gain from 0 to 10. Table 5: Speaker Display sub menu Description © 3M 2007. All Rights Reserved.
-
Page 26: Setup Display Sub Menu
3) Ceiling Front Projection 2) Rear Projection 4) Ceiling Rear Projection Factory Reset Resets all Menu items to Factory default settings. Reset Resets values in this sub-menu only. Table 6: Setup sub menu function description © 3M 2007. All Rights Reserved. - Page 27 ™ Digital Media System 700P Basic Operations Status Display sub menu © 3M 2007. All Rights Reserved. © 3M 2006. All Rights Reserved.
-
Page 28: Troubleshooting
Please be aware, however, that among lamp types, there are major differences in product lifetimes; a lamp may thus fail to light even prior to the functioning of the automatic shut-down function of this unit. © 3M 2007. All Rights Reserved. © 3M 2006. All Rights Reserved. -
Page 29: Indicator Lamps
(attached). Turn the power OFF and wait at least 45 minutes. After the unit has sufficiently cooled down, please make confirmation of the attachment state of the lamp and lamp cover, and then turn the power ON again. © 3M 2007. All Rights Reserved. - Page 30 filter by referring to the "Air Filter" section of this manual. After you have cleaned or changed the air filter, please be sure to reset the filter timer. After the treatment, reset the power to ON. © 3M 2007. All Rights Reserved.
-
Page 31: Audio And Image Issues
Confirm that the disc is an original edition. Cannot play DVD. Eject the disc and play again. Press "Menu" button while the projector is detecting the source, then press "Enter" button to reboot the DVD player. © 3M 2007. All Rights Reserved. -
Page 32: Replacing Projection Lamp
When the lamp’s total working time accumulates to over 2000 hours, the on-screen display (OSD) will deliver a message recommending that you replace the lamp. Please contact a service center to replace the lamp as soon as possible, or refer to the following instructions to replace it yourself. www.lamprecycle.org 1-800-328-1371 © 3M 2007. All Rights Reserved. -
Page 33: Specifications
Environmental Regulations: RoHS and WEEE compliant Power Consumption: 288W Max Sound System Built-in Dolby 2.0 Sound (700) / (2) 2.5W speakers Built-in Dolby 5.1 Sound (710) / (3) 2.5W, (2) 1.5W and (1) 5W subwoofer © 3M 2007. All Rights Reserved. -
Page 34: Other Features
• Two IR receiver windows (front and rear) Dimensions 13.5" (W) x 12.7" (D) x 6.1" (H) 343.5mm (W) x 321.6mm (D) x 155.3mm (H) Weight 700: 9.9 lbs or 4.5kg 710: 10.6 lbs or 4.8kg © 3M 2007. All Rights Reserved. -
Page 35: Other Care
Wipe lightly with gauze or a soft cloth. If soiling is severe, dip soft cloth in water or a neutral cleaner diluted in water, and wipe lightly after wringing well. Then, wipe lightly with a soft, dry cloth. © 3M 2007. All Rights Reserved. - Page 36 Any statements related to the product which are not con- tained in 3M’s current publications, or any contrary statements contained on your purchase order shall have no force or effect unless expressly set forth in a written agreement signed by an authorized officer of 3M.
Need help?
Do you have a question about the Digital Media System 700P and is the answer not in the manual?
Questions and answers