Table of Contents
Advertisement
Quick Links
Advertisement
Table of Contents

Related Manuals for Nikon D60


Summary of Contents for Nikon D60
- Page 1 Nikon DIGITAL CAMERA User's Manual...
- Page 2 • The SO logo is a trademark of the SO Card Association. • The SOHC logo is a trademark. • PictBridge is a trademark. • All other trade names mentioned in this manual or the other documentation provided with your Nikon product are trademarks or registered trademarks of their respective holders.
- Page 3 Introduction First Steps Basic Photography P, S, A, Modes Changing Shooting Settings More on Playback ~ ..,""" ..Connecting to a Computer, Printer, or TV _r '-,..,.. " """W-""""IC<""""_.'._,-".<"__ .. , ,,,,,,- Menu Guide Optional Accessories Maximizing the Life of the Camera Technical Notes...
- Page 4 For Your Safety To prevent damage to your Nikon product or injury to yourself or to others, read the following safety precautions in their entirety before using this equipment. Keep these safety instructions where all those who use the product will read them.
-
Page 5: Notices
Notices • No part of the manuals included with this product • Nikon will not be held liable for any damages may be reproduced, transmitted, transcribed, resulting from the use ofthis product. - Page 6 Use the interface cables sold or provided by Nikon for your equipment. Using other interface cables may exceed the limits of Class B Part 15 of the FCC rules. Nikon Inc., 1300 Walt Whitman Road, Melville, New York 11747-3064, US.A. Tel.: 631-547-4200 Notices for Customers in Canada CAUTION...
-
Page 7: Table Of Contents
Table of Contents For Your Safety Notices - - - - - - - - _ - - - - - - - - - - Introduction About This Manual Information and Precautions Getting to Know the Camera Camera Body The Mode Dial The Power Switch The Viewfinder Display... - Page 8 Table of Contents Shooting Particular Scenes Taking Pictures ·5, I::J ~, ~, ($), Features of Modes Getting Good Results with Autofocus - - - - - 5, A, Modes P, S, A, Shooting in Modes Shooting in Mode (Programmed Auto) Shooting in Mode (Shutter-Priority Auto) Shooting in...
- Page 9 Table of Contents More on Playback Viewing Photographs in Full-Frame Playback Full-Frame Playback Photo Information Viewing Multiple Photographs: Thumbnail Playback Taking a Closer Look: Playback Zoom Protecting Photographs from Deletion Connecting to a Computer, Printer, or TV Connecting to a Computer Before Connecting the Camera Connecting the USB Cable Connecting to a Printer...
- Page 10 Table of Contents Custom Settings R Reset 01 Beep 06 No Memory Card? 07 Image Review 09 AF-assist 10 ISO Auto (9/Fn Button 12 AE-UAF-L 11 3 13 AE Lock 14 Built-in Flash/Optional Flash Unit 15 Auto off Timers 16 Self-Timer 17 Remote on Duration 18 Date Imprint 19 Rangefinder...
- Page 11 Table of Contents Creating Retouched Copies: The Retouch Menu Creating Retouched Copies Creating Retouched Copies in Full-frame Playback Quick Retouch D-Lighting Red-Eye Correction Trim Monochrome Filter Effects Small Picture Image Overlay NEF (RAW) Processing Stop-motion Movie Before and after (Making a Side-by-Side Comparison) Optional Accessories Compatible Lenses Optional Flash Units (Speedlights)
- Page 12 Table of Contents Technical Notes •...........••••••..••••••..•••••••167 Troubleshooting Display Shooting Playback Others Error Camera Messages and Displays Appendix Available Settings and Defaults Memory Card Capacity and Image Quality/Size Exposure Program (Mode P) Flash Control Shutter Speeds Available with the Built-in Flash Aperture, Sensitivity, and Flash Range Specifications Supported Standards...
-
Page 13: Introduction
Introduction About This Manual Thank you for your purchase of a Nikon D60 digital single-lens reflex (D-SLR) camera. This manual was written to help you enjoy shooting with your Nikon digital camera. Read this manual thoroughly before use, and keep it where all those who use the product will read... -
Page 14: Information And Precautions
Before taking pictures on important occasions (such as at weddings or before taking the camera on a trip), take a test shot to ensure that the camera is functioning normally. Nikon will not be held liable for damages or lost profits that may result from product malfunction. -
Page 15: Ae-Uaf
• Nikon will not be held liable for any damages resulting from the use of this product. • While every effort was made to ensure that the information in these manuals is accurate and complete, we would appreciate it were you to bring any errors or omissions to the attention of the Nikon representative in your area (address provided separately). -
Page 16: Getting To Know The Camera
Getting to Know the Camera Take a few moments to familiarize yourself with camera controls and displays. You may find it helpful to bookmark this section and refer to it as you read through the rest of the manual. :::J Camera Body :::J 1--+..,... - Page 17 Getting to Know the Camera ~-21 ''''''~ :::="-:::-TI~-- Rubber Eyecup DK-20 Battery-chamber cover latch Viewfinder eyepiece 7,26 Battery-chamber cover 17, 157 . . Eye sensor .32, 123 Tripod socket Diopter adjustment control Monitor 8, 72,123 (AE-UAF-L) button 63, 113 (playback zoom in) button (protect) button (Information display/Quick settings Command dial...
-
Page 18: The Mode Dial
Getting to Know the Camera The Mode Dial Use the mode dial to change the shooting mode. Rotate the mode dial so that shooting mode icon is aligned with the indicator..Advanced Modes (Exposure Modes) Select these modes for full control over camera settings. Programmed auto: Aperture-priority auto: Shutter-priority auto:... -
Page 19: The Viewfinder Display
Getting to Know the Camera The Viewfinder Display -=----..- - - - r - - _ _ _ . .~ELr.JE: ~;FE:.E:~i.li.I~.lilli;~~[E: E:.E:1K~[7J fl.E: • Focus points 26, 30, 58, 59,60 Number of exposures remaining ..28,178 Focus indicator 32, 61 Number of shots remaining before... -
Page 20: The Shooting Information Display
Getting to Know the Camera The Shooting Information Display When the camera is turned on, the Shooting information display will be shown in the monitor. Shooting information such as shutter speed, aperture, and number of exposures remaining, as well as the settings currently applied, can be confirmed . - Page 21 Getting to Know the Camera "Wide" (Landscape) Orientation "Tall" (Portrait) Orientation 28 27 26 25 24 23 ~ Jn~ISOI~;;;-~ ~'F5,6' .o ..•,;" •• I I I " ~ 12 13 The information displayed in the monitor varies depending upon shooting mode and shooting conditions.
-
Page 22: The Com Mand Dia I
Getting to Know the Camera The Command Dial Rotate the command dial alone or use the command dial with other buttons to adjust the following settings. Changes to shooting settings can be viewed in the viewfinder and the monitor's Shooting information display as settings are adjusted. Function Operation Display... - Page 23 Getting to Know the Camera Active D-Lighting When ~/Fn (Custom Setting 11 Release mode Release mode ~/Fn button; 112) is set to any (Set to single frame, of the options indicated at right, continuous, self-timer, the setting can be changed using delayed remote, or qUick- the command dial.
-
Page 24: Multi Selector
Getting to Know the Camera Multi Selector The multi selector is used for the following operations. With Shooting :::J Select focus point (Only when the dynamic area or single point option is selected for AF-area mode; :::J With Quick Settings Display Move highlight up or right ":\... -
Page 25: The Shutter-Release Button
Getting to Know the Camera The Shutter-Release Button The camera is equipped with a two-stage shutter-release button. To focus, press the shutter-release button halfway, stopping when you feel resistance. Focus wililock* while the shutter-release button is held in this position. To release the shutter and shoot, press the shutter-release button the rest of the way down. -
Page 26: The Camera Strap An-Dc1
(jetting to Know the Camera The Camera Strap AN-DCl Attach the camera strap as shown below (two eyelets). -
Page 27: First Steps
First Steps This chapter explains the procedures necessary to prepare for shooting, including charging and inserting the battery, instructions for mounting lenses, setting the date and time, using memory cards. ~ 18... -
Page 28: Charging And Inserting The Battery
Charging and Inserting the Battery Use the supplied Quick Charger MH-23 to charge the supplied Rechargeable Li-ion Battery EN-EL9 before first use, or when the battery runs low. The Quick Charger MH-23 The MH-23 is for use with the supplied Rechargeable Li-ion Battery EN-EL9. AC adapter plug Wall plug (shape varies with country of sale) The Rechargeable Li-ion Battery EN-EL9... - Page 29 Charging and Inserting the Battery 1.4 Charging is complete when the CHARGE lamp stops blinking. Remove the battery from the charger and unplug the charger. Insert the battery. 2.1 After confirming that the power switch is in the off position, open the battery chamber cover.
-
Page 30: Attaching A Lens
Attaching a Lens Care should be taken to prevent dust from entering the camera when exchanging lenses. - - - - - - - - --- Turn the camera off and remove the body cap. Remove the rear lens cap from the lens. Keeping the mounting index on the lens aligned with the mounting index on the camera body, position the lens in the... -
Page 31: Detaching Lenses
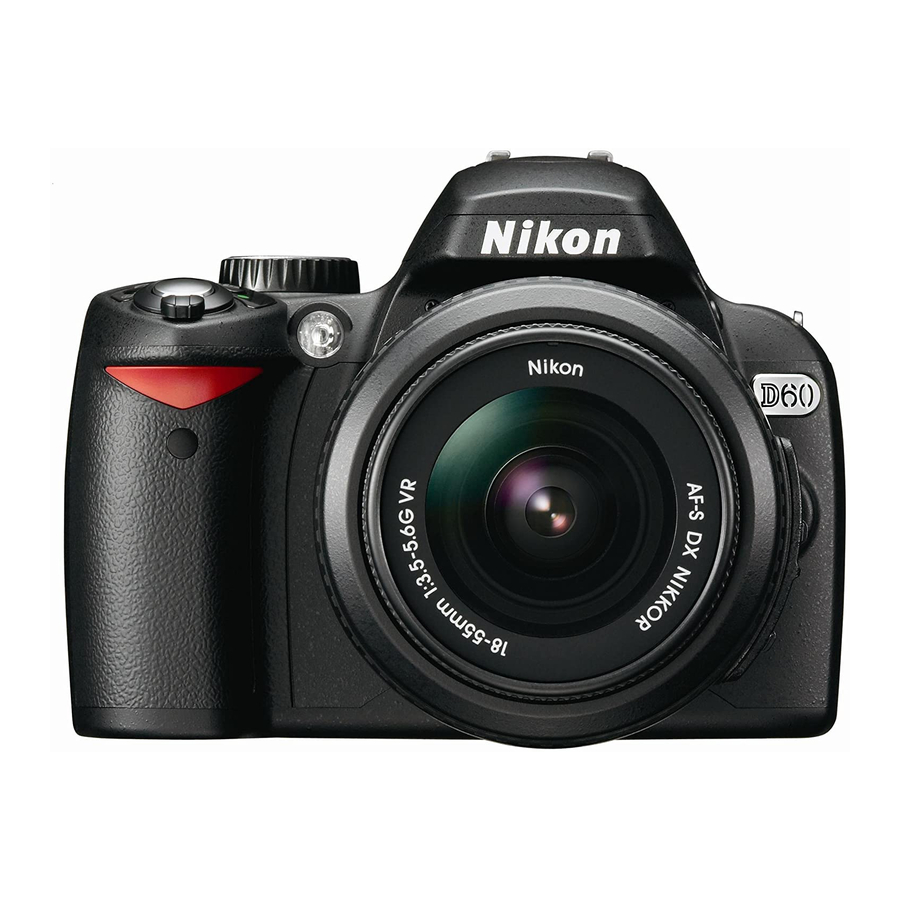
Attaching a Lens • Lens An AF-S OX NIKKOR 18-55mm f/3.5-5.6G VR lens 185) is used in this manual for illustrative purposes. The AF-S OX Zoom NIKKOR 18-55mm f/3.5-5.6G ED II lens can be used in the same manner, but it is not equipped with the vibration reduction (VR) function. When using the other User's Manual lenses, refer to the provided with the lens. -
Page 32: Vibration Reduction Mode (Vr)
(at a focal length of 55mm) than when <IE> vibration reduction is disabled. Panning is also supported. * Based on results achieved under Nikon measurement conditions. The effects of vibration reduction may vary depending on individual and shooting conditions. "T1 .. -
Page 33: Setting Display Language, Date And Time
Setting Display Language, Date and Time The first time the camera is turned on, the language selection dialog shown in step 1 will be displayed in the monitor. Follow the steps below to choose a language and set the time and date. No photographs can be taken until the camera clock has been set. Turn camera on. - Page 34 Setting Display Language, Date and Time ---~ ~--~ Highlight and press the multi selector right to highlight World time. World time screen is displayed. Highlight Time zone, Date, Date format, or Daylight saving time. Press the multi selector right to proceed to the next •...
-
Page 35: Inserting Memory Cards
Inserting Memory Cards The camera records photographs on Secure Digital (SO) memory cards (available separately). See "Approved Memory Cards" 158) for details. Inserting Memory Cards turn the Before inserting or removing memory cards, camera "'T1 offand open the memory card slot cover.. -
Page 36: Formatting Memory Cards
Inserting Memory Cards Formatting Memory Cards Memory cards must be formatted in the camera before first use. Note that formatting memory cards permanently deletes all photographs and other data they may contain. Be sure all data you wish to keep have been copied to another storage device before formatting the card. - Page 37 Inserting Memory Cards Highlight Yes. Format card. Do not turn camera off or open the battery-chamber cover or memory card slot cover until formatting is complete and setup menu is displayed. MemoryCards • Format memory cards in the camera before first use. •...
-
Page 38: Adjusting Viewfinder Focus (Diopter Adjustment)
Adjusting Viewfinder Focus (Diopter Adjustment) Photographs are framed in the viewfinder. Before shooting, make sure that the display in the viewfinder is in clear focus. The viewfinder can be focused by removing the lens cap and sliding the diopter adjustment control up and down until the focus points are in sharp focus. -
Page 39: Basic Photography
Basic Photography This chapter explains basic operations, from shooting to playback, in four steps when the mode dial is set to A~ (auto). It also covers Digital Vari-Programs, in which simplify shooting for particular scenes. As the four basic steps described here apply to all forms of shooting and playback, a general knowledge of these operations is required before progressing to more advanced operations. -
Page 40: Point-And-Shoot" Photography (A~ (Auto) Mode)
IIPoint-and-Shoot Photography (Auto) Mode) This section uses shooting in A~ (auto) mode to explain basic procedures. A~ (auto) mode is an automatic "point-and-shoot" mode in which the majority of settings are controlled by the camera in response to shooting conditions. Step 1 Turn the Camera On and Select Shooting Mode Turn the... - Page 41 _ _ _ _ _ _ _ _ _ _ _ _ _ _ _ _ _ "_P_oi_n_t-_a_n_d_-Sh,oot" Photography (A8' (Auto) Mode) Image Sensor Cleaning Each time the camera is turned on or off, the function that removes dirt or dust from the low-pass filter, which protects the image sensor, is activated 162).
-
Page 42: Step 2 Frame A Photograph
"Point-and-Shoot" Photography (A~ (Auto) Mode) Step 2 Frame a Photograph .....•............Hold the camera as shown. Holding the Camera Hold the handgrip in your right hand and cradle the camera body or lens with your left. Keep your elbows propped lightly against your torso for support and place one foot half a pace ahead of the other to keep you upper body stable. - Page 43 "Point-and-Sh<?ot" Photography (A~ (Auto) Mode) - - - - - - - - - - - - Diopter Adjustment For more information on adjusting viewfinder focus, see "Adjusting Viewfinder Focus (Diopter Adjustment)" 26). Exposure Meters On/Off and Auto Meter-Off This camera is equipped with exposure meters, which meter the brightness of the subject. Exposure meters are activated with the folloWing situations: •...
-
Page 44: Step 3 Focus And Shoot
"Point-and-Shoot" Photography (A8' (Auto) Mode) Step 3 Focus and Shoot Press the shutter-release button halfway. The camera will automatically select the focus point containing the main subject closest to the camera and focus on this subject. When the focus operation is complete, a beep will sound, and the in- focus indicator (e) will appear in the viewfinder. - Page 45 (A8' (Autot~~~~ "Point-and-Shoot" Photography Pall Shutter-Release Button For more information on the two-stage shutter-release button, see 'The Shutter-Release Button" 13). Pall Beep • When Focus mode 57) is set to Continuous-servo AF, or if the subject is judged to be moving in Auto-servo AF (default setting) and Continuous-servo AF is automatically applied, a beep indicating that the subjects is in focus will not sound.
-
Page 46: Viewing Photographsldeleting Photographs
"Point-and-Shoot" Photography (A~ (Auto) Mode) Step 4 Viewing Photographs/Deleting Photographs Viewing Photographs While shooting information is displayed or the monitor is off after shooting, press to display the most recent photograph in the monitor. Additional photographs can be displayed by rotating the command dial or pressing the multi selector left or right. - Page 47 "Point-and-Shoot" Photography (A~ (Auto) Mode) Full-Frame Playback Option Description Zoom in on (rl77). Zoom in on current photograph photograph View thumbnails View multiple photographs 76). Create retouched copy of current photograph (~ 129). Retouch photograph ~or~ Exit to shooting To return to shooting mode, press the shutter-release mode button halfway or press Displaying Photo Information...
-
Page 48: Shooting Particular Scenes
Shooting Particular Scenes Digital Vari-Programs offer the following shooting modes, in addition to (auto) mode. Selecting a program automatically optimizes settings to suit the selected scene, making creative photography as easy as rotating the mode dial. Mode dial Mode Description Auto (flash off) For pictures that do not use the flash . - Page 49 Shooting Particular Scenes Landscape Use for vivid landscape shots. The camera selects the focus point containing the closest main subject; the built-in flash and AF-assist illuminator turn off automatically. . & Child Use for snapshots of children. Clothing and background details are vividly rendered while skin tones are given a soft, natural finish.
-
Page 50: Getting Good Results With Autofocus
Shooting Particular Scenes - - - - - - - - - - - - - - Getting Good Results with Autofocus Autofocus does not perform well under the conditions listed below. The shutter release may be disabled if the camera is unable to focus under these conditions, or the in-focus indicator (e) may be displayed and the camera may sound a beep, allowing the shutter to be released even when the subject is not in focus. - Page 51 S, A, Modes This chapter explains the procedures for shooting in Programmed auto (p) mode, Shutter-priority auto (S) mode, Aperture-priority auto (A) mode, and Manual (M) mode. These modes allow for manual adjustment of shutter speed and/or aperture settings, and offer control over a variety of advances settings, including white balance 52), metering 62), flash compensation 68), and exposure compensation...
-
Page 52: 5, ~, ~, And I::j Modes
P, S, A, Shooting in Modes P, S, A, modes offer a differing degrees of control over shutter speed and aperture. Choose the mode best suited to the situation. Mode Description Camera sets shutter speed and aperture for optimal exposure. (II! Programmed auto 41) . -
Page 53: Shooting In
Shooting in Mode (Programmed Auto) In this mode, the camera automatically adjusts shutter speed and aperture for optimal exposure in most situations. This mode is recommended for snapshots and other situations in which you want to leave the camera in charge of shutter speed and aperture. Rotate the mode dial to Frame a photograph, focus, and shoot. -
Page 54: Shooting In S Mode (Shutter-Priority Auto)
Shooting in Mode (Shutter-Priority Auto) In shutter-priority auto mode, you choose the shutter speed while the camera automatically selects the aperture that will produce the optimal exposure. Use slow shutter speeds to suggest motion by blurring moving subjects, high shutter speeds to (!I! "freeze"... -
Page 55: A Mode (Aperture-Priority Auto)
Shooting in Mode (Aperture-Priority Auto) In aperture-priority auto mode, you choose the aperture while the camera automatically selects the shutter speed that will produce the optimal exposure. Small apertures (high f-numbers) increase depth of field, bringing both the main subject and background into focus. -
Page 56: Shooting In
Shooting in Mode (Manual) In manual exposure mode, you control both shutter speed and aperture. This mode can also be used for longer exposures, with which the shutter can be held open indefinitely ("Bulb" and 'Time"; 1':l46), necessary for shooting fireworks and stars. Rotate the mode dial to Watch the electronic analog exposure display 45) while rotating the... - Page 57 Shooting in Mode (Manual) Electronic Analog Exposure Display If a CPU lens (£1146) is attached and a shutter speed other than "Bulb" (£146) is selected, the electronic analog exposure displays in the viewfinder and Shooting information display show whether the photograph would be under- or over-exposed at current settings. If the limits of the exposure metering system are exceeded, the displays will flash.
-
Page 58: Shooting In Mode (Manual)
Shooting in Mode (Manual) Long Time-Exposures Shutter speeds of "Bulb" and "Time" can be used for long time-exposure photographs of moving lights, the stars, night scenery, or fireworks. To prevent blurring caused by camera shake, use a tripod or an optional Wireless Remote Control ML-L3. Bulb Shutter remains open while the shutter-release button is held down, and closes when the shutter-release button is released. -
Page 59: Changing Shooting Settings
Changing Shooting Settings This chapter explains the application and adjustment of camera functions, to suit shooting conditions and personal intent, using the Quick settings display. Note that some functions are not available in some shooting modes. • Most of the functions explained in this chapter can be applied, or adjusted, from the (tyj shooting menu (!Ill 00) or Custom Settings 109). -
Page 60: The Quick Settings Display
The Quick Settings Display Switch the display in the monitor to the Quick settings display to change shooting settings. When the Shooting information display (!IS) is shown, press (~fI~) to switch to the Quick settings display. ,,'-- ~ (~fI~) Each time is pressed, the display changes in the following order: Shooting information display -. -
Page 61: Image Quality And Size
The Quick Settings Display/Image Quality and Size Select option. The option selected in step 3 is applied, and the screen shown in step 1 will be displayed. Repeat steps to change other settings. ~ (~o~) Press the shutter-release button halfway or complete the setting. -
Page 62: Image Quality
Image Quality and Size Image Quality Image quality Select from the Quick settings display to adjust the setting 48). The camera supports the following image quality options (the first four are listed in descending order by image quality and file size). Option Format Description... - Page 63 NEF and JPEG images will be deleted. Install ViewNX from the supplied Software Suite CD. Be sure to update to the latest version of Capture NX. Nikon Message Center automatically checks for updates if an Internet connection is detected at startup.
-
Page 64: White Balance
White balance 103) in the shooting menu. Direct sunlight Use with subjects lit by direct sunlight. :::T Flash <0 Use with built-in flash or optional Nikon flash units. <0 Cloudy :::T Use in daylight under overcast skies. ::!. &. -
Page 65: Iso Sensitivity
ISO Sensitivity from the Quick settings display to adjust the setting (~48). ISO sensitivity Select Photographs taken at slow shutter speeds are prone to blurring. If ISO sensitivity is raised above the base setting of ISO 100, the same exposures can be achieved at faster shutter speeds, preventing blur. -
Page 66: Releasing The Shutter
Releasing the Shutter Release Mode (til Release mode Select from the Quick settings display to adjust the setting 48). Single frame (default setting) Camera shoots one photograph each time the shutter-release button is pressed. !;I!J Continuous (burst mode) Camera records photographs at up to about three frames per second while the shutter-release button is pressed. -
Page 67: Self-Timer And Remote Control Modes
Releasing the Shutter Continuous Mode When shooting conditions demand firing of the flash, continuous shooting is disabled even when ~ (Continuous) is selected for Release mode. Select or change flash mode (~ 65) to turn the flash off. The Number of Shots Remaining before Memory Buffer Fills liim- The approximate number of images that can be recorded to the memory buffer, while maintaining the maximum frame rate, is shown... - Page 68 Releasing the Shutter Shoot. Self-timer: Press the camera shutter-release button halfway to focus, then press it the rest of the way down to start the self-timer. The self-timer lamp will start to blink, stopping two seconds before the photograph is shot. The release mode is set to Single frame or Continuous after the shutter is released.
-
Page 69: Focus
Focus Focus Mode Select Focus mode from the Quick settings display to adjust the setting (~ 48). AF-S AF-C P, S, A, Choose how the camera focuses. are available only in modes. AF-A Auto-servo AF (default setting) Camera automatically selects single-servo autofocus when subject is judged to be stationary, continuous-servo autofocus when subject is judged to be moving. -
Page 70: Af-Area Mode
AF-area mode from the Quick settings display to adjust the setting Select 48). The D60 is equipped with three focus points (areas in which the camera focuses). Choose how the focus point is selected in autofocus mode. Closest subject Camera automatically selects focus point containing subject closest to camera. Default for... -
Page 71: Focus Point Selection
Focus Focus Point Selection The focus point can be selected manually for composing photographs in which the main subject is not positioned at the center of the frame. Highlight AF-area mode in the Quick settings display (~ 48). To enable manual focus selection in these modes, select [[]] (single point) or ~[]~ (dynamic area) for AF-area mode 58) in the Quick settings display. -
Page 72: Focus Lock
Focus Focus Lock Focus lock can be used to change the composition after focusing, making it possible to focus on a subject that will not be in the one of three focus points in the final composition. ~[l~ AF-area mode Selecting [[ (single point) or (dynamic area) for... -
Page 73: Manual Focus
Focus Manual Focus Use this option to focus manually or when the camera is unable to focus correctly using autofocus. To focus manually, display the Quick settings display and choose Focus mode 48) and select (manual focus) for Focus mode (~ 57). Adjust the lens focusing ring until the image displayed on the clear matte field in the viewfinder is in focus. -
Page 74: Exposure
Exposure Metering from the Quick settings display to adjust the setting (~ 48). Metering Select The metering method determines how the camera sets exposure. The following options 8, A, are available when the mode dial is rotated to (matrix metering is always d ·... -
Page 75: Autoexposure Lock
Exposure Autoexposure Lock If the subject is not in the metered area when center-weighted or spot metering is used, exposure will be based on lighting conditions in the background and the main subject may not be correctly exposed. This can be prevented by using autoexposure lock. P, S, Available in modes. -
Page 76: Using The Built-In Flash
Using the Built-in Flash The camera supports a variety of flash modes for photographing poorly lit or backlit subjects. Note that the built-in flash cannot be used, nor can the flash mode be changed, in ~, mode. :I, -5, 1£1 Using the Built-in Flash: Modes :i, -5,... -
Page 77: Changing The Flash Mode
Fla~~ Using the Built-in Changing the Flash Mode Select Flash mode from the Quick settings display to adjust the setting (efj 48). Change the flash output depending upon shooting conditions. The flash modes available depend upon the mode currently selected with the mode dial. Ia1iI Al!10 0, A I . - Page 78 Using the Built-in Flash The Built-in Flash Use with CPU lenses with focal lengths of 18mm to 300mm or non-CPU lenses with focal lengths of 18mm to 200mm. Restrictions on focal length and shooting distance may apply with some lenses. See "Optional Accessories"...
-
Page 79: Exposure Compensation
Exposure Compensation Exposure compo (tyj Select from the Quick settings display to adjust the setting 48). Exposure compensation is used to alter exposure from the value suggested by the P, S, camera, making photographs brighter or darker. It is available in modes and (tyj is most effective when used with... -
Page 80: Flash Compensation
Flash Compensation Select Flash compensation from the Quick settings display to adjust the setting 48). P. 5, A. Flash compensation (available only in modes) is used to alter flash output, changing the brightness of the main subject relative to the background. Flash output can be increased to make the main subject appear brighter. -
Page 81: Active D-Lighting
Active D-lighting (~48). Select Active D-Lighting from the Quick settings display to adjust the setting When Active D-Lighting is enabled before shooting, the camera automatically applies Active D-Lighting compensation, which preserves details in highlights and shadows, creating photographs with natural contrast. Use for high contrast scenes, for example when shooting brightly lit outdoor scenery through a door or window or shooting of shaded subjects on a sunny day. -
Page 82: Two-Button Reset
Two-Button Reset Flexible program and the camera settings that can be changed from the Quick settings display can be restored to default values by holding down together for more than two • seconds (these buttons are marked by a green dot). The monitor turns off briefly while settings are reset. -
Page 83: More On Playback
More on Playback This chapter explains photograph playback in the camera monitor, and protection of photographs from accidental deletion. (til Photographs can be edited from the retouch menu 129) during playback and recorded as separate files. The color tone of photographs can be modified, and multiple photographs can also be combined to create and play back a movie file. -
Page 84: Viewing Photographs In Full-Frame Playback
Viewing Photographs in Full-Frame Playback Full-Frame Playback [E]. To view photographs in the monitor, press Photographs taken in "tall" (portrait) orientation are displayed in tall orientation as shown at right. The following operations can be performed in full- frame playback. Option Description "(g) -
Page 85: Photo Information
':!i~:!'i!:lJLfhotographsi_~_£_~!!=~_~~!!l.~_ _.__. .________ Playback Photo Information Photo information is superimposed on images displayed in full-frame playback. Press the multi selector up or down to cycle through the following information. File Information ..-.. Shooting Data Page 1 ..-.. Shooting Data Page 2 .111---.. - Page 86 Viewing Photographs Full-Frame Playback Shooting Data, Page Retouch indicator. Protect status Image optimization 11150 sensitivity] White balance 52,103 white balance fine tuning Image size/image quality Tone compensation Sharpening Color mode/hue Saturation Image comment Frame number/total number of images 1. Displayed in red if ISO sensitivity was modified from selected value by the ISO auto option when On is selected for Custom Setting 10 (ISO auto;...
- Page 87 Viewing Photographs in Full-Frame Playback Highlights The brightest portions of the image (highlights) blink. Details may be lost ("washed out") in areas of highlights that are overexposed. Use highlights as a guide when setting exposure. Retouch indicator ~--I.--- ft!!ll'!!k!1 Protect status 1i!lI_</-~Y:.7;:1-r.~ .
-
Page 88: Viewing Multiple Photographs: Thumbnail Playback
Viewing Multiple Photographs: Thumbnail Playback To display images in "contact sheets" of four or nine (tyj images, press in full-frame playback 72). The following operations can be performed while thumbnails are displayed. Option Description Display more images Increase number of images displayed from one (full-frame playback) to four or from four to nine. -
Page 89: Taking A Closer Look: Playback Zoom
Taking a Closer Look: Playback Zoom Press to zoom in to maximum of approximately 25 (large images), (medium images) or (small images) on a photograph in full-frame playback 72). The following operations can be performed. Description Option Press to zoom in. Zoom in Press E{~ to zoom Zoom out... -
Page 90: Protecting Photographs From Deletion
Protecting Photographs from Deletion In full-frame, zoom, and thumbnail playback, ~~l (0-...) can be used to protect photographs from accidental deletion. Protected files cannot be deleted using or the Delete option in the playback menu. Note that protected files will be deleted when the memory card is formatted (tvj24). Choose a photograph. -
Page 91: Connecting To Acomputer, Printer, Or Tv
Connecting to aComputer, Printer, or TV This chapter explains connection of the camera to external devices such as computers, printers, or televisions using the supplied USB cable and the optional video cable. Photographs can be transferred to a computer for viewing, editing, and printing, or displayed on a 1V screen, expanding the ways in which photographs are enjoyed. -
Page 92: Connecting To A Computer
(1!l82). Macintosh as x (version 10.3.9, 10.4.10) :::l :::l Refer to the Nikon website for the latest information on operating system compatibility. !:!. :::l '" "0 Notes on Power Source When connecting the camera to a computer or printer, use batteries with adequate charge remaining to prevent the camera from turning off unexpectedly. -
Page 93: Connecting The Usb Cable
_-~._-----_. :::J Transfer photographs using Nikon Transfer. For more information on using Nikon Transfer, refer to help information contained in Nikon Transfer. When transfer is complete, ViewNX will start automatically. Turn the camera off and disconnect the USB cable when transfer is complete. - Page 94 When Camera Control Pro 2 is running, "PC' will appear in the viewfinder and Shooting information display. Nikon Message Center automatically checks for updates if an Internet connection is detected at startup. Be sure to update to the latest version.
-
Page 95: Connecting To A Printer
Connecting to a Printer Photographs can be printed by any of the following methods: • Connect the camera to a printer and print JPEG photographs directly from the camera 84). • Insert the camera memory card in a printer equipped with a card slot (see the printer (II! manual for details). -
Page 96: Printing Via Direct Usb Connection
Printing Via Direct USB Connection JPEG photographs can be printed directly from a camera connected to a PictBridge printer P, S, A, (~ 186). When shooting photographs for printing via direct USB connection in modes, choose la (sRGB) or ilia (sRGB) for the Optimize image>Custom> Color mode option 102) in the shooting menu. -
Page 97: Connecting The Printer
Printing Via Direct USB Connection Connecting the Printer Turn the printer on. Turn the camera off. -~~~~ Connect the camera to the printer using the supplied USB cable. Turn the camera on. When connected correctly, the PictBridge startup screen will be displayed in the camera monitor. -
Page 98: Printing Photographs One At A Time
Printing Via Direct USB Connection Printing Photographs One at a Time Press the multi selector left or right in the PictBridge playback display (~ 85) to choose a photograph. ~lEl To view six photographs at a time, press or press . - Page 99 Printing Via Direct USB Connection Time stamp Press the multi selector up or down to choose Printer default (print at current printer settings), Printtime stamp (print time and date of recording on photo), or No time stamp, then press to select and return to the setup screen.
-
Page 100: Printing Multiple Photographs
Printing Via Direct USB Connection Printing Multiple Photographs MENU To print multiple photographs, press in the PictBridge playback display (!ISS). The PictBridge menu shown at right will be displayed. Print select Print selected photographs. Print (DPOF) Print photographs for which a DPOF print order has been created from the Print set (DPOF) option (!Il90) the playback menu. -
Page 101: Creating An Index Print
Printing Via Direct USB Connection Creating an Index Print Print "contact sheets" of small thumbnail images of all JPEG photographs. _. __ ••..- ..•...• _,-.- ,-_._-----,--_ .•..•.•..•..•.. -,.-.-. -~_.,_ _._--~_. MENU (t1! Press in the PictBridge playback display 85). -
Page 102: Creating A Dpof Print Order: Print Set
Creating a DPOF Print Order: Print Set When printing from a memory card inserted in the printer's card slot or directly from the camera connected to a printer (!Ij 84), or when having photographs printed by a professional developer or digital print center, photographs can be printed as indicated in the DPOF print order you have created for your photographs on the memory card. - Page 103 Creating a DPOF Print Order: Print Set Display options. Highlight option and press the multi selector right. • Data imprint: Print shooting information (shutter 'iii' speed and aperture) on all photographs in print order. • Imprint date: Print date of recording on all photographs in print order.
-
Page 104: Viewing Photographs On Tv
Viewing Photographs on TV EG-Dl A Video Cable 00 (available separately; erl156) can be used to connect the camera to a television or VCR for playback or recording. Turn the camera off. Always turn the camera off before connecting or disconnecting the video cable. Connect the camera to the TV using the video cable. - Page 105 Menu Guide This chapter explains the details and specification of five camera menus. '~~ Playback Options: . Basic Camera Settings: '" ~Th~ Rlayback Men'!..l!l96) ~-.I The ~tu 17):.~-:;;.w Menu c!l Delete CSM/setup menu 118) Playback folder Format memory card Rotate tall Info display format 120) Slide show...
-
Page 106: Using Camera Menus
Using Camera Menus MENU. To view the menus, press Current setting for each option is shown by icon There are five major groups of menus. Playback Adjust playback settings and manage photographs. Shooting Adjust shooting settings. Custom Settings Personalize camera settings. !Ill? Setup Format memory cards and perform basic camera setup. - Page 107 Using Camera Menus Display menus. Highlight icon in yellow for current menu. When a menu item is highlighted, the menu icon can MENU. be selected by pressing of the Select one five menus. Choose from (playback), (shooting), ~ (Custom Settings), [£1 (Setup), or (retouch)
-
Page 108: Playback Options: The Playback Menu
Playback Options: The Playback Menu The playback menu contains the following options. See "Using Camera Menus" (~ 94) for more information on using the menus. Delete Delete all or selected photographs. Playback folder Choose folder for playback. Rotate tall Rotate "tall" (portrait-orientation) photographs during playback. Slide show Play photographs back in automatic slide shows. -
Page 109: Playback Folder
Playback Options: The Playback Menu Selecting Multiple Photographs for Deletion Highlight photograph. Press and hold ~ to enlarge display of the selected photograph. Select highlighted photograph. Selection shown by icon. To deselect photograph marked with icon, highlight and press the multi selector up or down. Repeat steps 1-2 to select additional photographs. -
Page 110: Rotate Tall
Playback Options: The Playback Menu Rotate Tall Select On to rotate "tall" (portrait-orientation) photographs for display in the camera monitor. Default setting is On. Photographs taken with Off selected for Auto image rotation 128) in the setup menu will be displayed in "wide" (landscape) orientation. Slide Show Create a slide show of the photographs in the current playback folder. -
Page 111: Stop-Motion Movie
Playback Options: The Playback Menu Stop-Motion Movie View movie files created with the Stop-motion movie option (!Il141) from the retouch menu. A thumbnail list of existing stop- motion movies only is displayed in the monitor. Press the multi selector left or right to choose a file and press to play back. -
Page 112: Shooting Options: The Shooting Menu
Shooting Options: The Shooting Menu The shooting menu contains the following options. See "Using Camera Menus" 94) for more information on using the menus. Optimize image* 101, Optimize images according to scene. !Iso Image quality Choose image quality and file format. !Iso Image size Choose image size. -
Page 113: Optimize Image
Shooting Options: The Shooting Menu Optimize Image Optimize contrast, sharpening, and other settings according to how photographs will be used or the type of scene. Normal (default setting) Recommended for most situations. Softer Softens outlines, producing natural results suitable for portraits or retouching on a computer. -
Page 114: Customizing Image Enhancement Options: Custom
Shooting Options: The Shooting Menu Customizing Image Enhancement Options: Custom Select Custom to make separate adjustments to the following options. After adjusting settings, highlight Done and press Image sharpening Choose how much outlines are sharpened during shooting from Auto, Normal, Low, Medium low, Medium high, High, or None. -
Page 115: White Balance
M~nu Shooting Options: The Shooting ColorMode • Modes la and Ilia are recommended for photos that will be printed without modification or viewed in applications that do not support color management. • If the application supports color management, choose the Adobe RGB color space when opening photos taken in mode II. -
Page 116: Fine-Tuning White Balance
Shooting Options: The Shooting Menu Color Temperature The perceived color of a light source varies with the viewer and other conditions. Color temperature is an objective measure of the color of a light source, defined with reference to the temperature to which an object would have to be heated to radiate light in the same wavelengths. -
Page 117: Preset Manual
Shooting Options: The.Shooting Menu Press Press to select and return to the shooting menu. "*,, At settings other than ±O, will appear next to the white balance icon in the Shooting information display. White Balance Fine Tuning The colors on the fine-tuning axes are relative, not absolute. For example, moving the cursor to B (blue) when a "warm"... - Page 118 Shooting Options: The Shooting Menu Highlight Measure and press the multi selector right. The screen shown at right will be displayed; highlight Yes and press The message, Take photo of white or gray object will filling viewfinder under lighting for shooting. be displayed.
- Page 119 Press to apply the setting. The display will return to shooting menu. Source for Preset Manual Images displayed may include those created with other cameras, but only photographs created with D60 can be used as source for preset manual.
-
Page 120: Noise Reduction
Shooting Options: The Shooting Menu Noise Reduction Photographs taken at high sensitivities or at shutter speeds of eight soconds or slower can be processed to reduce "noise" in the form of mottling or randomly-spaced, brightly- colored pixels. Choose from the following options. Off (default setting) Noise reduction turns off at ISO sensitivities of 800 or less. -
Page 121: Custom Settings
Custom Settings The Custom Setting menu contains the following options. See "Using Camera Menus" 94) for more information on using the menus. R Reset !E 110 Restore all Custom Settings to default values. 01 Beep !E 110 Turn on or off the beep that sounds when the camera focuses or when the self- timer or remote control is used. -
Page 122: R Reset
Custom Settings 15 Auto off timers .114 Choose how long the monitor and exposure meters remain on. 16 Self-timer .114 Choose the length of the self-timer delay. 17 Remote on duration • Select the length of time the camera will wait for a signal from the remote before canceling remote control mode. -
Page 123: Image Review
Custom Settings 07 Image Review (Displayed When Full Is Selected; 118) (default setting) is selected, photographs will automatically be displayed in the monitor after shooting. The length of time photographs are displayed depends on the option selected for Custom Setting 15 (Auto off timers;... -
Page 124: Fn Button
Custom Settings When On is selected, the indicators appear in the viewfinder and Shooting information display as shown at right. When these indicators are displayed, photographs are taken at the ISO sensitivity selected by the user. Unless a flash is used, these indicators blink when sensitivity is altered from the value selected by the user. -
Page 125: Ae Lock
Custom Settings 12 AE-L/AF-L (Displayed When Full Is Selected; 118) :~=~. Choose the function performed by AE/AF lock (default setting) Both focus and exposure lock while ~n is pressed (tyj 60, 63). t§ AE lock only Exposure locks while ~~l is pressed. Focus is unaffected (tyj 63). -
Page 126: Auto Off Timers
Custom Settings 15 Auto off Timers (Displayed When Full Is Selected; 118) If no operations are performed for the selected length of time, the monitor and the viewfinder will turn off to reduce the drain on the battery. Choose the time allowed to elapse before the monitor and exposure meters turn off. -
Page 127: 17 Remote On Duration
Custom Settings 17 Remote on Duration (Displayed When Full Is Selected; 118) Choose how long the camera will wait for a signal from the remote before cancelling (t!i min. (default setting), S min., delayed or quick-response remote modes 55) from 1 10 min., or 1S min. -
Page 128: Rangefinder
Custom Settings Date Counter Photographs taken while this option is in effect are imprinted with the number of days remaining until, or the number of days elapsed since a specified date. Use it to track the growth of a child or count down the days until a birthday or wedding. -
Page 129: Basic Camera Settings: The Setup Menu
Basic Camera Settings: The Setup Menu The setup menu contains the following options. See "Using Camera Menus" 94) for more information on using the menus. CSM/Setup menu lI! 118-119 Choose the options displayed in the menus. Format memory card Format memory card. Info display format .120-122 Choose a Shooting information display format. -
Page 130: Csm/Setup Menu
Basic Camera Settings: The Setup Menu Dust off ref photo !l12? Acquire reference data for the Image Dust Off option in Capture NX (available separately). Auto image rotation !I 128 Choose whether to record camera orientation with new photographs. My menu My menu is selected for Only selected options for 119) will be displayed if... -
Page 131: Choosing Menu Items For My Menu
Basic Camera Settings: The Setup Menu Choosing Menu Items for My Menu Highlight My menu and press the multi selector right. A list of menu names will be displayed. Highlight a menu name and press the multi selector right. The items in the selected menu will be listed as shown at right (the illustration shows the items listed when the playback menu is selected). -
Page 132: Info Display Format
Basic Camera Settings: The Setup Menu Info Display Format (II! Choose one ofthe following Shooting information display 8) formats for Digital Vari- I::!) (A~, ~, ~, ·5, P, S, A, \1), Program modes and modes. Classic, Graphic, Wallpaper. Choose from the three formats, •... - Page 133 Basic Camera Settings: The Setup Menu Classic The information displayed in Classic format is shown below. "Wide" (Landscape) Orientation "Tall" (Portrait) Orientation 11 12 6 78 Shooting mode Electronic analog exposure display Exposure compensation Shutter speed 40-46 Aperture (f-number) 40-46 ISO auto indicator Date imprint indicator Flash sync mode...
-
Page 134: Auto Shooting Info
Basic Camera Settings: The Setup Menu Wallpaper Wallpaper The design of the format is the same Graphic as the display except that a user- selected photograph is displayed in the background. The shutter speed and aperture displays, and the graphic display of the shooting mode (!I:l9) do not appear. -
Page 135: Shooting Info Auto Off
_ _ _ _ _ _ _. B_as.ic Camera Settings: The Setup Menu Shooting Info Auto off On (default setting) The eye sensor under the viewfinder is activated when your face comes closer to the viewfinder while the exposure meters are on, turning the Shooting information display off and the viewfinder display on. -
Page 136: Image Comment
Basic Camera Settings: The Setup Menu Image Comment Create a comment beforehand and attach it to new photographs as they are taken. Comments can be viewed in Capture NX (available separately; 156) or ViewNX. Done Save changes and return to the setup menu. Input comment The following dialog will be displayed. -
Page 137: Folders
Basic Camera Settings: The Setup Menu Folders (Displayed When Full Is Selected; 118) Create new folders on the memory card and choose the folder to which new photographs will be recorded. Folder names are comprised of a three-digit folder number and a five-digit folder name (e.g., "1 OONCD60"). -
Page 138: File No. Sequence
Basic Camera Settings: The Setup Menu File No. Sequence (Displayed When Full Is Selected; 118) Choose how the camera names files. Off (default setting) File numbering is reset to 0001 when a new folder is created, the memory card is formatted, or a new memory card is inserted. -
Page 139: Dust Off Ref Photo
Basic Camera Settings: The Setup Menu Dust off Ref Photo (Displayed When Full Is Selected; 118) Acquire reference data for the Image Dust Off option in Capture NX (available separately; 156). Image Dust Off is used to reduce the effects of dust in NEF (RAW) photographs. For more information, see the documentation provided with Capture NX. -
Page 140: Auto Image Rotation
Basic Camera Settings: The Setup Menu Image Dust Off Dust off ref photo is available with CPU lenses only. A lens with a focal length of at least SOmm is recommended 146). If using a zoom lens, zoom all the way in. The same reference image can be used for photographs taken with F---I""'--- ...-.,N0... -
Page 141: Creating Retouched Copies: The Retouch Menu
Creating Retouched Copies: The Retouch Menu The options available in the retouch menu can be used to create cropped, resized, or retouched copies of photographs, or to create JPEG-format copies of NEF (RAW) photographs stored on the memory card. Copies created using options in the retouch menu are recorded as separate files. -
Page 142: Creating Retouched Copies
Cross screen cannot be applied to photographs taken with Black-and-white selected for (~101). Optimize image • The D60 may be unable to display or retouch photographs that were created with other models of camera or that have been modified using a computer or other device. Creating Retouched Copies... -
Page 143: Creating Retouched Copies In Full-Frame Playback
Creating Retouched Copies: The Retouch Menu Creating Retouched Copies in Full-frame Playback Except in the case of Image overlay, retouched copies can also be created by pressing after selecting photographs in full-frame playback... _... " Select photograph in full-frame playback 72). -
Page 144: Quick Retouch
Creating Retouched Copies: The Retouch Menu Quick Retouch Easily create retouched copies in which contrast and saturation have been enhanced. The camera automatically creates copies in which dark or backlit subjects are brightened using the D-Lighting option and the contrast and saturation (vividness) are enhanced. Press the multi selector up or down to choose the amount of enhancement performed from High, Normal, or Low. -
Page 145: Red-Eye Correction
Creating Retouched Copies: The Retouch Menu Red-Eye Correction The camera automatically detects tired eye" in photographs taken using the flash, and creates copies in which this phenomenon is reduced. Selecting this option displays a preview image as shown below. Red-eye correction is available only with photographs taken using the flash. -
Page 146: Trim
Creating Retouched Copies: The Retouch Menu Trim Create cropped copies of selected photographs. A preview of the portion of the photograph to be copied is displayed. The following operations can be performed. Option Description Reduce the portion Each time is pressed, the portion to be copied be copied is reduced in the preview image. -
Page 147: Filter Effects
Creating Retouched Copies: The Retouch Menu Filter Effects Choose from the following options. Hecr effects Warm filter Red intensifier ..•• G "'" ;''',o;if;" ·i ..· . . . · ... Cross screen Blue intensifier ': 2... -
Page 148: Small Picture
Creating Retouched Copies: The Retouch Menu Small Picture Create a small copy of the selected photograph. Copies have an image quality of JPEG Fine. The following sizes are available. 640x480 Suited to television playback. 320x240 Suited to display on website. 160x120 Suitable for e-mail. - Page 149 Creating Retouched Copies: The Retouch Menu Highlight Select picture. Display selection screen. - - - - - - ---_._--_. _ - - - - - - - - - - - - - - - - - - - - - - ..
-
Page 150: Image Overlay
Creating Retouched Copies: The Retouch Menu Image Overlay Image overlay combines two existing RAW photographs to create a single photograph that is saved separately from the source images. Adjust image quality (~ 50) and image size (~ 50), to suit intent, from the Quick settings display (tI!48), or from the shooting (till Image overlay menu... - Page 151 Pall Image Overlay • Only RAW photographs created with the D60 can be selected for image overlay. Other images are not displayed on the selection screen. • The overlay has the same photo info (including date of recording, metering, shutter speed, aperture, exposure mode, exposure compensation, focal length, and image orientation) and values for white balance and optimize image as the photograph selected for Image 1.
-
Page 152: Nef (Raw) Processing
MENU Press to exit to full-frame playback without creating a copy. NEF(RAW) Photographs • The D60 can only create JPEG-format copies of NEF (RAW) photographs taken with the D60. balance>Preset • NEF (RAW) processing>White manual cannot be selected for photographs taken at a white balance setting other than Preset manual. -
Page 153: Stop-Motion Movie
Creating Retouched The Retouch Menu Copies: Stop-motion Movie Create a stop-motion movie from photographs on the memory card and record as a movie file. Create movie Choose the photographs for stop-motion movie and create a movie file. Frame size Choose the frame size from 640 480, 320 240, 120. - Page 154 Creating Retouched Copies: The Retouch Menu Highlight Starting image, Middle image, or End image and press When Starting image is selected, repeat step 2 to select the starting image. After the starting image is changed, the monitor will return to display shown in step 4.
-
Page 155: Before And After (Making A Side-By-Side Comparison)
Creating Retouched Copies: The Retouch Menu Before and after (Making a Side-by-Side Comparison) Compare a retouched copy to the source image by displaying them side-by-side. This option is displayed only when is pressed while a retouched copy, or the source image for a retouched copy, is displayed in full-frame playback (!l131). -
Page 157: Optional Accessories
156, 157) Use Only Nikon Brand Electronic Accessories Only Nikon brand accessories certified by Nikon specifically for use with your Nikon digital camera are engineered and proven to operate within its operational and safety requirements. USE OF NON-NIKON ACCESSORIES COULD DAMAGE YOUR CAMERA AND MAY VOID YOUR NIKON WARRANTY. -
Page 158: Compatible Lenses
Type G or D AF NIKKOR " PC Micro 85mm f/2.8D AF-S/AF-I Teleconverter :::l Other AF NIKKOR (except lenses for F3AF) AI-PNIKKOR AI- or AI-modified NIKKOR ./12 and Nikon Series-E Medical-NIKKOR 120mm ./13 f/4 (IF) ./12 Reflex-NIKKOR :::l ./12 " PC-NIKKOR ./12... - Page 159 Once the PB-6 is attached, the camera can be repositioned in "wide" (landscape) orientation if necessary. • Reprocopy Outfit PF-4 requires Camera Holder PA-4. Incompatible Accessories and Non-CPU Lenses The following accessories and non-CPU lenses can NOT be used with the D60: fl2.8, • AF Teleconverter TC-16A • Lenses for the F3AF (AF 80mm •...
- Page 160 Compatible Lenses The AF-S/AF-I Teleconverter The AF-S/AF-I teleconverter can be used with the following AF-S and AF-I lenses: • AF-S VR 70-200mm f!2.8G ED • AF-S 400mm f!2.8D ED II • AF-S 80-200mm f!2.8D ED • AF-S 400mm f!2.8D ED •...
- Page 161 Compatible Lenses The Built-in Flash The built-in flash can be used with CPU lenses with focal lengths of 18 mm to 300 mm (~ 66). The flash may be unable to light the entire subject and restrictions on focal length and shooting distance may apply with the following lenses.
-
Page 162: Optional Flash Units (Speedlights)
5B-R200 Wireless Remote 5peedlight can be fired remotely. provided with the 5peedlight or wireless 5peedlight commander for details. CLS is the latest flash control system for use with Nikon Speedlights and cameras. Various features are supported, including Flash Color Information Communication, with which flash output color temperature information is automatically transmitted to the camera for use in tuning white balance to achieve optimal results. - Page 163 • The monitor and all buttons are illuminated to simplify operation in dark surroundings. • Custom settings can be used to enable, disable, or adjust a variety of functions. Nikon Wireless Remote 5peedlight 5B-R200 This high-performance wireless remote 5peedlight has a guide number of 10/32 (150 100, mlft, 20°C/68°F).
- Page 164 Optional Flash Units (Speedlights) The following features are available with CLS-compatible flash units. Speedlight Advanced Wireless Lighting Single flash unit Commander Remote S8-400 58-800 58-600 58-800 SU-800 58-BOO 58-600 SB-R200 Flash mode/feature i-TIL Balanced v"3,4 v"3 v"3 v"s v" v" v"...
- Page 165 • The optional Speedlight will not fire when the mode dial is rotated to Use Only Nikon Flash Accessories Use only Nikon Speed lights. Negative voltages or voltages over 250 V applied to the accessory shoe could not only prevent normal operation, but damage the sync circuitry of the camera or flash.
- Page 166 Optional Flash Units (Speed lights) Notes on Optional Speedlights Refer to the documentation provided with Speedlight for details. If the Speedlight supports the Creative Lighting System, refer to the section on CLS-compatible digital SLR cameras. The 060 is not included in the "digital SLR" category in the S8-80DX, S8-28DX, and S8-50DX manuals. The shutter will synchronize with an external flash at speeds of or slower.
-
Page 167: Other Accessories
• Nikon filters can be divided into three types: screw-in, slip-in, and rear-interchange. Use Nikon filters; other filters may interfere with autofocus or electronic range finding. • The D60 cannot be used with linear polariZing filters. Use the C-PL circular polariZing filter instead. - Page 168 Use the AC Adapter EH-5a to power the camera for extended periods. The Power Connector EP-5 is required (available separately) to connect the AC adapter to the D60. The AC Adapter EH-5 can be used in place of the EH-5a. For more information about connecting the AC adapter to the camera using power connector, see "Connecting the...
-
Page 169: Connecting The Power Connector And The Ac Adapter
Other Accessories Connecting the Power Connector and the AC Adapter Turn off the camera before connecting the power connector and the AC adapter. - - _ . _ - _ _ . _ - - - - - ..•..•. ®... -
Page 170: Approved Memory Cards
Approved Memory Cards The following memory cards have been tested and approved for use in the 060. All cards of the designated make and capacity can be used, regardless of speed. SanDisk 64MB, 128MB,256MB,512MB, 1GB,2GB ,4GB Toshiba 64MB, 128MB, 256MB, 512MB, 1GB, 2GB Panasonic 64MB, 128MB, 256MB, 512MB, 1GB, 2GB 128MB,256MB,512MB,lGB... -
Page 171: Maximizing The Life Of The Camera 1S9
Servicing the Camera and Accessories The D60 is a precision device and requires regular servicing. Nikon recommends that the camera be inspected by the original retailer or Nikon service representative once everyone to two years, and that it be serviced once every three to five years (note that fees apply to these services). -
Page 172: Caring For The Optical Low-Pass Filter
Cleaning is performed by vibrating the image sensor. If dust cannot be fully removed using the options in the Clean image sensor menu, clean the image sensor manually (~ 162) or consult a Nikon-authorized service representative. If image sensor cleaning is performed several times in succession, image sensor cleaning may be temporarily disabled to protect the camera's internal circuitry. - Page 173 Caring for the Camera Cleaning at Startup/Shutdown Select Clean at. Display the Clean image sensor menu as described in step 2 of "Cleaning from the Setup Menu Option" 160). Highlight Clean at and press the multi selector right........_ Select an option.
- Page 174 Note, however, that the filter is extremely delicate and easily damaged. Nikon recommends that the filter be cleaned only by Nikon- authorized service personnel. To prevent the camera from powering off while the mirror is raised, use a fully-charged battery or an optional AC Adapter EH-5a with a Power Connector EP-5 (~ 156).
- Page 175 Nikon takes every possible precaution to prevent foreign matter from coming into contact with the low-pass filter during production and shipping. The D60, however, is designed to be used with interchangeable lenses, and foreign matter may enter the camera when lenses are removed or exchanged.
-
Page 176: Caring For The Camera And Battery: Cautions
Caring for the Camera and Battery: Cautions The Camera and Lens Do not drop: The product may malfunction if subjected to strong shocks or vibration. Keep dry: This product is not waterproof, and may malfunction if immersed in water or exposed to high levels of humidity. - Page 177 Caring for the Camera and Battery: Cautions Storage: To prevent mold or mildew, store the camera in a dry, well-ventilated area. If the product will not be used for an extended period, remove the battery to prevent leakage and store the camera in a plastic bag containing a desiccant. Do not, however, store the camera case in a plastic bag, as this may cause the material to deteriorate.
-
Page 178: The Battery
Caring for the Camera and Battery: Cautions The Battery Dirt on the battery terminals can prevent the camera from functioning and should be removed with a soft, dry cloth before use. After removing the battery from the camera, be sure to replace the terminal cover. Charge the battery before use. -
Page 179: Technical Notes
Technical Notes Troubleshooting If the camera fails to function as expected, check the list of common problems below before consulting your retailer or Nikon representative. Refer to the page numbers in the right-most column for more information. Display Problem Solution... -
Page 180: Shooting
Troubleshooting Shooting All shooting modes .' " Problem Solution Camera takes time to Delete files or folders. turn on. • Memory card is full, locked, or not inserted. 23,25, • Flash is charging. Shutter release is • Camera is not in focus. disabled. - Page 181 Troubleshooting Problem Solution Randomly-spaced bright pixels ("noise") • Lower ISO sensitivity or use noise reduction. 53,108 appears in • Shutter speed is slower than 8s: use noise reduction. photographs. 6,36-37 • Mode dial rotated to select another mode. • AF-assist lamp does not light for manual focus, continuous- servo autofocus, or when focus mode automatically switches AF-S.
-
Page 182: Playback
Subject is too dark or too bright. white balance. Image cannot be selected as source for Image was not created with D60. preset manual. Inconsistent results Select Custom in Optimize image and choose a setting other with a series of than Auto for image sharpening and tone compensation. -
Page 183: Others
Troubleshooting Solution Problem "Tall" (portrait) • Select On for Rotate tall. • Photo was taken with Off selected for Auto image rotation. orientation photos are displayed in • Camera orientation was changed while the shutter-release "wide" (landscape) button was pressed in continuous release mode. orientation. -
Page 184: Camera Error Messages And Displays
Camera Error Messages and Displays This section lists common warning indicators and error messages that appear in the viewfinder and monitor. Message Viewfinder Solution Lock lens aperture ring at Lock ring at minimum aperture (largest f- minimum aperture (largest 19,40 (blinks) number). - Page 185 Camera Error Messages and Displays . . . em Message Viewfinder Solution • Use Nikon-approved card. • Card may be damaged. Format memory This memory card cannot card again. If error persists, contact retailer ""') or Nikon-authorized service be used. Card may be L ,.".,...
- Page 186 Camera Error Messages and Displays Message Viewfinder Solution • Built-in flash is lowered: raise built-in flash 40-46, • Reduce distance subject, use larger aperture, or increase ISO sensitivity or flash 53, 153, range. • Flash head on optional SB-400 Speed light ~/17J is in bounce-flash position.
- Page 187 Camera Error Messages and Displays Message Viewfinder Solution Press shutter-release button again. If error C ,. ,. Error. Press shutter release 32-33 persists, consult with Nikon-authorized button again. (blinks) service representative. Initialization error. Contact c,· ,. Contact Nikon-authorized service Nikon-authorized service (blinks) representative.
-
Page 188: Appendix
Appendix Available Settings and Defaults The following defaults are restored with Custom Setting R (Reset). A~I\l)I~ .& llllplSIAIM 01 Beep 02 Focus mode AF-A (Set to MF with some lenses) Dynamic Single 03 AF-area mode Closest subject Closest subject area point 04 Release mode Single frame... - Page 189 Appendix PISIAIM <:i) I:z menu Shooting Normal Optimize image Image qualityl JPEG normal Large Image size Auto (fixed) Auto White balance Auto ISO sensitivity' Noise reduction Active D-Lighting ~1<:i)1:z1~1_1~1~1~IPISIAIM menu setup Simple CSM/Setup menu Graphic (Background color: White) Info display format Auto shooting info Shooting info auto off 2008.01.01.00:00:00 (format and time zone vary with region of sale)
-
Page 190: Memory Card Capacity And Image Quality/Size
Appendix Memory Card Capacity and Image Quality ISize The following table shows the approximate number of photographs that can be recorded on a 1GB memory card at different image quality and size settings All figures are approximate; actual file size and memory card capacity may vary with scene recorded and make of memory card. -
Page 191: Flash Control
Appendix Flash Control Flash output is adjusted using one of the following systems when a CPU lens is used in combination with the built-in flash or optional 5B-400, 5B-800, or 5B-600 5peedlights. i-TIL Balanced Fill-Flash for Digital SLR Flash output is adjusted for a natural balance between the main subject and the background. -
Page 192: Specifications
Specifications Nikon 060 Digital Camera Type Lens mount Effective picture angle lve~els sensor Image sensor 23.6 x 15.8 mm CCD sensor Total pixels 10.75 million Image sensor cleaning, Image Dust Off reference data Dust-reduction System (optional Capture NX software required) ~==::::::::J •... - Page 193 Specifications • AF-S and AF-I NIKKOR: All functions supported • Type G or 0 AF NIKKOR not equipped with an autofocus motor: All functions supported except autofocus. • Non-Type G or 0 AF NIKKOR not equipped with an autofocus motor: All functions supported except 3D color matrix metering II and autofocus.
- Page 194 Exposure Index) Active D-Lighting Can be selected from (auto) or Nikon Multi-CAM 530 autofocus sensor module with TIL phase detection, 3 focus points, and AF-assist illuminator (range approx. 0.5-3 m/l ft. 8 in.-9 ft. lOin.) Detection range -1 - + 19 EV (ISO 100, 20°C/68°F) •...
- Page 195 Nikon reserves the right to change the specifications of the hardware and software described in this manual at any time and without prior notice. Nikon will not be held liable for damages that may result from any mistakes that this manual may contain.
- Page 196 Specifications Quick Charger MH-23 AC 100-240 V (50/60 DC 8.4 V, 0.9 A Rechargeable Li-ion Battery EN-EL9 Approx. 90 minutes when battery is fully discharged 0-40°C (32-104 OF) Approx. 82.5 65 mm (3.2 2.6 in.) Approx. 1.8 m (5 ft. 11 in.) Approx.
- Page 197 Nikon reserves the right to change the specifications of the hardware and software described in this manual at any time and without prior notice. Nikon will not be held liable for damages that may result from any mistakes that this manual may contain.
-
Page 198: Supported Standards
. • Exif version 2.21: The D60 supports Exif (Exchangeable Image File Format for Digital Still Cameras) version 2.21, a standard in which information stored with photographs is used for optimal color reproduction when the images are output on Exif-compliant printers. -
Page 199: Index
Index Symbols display 9 ring 40 (auto) 28 Aperture-priority auto 43 <i) Auto (flash off) 36 Auto image rotation 128 Portrait 36 Auto meter off 31 ~ Landscape 37 Auto off ti mers 114 Child 37 Auto shooting info 122 ~ Sports 37 &... - Page 200 Index CSM/setup menu 118 manual 113 full 118 mode 65 my menu 119 optional unit 113 simple 118 range 149, 179 Custom settings 109 rear curtain sync 65, 66 Cyanotype 134 red-eye reduction 65 slow sync 65 sync mode 9 TTL 113 Date Flash compensation 68...
- Page 201 NEF 51 ISO sensitivity NEF (RAW) 51 Hi 1 53 NEF (RAW) processing 140 i-TIL balanced fill-flash for digital SLR 179 Nikon Transfer 80 No memory card? 110 No. of copies 86 JPEG 50,140 Noise reduction 108 JPG 51 Optimize image 101...
- Page 202 Index Stop-motion movie (playback) 99 Strap 14 Rangefinder 7, 116 RAW+B 51 Rechargeable Li-ion Battery EN-EL9 16, 184 Terminal cover 16 Red intensifier 135 Time 46 Red-eye Time stamp 87 correction 133 Tone compensation 102 reduction lamp 4, 65 Trim 134 Release mode 9, 54 Two-button reset 70 Remote...
- Page 204 Nikon No reproduction in any form of this manual, in whole or in part (except for brief quotation in critical articles or reviews), may be made without written authorization from NIKON CORPORATION. «( NIKON CORPORATION Fuji Bldg., 2-3 Marunouchi 3-chome,...
- Page 205 AF-I lenses. For information on purposes. lenses that can be used with the D60, see the User's Manual. Mode dial - - - - - . , If the lens has vibration reduction function, set the...
- Page 206 User~ Manual. See the other side of this guide for information on using the supplied Nikon to the viewfinder, be careful not to Transfer software to copy photographs to a computer, and printing photographs via direct put your fingers or fingernails in USB connection.
- Page 207 European release of the Software Suite). If your computer is running Windows 2000 Professional, the D60 cannot be connected to the computer. Use a card reader or similar device to transfer pictures stored on the memory card to the computer.
- Page 208 If the memory card has a capacity greater than 2 GB, or is SDHC-compliant, the intended device must support these features of the memory card. • At the Nikon Transfer default settings, Nikon Transfer will start automatically when a memory card is inserted Turn the printer on.
- Page 210 (l'l*-'l), No reproduction in any form of this manual. in whole or in part (except for brief quotation in critical articles or reviews). may be made without written authorization from NIKON CORPORATION. NIKON CORPORATION FUJI BLDG., 2-3, MARUNOUCHI 3-CHOME, CHIYODA-KU, TOKYO 100-8331, JAPAN Printed in China TI7E02 (80) 7MAA3480-- ..
- Page 211 Thank you for purchasing the AF-S OX VR Zoom-Nikkor 55-200mm f/4-56G IF-ED OX Nikkor lenses are specially designed for use with Nikon digital SLR (Nikon OX format) cameras, such as the D2-Series and 040. When mounted on Nikon OX format cameras, the lens' picture angle is equivalent to approx.
- Page 212 Vibration reduction mode (VR) Pictures can be taken at shutter speeds approx. 3 stops' slower than is possible without using a lens. Panning is also possible. ('Under Nikon measurement conditions. The effects of vibration reduction vary depending on individual and shooting conditions.) .Setting the vibration reduclion ON/OFF switch...
- Page 213 Nikon \.l'ko C_I_ f'(t n.,:)U1 presents Understanding Digital Photography Release Your Digital SLR's Potential ..--:r.I' Featuring Nikon DigitalSLR Cameras...
- Page 215 Nikon," Sd1cor Nil<on presents Understanding .;:, Digital Photography ' " q,;§' Release Your Digital SLR's Potential .. 0 .. < ' Featuring Nikon Digital Cameras ",:':J , ,~ ",c-' " Program length: Approx. 45 minutes ·ii.0(:o. ':" ® 1.c;§l .
- Page 216 Bring Your Ideas to Light Nikkor lenses, Nikon Speedlights and other Accessories for Your Nikon Digital SlR System...
- Page 217 Nikkor lenses Extraordinary image quality is reliant upon exceptional lenses. Nikon offers a stunning variety of Nikkor inter- changeable lenses, each of which demonstrates Nikon's unique dedication to optical excellence. Enhanced by exclusive Nikon technologies, Nikkor lenses deliver astonishing image quality. Highlighted here are just a few Nikkor interchangeable lenses from which you can choose.
- Page 218 Nikon," Sd1cor Nikon presents Fast, Fun & Easy Great Digital Pictures...
- Page 219 For more information visit www.nikonusa.com Format: 16x9 widescreen DVD Nikon ' " the heart of the ImageN All camera specifications and/or included accessones referred to are subject to change without notice. SKU #5881 ® 2007 Nikon Inc. All rights reserved Printed in the USA...
- Page 220 Nikonm Program length: Approx. 35 minutes Ct/l presents Fast, Fun Easy & Great Digital Pictures Featuring Nikon D40, D40X & D60 Digital SLR Cameras...
- Page 221 Other Options for Fast, Fun and Easy Pictures Nikon wants to make it easy for you get the most from your Nikon camera. To learn about the following topics and more, visit www.nikonusa.com • Nikon World Online Learn about the techniques and viewpoints of legendary photographers, enter contests and more.
- Page 222 TNR01-01 Nikon~ PO BOX 173031 DENVER CO 80217-3031 11"1,11"",1,1",111",1"11,11"",11",,11,,11,,,,11",111 this card to register your purchase and enter • Return • One winner of dollars • One winner of Five winners of dollars • dollars each • Register online at www.prodregister.com/nikon...
- Page 223 Marital status: 0 Married 2. 0 Single Date of purchase: Month Year Serial number: Model number: Please indicate the Nikon carnera this accessory will be used with. Carnera model: Carnera model: Lamera mOdel: Lamera mooel: Camera model: carnera mooe.: Dealer name:...
- Page 224 Please fold here. Please check all that apply to your household. OJ. 0 Shop by Catalog!Mail 06. 0 Speak Spanish Have a Dog 02. 0 Shop via the Internet 07. 0 II. 0 Own an ApplelMacintosh Computer Have a Cat 03.
- Page 227 Your Telephone Your E-mail L-I--,----,-----,----,I Lens Model mm f/ Date of Purchase Lens Serial #, Nikon SLR owned: (1) F6 _ (2) F5 _ (3) F3 _ (4) F100 _ (5) N90S _ (6) N80 _ (7) N75 _ (8) N65 _...
- Page 228 YEAR ExTENDED SERVICE COVERAGE YEARS OF PROTECTION To obtain Extended Service Coverage (ESC), you must register with Nikon Inc. within ten days from the date of the original retail purchase of this Nikkor AFhX lens. Faflure to register invalidates your ESC. To register, complete and mail the attached postcard to Nikon Inc.
- Page 229 Please send products and other PLACE correspondence to: STAMP Nikon Inc. HERE 19601 Hamilton Avenue Torrance, CA 90502 NIKKOR LENS ESC REGISTRATION P. O. BOX 173031 DENVER, CO 80217-3031 H9Y01·01 11.,1,1111",1,1",111",1,,11,11,,",11",,11,1,1,1...
- Page 230 IMPORTANT NOTICE: YOU MUST PRESENT THE ATTACHED WARRANTY fORM (PART 1) TOGETHER WITH PROOf-Of-PURCHASE AND PROOf-Of-PURCHASE DATE TO OBTAIN WARRANTY SERVICE.
- Page 231 WAR A TY This Nikon product is warranted by Nikon Inc. to be free from defects in materials and workmanship for a period of one (1) year from the date of purchase. During this period, if this product is found to be defective in materials or workmanship, Nikon Inc.
- Page 232 Nikon AUTHORIZED SERVICE STATIONS For a list of local Nikon AUTHORIZED SERVICE STATIONS, please visit nikonusa.com and proceed to the Service tab, or call 800 NIKONSV (800 645 6678) toll free.
- Page 233 It affords the consumer warranty protection outside the continental United States, Alaska, Hawaii, Puerto Rico and the U.S. Virgin Islands. Such warranty coverage is supplemental to and not in lieu of the United States Nikon One Year Limited Warranty which is received by the customer with the Nikon product.
- Page 234 Nikon SERVICE FACILITIES (As of 2007) New Zealand. TA MacallSter lid Argentina: Eduardo Udemo y C.. SACJFI. Australia: Nikon Aurtrall<l Ply ltd NOIWaY' Interfoto AS Panama: Panama Contto Amenca Teiefolo Internaaonal Zona Ubn!. SA Austria Krca Kamera SeMee Belgium: H D. Beukelaer...
- Page 235 Attn: Marketing Services Department TN001-01 PO BOX 173031 DENVER CO 80217-3031 11"1,11",,,1.1,,,111,,,1,,11,11.,,,,11,.,,11,,11,,,,11,,,111 this card to register your purchase and enter • Return • One winner of dollars • One winner of Five winners of dollars • dollars each • Register online at www.prodregister.com/nikon...
- Page 236 EMS. Nikon. and pholograph for adn'nl\mglpubhclt) purpo'>C\ "'lIhout compensauon All cnlncs become lhe propcn) of In case of a dl"PUIC of all) online enlf), Ihe aUlhOf"lled al:count holder of Ihe c-m;nl addre..\ USl."d cnler lhe s..ccp...
- Page 237 Please fold /rere. Please check all that apply to your household. Shop by CataloglMail Have a Dog II. ..J Own an ApplelMacintosh Computer Own a CD-ROM Drive Have a Cat Shop via the Internet Member of Frequent Flyer Program Home Workshop/Do-It- Yourself Own a Wireless/Cellular Phone Donate to Charitable Causes Subscribe to an Onlinellntemet Service...
- Page 238 1 YEAR WARRANTY 4 YEARS EXTENDED SERVICE COVERAGE 5 YEARS OF PROTECTION Nikon,~ for Nikkor AF and PC Lenses Please note: You must register this ESC with Nikon Inc. within 10 days of your retail purchase. See inside for details. PIN 5324...
- Page 239 Nlkkor AF or PC Nlkkor service 1 Year Warranty + 4 Year Extended Coverage YEARS OF PROTECTION Nlkon" Mrs. RrstName Last Name Initial Street Apt. No. City State Code E-mail 2. Dealer Name City State Zip Code 3. Your Telephone # 4.
- Page 240 Nikkor AF or PC Nikkor 1 Year Warranty + 4 Year Extended service Coverage = N/kon. YEARS OF PROTECTION First Name Inrtlal Last Name Street Apt No State City Zip Code 2. Dealer Name City State Zip Code 3. Your Telephone 5.
- Page 241 5 Years of ob1iiA~ndtfService Coverage (ESQ. you must register with Nikon Inc. within ten days from the date of original retail pbfChase of this NIKKOR AF or PC-NIKKOR lens. Failure to register invalidates your ESC. To register. complete and mail the attached postcard to Nikon Inc.
- Page 242 TNX01-01 PLACE STAMP HERE NIKKOR LENS ESC REGISTRATION 173031 P. O. BOX DENVER, CO 80217-3031 11 •• 1.11"11.1.1••• 111 ••• 1 •• 11.11"11.1111 •• 11•• 1111 •• 11••• 1II...
- Page 243 I •• AF-S OX 18-55/3.5-5.6G VR • • ! • • • • • • • IMPORTANT NOTICE: I • • • YOU MUST PRESENT THE ATTACHED WARRANTY FORM (PART 1) TOGETHER WITH PROOF-OF-PURCHASE AND PROOF-Of-PURCHASE ;::::; • DATE TO OBTAIN WARRANTY SERVICE. i .
- Page 244 WARRANTY SERVICE. This Nikon product is warranted by Nikon Inc. to be free from defects in materials and workmanship for a period of one (1) year from the date of purchase. Durmg this period. if this product is found to be defective in materials or workmanship, Nikon Inc.
- Page 245 Nikon AUTHORIZED SERVICE STATIONS I" (\ For a list of local Nikon AUTHORIZED SERVICE STATIONS. please visit nikonusa.com and proceed to the Service tab. or call 800 NIKONSV (800 645 6678) toll free. "I: Ct ..
- Page 246 It affords the consumer warranty protection outside the continental United States, Alaska, Hawaii, Puerto Rico and the ' . . U.S. Virgin Islands. Such warranty coverage is supplemental to and not in lieu of the United States Nikon One Year Limited Warranty which is received by the customer with the Nikon product.
- Page 247 Torino Phone: +39-011-8996804 Phone: +81·3·3344-1835 Italy: 12th Floor, Seoul Chamber Commerce Industry Building, 4-45, Ginza Centtr Strata Ginza.• 7-10-1, Ginza, Chuo-ku, Tokyo 1Q4-0061 Korea: Nikon Imaging Korea Co.• ltd. & Servi<e ~~+~-o"i~~J6~r8~' Phone: +81-3-5537-1434 • Seoul1DO-743 ~~! ~I.;~~~i Nagoya Service Center 6F, 3-2().
- Page 248 (1) year from the date of purchase. During this period if this product is found to be defective in material or workmanship, Nikon Inc. or one of its authorized service facilities will at its option, either repair or replace this Product without charge, subject to the following conditions, limitations and exclusions: 1.
Need help?
Do you have a question about the D60 and is the answer not in the manual?
Questions and answers