Table of Contents
Advertisement
Quick Links
Advertisement
Table of Contents

Related Manuals for NETGEAR NeoTV MAX


Summary of Contents for NETGEAR NeoTV MAX
- Page 1 Getting Started...
- Page 2 After installing your device, locate the serial number on the label of your product and use it to register your product at https://my.netgear.com. You must register your product before you can use NETGEAR telephone support. NETGEAR recommends registering your product through the NETGEAR website.
-
Page 3: What's In The Box
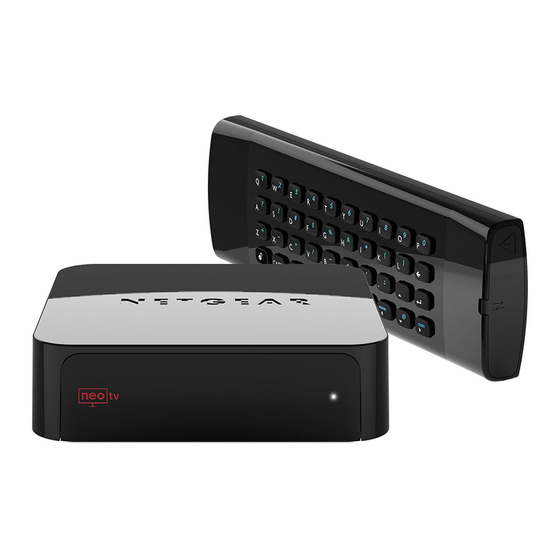
What’s in the Box Remote control NeoTV Streaming Player Installation guide AV cable Power adapter (varies by region) -
Page 4: Front And Rear Views
Front and Rear Views What You Need to Get Started • TV with HDMI or AV port • HDMI cable • Broadband Internet connection • A wireless or wired network • Device with Internet browser for service activation... -
Page 5: Connect To The Tv
Connect to the TV Make sure that your TV is on and set to display the correct video input. Connect an HDMI cable (sold separately) to the HDMI port on your player and to the HDMI IN port on your TV. Alternatively, if your TV does not have an HDMI port, you can connect using the AV composite cable. -
Page 6: Connect To Your Network
Connect to Your Network To start streaming, you must connect the NeoTV to your wireless or wired home network. After you get your network ready, the onscreen guided setup helps you connect your player to your network. TIP: Do not place anything on top of your NeoTV player. Placing objects on top of your player can interfere with the wireless signal or cause the player to overheat. -
Page 7: Wired Connection
Wired Connection Use an Ethernet cable (sold separately) to connect your player to a LAN port on your router. (optional) Router NeoTV... -
Page 8: Wireless Connection
Wireless Connection If you are using a wireless connection, place your NeoTV within range of your wireless network. To connect wirelessly, you can use Wi-Fi Protected Setup (WPS), or you can select your network and enter its security password using the onscreen setup guide. (optional) NeoTV Wireless... -
Page 9: Onscreen Guided Setup
Onscreen Guided Setup On your TV: • Use the remote control to follow the NeoTV onscreen setup instructions, which include setting the output resolution to the TV, and the standby timing, connecting to a network, and checking for the latest NeoTV software update. •... -
Page 10: Remote Control
Remote Control Lock Home Power Select Left Right Down Play/Pause Menu Return Rewind Fast Forward Previous Next Stop TIP: Before using the remote control, remove the yellow battery isolation strip at the bottom of the remote. -
Page 11: Remote Control Lock Key Feature
Remote Control Lock Key Feature This remote control feature prevents the accidental pressing of the keyboard buttons when you are using the opposite side of the remote control. By pressing the Lock button on the navigation side of the remote, the keyboard is automatically locked. To unlock and start using the keyboard, press the Lock button again. - Page 12 To Install the Remote Control App Using your iPhone or Android smartphone, navigate to the Apple AppStore or Google Play, and search for NeoTV Remote. You can use the following QR codes to speed up this process: Apple App Store Google Play Install the app on your phone.
-
Page 13: Intel Widi Channel
Intel WiDi Channel The Intel Wireless Display (WiDi) channel lets you display your laptop screen on your TV. Note: To use the Intel WiDi channel, your laptop must: • Be Intel WiDi-capable • Have the Intel WiDi software installed From the NeoTV main screen, use the remote to select the Intel WiDi channel: The Ready for Connection screen displays. - Page 14 Use the Intel WiDi software to scan and find the NeoTV WiDi adapter. Double-click the detected NeoTV to connect to it. If you are connecting the laptop to the NeoTV for the first time, the NeoTV adapter displays a 4-digit security code on your TV. Enter this security code into the Intel WiDi application on your laptop.
- Page 15 My Media My Media channel lets you play back your local storage content from a USB disk drive, MicroSD card, and local network DLNA server. Select the My Media icon from the NeoTV main screen. Use the remote to select the storage device you want to browse. Valid devices display on the left.
- Page 16 Select a video, audio, or photo file and press OK on the remote to start playing. Press the green button on the remote to change the thumbnail view. Press the green button again to remove the list mode view.
- Page 19 NETGEAR, the NETGEAR logo, and Connect with Innovation are trademarks and/or registered trademarks of NETGEAR, Inc. and/or its subsidiaries in the United States and/or other countries. Information is subject to change without notice. © NETGEAR, Inc. All rights reserved. Compliance For the current EU Declarations of Conformity, visit:...
- Page 20 N E T G E A R , Inc. 350 E. Plumeria Drive San Jose, CA 95134-1911 USA July 2013...
Need help?
Do you have a question about the NeoTV MAX and is the answer not in the manual?
Questions and answers