Table of Contents
Advertisement
Country Flame Technologies
A Division of American Products, LLC
900 George Street
Marshfield, MO 65706
417-859-0990 phone
417-859-0192 fax
www.countryflame.com
Version 1.0
COUNTRY FLAME TECHNOLOGIES
INSTALLATION, OPERATION AND MAINTENANCE MANUAL
LITTLE RASCAL PELLET FUEL STOVE
FREESTANDING/FIREPLACE INSERT, MODEL LR-01
USA & CANADA TEST:
ASTM E 1509-03, ULCS627-M90
ULCS628-M92, UL 1482,
Oregon Administrative Rules 814-23-900 thru 909
Do not store or use gasoline or other flammables (vapor or liquids) in
or around the vicinity of this appliance.
Installation and repair must be performed by a qualified service
agency.
Always check with local jurisdiction or code agency before installing
WARNING:
a fire may result causing property damage, personal injury or loss of
© 2004
1
TESTED BY:
WARNOCK HERSEY
FOR YOUR SAFETY
If the directions in this manual are not followed exactly,
MOBILE HOME APPROVED
COUNTRY FLAME
Advertisement
Table of Contents

Related Manuals for Country Flame LITTLE RASCAL LR-01


Summary of Contents for Country Flame LITTLE RASCAL LR-01
-
Page 1: Country Flame
COUNTRY FLAME TECHNOLOGIES INSTALLATION, OPERATION AND MAINTENANCE MANUAL LITTLE RASCAL PELLET FUEL STOVE FREESTANDING/FIREPLACE INSERT, MODEL LR-01 TESTED BY: USA & CANADA TEST: WARNOCK HERSEY ASTM E 1509-03, ULCS627-M90 ULCS628-M92, UL 1482, Oregon Administrative Rules 814-23-900 thru 909 MOBILE HOME APPROVED... -
Page 2: Table Of Contents
LITTLE RASCAL MODEL LR-01 PELLET FUEL STOVE TABLE OF CONTENTS Introduction Page 3 Safety Notes Page 4-6 Specifications Page 7 Operating Instructions Page 8-15 Description Page 8 Pre-Operation Notes Page 10 Intelli-Choice Control Panel Page 11 Lighting Procedure Page 16... -
Page 3: Introduction
On cold winter nights, your LR-01 will become a true friend and you’ll wonder how you ever got along without it. -
Page 4: Safety Notes
MAINTENANCE INFORMATION. PLEASE READ ALL OF THIS MANUAL AND SAFETY NOTES. The Country Flame LR-01 Pellet Stove is different from conventional wood burning appliances. It is very important that you read and understand all of the instructions before installing and using your Pellet Stove. - Page 5 21. INSTALL a smoke detector within the proximity of your pellet stove. 22. NEVER put foreign objects in the hopper. NEVER burn trash or unapproved material in your LR-01. 23. NEVER block free airflow through open vents. 24. The exhaust system should be checked twice a year (minimum) for any buildup of soot or creosote.
- Page 6 25. This unit’s exhaust system works with a negative combustion chamber pressure and a low positive flue pipe pressure. It is very important that the exhaust system be properly installed and air tight. The flue pipe joints should be sealed. Use high temperature RTV (500 F) (260 C) silicone sealant or aluminum flue tape and...
-
Page 7: Specifications
SPECIFICATIONS FUEL TYPE: A.P.F.I. residential fuel: Heat Content: 8200 BTU/lb. min. Bulk Density: 40 lb. /cubic ft. min. Moisture Content: 8% max Ash Content: 1% max Size: ¼” to 3/8” diameter 1.5” long max Fines: 1% max through 1/8 screen HOPPER SIZE: 55# Hopper Capacity FLUE SIZE: 3”... -
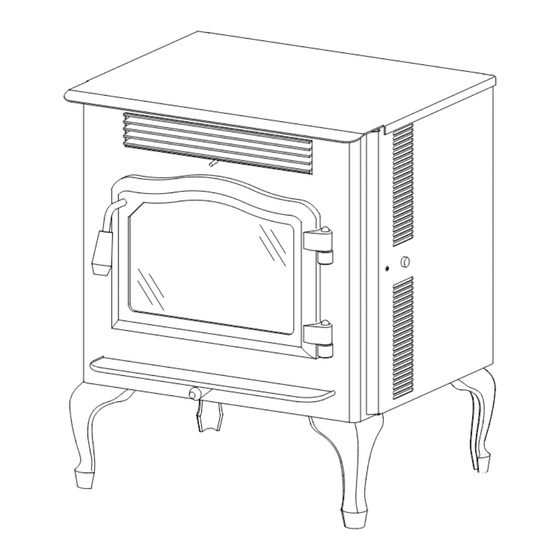
Page 8: Operating Instructions
DESCRIPTION The LR-01 Pellet Stove is designed to sit on a pedestal or legs as a freestanding unit or can be installed as in insert with the optional shroud and split lid. The basic stove unit without shroud or pedestal measures 22 3/4” high by 26” wide and 19 3/4” deep. - Page 9 1. Conditions that warrant more combustion air are: Hardwood pellets Higher altitudes Increased heat settings (3- 5) 2. Conditions that warrant less air: Softwood pellets Low altitudes Lower heat settings (2-3) 3. Conditions that warrant even less air: Softwood pellets Low altitudes Lower heat settings (1-2) Things to watch for:...
-
Page 10: Pre-Operation Notes
6. The first time the Country Flame pellet stove is fired up, a odor or smoke may emanate from the pellet stove. This is normal and should not last very long. Once the unit is “broken in”... - Page 11 This means that a purchase of today’s Country Flame product allows a customer to upgrade to newer and more advanced technology, as it becomes available while minimizing cost. Country Flame is committed to ensuring its customer base will remain a life long family member once the initial purchase of product is complete.
- Page 12 An AC heating element used to provide initial heat to the pellet combustion process. Once the Control Board senses combustion, the Igniter is shut off to conserve energy usage. A thermostat input is provided on the back of each Country Flame Thermostat (optional) product. The Control Board has individual personality modules that allow for stand-alone, semi automatic, or fully automatic thermostat operation.
-
Page 13: Intelli-Choice Control Panel
Below is a graphical display of the Country Flame Control Board front Panel. Each function of the Control Board is identified. Those control functions having secondary functions are identified with asterisks. The secondary functions will be explained in following paragraphs. - Page 14 At the same time, the rule of thumb is that each heat setting on the Country Flame line of Biomass Product starts at one pound of fuel per hour and increments to a top setting of five pounds of fuel per hour.
- Page 15 In order to utilize the full capabilities of the Control Board, the service technician should familiarize himself with the backside of the Control Board. The following diagram provides additional information about the major components of the Control Board’s backside. AC Transformer Converts 120VAC To 9.6VAC for Board operation.
-
Page 16: Lighting Procedure
9. There will be some odor as the paint cures when the stove is new. This is normal 10. You are now ready to enjoy your new Country Flame Pellet stove. 11. In the unlikely event that the ignition system should ever fail, you may use Starting Gel to light the pellets. -
Page 17: Shut System Down
SYSTEM SHUT DOWN Simply push the “ON/OFF” button and hold for 5 seconds until the lights on the heat settings start to flash from top to bottom. This designates the “cool down” cycle. The feed auger will shut off immediately and the blowers will shut down when the unit has cooled off sufficiently. The stove will remain in the cool down cycle until such time that the Intelli-Choice control board senses that all temperature sensors have returned back to their “normal”... -
Page 18: Maintenance
MAINTENANCE 1. If pellets contain a large amount of “fines” (foreign matter or sawdust), you will need to clean the heat exchanger area for buildup often to determine if any maintenance is needed. You may want to screen pellets before use if they contain a large number of “fines.” 2. - Page 19 Corning Pyroceram II, or a similar ceramic type high temp glass. Do not use any other glass type in this unit. Replacement glass may be obtained from a Country Flame Dealer. 15. Use care not to slam or strike the door as this could result in glass breakage. If the glass in a pellet stove is broke or cracked, DO NOT operate the unit until the ceramic glass has been replaced.
-
Page 20: Installation Instructions
Read all instructions carefully before starting installation. Failure to follow these installation instructions may result in a possible fire hazard and will void the Country Flame warranty. 1. Look at the label on the back of your unit to find the serial number. Write the serial number of the unit on the Table of Contents page immediately. -
Page 21: Free Standing Unit Positioning
WARNING: ALL combustibles in front of a LR-01 must be kept a minimum of at least 48” (120cm) from the unit. Remember that combustible vapors can travel a long distance. -
Page 22: Venting
1. After positioning the Little Rascal in its final position, proper flue venting must be installed according to local and national codes. The LR-01 is a rear vented unit and flue vent pipe can be run directly from the rear of the unit. Proper venting can be achieved by installing 3” TYPE PL double wall vent pipe according to code requirements. - Page 23 6. The LR-01 is designed to accept installations using a horizontal vent through an exterior wall. A horizontal flue pipe installation should be a minimum of 24” from pellet stove vent pipe to flue cap connection. FIGURE 1 shows a through the wall exterior vent installation.
- Page 24 8. For installations that pass through a vertical wall and not through the roof, Country Flame recommends an installation similar to the one shown in FIGURE 3. Dimension A should be a minimum of 16” and dimension B should be a minimum of 3”. Any outside vent should have a vertical run of at least 5’.
- Page 25 INSTALLATION / FREESTANDING UNIT / DETAIL The flue vent exit shall be located not less than 48” from any opening through which exhaust could enter the building, (i.e. windows and doors), and not less than 24” from adjacent public walkways. It shall be arranged so that flue gases are not directed in such a way as to pose a health hazard, overheat combustible structures or enter any building.
-
Page 26: Details
INSTALLATION / FREESTANDING UNIT / DETAILS LEG INSTALLATION / FREESTANDING UNIT / DETAILS 1. Locate the eight (8) bolts in the package that comes with the leg kit. 2. Bolt the four (4) legs to the bottom of the pellet stove using two bolts per leg for a total of eight (8) bolts through the holes provided at the bottom corner of each unit. -
Page 27: Insert Unit Positioning
INSTALLATION / INSERT UNIT / POSITIONING 1. The LR-01 insert is designed to be inserted into an existing masonry fireplace or zero clearance box. The suitability of the existing firebox needs to be determined. You should insure that the heater is kept out of any traffic paths in the room, away from curtains, drapes or any other combustibles. -
Page 28: Venting
INSTALLATION / INSERT UNIT / VENTING 1. The LR-01 is designed for both new installations and as an insert into existing fireplaces. The LR-01 is NOT designed to be installed without proper vent pipe. Proper venting can be achieved by installing a 3” (less than ten feet) or 4” (more than ten feet) TYPE PL double wall vent pipe or listed TYPE “L”... - Page 29 FIGURE 9, Item A shows another method of installing an LR-01 pellet stove. The flue pipe is extended a minimum of 18” past an existing damper with a seal plate installed at or above the damper. Although this is an approved method of installation, Country Flame strongly recommends that all...
-
Page 30: Details
2. The LR-01 is designed to be inserted into a minimum 16” deep firebox. If the depth is greater than 16” this will only provide additional room but if the depth is less than 16” then a hearth extension may be required. -
Page 31: Mobile Home Venting Standards
INSTALLATION / MOBILE HOME STANDARDS 1. Mobile home code requires the pellet stove be bolted to the floor regardless of whether it has legs or is mounted on its optional pedestal. 2. A pellet stove must be electrically grounded to the steel frame of the mobile home. 3. -
Page 32: Electrical/Schematic
ELECTRICAL INFORMATION 1. When an electrical power line and outlet needs to be installed, all electrical installations must be code compliant. In the absence of any local codes, the National Electrical Code ANS2 / NFPA 70-1987 apply. 2. The Little Rascal is equipped with a three prong (grounded) plug. The pellet stove will not operate properly in a non-compliant improperly grounded electrical outlet. -
Page 33: Plates & Tags
HEATER COMPONENTS: PLATES AND TAGS A safety label is shown in FIGURE 14 for informational purposes. Refer to the back of a LR-01 pellet stove for the actual safety label. Illustrations are artist renderings and the actual label on a product may vary slightly in information and design. - Page 34 Keep the hopper lid closed during operation. 4. There are electrical warning labels inside the LR-01 that inform the consumer that before any electrical service is attempted on a unit, disconnect the unit from the source power before servicing.
-
Page 35: Warranty
(30) days subsequent to the date of purchase. 4. Remedies in the Event of Failure. In the event a Model LR-01 Pellet Stove Heater or Insert fails to perform as warranted, the following terms and conditions will apply: Heating Unit. - Page 36 Country Flame is not liable for any of them. 5. Limit on Damages. In no event shall Country Flame be liable for damage to property, lost profits, injury to goodwill, or any other special, incidental or consequential damages resulting from any defective Model LR-01 Pellet Stove Heater and Insert or any breach of the above express warranties.
- Page 37 Model No. Serial Number The express warranties made by Country Flame Technologies do not apply unless this card is returned to Country Flame Technologies by the original retail purchaser no later than thirty (30) days from date of retail purchase.
Need help?
Do you have a question about the LITTLE RASCAL LR-01 and is the answer not in the manual?
Questions and answers