
Related Manuals for Zanussi ZWT 3001


Summary of Contents for Zanussi ZWT 3001
- Page 1 ZANUSSI WASCHAUTOMAT WASHINGѝMACHINE ZWTѝ3201 ZWTѝ3001ѝ GEBRAUCHSANWEISUNG INSTRUCTIONSѝMANUAL 146ѝ8017ѝ00ѝ-ѝ02/05...
-
Page 2: Table Of Contents
CONTENTS FOR THE USER ..........18 FOR THE INSTALLER ........28 Warnings ............28 Warnings............18 Usage ............18 Precautions against frost ......18 Technical characteristics ......28 Scrapping ..........18 Protection of the environment ....18 Installation ........... 29 Unpacking ..........29 Washing machine description ....19 Position ............ -
Page 3: For The User
A. FOR THE USER 1. WARNINGS Keep this user’s manual with your washing machine. If you sell your washing machine or give it away, make sure that it is accompanied by its user’s manual. The new user can then be informed of how the washing machine operates and read relevant warnings. -
Page 4: Washing Machine Description
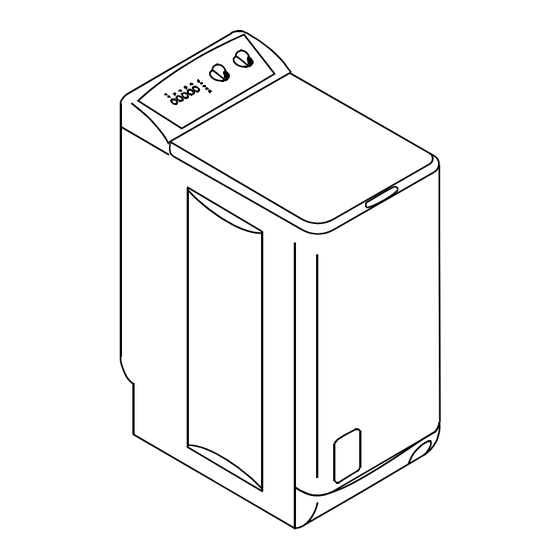
2. WASHING MACHINE DESCRIPTION 1 - Control panel 2 - Lid opening handle 3 - Leveling screws 4 - Filter door 5 - Lever for moving the washing machine 2.1. The detergents dispenser Symbols 1 - prewash 3 - softener (do not exceed the MAX mark) 2 - wash 4 - softener overflow (if overfilled) -
Page 5: How To Do A Wash
3. HOW TO DO A WASH ? 3.4. Choice of the spinning speed Before the first wash in your washing machine, we re- The maximum spin speed is de- commend that you should do a preliminary wash at fined as a function of the type of 90°C with detergent but without any washing to clean washing and depending on the the tub. -
Page 6: Starting The Programme
3.6. Starting the programme Turn the programme selector knob to the "Off" position. Take out the laundry. Pull out the power supply plug and close the water sup- After you chose the washing programme, ply tap. press the Start/Pause pushbutton to start the cycle. -
Page 7: Programs Table
4. PROGRAMS TABLE The following does not show all possibilities, but simply the most frequent settings. Program Load Possible Tempe- Approximate Washing type options ra-tures consumptions °C liters Cotton 5,0 kg 2,10 140-150 White or color, for exam- 1,30 120-130 ple normally dirty work 0,65 115-125... -
Page 8: Washing Guide
5. WASHING GUIDE 5.3. Detergents and additives Only use detergents and additives suitable for use in a 5.1. Sorting and preparing your washing machine. Read the manufacturer's instructions and respect sections 2.1 and 3.2. washing Powder detergents can be used without restriction; liquid •... -
Page 9: International Symbols For Care Of Textiles
5.4. International symbols for care of textiles NORMAL WASH Wash at Wash at Wash at Wash at 95°C 60°C 40°C 30°C Delicate Do not wash wash by DELICATE hand WASH JAVEL WATER Bleaching with chlorine (Javel water) allowed Do not bleach with chlorine (Javel water) (only cold and with a dilute solution) IRONING High temperature... -
Page 10: Care And Cleaning
6. CARE AND CLEANING 6.4. The drain filter Clean the filter at the bottom of the washing machine regu- Do not do any cleaning operation until you have unplugged larly. The "filter" light comes on if the filter is blo-cked. In the washing machine. -
Page 11: Operating Problems
7. OPERATING PROBLEMS Many checks have been carried out during the manufacture of your washing machine. However, if you face a problem with its operation, please read the following sections before calling the After Sales service. Symptom Cause The washing machine will not start or will not fill: •... -
Page 12: Guarantee
Symptom Cause The « »* light** is not on at the • the drum could not reach the right position due to a persis- DRUM POSITIONNING end of the cycle: tent unbalanced mass; turn the drum manually. The «End»* light flashes 4 times •... -
Page 13: For The Installer
B. FOR THE INSTALLER 1. WARNINGS • Please read the instructions in the "electrical connec- • This washing machine is heavy. Take care when tions" chapter carefully before connecting your moving it. washing machine. • You must remove the packing on the washing machine •... -
Page 14: Installation
3. INSTALLATION If you want to keep your washing machine aligned with the adjacent 3.1. Unpacking furniture, you can cut the pipe sup- port strip at the back of your Packing used to protect internal parts of the washing machine. Leave the two washing machine during transport must be side closers in place. -
Page 15: Water Inlet
4. Water inlet Please install the water inlet hose onto the back of your washing machine: - Insert the seal in the hole at the bottom of the back panel (fig. 1). - Screw on the bottom fitting of the water inlet hose as shown in fig. - Page 16 From the Electrolux Group. The world’s No.1 Choice. The Electrolux Group is the world largest producer of powered appliances for kitchen, cleaning and outdoor use. More than 55 million Electrolux Group products (such as refrigerators, cookers, washing machines, vaccum cleaners, chain saws and lawn mowers) are sold each year to a value of approx. USD 14 billion in more than 150 countries around the world.
Need help?
Do you have a question about the ZWT 3001 and is the answer not in the manual?
Questions and answers