Table of Contents
Advertisement
Quick Links
Advertisement
Table of Contents

Related Manuals for Sharp FX PLUS Series


Summary of Contents for Sharp FX PLUS Series
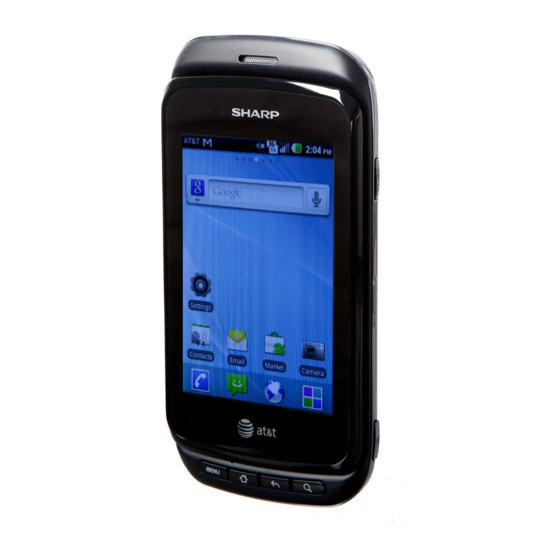
- Page 2 From its unique, stylish design and best-in-class QWERTY keyboard to features like its bright 3.2” HVGA touch screen, Android Operating System, and Wi-Fi connectivity, we know you will enjoy the entire Sharp FX PLUS experience. This User Guide contains important and useful information that will familiarize...
-
Page 3: Conventions Used In This Guide
How Does it Work? The earSmart voice processor in your Sharp FX PLUS captures your voice and all the sounds around you. Working like the human ear, it processes and distinguishes these sounds, isolates your voice conversation, and removes background noise –... -
Page 4: Table Of Contents
Contents Specifications ..........................7 Basics ............................. 8 In Box .......................................8 Phone Overview ..................................8 Proper Holding Position................................9 Battery ....................................10 SIM Card ....................................11 MicroSD Card ..................................12 Turning Phone On or Off .................................13 Phone Options ..................................13 Entering Your PIN ..................................13 Finger Gestures ..................................14 Keyboard ............................ - Page 5 Communicating ..................................48 Account Setting ..................................49 Groups ....................................50 Messaging ............................ 52 About Messaging ...................................52 Sending Messages ..................................52 Reading Messages ..................................54 Changing Messaging Settings ..............................55 Google ............................56 Gmail ......................................56 Google Talk .....................................59 Maps .......................................62 Places .....................................65 Navigation ....................................66 Latitude ....................................68 Calendar ....................................70 News &...
- Page 6 YPmobile ....................................106 Live TV ....................................106 myAT&T ....................................107 AT&T Code Scanner ................................107 Settings ............................108 Settings on Your Phone ................................108 Tethering/Dial-up Networking ....................112 USB Tethering for Windows Computer ..........................112 USB Networking for Mac® ..............................113 Safety Information ........................117 Safety Information for Wireless Handheld Phones .......................117 Hearing AID Compatibility with Mobile Phones ........................119 Safety Information for FCC RF Exposure ..........................119 SAR Information ...................................120...
-
Page 7: Specifications
Specifications Display 3.2” HVGA (480x320 Pixels) Camera 3.0 Mega Pixel Auto Focus Size and Weight Size: 4.72 x 2.36 x 0.55 inch Weight: 5.29 oz Memory 512MB (NAND Flash)/512MB (DDR SDRAM) External 2GB microSD Card Operating Frequencies Networks: GSM/GPRS/EDGE (850/900/1800/1900 MHz) UMTS/HSDPA(850/1900/2100 MHz) Wi-Fi(802.11 b/g/n) (802.11n 2.4GHz only) Data speed: Up To HSDPA 7.2Mbps... -
Page 8: Basics
Basics In Box The Sharp FX PLUS comes with the following items included in the box: FX PLUS Mobile Phone Battery Micro USB cable USB Power adapter Quick start guide Safety & Warranty Guide 2GB microSD card (mounted in the device) -
Page 9: Proper Holding Position
QWERTY Keyboard Overview Your phone has a QWERTY keyboard which provides a superior typing experience for easy and comfortable texting. You can use all the phone functions from the QWERTY keyboard. 1. Function key 6. A-Z 2. Shift key 7. Delete key 3. -
Page 10: Battery
Bluetooth when not required. Installing the battery Please use only the original batteries and accessories you received with your phone or Sharp recommended replacements. 1. Remove the battery cover by sliding it down. 2. Align the battery’s exposed gold contacts with the battery connectors inside the battery compartment. -
Page 11: Sim Card
4. Slide the SIM card completely into the slot. 5. Replace the battery and battery cover. NOTE Only AT&T SIM cards can work with the Sharp FX PLUS. Removing the SIM card 1. Make sure that your device is turned off, then remove the battery cover. -
Page 12: Microsd Card
MicroSD Card Use the microSD card to store your photos, videos, music and some memory card enabled Android applications. You can also move and copy files to your computer from your device. Inserting the microSD card 1. Remove the battery cover. 2. -
Page 13: Turning Phone On Or Off
Turning Phone On or Off Turning your phone on 1. Press and hold Power/Lock. NOTE The first time you use your phone you’ll need to set it up. See the Getting Started chapter for details. Turning your phone off 1. If the display is off, press any of the 4 buttons on the front of the phone or Power/Lock to turn it back on. -
Page 14: Finger Gestures
Finger Gestures To select onscreen items such as application and settings icons or press onscreen buttons, simply touch them with your finger. Tap and hold To open available options for the item, simply touch and hold your finger on the screen over the item. Swipe or slide Quickly drag your finger vertically or horizontally across the screen. -
Page 15: Keyboard
Using the QWERTY Keyboard Your device has a specially designed QWERTY keyboard that provides a superior, easy, and comfortable typing experience on the Sharp FX PLUS. (Function key) To type the number or symbol printed on the keys in blue, hold down the key and press one or more letter keys. -
Page 16: Using The Onscreen Keyboard
Swype Android keyboard. Remember, the Sharp FX PLUS has a built-in QWERTY keyboard, which you can use for all phone functions. NOTE You can change all keyboard settings including User dictionary through the settings menu. From the Home screen, tap Apps >... -
Page 17: Changing The Keyboard Language
3. Use to erase characters to the left of the cursor. 4. When you’ve finished typing, press Back to close the keyboard. To enter numbers, symbols, and other characters To switch to the numeric keyboard. To view additional symbols, tap it again to switch back. on the numeric keyboard Tap and hold a vowel or the C, N, or S key To open a pop up menu to select an accented vowel or other alternate letter. -
Page 18: Using Swype Text Entry Method
3.Tap Voice input. 4. Tap the option for where you want to use (On main keyboard On symbols keyboard). Or tap Off to turn off voice input. Entering text by speaking You can enter text by speaking, in most places that you can enter text with the Android keyboard. 1. - Page 19 good : To enter a double letter within a word, make a small circle on the letter. 123... : To enter characters on the upper half of the key, tap and hold the key. When the character list appears, you can enter special characters, symbols, and numbers.
- Page 20 Adding, Editing or Deleting Words in the User Dictionary Sometimes you may need to add a word to the predictive text dictionary, for example a name or a specialized technical word. If you want to add a word to your User dictionary while entering text, double tap the word to highlight it, then tap and hold the word and select Add ** to dictionary.
-
Page 21: Editing Text
Editing Text You can select, copy or cut the text you’ve entered, then paste it in another text field within the user interface. NOTE Some applications may offer different text editing methods. Selecting text 1. Tap the text field. 2. Move the cursor to the beginning or end of the desired text by tapping in the location you want the cursor. 3. -
Page 22: Getting Started
Getting Started Google Account You must sign in to a Google account to use Gmail, Google Calendar, and other Google applications; to download applications from Android Market; to back up your settings to Google servers; and to take advantage of other Google services on your phone. - Page 23 > Tap Sign in > Finish. The Sharp FX PLUS supports multiple Google accounts. If you have the same contact across multiple Google accounts, you can merge duplicates into a single item in the contact list. Removing a Google account 1.
-
Page 24: Getting To Know The Home Screen
Getting to Know the Home Screen The Home screen is displayed when the device is in idle mode. You can add your favorite apps, shortcuts, folders and widgets to the Home screen so they’re only a tap away. The Home screen is actually seven separate screens. Slide your finger the left or right and you’ll discover more space to add icons, widgets, and more. -
Page 25: Customizing The Home Screen
Widgets Clock, Facebook, Google Search, Home screen tips, Latitude, Mail, Market, Message, Music Player, News & Weather, Picture frame, Power Control, Rate Places, Sharp cal., Sharp clock, Twitter(large), Twitter(small), Weather and YouTube. If you create a new folder, you can drag icons into the folder to organize them. -
Page 26: Essential Display Icons
Renaming a folder 1. Tap the folder to open it. 2. Tap and hold the title bar of the folder window. 3. Enter a new name in the dialog box that appears, and then tap OK. Essential Display Icons Status icons You can tell a lot about your phone when you understand the icons in the Status bar. - Page 27 Notification icons Notification icons in the Status bar alert you to items that may require your attention such as new messages, calendar event reminders, missed call notifications, etc. Here’s what each one means: Call in progress Downloading data Call using a Bluetooth headset Uploading data (animated) Call on hold General Alert Icon...
-
Page 28: Notifications Panel
Notifications Panel When you receive a new notification, an icon will be displayed in your status bar at the top of your screen. Viewing and responding to Notifications 1. Tap and hold Status bar, and then slide your finger downward to open the Notifications panel. 2. -
Page 29: Opening And Switching Between Applications
Opening and Switching Between Applications The Launcher, which you open from the Home screen, shows the icons of all installed applications on your phone. Opening and closing the Launcher 1. To open, from the Home screen, tap Apps. 2. To close, press Home Back. -
Page 30: Sleep Mode
Sleep Mode Sleep mode saves battery power by turning off your display. You will still receive messages and calls when the display is turned off. Switching to Sleep mode Press Power/Lock to switch your phone to Sleep mode. Your phone automatically turns off the display after a period of inactivity. To customize the screen timeout settings, from the Home screen, tap Apps >... -
Page 31: Adjusting Volume
Adjusting Volume Ringtone and Media volume are independent of each other and adjusted separately. Adjusting the ringer volume From the Home screen, press Volume up Volume down on the left side of the phone to adjust the ringer volume to your desired level. While in the lowest ringer volume level, press Volume down once to set your phone to Vibrate mode. -
Page 32: Searching Your Phone And The Web
Searching Your Phone and the Web The search key is a powerful part of the Sharp FX PLUS’s software and enables you to quickly locate files, contacts, and applications. You can also search the web using your favorite web search service. -
Page 33: Connecting Your Phone To A Computer
Connecting Your Phone to a Computer Copying files to/from the microSD card You can copy your music, photos, and other files to the microSD card of your phone. NOTE storage mode prevents you from using applications that access the memory card. 1. -
Page 34: Phone Calls
Phone Calls Making Calls The simplest way to make a call is to dial the number directly. You can also call numbers listed in your call log or Contacts list. Making a call from the dialer screen 1. From the Home screen, tap Phone. - Page 35 Calling a number from the Call log Your phone logs all incoming and outgoing calls. 1. From the Home screen, tap Phone > Call log. Or tap Apps > Contacts > Call log. 2. Tap at the right of any entry to dial. Calls are listed with the most recent at the top.
-
Page 36: Answering Or Rejecting Calls
Answering or Rejecting Calls When you receive a phone call, the screen displays the caller’s name, phone number, and caller ID icon (if stored in Contacts). When you receive a phone call from a phone number not stored in your Contacts, only the default caller ID icon and phone number are shown. -
Page 37: Using In-Call Options
Using In-Call Options When a call is in progress, the following options are available: Bluetooth When a Bluetooth device is paired and connected to your phone, you can conduct all calls using Bluetooth for hands-free conversation. When using Bluetooth headset during a call, the current call screen has a blue border and the Ongoing Call icon turns blue in the Status bar. -
Page 38: Managing Multiple Calls
Managing Multiple Calls Your Sharp FX PLUS supports conference or multi-party calling. You can switch back and forth between 2 or more active calls, or join multiple calls together. Switching between calls If you have an active call and a call on hold, you may switch between the two calls. -
Page 39: Using Call Log
Releasing a participant 1. During the conference call, tap Manage. 2. Tap at the left of desired participant. Or, tap at the right of desired participant > Tap Ending the entire conference call 1. During the conference call, tap Using Call Log The phone stores the numbers of all incoming and outgoing calls in the Call log. - Page 40 Adding a phone number from your Call log to your the Contacts lists 1. From the Home screen, tap Phone > Call log. 2. Tap and hold the desired entry > Add to contacts. 3. In the list of contacts that opens, tap Create new contact or add to an existing contact.
-
Page 41: Listening To Your Voicemail
Listening to Your Voicemail When you have a new voicemail message, appears in the Status bar. If you have not set up your voicemail number, or if you need to change it, you will need to set it up using the Call settings menu. Entering your voicemail number 1. -
Page 42: Contacts
Contacts About Contacts Contacts give you quick and easy access to the people you want to reach. When you first turn on your phone and sign into your AT&T Address Book Account, any existing AT&T Address Book contacts are downloaded to your phone. Contacts from Google accounts are also downloaded and synced with the Contact list. - Page 43 In just a few moments your AT&T Address Book will be ready for use. Adding a new contact 1. From the Home screen, tap Apps > Contacts. 2. Press Menu > contact. 3. If you have more than one account, select an account, then enter the information for the contact. >...
- Page 44 Sharing visible contacts 1. From the Home screen, tap Apps > Contacts. 2. Press Menu > Import/Export. 3. Tap Share visible contacts > Select Bluetooth, Gmail Messaging. Copying contacts to the SIM card 1. From the Home screen, tap Apps >...
- Page 45 Viewing details about a contact 1. From the Home screen, tap Apps > Contacts. 2. Tap the contact whose details you want to view. 3. Tap the communication icon to start dialing, texting, or emailing the contact. Tap to open Quick Contact. Add to favorites : Tap the star to add a contact to the favorites list, indicated by a gold star.
-
Page 46: Editing/ Deleting Contacts
Adding ICE (In Case of Emergency) contacts 1. From the Home screen, tap Apps > Contacts. 2. Tap Groups > ICE. 3. Press Menu > New contact Select contacts. New contact : Enter a new contact for the ICE menu. Select contacts : Select ICE contacts from your contact list. - Page 47 Setting a ringtone for a contact 1. From the Home screen, tap Apps > Contacts. 2. Tap the desired contact. 3. Press Menu > Options > Ringtone. Tap a ringtone from the list to play when the contact calls. A sample of the ringtone is played. 4.
-
Page 48: Communicating
Communicating Sending text message 1. From the Home screen, tap Apps > Contacts. 2. Tap and hold the contact you want to send > Text contact. The Primary Phone Number is used, or you are prompted to choose a phone number. Making calls 1. -
Page 49: Account Setting
Account Setting Working with Google and AT&T Address Book accounts 1. From the Home screen, tap Apps > Contacts. 2. Press Menu > More > Accounts. After registering your Google account, your online Google contacts are synchronized to your phone. Changes made online or on the phone are automatically synchronized and updated in both locations. -
Page 50: Groups
Groups Assign contacts to groups to easily send a message or email to a whole group. You can also sync groups on your phone with your Google groups, which are accessible via the web browser of your computer. Viewing contact groups 1. -
Page 51: Renaming A Group
Sending a group message NOTE Group messages are billed according to the number of messages sent to each individual group member. Meaning a single message sent to a group of 5 people will be billed as 5 messages. 1. From the Home screen, tap Apps >... -
Page 52: Messaging
Messaging About Messaging Use Messaging to send text messages (SMS) and multimedia messages (MMS) to other mobile phones. 1. From the Home screen, tap Messaging. Or tap Apps > Messaging On the Messaging screen, your sent and received messages are neatly grouped into conversations, by contact names or phone number. - Page 53 Sending a multimedia message (MMS) To compose a multimedia message, start by creating a new text message. Then simply add an attachment. 1. From the Home screen, tap Messaging. 2. Tap message. Or press Menu > Compose. 3. Enter the phone number in the field.
-
Page 54: Reading Messages
Reading Messages 1. From the Home screen, tap Messaging. 2. Tap a message thread. 3. Tap and hold an individual message to see more options. Lock/Unlock message To lock/unlock a message. Call *** To call the message sender. (Only on incoming messages) Send message to *** To reply back to the sender. -
Page 55: Changing Messaging Settings
Changing Messaging Settings 1. From the Home screen, tap Messaging. 2. Press Menu > Settings. Storage settings Delete old messages Check to delete older messages in a thread when messaging memory or thread limits are reached. Uncheck to keep all messages. You may need to manually delete messages if the messaging memory limit is reached. -
Page 56: Google
Google Gmail Opening your Inbox and Reading your Gmail The inbox is your default Gmail view. All your received emails are delivered to your inbox. 1. From the Home screen, tap Apps > Gmail. 2. Tap the email you want to read. to star the email. - Page 57 Working with Multiple Email Messages You can archive, delete or label groups of email messages at the same time. 1. From the Home screen, tap Apps > Gmail. 2. From any message list, check the box next to the email messages you want to work with. Archive to move messages out of your inbox without deleting.
-
Page 58: Gmail Settings
Starring/un-starring an email message You can star an important email to make it easy to find again. Starred emails are assigned the Starred labels. 1. From the Home screen, tap Apps > Gmail. 2. From any message list, to star a message. to un-star a message. -
Page 59: Google Talk
Google Talk Use Google Talk to send instant messages to other Google Talk users anywhere they are logged in. Signing in or out of Talk Opening Talk and Signing in 1. From the Home screen, tap Apps > Talk. When you first open Talk, your Friends list is displayed. NOTE: When you first turn on your phone and sign in to your Google Account, you are automatically signed in to Google Talk. -
Page 60: Chatting With Friends
Accepting chat invitations When you are added to a friend’s Talk contact list, you will receive a notification and an invitation appears in your Friends list. 1. From the Home screen, tap Apps > Talk. 2. From the Talk Friends list, tap Chat invitation. - Page 61 Switching between active chats You can switch between multiple active chats. 1. When you’re chatting with a friend, Press Menu > Switch chats > tap the desired active chat. Or swipe left or right across the screen to switch between chats. Ending your current chat 1.
-
Page 62: Maps
Maps Use Maps to find your current location and get directions. You can search for addresses, landmarks and businesses directly on a street map or satellite image. NOTE You need an active mobile data or Wi-Fi connection to use Maps. To see your location and get directions, you must turn on location services. - Page 63 Starring or un-starring a location Add a Star to bookmark and easily return to a map location. 1. While viewing detail information for a location, to star the location. to un-star the location. Viewing starred places Once you star a place, you can easily find it again on the phone or the web. 1.
- Page 64 Viewing map layers Initially, Google Maps opens with a street map. You can view additional map layers, such as satellite images and traffic information. You can also view custom Web created Google Maps. 1. From the Home screen, tap Apps >...
-
Page 65: Places
Places Use Google Places to explore your current location. NOTE You need an active mobile data or Wi-Fi connection to use Places. To see your location and get directions, you must turn on location services. From the Home screen, tap Apps >... -
Page 66: Navigation
Navigation Navigation is an internet-connected GPS navigation system with voice guidance. Navigation provides both spoken and on-screen turn-by-turn driving directions. NOTE You need an active mobile data or Wi-Fi connection to use Navigation. To see your location and get directions, you must turn on location services. From the Home screen, tap Apps >... - Page 67 Changing views of your route You can view your progress on your route as a map with different informational layers. Zoom in and out or drag to view adjacent areas. You can also view your progress in Satellite or Street View. 1.
-
Page 68: Latitude
Latitude Latitude allows you to share your location with friends and view their locations on a map. Your location is not shared automatically. You must join Latitude, and then invite your friends to view your location or accept their invitations. Only friends that you have explicitly invited or accepted can see your location. NOTE You need an active mobile data or Wi-Fi connection to use Latitude. -
Page 69: Privacy Settings
Viewing friends’ locations and managing friends You can view your friends’ locations on a map or in a list. When you open Latitude, you are shown list of your Latitude friends with location summaries. When you open Maps, your friends’ locations are shown. Each friend is represented by a photo and arrow indicating their approximate location. -
Page 70: Calendar
Calendar The Calendar application data on your phone syncs with the web-based Google Calendar service. It is also compatible with Microsoft Exchange ActiveSync Calendar. Opening Calendar 1. From the Home screen, tap Apps > Calendar. Events are color coded to enable you to distinguish between multiple calendars. The Calendar application indicates the current time with a red marker. - Page 71 Viewing calendar and events Changing calendar view When you open Calendar, Month view is shown by default. You can also view the Calendar by Agenda, Day, or Week. 1. From the Home screen, tap Apps > Calendar. 2. Press Menu >...
-
Page 72: Changing Calendar Settings
Changing Calendar settings 1. From the Home screen, tap Apps > Calendar. 2. Press Menu > More > Settings. Or press Menu at the same time. Calendar view setting Hide declined events Check if you don’t want to see events to which you’ve declined invitations. Reminder settings Set alerts &... -
Page 73: News & Weather
News & Weather The News & Weather application offers updates on current events and local weather forecasts. Viewing the weather information 1. From the Home screen, tap Apps > News & Weather. 2. Tap Weather at the top of the screen. Or flick left across the screen to switch to Weather view. 3. -
Page 74: Market
Market Android Market provides direct access to applications and games to download and install on your phone. To access Market, you must first sign into your Google account using a WiFi or data connection. Paid apps are currently only available in certain countries. When you open Android Market for the first time, you must read and accept the terms of service to continue. -
Page 75: Managing Your Downloads
Creating a Google Checkout account You must have a Google Checkout account to purchase items from Android Market. You can set up a Checkout account with your first purchase from the Android Market. In a web browser, go to http://checkout.google.com to establish a Google Checkout account. From the phone, you will be prompted to enter your billing and credit card information when you buy your first application from the Google Market. -
Page 76: Web
Email The Email application is used to read and send email from services other than Gmail. The Email application includes a wizard enabling easy setup for several popular email service providers. Email Account Setup Initial Setup 1. From the Home screen, tap Email. -
Page 77: Reading An Email
Reading an email You can read messages in your Combined Inbox or individual account folders. 1. From the Home screen, tap Email. Press Menu to see more options. 2. Tap an email you want to read. Press to see more options. Menu Replying to a message 1. - Page 78 Starring/un-starring an Email You can star an important message find it easily later. Once you star a message, a Starred folder is added to the Accounts screen. 1. From any email list or while reading a message, to star the message. to un-star.
-
Page 79: Browser
Browser Search for information or browse web pages using the browser. To access the internet, you must have an active data or Wi-Fi connection. Opening Browser 1. From the Home screen, tap Browser. Or tap Apps > Browser When you open the Browser, the default homepage is displayed. If you have used the Browser recently, your most recently viewed web page is displayed. - Page 80 Finding the text on the current page 1. While viewing any webpage, press Menu > More > Find on page. Or press Menu at the same time. 2. Enter the search term. As you type, matching characters will be highlighted. Tap to scroll to the previous or next matching term.
-
Page 81: Using Bookmarks
NOTE You can have up to 8 browser windows open at one time. Using bookmarks Browser bookmarks are stored shortcuts which allow you to quickly access a webpage without having to type in its full address. Bookmarking a webpage 1. While viewing a webpage, press Menu >... - Page 82 Privacy settings Clear cache Delete temporary files. Clear history Delete the history of webpages you visited. Accept cookies Allow sites to save and read cookie data. Clear all cookie data Delete all cookie data. Remember form data Remember what you enter in form fields. Clear form data Delete all the information the browser remembered.
-
Page 83: Youtube
YouTube YouTube is Google’s online video streaming service for viewing, discovering, and sharing videos. Opening and signing into YouTube Signing into YouTube You can discover and watch YouTube videos without a YouTube account, but if you want to take advantage of many YouTube features, you must sign into your YouTube account. -
Page 84: Watching Videos
Watching videos 1. From the Home screen, tap Apps > YouTube. 2. Tap a video begin playback. Tap the video to pause or resume playback. Tap Info, Related videos Comments to learn more about the video. Rotate your phone to watch the video in full-screen view. You can also double-tap the video to toggle full-screen view on and off. - Page 85 YouTube settings You can change the following settings for YouTube on your phone. 1. From the Home screen, tap Apps > YouTube. 2. Press Menu > Settings. General settings High quality on mobile Check if you prefer to watch videos in high resolution by default when connected to mobile networks.
-
Page 86: Facebook
Facebook The first time you launch the Facebook application, you must agree to the End User License Agreement. 1. From the Home screen, tap Apps > Facebook. 2. If you already have a Facebook account, enter your Email and Password > Login. If you do not have a Facebook account, tap Sign up to create one. -
Page 87: Wi-Fi
Wi-Fi Turning Wi-Fi on and connecting to a wireless network 1. From the Home screen, tap Apps > Settings. 2. Tap Wireless & networks > Wi-Fi settings. 3. Select the Wi-Fi check box to turn Wi-Fi on. 4. The network names and security settings of detected Wi-Fi networks are displayed. 5. -
Page 88: Bluetooth
Bluetooth Using Bluetooth Bluetooth is a short-range wireless communications technology that devices can use to exchange information over a distance of about 30 feet. The most common Bluetooth devices are headphones, hands-free car kits, and portable devices, including laptops and cell phones. Turning Bluetooth on or off... -
Page 89: Disconnecting Or Unpairing From A Bluetooth Device
Disconnecting or Unpairing from a Bluetooth Device Disconnecting a Bluetooth device 1. From the Home screen, tap Apps > Settings. 2. Tap Wireless & networks > Bluetooth settings. 3. In the Bluetooth devices section, tap and hold the device name to disconnect. 4. -
Page 90: Sending And Receiving Information Using Bluetooth
Sending and Receiving Information Using Bluetooth You can use Bluetooth to transfer information between your phone and another Bluetooth-enabled device such as a phone or laptop computer. You can send the following types of information, depending on the device you are sending to: Images and videos Contacts Audio files... -
Page 91: Entertainment
Entertainment Camera/Camcorder You can take pictures and shoot videos with Camera/Camcorder. Photos and videos captured with the camera will be stored on the phone’s microSD card. A microSD card must be installed to use the Camera/Camcorder. Opening Camera From the Home screen, tap Apps >... -
Page 92: Opening Camcorder
Taking a picture 1. From the Home screen, tap Apps > Camera. 2. Frame your subject on screen. Press Camera or tap . The camera brings the image into focus. When the image is in focus, the camera takes a picture. -
Page 93: Gallery
Gallery Use Gallery to view your pictures and videos. You can edit and add effects to your photos. You can also easily add a photo as your contact icon, location icon, or wallpaper. Opening Gallery and viewing album lists Opening Gallery From the Home screen, tap Apps >... -
Page 94: Viewing Pictures
The controls available depend on the mix of selected items. Viewing pictures Viewing a picture 1. From the Home screen, tap Apps > Gallery. 2. Tap the album you want to open, and then tap a thumbnail image of picture to view it. Swipe left or right across the screen to view the previous or next picture in the album. -
Page 95: Videos
Videos Opening Videos and viewing video lists Use the Videos application to play videos that you’ve recorded with the Camcorder, downloaded from the web, or copied onto your microSD card. From the Home screen, tap Apps > Videos. Your video list is displayed. If you tap and hold the file, you can select to play or delete it. Playing videos 1. -
Page 96: Music Player
Music Player Play music and audio files with Music Player. NOTE You need to copy music files to your microSD card to use the Music Player. Viewing your music library 1. From the Home screen, tap > Music Player. Apps 2. -
Page 97: Working With Playlists
Playing music 1. From the Home screen, tap Apps > Music Player. 2. Drag the tabs at the top of the screen, and then tap the library you want to open. 3. Tap a song or p ress Menu > Tap Play all mode or Shuffle all... - Page 98 Adding a song to a playlist 1. While in the Music Player, tap and hold the desired track > Add to playlist > Current playlist, or tap the playlist you want. Current playlist The selected music is added to the current playlist. When you enter the name of a playlist and tap Save, the music is added to the new playlist.
-
Page 99: Tools
Tools Clock Opening the Clock 1. From the Home screen, tap > Clock. Apps The Clock application opens and displays the date time, local weather and other useful information. Tap to dim the screen The battery charge level, displayed only while the phone is charging. -
Page 100: Calculator
Changing alarm settings 1. From the Home screen, tap Apps > Clock. 2. Tap > Press Menu > Settings. Alarm in silent mode Check to play alarms even when the phone is in silent mode. Alarm volume Set the volume of alarms. Snooze duration Set how long Clock waits before playing an alarm again. -
Page 101: Memo
Memo Adding a new memo 1. From the Home screen, tap Apps > Memo. 2. Tap the Add New Memo. 3. Enter the text > Save. Managing Memos 1. From the Home screen, tap Apps > Memo. 2. Tap the memo you want to manage: Tap the Memo screen to edit it and then edit the text >... -
Page 102: Polaris Office
Polaris Office Polaris Office is divided into a word processor, spreadsheet editor, presentation editor, and a file viewer. It is capable of reading and exporting in Microsoft Office file formats, viewing PDF and image files, and decompressing ZIP files. Opening Polaris Office 1. - Page 103 3. To use the additional options, press Menu while you are viewing the document. Zoom Select one out of Fit to page, Fit to width, Custom zoom, 25%, 50%, 75%, 100%, 125%, 200%, 300% and 400% to see the screen in the selected view. Edit mode File formats available for Edit mode: Microsoft Word, Microsoft Excel, Microsoft PowerPoint.
-
Page 104: At&T Applications
AT&T Applications AT&T Navigator The AT&T Navigator™ application on your device uses GPS positioning technology and your carrier’s data network to provide you with driving directions and a host of other services, including: GPS navigation that gives you turn-by-turn directions to any address in the continental United States. If you miss a turn or get off track, AT&T Navigator will calculate a new route for you. -
Page 105: At&T Familymap
Search using text entry 1. From the Home screen, tap Apps > AT&T Navigator. 2. Tap the search box, enter the text you’re looking for. 3. Select from the results. 4. Select the desired option. 5. To end the session, tap the Back key. -
Page 106: Ypmobile
YPmobile You can use YPmobile to find, get information about, and get directions to businesses in your area. Find a business 1. From the Home screen, tap Apps > YPmobile. 2. The End User License Agreement displays. 3. Read the agreement and tap Accept to continue. -
Page 107: Myat&T
myAT&T myAT&T enables you to view usage for minutes, data, and messaging from your phone. With this application you can also access support through FAQs (frequently asked questions). NOTE In order to access myAT&T, you first need to register your phone with My ATT. Visit http://www.att.com for more information. To access myAT&T 1. -
Page 108: Settings
Share your phone’s mobile data connection via USB. You may need to prepare your computer to establish a network connection via USB. You are required to download USB driver to access this function. To download this USB driver, please visit the Sharp website at http://sharp-world.com/products/smartphone/fxplus/ download.html. For details about downloading this USB driver, see “Tethering/Dial-up Networking” . - Page 109 Sound Normal mode While in the lowest ringer volume level, your phone operates in silent mode. To change back from silent to vibrate mode, simply press Volume up. To change back from vibrate to normal mode, press Volume button. Silent mode When set to silent, your phone doesn’t play any ring, alert, and effects sounds.
- Page 110 Accounts & sync Background data Set whether applications can sync, send and receive data at any time. Auto-sync Allow applications to sync data automatically. Manage accounts Lists the Google accounts and other accounts you’ve added to the phone. If you tap an account, its account screen opens. Privacy Back up my data Allow settings and other application data to be backed up to Google servers.
-
Page 111: About Phone
Accessibility Accessibility Accessibility options are activated after downloading the Accessibility service from the Android Market. TalkBack TalkBack is a screen reader that provides spoken feedback when using native Android applications. Once installed it becomes part of the Android system and cannot be uninstalled. TalkBack does not run if Accessibility is disabled. -
Page 112: Tethering/Dial-Up Networking
2. Unzip and run the downloaded installer file. You may be required to reboot your computer to complete the installation. 3. Connect your Sharp FX PLUS to your computer with the USB cable. Do not change any settings on the phone. -
Page 113: Usb Networking For Mac
Intel 64bit 10.6.x Installing USB Drivers on a Mac® 1. To download the USB driver install files contained in the MAC_USBDriver_V**.zip file, please visit the Sharp website at http://sharp-world.com/products/smartphone/fxplus/download.html. 2. Double-click MAC_USBDriver_V**.zip file to unzip the installation files. 3. Double-click SharpHSUSB_V**.pkg.zip installer file. - Page 114 Setting up the Dial-up Modem (Mac OS® X 10.5 or Later) 1. Connect your Sharp FX PLUS to your Mac® with the USB cable. 2. Your computer will auto-detect the Sharp FX PLUS and prompt you to set up a new modem connection. 3. Click If your computer does not auto-detect the Sharp FX PLUS, open the folder >...
- Page 115 Setting up the Dial-up Modem (Mac OS® X 10.4) 1. Connect your Sharp FX PLUS to your Mac® with the USB cable. 2. Click and select on Show list > Network Sharp USB Modem Apply Now. 3. Select > Change Modem Setting as below.
- Page 116 5. Click > Change PPP Options Setting as below > OK. PPP Options... 6. Click > Connect. Dial Now... 7. Sharp USB Modem is connected.
-
Page 117: Safety Information
Wireless Technology Research. Never come closer than six (6) inches to a person with a heart pacemaker implant when using your Sharp FX PLUS. Doing so could result in interference with the function of the pacemaker. - Page 118 Hospitals and health care facilities Turn your Sharp FX PLUS OFF in health care facilities when any regulations posted in these areas instruct you to do so. Hospitals or healthcare facilities may be using equipment that could be sensitive to external RF energy.
-
Page 119: Hearing Aid Compatibility With Mobile Phones
The more immune your hearing aid is, the less likely you are to experience interference noise from mobile phones. Safety Information for FCC RF Exposure Read this information before using your Sharp FX PLUS. In August 1996 the Federal Communications Commission (FCC) of the United States with its action in Report and Order FCC 96-326 adopted an updated safety standard for human exposure to radio frequency electromagnetic energy emitted by FCC regulated transmitters. -
Page 120: Sar Information
SAR Information This model phone meets the government’ s requirements for exposure to radio waves. Your wireless phone is a radio transmitter and receiver. It is designed and manufactured not to exceed the emission limits for exposure to radiofrequency (RF) energy set by the Federal Communications Commission of the U.S. Government. These limits are part of comprehensive guidelines and establish permitted levels of RF energy for the general population. -
Page 121: Fda Consumer Update
FDA Consumer Update U.S. Food and Drug Administration Cell Phone Facts Consumer Information on Wireless Phones 1. What kinds of phones are the subjects of this update? The term “wireless phone“ refers here to handheld wireless phones with built-in antennas, often called “cell,” “mobile,” or “PCS“... - Page 122 Occupational Safety and Health Administration National Telecommunications and Information Administration The National Institutes of Health participates in some interagency working group activities, as well. FDA shares regulatory responsibilities for wireless phones with the Federal Communications Commission (FCC). All phones that are sold in the United States must comply with FCC safety guidelines that limit RF exposure. FCC relies on FDA and other health agencies for safety questions about wireless phones.
- Page 123 Development Agreement(CRADA) to do research on wireless phone safety. FDA provides the scientific oversight, obtaining input from experts in government, industry, and academic organizations. CTIA-funded research is conducted through contracts to independent investigators. The initial research will include both laboratory studies and studies of wireless phone users.
- Page 124 sold devices that claimed to protect wireless phone users from radiation with making false and unsubstantiated claims. According to FTC, these defendants lacked a reasonable basis to substantiate their claim. 11. What about wireless phone interference with medical equipment? Radiofrequency energy (RF) from wireless phones can interact with some electronic devices. For this reason, FDA helped develop a detailed test method to measure electromagnetic interference (EMI) of implanted cardiac pacemakers and defibrillators from wireless telephones.
-
Page 125: Emergency Calls
E911 signal is transmitted and over which Sharp FX PLUS has no control. Finally, customers are advised that the Sharp FX PLUS’s ALI capability is to be used for E911 purposes only. This feature allows you to place an emergency call even if your phone is in “Phone Lock“ or “Restrict“ mode when you dial the preprogrammed emergency number, 911, #911, or *911. -
Page 126: Compliance With Other Fcc Regulations
Compliance with Other FCC Regulations Operating procedures Never violate any of the following Rules and Regulations of the FCC when using your Cellular Phone. Such violations are punishable by fine, imprisonment or both. Never use obscene, indecent, or profane language. Never use your Cellular Phone to send false distress calls. -
Page 127: Battery
Battery Battery safety Your device uses a removable and rechargeable lithium ion battery. Please contact customer service for assistance should you need a replacement battery. Do’ s Only use the battery and charger approved by the manufacturer. Only use the battery for its original purpose. Try to keep batteries in a temperature between 41°F (5°C) and 95°F (35°C). -
Page 128: Adapter/Charger
Adapter/Charger Charger The charger designed by Sharp for this unit requires the use of a standard 120 V AC power source for its operation. authorized service center, if repair or replacement is required. by a qualified electrician. designed for this unit to avoid any risk of bodily injury or damage to your cellular phone or battery. -
Page 129: Recycle Your Cell Phone
Recycle Your Cell Phone! Carriers marketing this cell phone have an in-store phone take-back program. Consumers can drop off their used wireless devices to specified carrier retail outlets for recycling purposes. For a list of carrier members and collection sites, visit the cellular industry’s recycling website www.recyclewirelessphones.com. -
Page 130: Fcc Compliance Information
FCC Compliance Information This device complies with Part 15 of FCC Rules. Operation is subject to the following two conditions: (1) This device may not cause harmful interference, and (2) This device must accept any interference received. Including interference that may cause undesired operation. Information to User This equipment has been tested and found to comply with the limits for a Class B digital device, pursuant to part 15 of the FCC Rules. -
Page 131: Copyright & Patent
Software Copyright Notice All Intellectual Property, as defined below, owned by or which is otherwise the property of Sharp or its respective suppliers relating to the Sharp Phone, including but not limited to, accessories, parts, or software relating there to (the “Phone System”), is proprietary to Sharp and protected under federal laws, state laws, and international treaty provisions. -
Page 132: Warranty
Warranty Manufacturer’s Warranty 12 month limited warranty Personal Communications Devices, LLC. (the Company) warrants to the original retail purchaser of this handheld portable cellular telephone, that should this product or any part thereof during normal consumer usage and conditions, be proven defective in material or workmanship that results in product failure within the first twelve (12) month period from the date of purchase, such defect(s) will be repaired or replaced (with new or rebuilt parts) at the Company’s option, without charge for parts or labor directly related to the defect(s). - Page 133 THE EXTENT OF THE COMPANY’S LIABILITY UNDER THIS WARRANTY IS LIMITED TO THE REPAIR OR REPLACEMENT PROVIDED ABOVE AND, IN NO EVENT, SHALL THE COMPANY’S LIABILITY EXCEED THE PURCHASE PRICE PAID BY PURCHASER FOR THE PRODUCT. ANY IMPLIED WARRANTIES, INCLUDING ANY IMPLIED WARRANTY OF MERCHANTABILITY OR FITNESS FOR A PARTICULAR PURPOSE, SHALL BE LIMITED TO THE DURATION OF THIS WRITTEN WARRANTY.
Need help?
Do you have a question about the FX PLUS Series and is the answer not in the manual?
Questions and answers