Table of Contents
Advertisement
Quick Links
Download this manual
See also:
User Manual
Advertisement
Table of Contents

Related Manuals for Leadtek BVP 8759

Summary of Contents for Leadtek BVP 8759
- Page 1 BVP 8759 User's Manual...
- Page 2 No part of this document may be copied or reproduced in any form or by any means without the prior written consent of Leadtek Research Inc. Leadtek makes no warranties with respect to this documentation and disclaims any implied warranties of merchantability, quality, or fitness for any particular purpose. The information in this document is subject to change without notice.
-
Page 3: Table Of Contents
When the IP is shared with other devices (without a DHCP server connected) ............... 14 ADSL/Constant ADSL/Multiple, Public, & Fixed IP ... 15 When BVP 8759 uses one of the IPs (with a DHCP server connected) .................. 15 When BVP 8759 uses one of the IPs (without a DHCP server connected) ............... - Page 4 Table of Contents ADSL/Timing ADSL ............ 19 When the ADSL is used exclusively by BVP 8759 ..... 19 When the ADSL is shared with other devices (with a DHCP server connected) ............... 20 When the ADSL is shared with other devices (without a DHCP server connected) ............
- Page 5 Table of Contents Using OSD Menus ..........37 Missed Calls ..............37 Inbox ................38 Outbox ................. 39 Phonebook ..............40 Add ................. 40 List .................. 41 Information ..............43 ..............44 Calls Setup Communication mode ............ 44 Caller ID ................. 45 Auto answer ..............
-
Page 6: Getting Started
(OSD), easily control the functions and make adjustments. The BVP 8759 has a built-in high quality CCD camera. While making a video call, you can enjoy the brilliant real-time color images of yourself, your correspondents or both. If you do not want your image to display on the caller or receiver's screen. -
Page 7: What's In The Package
Please unpack the product package with caution; inspect the items closely. If you find any damaged item, please contact your local distributor immediately. Also, please keep the box and packing material for future use in the event of future shipments. BVP 8759 User's Manual... -
Page 8: Getting To Know Your Bvp 8759
Getting to Know Your BVP 8759 Front view CCD Camera: Power Indicator: The input source of The LED lights green local video image. This when the unit is is a mini built-in CCD powered on. camera. Message Indicator: The LED lights red when a message comes. -
Page 9: Rear View
Ethernet connector Power Switch Microphone USB Connectors Phone Connector For turning Connect to other Connect to on/off the power Connect to an USB devices a telephone external (optional) microphone Connect to an external PTZ camera (optional) BVP 8759 User's Manual... -
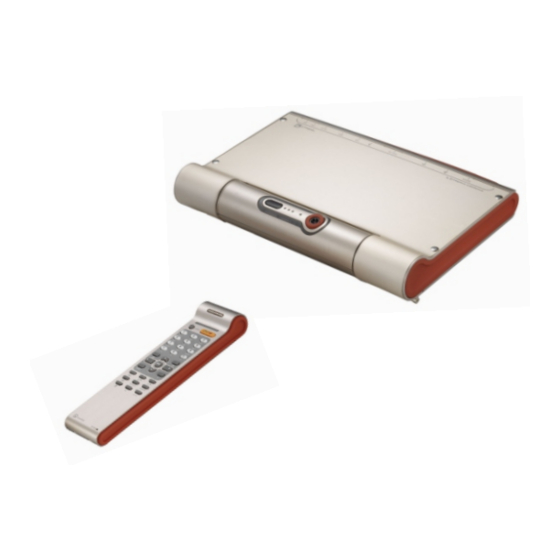
Page 10: Using Remote Control
Using remote control PQRS WXYZ 1. Camera 12. Soft key 1 (reserved) 2. Number keys 13. On-hook / Off-hook 3. PTZ Camera zoom in 14. PTZ Camera zoom out 4. Navigation key 15. Navigation key 5. Navigation key 16. Ok 6. -
Page 11: Hot Keys
Hot Keys Camera: IN-BOX: To switch between BVP 8759 To bring out the menu that and external PTZ camera. contains the numbers of the 10 last received calls. MENU: To bring out the OSD menu. - Page 12 Using remote control (cont.'d) Numeric Keypad Inputting numbers Pressing any key on the numeric keypad can input the correspondent number. PQRS WXYZ For example, pressing will generate the number " 8 ". Numeric Keypad Inputting letters, punctuation marks, and special characters Every button on the numeric keypad has characters printed under it.
-
Page 13: Installation
Installing the unit Step 1 Pick a good spot Stability Place your BVP 8759 on top of a counter, desk, or table with the CCD camera opening in front. Or you can install BVP 8759 on the wall by fixing the included mounting plate to the wall with screws and sliding the slot on the back of BVP 8759 onto the mounting plate. - Page 14 Step 3 Plug in for power Connect the power cord between the wall outlet and the power adapter. Plug the free end of the power adapter into the power connector (DC IN) on BVP 8759. Connect the power adapter. Connect the power cord and plug in.
- Page 15 Installing the unit (cont'd) External Microphone (Optional) Video/Audio Video/Audio Output Input (Optional) (Optional) Television CCD Camera Television BVP 8759 User's Manual...
-
Page 16: System Setup
System Setup The System Setup section gives instructions on how to set up your BVP 8759 system under some mostly used interconnection types. There is a condition bar on each page (as shown in the figure), indicating what type of connection the setup guide on that page is for. -
Page 17: Adsl/Constant Adsl/Single, Public, & Fixed Ip
System Setup (Cont'd) Connection ADSL Type Constant ADSL Single, Public, & Fixed When the IP is used exclusively by BVP 8759 Internet BVP 8759 ATU-R BVP 8759 System Setup (see p. 53) Note : IP address, Subnet Mask and Gateway are assigned by your ISP, each consisted of 4 sets of numbers with dots in between them. -
Page 18: When The Ip Is Shared With Other Devices (With A Dhcp Server Connected)
DHCP Server The DHCP Server This router has to be able to provide the NAT service. must be able to Or you can put BVP 8759 into DMZ if your router support dynamic- supports this function. fixed IP allocation. BVP 8759 System Setup (see p. -
Page 19: When The Ip Is Shared With Other Devices (Without A Dhcp Server Connected)
Router General PC 1, 2, ...n BVP 8759 This router has to be able to provide the NAT service. Or you can put BVP 8759 into DMZ if your router supports this function. BVP 8759 System Setup (see p. 53) Note : You can assign your own IP , Subnet Mask and Gateway within your private segment. -
Page 20: Adsl/Constant Adsl/Multiple, Public, & Fixed Ip
System Setup (Cont'd) Connection ADSL Type Constant ADSL Multiple, Public, & Fixed When BVP 8759 uses one of the IPs (with a DHCP server connected) Internet ATU-R General PC 1, 2, ...n BVP 8759 DHCP Server BVP 8759 System Setup (see p. -
Page 21: When Bvp 8759 Uses One Of The Ips (Without A Dhcp Server Connected)
System Setup (Cont'd) Connection ADSL Type Constant ADSL Multiple, Public, & Fixed When BVP 8759 uses one of the IPs (without a DHCP server connected) Internet ATU-R General PC 1, 2, ...n BVP 8759 BVP 8759 System Setup (see p. 53) Note : IP address, Subnet Mask and Gateway are assigned by your ISP, each consisted of 4 sets of numbers with dots in between them. -
Page 22: When One Of The Ips Is Shared With Other Devices (With A Dhcp Server Connected)
DHCP Server The DHCP Server This router has to be able to provide the NAT service. must be able to Or you can put BVP 8759 into DMZ if your router support dynamic- supports this function. fixed IP allocation. BVP 8759 System Setup (see p. -
Page 23: When One Of The Ips Is Shared With Other Devices (Without A Dhcp Server Connected)
Router General PC 1, 2, ...n BVP 8759 This router has to be able to provide the NAT service. Or you can put BVP 8759 into DMZ if your router supports this function. BVP 8759 System Setup (see p. 53) Note : You can assign your own IP , Subnet Mask and Gateway within your private segment. -
Page 24: Adsl/Timing Adsl
System Setup (Cont'd) Connection ADSL Type Timing ADSL Sin gle , Pu blic , & Dyn am ic When the ADSL is used exclusively by BVP 8759 Internet BVP 8759 ATU-R BVP 8759 System Setup (see p. 53) Note : IP, Subnet Mask and Gateway are assigned by PPPoE. -
Page 25: When The Adsl Is Shared With Other Devices (With A Dhcp Server Connected)
DHCP Server The DHCP Server This router has to be able to provide the NAT service. must be able to Or you can put BVP 8759 into DMZ if your router support dynamic- supports this function. fixed IP allocation. BVP 8759 System Setup (see p. -
Page 26: When The Adsl Is Shared With Other Devices (Without A Dhcp Server Connected)
Router General PC 1, 2, ...n BVP 8759 This router has to be able to provide the NAT service. Or you can put BVP 8759 into DMZ if your router supports this function. BVP 8759 System Setup (see p. 53) Note : You can assign your own IP , Subnet Mask and Gateway within your private segment. -
Page 27: Cable
When the IP is used exclusively by BVP 8770 Internet BVP 8759 Cable modem BVP 8759 System Setup (see p. 53) Note : IP, Subnet Mask and Gateway are assigned by the DHCP server of your ISP. BVP 8759 User's Manual... -
Page 28: When The Ip Is Shared With Other Devices (With A Dhcp Server Connected)
Cable modem The DHCP Server This router has to be able to provide the NAT service. Or must be able to you can put BVP 8759 into DMZ if your router supports support dynamic- this function. fixed IP allocation. BVP 8759 System Setup (see p. -
Page 29: When The Ip Is Shared With Other Devices (Without A Dhcp Server Connected)
General PC 1, 2, ...n BVP 8759 Cable modem This router has to be able to provide the NAT service. Or you can put BVP 8759 into DMZ if your router supports this function. BVP 8759 System Setup (see p. 53) Note : You can assign your own IP , Subnet Mask and Gateway within your private segment. -
Page 30: Lan/No Firewall Or Nat
Type Firewall Packet Filter With a DHCP server connected Internet Router General PC 1, 2, ...n BVP 8759 DHCP Server BVP 8759 System Setup (see p. 53) Note : IP, Subnet Mask and Gateway are assigned by your DHCP server. -
Page 31: Without A Dhcp Server Connected
Router General PC 1, 2, ...n BVP 8759 BVP 8759 System Setup (see p. 53) Note : IP address, Subnet Mask and Gateway are assigned by your ISP. If you are using an IP segment, which is x.x.x.0-x.x.x.255, your settings should be: IP : one chosen from the range between x.x.x.1 to x.x.x.254... -
Page 32: Lan/Nat
DHCP Server The DHCP Server This router has to be able to provide the NAT service. must be able to Or you can put BVP 8759 into DMZ if your router support dynamic- supports this function. fixed IP allocation. BVP 8759 System Setup (see p. -
Page 33: Without A Dhcp Server Connected
This router has to be able to provide the NAT service. Or you can put BVP 8759 into DMZ if your router supports this function. BVP 8759 System Setup (see p. 53) Note : You can assign your own IP , Subnet Mask and Gateway within your private segment. If the segment is 172.16.0.0-172.16.0.255, your settings should be:... -
Page 34: Lan/Firewall With Packet Filter
Firewall This firewall must be able to enable packets I/O for TCP port 1720-1730 and 7000-7009 and UDP port 8050-8058 (for BVP 8759 exclusively). Or you can put BVP 8759 into DMZ if your router supports this function. BVP 8759 System Setup (see p. -
Page 35: Without A Dhcp Server Connected
BVP 8759 Firewall This firewall must be able to enable packets I/O for TCP port 1720-1730 and 7000-7009 and UDP port 8050-8058 (for BVP 8759 exclusively). BVP 8759 System Setup (see p. 53) Note : IP address, Subnet Mask and Gateway are assigned by your ISP. If you are using an IP segment, which is x.x.x.0-x.x.x.255, your settings should be:... -
Page 36: Lan/Firewall With Nat & Packet Filter
This firewall must be able to enable packets I/O for TCP port 1720-1730 Server must be and 7000-7009 and UDP port 8050-8058 (for BVP 8759 exclusively). able to support It must also be able to provide the NAT service. Or you can put BVP dynamic-fixed 8759 into DMZ if your router supports this function. -
Page 37: Without A Dhcp Server Connected
This firewall must be able to enable packets I/O for TCP port 1720-1730 and 7000-7009 and UDP port 8050-8058 (for BVP 8759 exclusively). It must also be able to provide the NAT service. Or you can put BVP 8759 into DMZ if your router supports this function. -
Page 38: Making A Call
BVP 8759. might shine into the camera lens. 0.5 m Make sure of the most appropriate Do not point the BVP 8759 at a lighting source, preferably from mirror or bright light. the front with the beam on your face. -
Page 39: Making A Voice Call
Step 4 After dialing out, the local view disappears and a message shows that BVP 8759 is in audio mode. Step 5 The other party answers the phone, and the audio connection is established. BVP 8759 User's Manual... -
Page 40: Making A Video Call
Making a video call Step 1 Turn on the power of the unit. The bootup screen is shown on the TV. Bootup screen Step 2 Press the button on the remote control. The bootup screen disappears and the local view is displayed. -
Page 41: Icon Explanations
Icon explanations When BVP 8759 is powered on, a bootup screen will be displayed. There are icons around the screen indicating various statuses of the unit, as explained below. Video Privacy Service Status Built-in Video Source Auto Answer Incoming Message... -
Page 42: Using Osd Menus
Using OSD Menus Missed Calls Missed Calls You can dial out directly from the Missed Calls list. -
Page 43: Inbox
Using OSD menus Inbox Inbox You can dial out directly from the Inbox list. BVP 8759 User's Manual... -
Page 44: Outbox
Using OSD menus Outbox Outbox You can dial out directly from the Outbox list. -
Page 45: Phonebook
Using OSD menus Phonebook Add Adding to the phonebook You can add certain people in the phonebook and set their respective Auto answer status. Saving... Please wait... BVP 8759 User's Manual... -
Page 46: List
Using OSD menus Phonebook List List of numbers Edit contact Saving... Please wait... - Page 47 Using OSD menus Phonebook List List of numbers (cont'd) Delete contact Make call If you can not dial out with BVP 8759, press the button to return to local Record deleted view, and try to dial again. BVP 8759 User's Manual...
-
Page 48: Information
Using OSD menus Using OSD menus Information Information This screen displays system information such as IP, Submask, Gateway, software & hardware version. -
Page 49: Calls Setup
Using OSD menus Calls Setup Communication mode Communication mode Saving... Please wait... Users can choose the Communication mode to be either Audio mode only or Video + Audio mode. BVP 8759 User's Manual... -
Page 50: Caller Id
Using OSD menus Calls Setup Caller ID Caller ID Saving... Please wait... When Caller ID is ON, the caller ID will display on the screen when an incoming call is received. -
Page 51: Auto Answer
Using OSD menus Calls Setup Auto answer Auto answer Saving... Please wait... While dialing, the Auto answer function is turned on when the auto answer function for a phonebook entry is set to ON. BVP 8759 User's Manual... -
Page 52: Auto Answer Rings
Using OSD menus Calls Setup Auto answer rings Auto answer rings Saving... Please wait... When Auto Answer is ON, you can set the number of rings (0~9) before the auto answer function is activated. -
Page 53: Phone Setup
Using OSD menus Phone Setup Time setup Time setup Saving... Please wait... Please set the time zone according to the area in which you are using the phone. BVP 8759 User's Manual... -
Page 54: Language Setup
Using OSD menus Phone Setup Language setup Language setup Saving... Please wait... Choose the language for the OSD Menu. -
Page 55: Software Update
Using OSD menus Phone Setup Software update Software update BVP 8759 User's Manual... -
Page 56: Return Default
Using OSD menus Phone Setup Return default Return default Press to restore the factory settings. Press to cancel. -
Page 57: Network Setup
Using OSD menus Network Setup Bandwidth Bandwidth Saving... Please wait... Please set the bandwidth according to the bandwidth your ISP provides. BVP 8759 User's Manual... -
Page 58: Ip Setup
Using OSD menus Network Setup IP Setup IP Setup Saving... Please wait... Connect Type: STATIC: IP address/Subnet Mask/Gateway have to be assigned (Consult your ISP). DHCP: IP address/Subnet Mask/Gateway will be assigned by DHCP server PPPoE: PPPoE Username/PPPoE Password have to be assigned (Consult your ISP). -
Page 59: Nat Setup
Using OSD menus Network Setup NAT Setup NAT Setup Saving... Please wait... BVP 8759 User's Manual... -
Page 60: Gk Setup
Using OSD menus Network Setup GK Setup GK Setup Saving... Please wait... GK: When the Gatekeeper is turned off, the GK IP, Phone number, H323 alias and Keep alive functions are unavailable. GK IP: You need to get the IP of the gatekeeper from your gatekeeper service provider. -
Page 61: Osd Menu Tree
Delete List Phonebook Make call Communication mode Information Caller ID Calls Setup Auto answer Auto answer rings Time Setup Phone Setup Language Setup Software upgrade Return default Bandwidth Network Setup IP Setup NAT Setup GK Setup BVP 8759 User's Manual... -
Page 62: Trouble Shooting
Trouble Shooting Your BVP 8759 is reliable and easy to use. If you encounter any problem while using this product, please refer to the table below for possible solutions. Power Indicator OFF Video of local view is dark Plug power adapter in the unit. -
Page 63: Tech Support
In the event of not finding the solution to your problem, please contact your local distributor. You may also contact our technical support staff; E-mail to <service@leadtek.com.tw> with the following information: Product name: It will be easier for our staff to answer your question if you know the name of the product. -
Page 64: Limited Warranty
Limited Warranty Leadtek warrants to the original purchaser of this product that it shall be free of defects resulting from workmanship or components for a period of one (1) year from the date of sale. Defects covered by this Limited Warranty shall be corrected either by repair or, at Leadtek's discretion by replacement. -
Page 65: Fcc Statement
+ Consult the dealer or an experienced radio/TV technician for help. + Shielded interface cables must be used in order to comply with emission limits. Changes or modifications not expressly approved by the party responsible for compliance could void the user's authority to operate the equipment. BVP 8759 User's Manual...
Need help?
Do you have a question about the BVP 8759 and is the answer not in the manual?
Questions and answers