Table of Contents
Advertisement
Advertisement
Table of Contents

Related Manuals for Harman Kardon HS 250


Summary of Contents for Harman Kardon HS 250
- Page 1 HS 250 Home Cinema System OWNER’S MANUAL...
-
Page 2: Table Of Contents
Table of Contents Page Introduction Safety Information Unpacking Terminology Features Front Panel Controls Front Panel Display Rear Panel Connections Remote Control Basic Information About This Manual Regional Coding System Connection Installation and Connections Audio Connections Video Connections Optional Audio Connections Speaker Placement Connecting AC Power First Turn On... -
Page 3: Introduction
HS 250 is truly a multichannel system for the new millennium. The HS 250 has been engineered so that it is easy to take advantage of all the power of its digital technology. To obtain the maximum enjoyment from your new system, we urge you to read this manual. -
Page 4: Safety Information
Introduction / Safety Information Only use the HS 250 controller with the loud- speaker system supplied. Failure to do so may cause damage to either the controller or the loudspeakers and will invalidate any warranty. All of the optional system settings have been preset at our factory for correct operation of the system. -
Page 5: Terminology
Terminology Terminology Since they share some of the characteristics and technology of CD players, many of the terms and operational concepts used in a DVD player are similar to what you may be familiar with from CD players and changers, or older video disc for- mats such as Laser Disc. -
Page 6: Features
6 FEATURES Compatible with CD as well as DVD • The HS 250 will play any conventional Audio CD or recordable (CD-R) or erasable CD (CD-RW), MP3, WMA (v9) or any DivX or VCD or DVD- Video with the region code 0 or 2. -
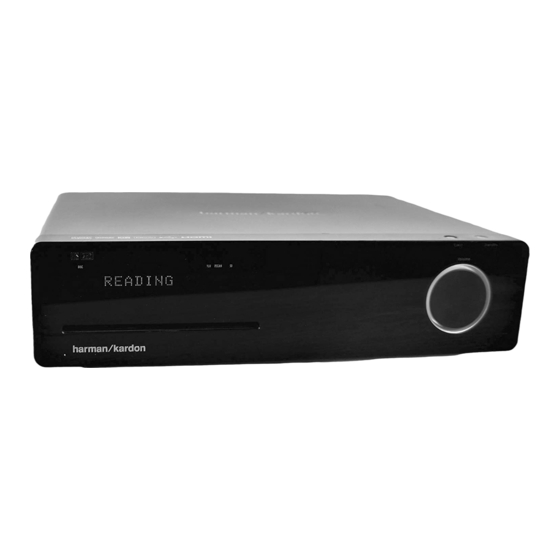
Page 7: Front Panel Controls
HS 250 Controller. Power On/Off (Standby): Press the button once to turn the HS 250 Controller on, press it again to put the unit in the Standby mode. Note that when the HS 250 Controller is switched on, the Power Indicator around the button turns white. -
Page 8: Front Panel Display
Front Panel Display DISC DMP VCDVD TITLE PROG. A Disc Type Indicators B Playback-Mode Indicators C Progressive Scan Indicator D Parental Lock Indicator E Time Indicators F Video Format Indicators A Disc Type Indicators: The CD or DVD indicator will illuminate to show the type of disc currently being played. -
Page 9: Rear Panel Connections
(–) terminals on the HS to the black (–) terminals on the speakers. See page 14 for more information on speaker polarity. Remote IR Input: If the HS 250’s front- panel IR sensor is blocked due to cabinet doors or other obstructions, an external IR sensor may be used. - Page 10 “IR IN” jack on Harman Kardon or other compatible equipment. Digital Media Player (DMP) Connector: With the HS 250 turned off, con- nect one end of the optional Harman Kardon to this proprietary connector, and the other to your compatible Apple iPod. When the Digital Media Player source is selected, you may view your iPod’s control and navigation...
-
Page 11: Remote Control
Remote Control Power On/Source Selection Button Power Off Button Subtitle Button Title Button Angle Button Audio Button Enter Button Eject Button Set-Up/OSD Button Arrows Button Mute Button Menu Button Pause Button Status Button Skip/Step (Previous) Button Skip/Step (Next) Button Play Button Search/Slow Reverse Button STOP Button Search/Slow Forward Button... - Page 12 (See page 26 for more information on using the remote’s learning function.) These buttons do not have a direct function with the HS 250, but can be programmed to control some of the functions of your TV using the Learning function of the remote control.
-
Page 13: Basic Information
Basic Information About This Manual • The types of functions and operations that can be used for a particular disc vary depending on the features of that disc. In some cases, these functions and operations may differ from the descriptions given in this manual. In this event, follow the instructions given on the screen. -
Page 14: Installation And Connections
Component Video Connection (method 4) If the video display has component video inputs, connect the Component Video Outputs the HS 250 to the corresponding input jacks on your television. If you are using a progressive scan television or projector, you must also change the Scan Type in the DVD player's Video Set-Up Menu from ”Interlaced”... -
Page 15: Optional Audio Connections
Installation and Connections Connecting VCR and Sat Decoder (method 5 and 6) Diagrams 5 and 6 show possible connection methods for common system configurations. These are intended as guidelines only. Due to differences in equipment specifications, the method of connection of your equipment may be different to that shown. -
Page 16: Dvd Only
Once the speakers have been placed in the room and connected, the remaining steps are to program the system configuration memories. First Turn On You are now ready to power up the HS 250 Controller to begin final adjustments. 1. Plug the Power Cable into an un- switched AC outlet. -
Page 17: Slow Motion Playback (With Dvd Only)
Surround Mode One of the most important features of the HS 250 Controller is its ability to reproduce a full multichannel surround sound field from digi- tal sources, analog matrix surround encoded programs and standard stereo programs by using only a pair of stereo loudspeakers and a subwoofer. -
Page 18: System Setup
General Functionality of the OSD Menu The complete setup and control of the HS 250 takes place in an advanced user-guided On Screen Display (OSD) menu system. The OSD can be activated by pressing the OSD button the remote control. -
Page 19: Disc Recognition
The HS 250 accom- plishes this by compressing the audio to a greater or lesser degree, depending on which setting you choose. -
Page 20: Video Settings
System Setup Video Settings The Video Setting Submenu contains the follow- ing settings. Follow the explanations in the Upper Menu Line on the bottom of your screen to change the settings. Aspect Ratio: This step selects the TV aspect ratio, conventional screen shape (4:3) or widescreen (16:9), according to your TV. -
Page 21: Test Screen
Edges, setting backed off from the maximum setting. Reduce the sharpness setting on your television, and the Edges setting on the HS 250 video adjustments menu if necessary, to minimize the appearance of any white lines between the bars in the gray scale portion of the test screen. -
Page 22: Player Menu
MP3 or JPEG files. Radio Menu The FM Tuner in the HS 250 can be used to lis- ten to the Radio. Before listening to the radio stations, you need to preset your favorite sta- tions. -
Page 23: Rearranging The Station List
RDS indication in the OSD on or off. Surround Mode for Tuner As with all other inputs of the HS 250, you can also select your preferred surround mode when lis- tening to the radio. The actual surround mode is listed on the first line of the tuner menu. -
Page 24: Tv Menu, Aux Menu, Digital In Menu
In addition to the built-in DVD-Audio/Video and CD player, the built-in radio and Scart audio input, you can connect one more analog audio source to the HS 250. The analog source can be connected to the AUDIO IN input connectors on the rear panel. -
Page 25: Usb Menu
MUSIC, PICTURE or MOVIE icons on the left part of the screen to select or deselect the desired format. NOTE: The HS 250 will not play back any of the for- mats SVCD/VCD, MPEG1 (Video), MPEG2 (Video) and audio CD tracks (CDDA) stored on an external USB hard drive. -
Page 26: Learning Codes From A Remote
Example: To program the Macro 1 button so that it turns on the HS 250 and your TV, follow these steps: • Press the Macro 1 button and Mute buttons at the same time and then release them. -
Page 27: Dvd Languages Codes
Learning Codes from a Remote Erasing Macro Commands To remove the commands that have been programmed into one of the Macro buttons, follow these steps: 1. Press the Mute button and the Macro button that contains the commands you wish to erase. DVD Language Codes The availability of specific languages for the main audio track or subtitles is dependent on the choices made by a disc’s producer. -
Page 28: 28 Troubleshooting
Troubleshooting If you experience any of the following difficulties while using the system, use this troubleshooting guide to help you remedy the problem. Should any problem persist, consult your authorized Harman Kardon dealer. No power. • Is the power cord firmly plugged into the power outlet? •... - Page 29 Troubleshooting Track Skip or direct select with numeric buttons, Search, Slow-motion play, repeat play or Program play, etc., cannot be done. • Depending on the DVD or VCD, some of the above operations may not be available (Playback control). Messages do not appear on the TV screen in the language you want.
-
Page 30: 30 Glossary
Glossary Bit rate Value indicating the amount of video data com- pressed in a DVD per second. The unit is Mbps (megabit per second). 1 Mbps indicates that the data per second is 1,000,000 bits. The higher the bit rate, the larger the amount of data. However, this does not always mean higher quality pictures. -
Page 31: Specifications
C: PAL 0.3 Vp-p 75 Ohms / NTSC 0.286 Vp-p 75 Ohms 2 Vrms, 1 kilohms AC 230 V, 50 Hz 300 W Less than 2 W 350mm x 84mm x 250mm 3.8 kg and Logic 7 are registered trademarks of Harman International Industries, Incorporated. HS 250 CONTROLLER SPECIFICATIONS 31... - Page 32 250 Crossways Park Drive, Woodbury, New York 11797 516.422.HKHK (4545) Fax: 516.682.3523 (USA only) www.harmankardon.com Harman Consumer Group, Inc.: 2, route de Tours, 72500 Château-du-Loir, France © 2007 Harman Kardon, Incorporated Part No.: 01.00.YS.SM1.E1378...
Need help?
Do you have a question about the HS 250 and is the answer not in the manual?
Questions and answers