Table of Contents
Advertisement
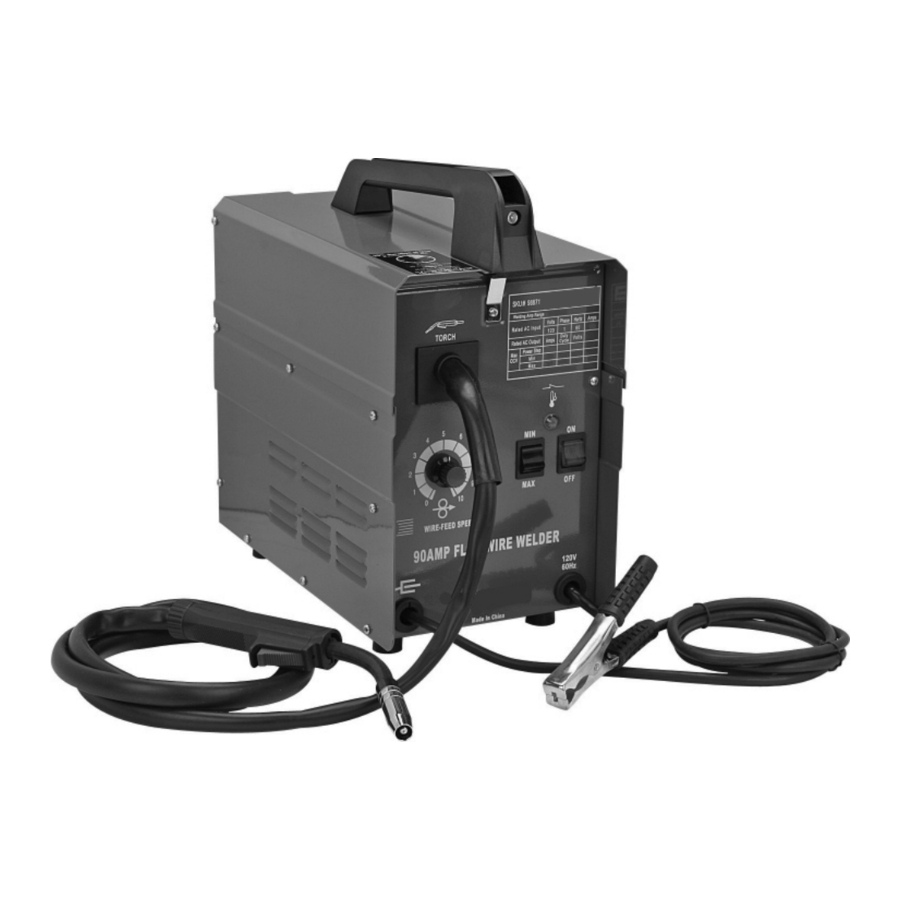
90 AMP FLUX WIRE WELdER
SEt UP And OPERAtIng InStRUctIOnS
Visit our website at: http://www.harborfreight.com
Read this material before using this product.
Failure to do so can result in serious injury.
SAVE thIS MAnUAL.
©
Copyright
2008 by Harbor Freight Tools
contained herein may be reproduced in any shape or form without the express written consent of
Harbor Freight Tools. Diagrams within this manual may not be drawn proportionally. Due to continuing
improvements, actual product may differ slightly from the product described herein. Tools required for
assembly and service may not be included.
For technical questions or replacement parts, please call 1-800-444-3353.
Manual Revised 10d
Model
98871
®
. All rights reserved. No portion of this manual or any artwork
Advertisement
Table of Contents

Related Manuals for Chicago Welding 98871


Summary of Contents for Chicago Welding 98871
- Page 1 Harbor Freight Tools. Diagrams within this manual may not be drawn proportionally. Due to continuing improvements, actual product may differ slightly from the product described herein. Tools required for assembly and service may not be included.
-
Page 2: Important Safety Information
There is an increased risk of electric shock if your body is grounded. do not expose welders to rain or wet conditions. Water entering a welder will increase the risk of electric shock. SKU 98871... - Page 3 Welder use and care do not use the welder if the switch does not turn it on and off. Any welder that cannot be controlled with the switch is dangerous and must be repaired. disconnect the plug from the...
- Page 4 Welder Safety Warnings Maintain labels and nameplates on the Welder. These carry important information. If unreadable or missing, contact Harbor Freight Tools for a replacement. Maintain a safe working environment. Keep the work area well lit. Make sure there is adequate surrounding workspace.
- Page 5 Use mechanical ventilation to improve air quality. If engineering controls are not feasible, use an approved respirator. SKU 98871 For technical questions, please call 1-800-444-3353. • Work in a confined area only if it is well-ventilated, or while wearing an air- supplied respirator.
- Page 6 Use care not to touch the welding tip to grounded material whenever the unit is plugged in. this unit is what is referred to as a “hot tip” welder, meaning that current is available to the wire at all times that the power Switch (7a) is in the On position.
-
Page 7: Extension Cords
The grounding prong in the plug is connected through the green wire inside the cord to the grounding system in the welder. The green wire in the cord must be the only wire connected to the welder’s grounding system and must never be attached to an electrically “live”... -
Page 8: Specifications
Wire Brush / chipping hammer When unpacking, make sure that the item is intact and undamaged. If any parts are missing or broken, please call Harbor Freight Tools at 1-800-444-3353 as soon as possible. Page 8 For technical questions, please call 1-800-444-3353. - Page 9 PREVEnt SERIOUS InjURy FROM AccIdEntAL OPERAtIOn: turn the Power Switch off and unplug the welder before assembly. Face Shield (38) Assembly Attach the handle to the Face Shield (38)
- Page 10 90 AMP FLUX WIRE WELdER 120 V~ 60 hz cover (31) cover Latch (8) Spool Retaining nut (26) wire must unwind this direction Wire Spool (27) Wing nut (25) Wire Spool (27) Spool Spring (24) Spool Spindle (28) SKU 98871...
- Page 11 Keep tension on the wire and guide at least 12 inches of wire into the Wire Liners. SKU 98871 For technical questions, please call 1-800-444-3353. Feed Swing Feed Arm (36)
- Page 12 (2b) WARnIng The following steps require applying power to the welder with the cover open. To prevent serious injury from fire or electric shock: do not touch anything, especially not the ground clamp, with the gun or welding wire or an arc will be ignited.
- Page 13 Replace the Nozzle (3) and cut the wire off at ” from tip ( ” stickout). Swing the Cover (31) closed until the Cover Latch (8) locks in place. SKU 98871 For technical questions, please call 1-800-444-3353. Welding Wire Incrementally increase tension until wire bends.
- Page 14 Power Switch is on. The Flux Wire Welder is used to weld sheet metal and low carbon steel. Good welding takes a degree of skill and experience. Practice a few sample welds on scrap before welding your first project. Additional practice...
-
Page 15: Control Panel Layout
Adjust this according to the weld settings chart to achieve a good weld. ground cable: This connects to the base metal to provide a good connection for the current to travel back to the welder. SKU 98871 For technical questions, please call 1-800-444-3353. control Panel Layout... -
Page 16: Weld Settings Chart
Power Switch on, so that the internal Fan will help cool the welder. When the welder can be used again, use shorter welding periods and longer rest periods to prevent needless wear. -
Page 17: Setting Up The Weld
Set the Wire Speed Dial and the Current Switch to the desired settings. Refer to the chart on the welder or the chart on the facing page. dO nOt SWItch thE cURREnt WhILE WELdIng. -
Page 18: Basic Welding Technique
90 AMP FLUX WIRE WELdER stringer bead Weld gun angles, viewed from front of weld joint. 45° fillet weld joint drag Angle 0-15° Stickout (up to Weld direction 120 V~ 60 hz weave bead 90° butt weld joint ”) SKU 98871... - Page 19 If Welder is used too long, the amber Overload Indicator (22) will light and the Welder Gun will shut off until the welder cools. If this happens, rest the Gun on an electrically non-conductive, heat-resistant surface, such as a concrete slab, well clear of the ground clamp.
-
Page 20: Welding Tips
A typical Flux-core Wire (FcAW) Weld before cleaning. slag base metal chipping hammer dead-blow hammer dead-blow hammer weld bead spatter Wire Brush clamp ScRAP workpiece gOOd WELd bends and is not brittle clamp ScRAP workpiece POOR WELd snaps or cracks SKU 98871... -
Page 21: Weld Diagnosis
WIRE-FEEd SPEEd 90 AMP FLUX WIRE WELdER WIRE-FEEd SPEEd 90 AMP FLUX WIRE WELdER 120 V~ 60 hz SKU 98871 For technical questions, please call 1-800-444-3353. WELd dIAgnOSIS PROPER PEnEtRAtIOn Ideal heat how to reduce workpiece heat and limit penetration:... - Page 22 Make tack welds to hold workpieces. Excessive heat: Weld a small portion and allow to cool before proceeding. Increase weld speed. Reduce wire feed speed. InAdEqUAtE PEnEtRAtIOn Weld does not contact the joint fully, just on the surface. SKU 98871...
- Page 23 Use two hands or rest hand on steady surface. Inconsistent welding speed: Maintain steady weld speed. Stickout too long: Reduce stickout. SKU 98871 For technical questions, please call 1-800-444-3353. Excessive Spatter Fine spatter is normal. Spatter that is grainy and large is a problem. View...
- Page 24 Nozzle will adversely effect the weld and should be replaced. Reinstall the Nozzle after inspecting and cleaning the Contact Tip. Page 24 For technical questions, please call 1-800-444-3353. concrete slab (or other heat-proof, non-conductive surface) nozzle contact tip (2b) SKU 98871...
- Page 25 Tip that is the correct size for the welding wire used (.035” tip for .030–.035” wire). Reinstall the Tip and securely reinstall the Nozzle as well. SKU 98871 For technical questions, please call 1-800-444-3353. nozzle contact tip (2b)
-
Page 26: Troubleshooting
Be cERtAIn to shut off the Welder, disconnect it from power, and discharge the gun to ground before adjusting, cleaning, or repairing the unit. Wire feed motor runs but wire does not feed properly POSSIBLE cAUSES And SOLUtIOnS Insufficient wire feed tension: Increase wire feed tension properly - follow step 16 on page 13. - Page 27 (continued) Be cERtAIn to shut off the Welder, disconnect it from power, and discharge the gun to ground before adjusting, cleaning, or repairing the unit. Power switch (7a) lights, but welder does not function when switched on POSSIBLE cAUSES And SOLUtIOnS tripped thermal protection device: Shut the welder’s switch to off and allow it to cool for at least 20 minutes.
-
Page 28: Wire Feeds, But Arc Does Not Ignite
(continued) Be cERtAIn to shut off the Welder, disconnect it from power, and discharge the gun to ground before adjusting, cleaning, or repairing the unit. Power switch (7a) does not light when switched on POSSIBLE cAUSES And SOLUtIOnS Unit is not connected to outlet properly or outlet is unpowered: Verify the voltage at the outlet and the connection to the outlet. -
Page 29: Weak Arc Strength
(continued) Be cERtAIn to shut off the Welder, disconnect it from power, and discharge the gun to ground before adjusting, cleaning, or repairing the unit. POSSIBLE cAUSES And SOLUtIOnS Incorrect line voltage: Check the line voltage and, if insufficient, have a licensed electrician remedy the situation. Improper gauge or length of extension cord: Extension cords are not recommended. -
Page 30: Wiring Schematic
PARtS LIStS And dIAgRAMS Overload Indicator MIn/MAX Page 30 For technical questions, please call 1-800-444-3353. Wiring Schematic cS 100 SKU 98871... -
Page 31: Parts List
TECHNICIANS AND NOT BY THE BUYER. THE BUYER ASSUMES ALL RISK AND LIABILITY ARISING OUT OF HIS OR HER REPAIRS TO THE ORIGINAL PRODUCT OR REPLACEMENT PARTS THERETO, OR ARISING OUT OF HIS OR HER INSTALLATION OF REPLACEMENT PARTS THERETO. SKU 98871 For technical questions, please call 1-800-444-3353. Parts List q’ty Part... -
Page 32: Assembly Diagram
Assembly diagram Page 32 For technical questions, please call 1-800-444-3353. SKU 98871... - Page 33 If product has no serial number, record month and year of purchase instead. note: Some parts are listed and shown for illustration purposes only, and are not available individually as replacement parts. SKU 98871 For technical questions, please call 1-800-444-3353. detail of Part 23...
- Page 34 LIMItEd 1 yEAR / 90 dAy WARRAnty Harbor Freight Tools Co. makes every effort to assure that its products meet high quality and durability standards, and warrants to the original purchaser that for a period of ninety days from date of purchase...
Need help?
Do you have a question about the 98871 and is the answer not in the manual?
Questions and answers
How do I order 1e gun tube and where