Advertisement
Advertisement
Table of Contents

Subscribe to Our Youtube Channel
Related Manuals for Realtone RT212

Summary of Contents for Realtone RT212
- Page 1 Model RT212 AM/FM Dual Alarm Clock Radio Questions? Visit www.realtoneaudio.com...
- Page 2 FCC Information This device complies with Part 15 of the FCC Rules, operation is subject to the following two conditions: (1) This device may not cause harmful interference, and (2) this device must accept any interference received, including interference that may cause undesired operation. •...
-
Page 3: Table Of Contents
Table of Contents Controls and Indicators / Unit Display ........................... 1 Quick Start ..................................2 Using the Unit................................3-5 Replacing Backup Battery ...............................5 A Consumer Guide to Product Safety ..........................6 Troubleshooting ................................7 Warranty Information ................................8 Maintenance • Place the unit on a level surface away from sources of direct sunlight or excessive heat. •... -
Page 4: Controls And Indicators Unit Display
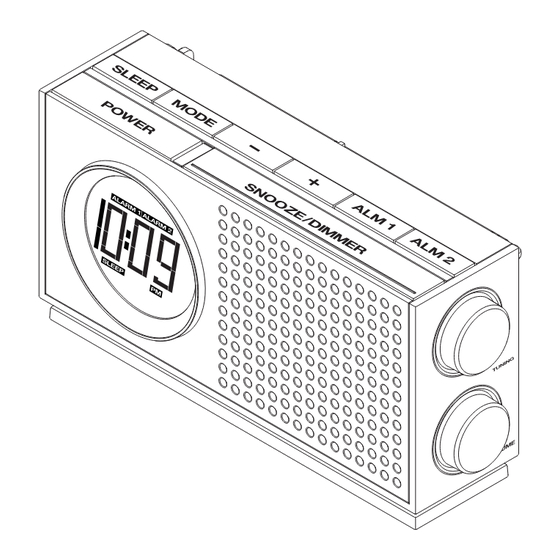
Controls and Indicators + Forward/Advance Setting Button Top Panel Alarm 1 Button Sleep Button Mode Button Alarm 2 Button Alarm Reset / Power Button Snooze/Dimmer Button FM Antenna – Reverse/Back Setting Button Rear Side Right Side Battery Pull Tab DST Switch Tuning Knob Clock Set Button Line-in Jack... -
Page 5: Quick Start
Quick Start 1: power 2: clock set DC 7.5V 500mA RESET RESET TEST TEST Connect AC adaptor to jack on back of • Move the DST switch on back of unit to the unit and plug into a wall socket. +1 or -1 (adds or subtracts an hour) Remove the tab from the battery backup •... -
Page 6: Using The Unit
Using the RT212 Connect Unit to AC Power Source Plug the included AC adaptor into the AC adaptor jack on the back of the unit and the other end into a standard 120V AC wall socket. Installing/Replacing Batteries for Portable Operation This unit requires 4 “AA”... - Page 7 Using the RT212 Arming and Disarming Alarm (Turn Alarm Function ON and OFF) Press Alarm 1 or Alarm 2 Button to arm or disarm alarm function. When armed, the related alarm icon appears in the display. Resetting the Alarm to Come on the Next Day When the alarm is sounding, press the related Alarm Button or the Power Button to stop the alarm and reset it to come on the following day.
-
Page 8: Replacing Backup Battery
Using the RT212 Using Sleep Mode Sleep mode lets you sleep to the current radio station, gradually lowering the volume until the unit shuts off at the selected time. Press the Sleep Button as needed to select an amount of time before the unit shuts off: 120, 90, 60, 30 or 15 minutes, or Off to exit sleep mode and shut the unit off. -
Page 9: A Consumer Guide To Product Safety
A Consumer Guide to Product Safety When used in the directed manner, this unit has been designed and manufactured to ensure your personal safety. However, improper use can result in potential electrical shock or fire hazards. Please read all safety and operating instructions carefully before installation and use, and keep these instructions handy for future reference. -
Page 10: Troubleshooting
Troubleshooting Possible Problem Solution Symptom Unit does not turn Power cord isn't plugged into a working Connect the power cord into a working wall socket, make wall socket sure any switch that controls the outlet is ON. Try testing a trusted device in the outlet. -
Page 11: Warranty Information
Limited 90 Day Warranty Information realtone, a division of SDI Technologies Inc. (hereafter referred to as SDI Technologies), warrants this product to be free from defects in workmanship and materials, under normal use and conditions, for a period of 90 days from the date of original purchase.
Need help?
Do you have a question about the RT212 and is the answer not in the manual?
Questions and answers