Table of Contents
Advertisement
Quick Links
Instruction Manual
MP-EG10W
Hitachi America, LTD.
2000 Sierra Point Parkway
Brisbane, Ca 94005-1835
Hitachi Sales Corporation of Hawaii
3219 Koapaka St, Honolulu, HI 96819
Tel. 808-836-3621
Thank you for buying a Hitachi product. Please take time to become familiar with
this manual and how it is set up. Keep it handy for future reference.
QR19122 © Hitachi, Ltd. 1998
HITACHI (HSC) CANADA INC.
6740 Campobello Road,
Mississauga, Ontario L5N 2L8
CANADA
Tel. 905-821-4545
Printed in Japan KY-Y(N)
Advertisement
Chapters
Table of Contents

Related Manuals for Hitachi MpegCam MP-EG10W


Summary of Contents for Hitachi MpegCam MP-EG10W
-
Page 1: Instruction Manual
3219 Koapaka St, Honolulu, HI 96819 Tel. 808-836-3621 Thank you for buying a Hitachi product. Please take time to become familiar with this manual and how it is set up. Keep it handy for future reference. QR19122 © Hitachi, Ltd. 1998... - Page 2 Chapter 1 Introduction This section gives you how to use your MP-EG10W efficiently, and explains the overview of your MP-EG10W. Before using it, read this section thoroughly. Features......................... 12 Operating Files......................14 PC Card......................... 15 Names of Each Part....................... 16 Viewing the On-Screen Display ...................
- Page 3 Chapter 1 Introduction _______________ Features A Variety of Recordings________________________________ One MP-EG10W allows you to record in three ways – moving picture (with audio), still picture, and still pic- ture with audio. Your recordings are stored in PC card* instead of videotape or film, as a video file* audio file* .
-
Page 4: A Variety Of Uses
Also, edit files, using application software PowerPoint Converter ® for Hitachi MPEG Camera for Windows 95 provided with the MP- EG10W: results in a more impressive presentation. After arranging the files, connect the MP-EG10W to a TV and execute auto play for presen- tation. - Page 5 Chapter 1 Introduction _______________ Operating Files In PLAY mode, you can use the file management function, Media Navigation, which is pro- vided with the MP-EG10W, to operate files. Here is a brief explanation of Media Navigation: File and folder________________________________________ The MP-EG10W records moving pictures, still pictures and a still picture with audio, and stores each as gathering of data.
- Page 6 _______________Chapter 1 Introduction PC Card What is a PC card? The MP-EG10W stores video and audio data in a harddisk, which is referred to as a PC card in this text. MP-HD260 PC card Initializing PC card Initialize the PC card by the following procedure before using it: q Connect AC adapter to MP-EG10W (see page 22).
-
Page 7: For Your Safety
For Your Safety The CAM/OFF/VIDEO switch turns the MP-EG10W on and off, leaving the date/time feature unaffected. If the unit is to be left unattended for a long period of time, turn the MPEG camera off. WARNING: To prevent fire or shock hazard, do not expose this unit to rain or moisture. - Page 8 Warning: This device complies with Part 15 of the FCC Rules. Operation is subject to the following two con- ditions: (1) This device may not cause harmful interference, and (2) this device must accept any interference received, including interference that may cause undesired operation. Note: This equipment has been tested and found to comply with the limits for a Class B digital device, pursuant to Part 15 of the FCC Rules.
-
Page 9: Important Safeguards
IMPORTANT SAFEGUARDS In addition to the careful attention devoted to quality standards in the manufacture of your video product, safety is a major factor in the design of every instrument. But, safety is your responsibility too. This page lists important information that will help to assure your enjoyment and proper use of MP- EG10Wand accessory equipment. - Page 10 11A An appliance and cart combi- 16 Lightning — For added protection for this video nation should be moved with care. product during a lightning storm, or when it is left unat- Quick stops, excessive force, and tended and unused for long periods of time, unplug it uneven surfaces may cause the ap- from the wall outlet and disconnect the antenna or cable- pliance and cart combination to over-...
-
Page 11: Important Safety Instructions For Ac Adapter/Charger
IMPORTANT SAFETY INSTRUCTIONS FOR AC ADAPTER/CHARGER 1. Save these Instructions - This page contains im- 10. An extension cord should not be used unless portant safety and operating instructions for AC absolutely necessary. Adapter/Charger Model MP-AC1A. Use of improper extension cord could result in a risk of fire and electric shock. -
Page 12: Read This First
• A quick index for the information you use most often (this page). • A detailed table of contents directing you to specific information quickly (page 9). Get to know your MP-EG10W by using this manual, and get to know Hitachi. We appreci- ate your business. -
Page 13: Cautions When Using
Cautions When Using Any problems that occur as a result of any of the following conditions will not be covered by our warranty. Handle the LCD screen with care: magnetism: • Do not apply force to the screen surface, as this could Do not use the unit near objects generating radio waves cause cracks, scratches or unevenness in display. -
Page 14: Before Using
Before Using Compensation for recorded contents: If the unit or PC card becomes faulty during use and no recording is possible on PC card or playback from it, we will no t be responsible for compensation for your lost recordings. Make a trial recording before recording important events: If recorded data is erased because the unit malfunctions, the data cannot be restored. -
Page 15: Checking The Provided Accessories
Checking the Provided Accessories Make sure you have following : PC Card Battery pack 3 2 AC adapter/charger DC power cord (MP-HD260) (MP-BP1A) (MP-AC1A) Connect this to the AC A 260MB hard disk. This The portable power supply To charge battery pack, etc. adapter/charger to power the stores video and audio data. -
Page 16: Table Of Contents
Contents Table For Your Safety IMPORTANT SAFEGUARDS.................... 2 IMPORTANT SAFETY INSTRUCTIONS FOR AC ADAPTER/CHARGER....... 4 Read This First........................5 Cautions When Using ......................6 Before Using ........................7 Checking the Provided Accessories .................. 8 CONTENTS TABLE......................9 Chapter 1 Introduction .................. 11 Features ............................ - Page 17 Contents Table ______________________ Auto Play of Desired Files ....................... 65 Playing Files Repeatedly (REPEAT) ....................67 Locating Starts of A Series of Files and Playing Them (SLIDE) ............69 Cheking Free Memory Area of PC Card (REMAIN) ................ 72 Switching Thumbnail Display On or Off ................... 73 Correcting File Recording Date/Time(CHG TIME menu item) ............
-
Page 18: Chapter 1 Introduction
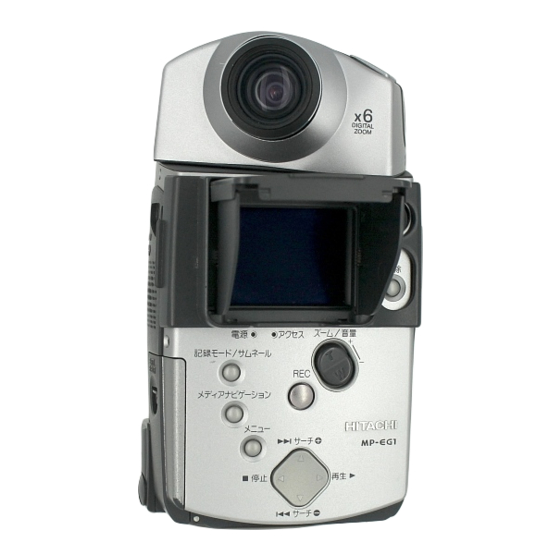
Chapter 1 Introduction _______________ Names of Each Part Front View Rear View Microphone External microphone input jack Lens Camera block Infrared receiver DC power cord connection terminal (behind the lid) B. LIGHT LCD monitor DEL·DIV button POWER CAM/OFF/PLAY indicator power switch Speaker REC MODE/ AV input and output/... - Page 19 Chapter 2 Set-up This section explains how to set up your MP-EG10W for recording. Before you start to record, be sure to read the section thoroughly. Charging battery pack....................20 Loading the battery pack....................21 Using power supply from AC outlet................22 Loading the PC card .....................
- Page 20 Chapter 3 Recording This section explains how to record moving pictures, still pictures, etc. Read thoroughly before starting to record. Rotating the camera block and attaching the sunshade ..........30 Recording moving pictures................... 31 Recording still pictures ....................33 Recording still pictures at intervals ................34 Recording consecutive still pictures ................
- Page 21 Chapter 3 Recording ________________ Recording a Still Picture with Audio The MP-EG10W can record a still picture, followed by recording of audio. * Still picture with audio files recorded by the MP-EG10W cannot be played back by the MP-EG1A. * All files recorded by the MP-EG10W are saved once in “folder 0” (see page 14): You cannot designate another folder in advance.
- Page 22 Chapter 4 Using Media Navigation (Playback) This section explains how to use Media Navigation for playing or arranging recorded files, editing folder for auto play, etc. Also, see “Operating Files” on page 14. Starting Media Navigation.................... 42 On-screen display and basic operation of Media Navigation........43 Playing back files......................
-
Page 23: Transferring Files To Another Folder (Move Menu Item)
Chapter 4 Using Media Navigation (Playback) ______ Transferring Files to Another Folder (MOVE menu item) You can transfer the files in a non-identified folder (folder 0) to folders 1- 5 and gather files for auto play. There are two ways of transferring files: all files in folder or specified files in folder. -
Page 24: Sorting Files
Chapter 4 Using Media Navigation (Playback) ______ Sorting files You can rearrange files in a folder: to move a file you frequently play to the top of file list, change the display order in a folder for auto play, etc. * Start Media Navigation (see page 42) and display the FOLDER select screen to start. - Page 25 ______Chapter 4 Using Media Navigation (Playback) Playing Files Repeatedly (REPEAT) You can repeatedly play back files. There are two ways of repeat play: all files in folder or specified files in folder. Repeat play of all files in folder__________________________ * Start Media Navigation (see page 42) and display the FOLDER select screen to start.
-
Page 26: Checking Free Memory Area Of Pc Card (Remain)
Chapter 4 Using Media Navigation (Playback) ______ Checking Free Memory Area of PC Card (REMAIN) Check the remaining free memory area of PC card before you start to record. You can do this by the following procedure: * Start Media Navigation (see page 42) and display the FOLDER select screen to start. - Page 27 ______Chapter 4 Using Media Navigation (Playback) Switching Thumbnail Display On or Off You can switch the thumbnail display on and off with the file select screen. If thumbnail dis- play is switched off, you can display six files on the screen at a time. * Start Media Navigation (see page 42) and display the FOLDER select screen to start.
- Page 28 Chapter 4 Using Media Navigation (Playback) ______ Correcting File Recording Date/Time (CHG TIME menu item) When the internal clock goes wrong because of consumption of the built-in battery, the date and time on which you start to record will not be recorded correctly. In this case, charge the built-in battery, correct the clock, and also correct the file recording date/time by the follow- ing procedure.
- Page 29 ______Chapter 4 Using Media Navigation (Playback) Correct the recording date/time. The number of year for the selected file in folder will be high- lighted. Press s or t to highlight the number you want to correct, and then press to increase or decrease it. * The seconds display counts up or down in 2-seconds unit.
- Page 30 Chapter 4 Using Media Navigation (Playback) ______ Display the menu and select CHG TIME. Press the MENU button to display the menu, and press select CHG TIME. Display the screen for correcting the record- ing date/time. Press s. The menu will disappear and the screen for correcting the recording date/time will appear.
- Page 31 ______Chapter 4 Using Media Navigation (Playback) Moving to Setting You can move to the screen for setting up during file playback or Media Navigation. * You can also use the remote control to operate. Display the menu and select SET UP. Press the MENU button to display the menu, and press select SET UP.
- Page 32 Chapter 4 Using Media Navigation (Playback) ______ To designate files in folder for repeat play_________________ * Start Media Navigation (see page 42) and display the FOLDER select screen to start. * You can also use the remote control to operate. * Using the MACRO/SHIFT button allows repeat play of multiple files at one time.
- Page 33 ______Chapter 4 Using Media Navigation (Playback) Locating Starts of a Series of Files and Playing Them (SLIDE) You can project slides of files (locate beginnings of a series of files) in folder. There are two ways of projecting slides: all files in the folder or specified files in the folder. To project slides of all files in folder______________________ * Start Media Navigation (see page 42) and display the FOLDER select screen to start.
- Page 34 Chapter 4 Using Media Navigation (Playback) ______ Project slide of next file. Press The next file will be played. * Press to return to the previous file (only when MP-EG10W stops at the start of file for moving pictures and still with audio).
- Page 35 ______Chapter 4 Using Media Navigation (Playback) Display the menu and select SLIDE. Press the MENU button to display the menu, and press select SLIDE. Project slide of first file. Press s. The selected files will be played from the bottom of list. Moving pictures: The first picture of file will appear and freeze.
- Page 36 ______Chapter 4 Using Media Navigation (Playback) Display the screen for selecting the location where you want to move the file. Press s. The screen will change to that for deciding the location where the file is to be moved. Move the file to your designated location. to select the location where the files are to be dis- played.
-
Page 37: Copying Files
Chapter 4 Using Media Navigation (Playback) ______ Copying Files You can copy files to another folder. There are two ways of copying files: all files in folder or specified files in folder. To copy all files in folder _______________________________ * Start Media Navigation (see page 42) and diaplsy the FOLDER select screen to start. - Page 38 ______Chapter 4 Using Media Navigation (Playback) Designate the folder to which copy is to be made. Press to change the folder number to which copy is to be made. Start copying. Press the REC/PAUSE button. All files will be copied to the designated folder, and the screen for copying (the screen in step 2) will be restored.
- Page 39 Chapter 4 Using Media Navigation (Playback) ______ Display the menu and select COPY. Press the MENU button to display the menu, and press select COPY. Display the screen for copying. Press s. The menu will disappear and the screen for copying will appear. * To stop copying, press t.
- Page 40 ______Chapter 4 Using Media Navigation (Playback) Auto Play of Desired Files You can automatically play desired files in sequence after gathering them in one folder. There are two ways of auto play: playing all files in a folder or only specified files in it. * Still pictures are displayed for about three seconds during auto play, and the next file will follow.
- Page 41 Chapter 4 Using Media Navigation (Playback) ______ Auto play specifying files in folder _______________________ You can specify a file in the folder and start auto play from that file, followed by all files listed above that file. * Start Media Navigation (see page 42) and display the FOLDER select screen to start.
- Page 42 ______Chapter 4 Using Media Navigation (Playback) Designate the folder to which you want to transfer files. Press to select the number of folder to which you are to transfer files. Execute the transfer. Press the REC/PAUSE button. Transfer will be executed and the screen for transfer (the screen in step 2) will be restored. The transferred files have now been stored in the selected folder.
- Page 43 Chapter 4 Using Media Navigation (Playback) ______ Display the file select screen. Press in the FOLDER select screen to select the folder containing the file you want to transfer, and then press s. The file select screen will appear. Display the menu and select MOVE. Press the MENU button to display the menu, and press select MOVE.
- Page 44 ______Chapter 4 Using Media Navigation (Playback) Execute the transfer. Press the REC/PAUSE button. The transfer has been decided and the screen for selecting the file to transfer (the screen in step 4) will be restored. The transferred file has now disappeared from this select screen. You can continue to change folders of other files by repeating steps 4-6.
-
Page 45: Deleting The File
Chapter 4 Using Media Navigation (Playback) ______ Deleting the File It is recommended that you delete as many unnecessary files as possible to expand the free memory area of PC card. There are two ways of deleting the file-deletion while playing back the file and deletion by selecting the file. - Page 46 ______Chapter 4 Using Media Navigation (Playback) Select the file and deleting it: ___________________________ * Start Media Navigation (see page 42) and display the FOLDER select screen to start. * Using MACRO/SHIFT button allows you to delete multiple files at one time. Display the file select screen.
-
Page 47: Deleting All Files In Folder
Chapter 4 Using Media Navigation (Playback) ______ Deleting All Files in Folder You can delete all files in a folder at one time. * It is recommended that you use AC power supply. * Start Media Navigation (see page 42) and display the FOLDER select screen to start. * Take great care when deleting files, since the files you have deleted once cannot be restored. -
Page 48: Protecting Files (Chg Lock Menu Item)
______Chapter 4 Using Media Navigation (Playback) Protecting Files (CHG LOCK menu item) You can lock files to protect them from accidental deletion. The protected file can be unlocked by the same procedure as locking. There are two ways of locking or unlocking files: all files in folder or specified files in folder. - Page 49 Chapter 4 Using Media Navigation (Playback) ______ Lock or unlock files. Press to lock or unlock the files. Pressing the REC/PAUSE button will lock or unlock all files. Perform steps 3 and 4 to lock or unlock all files in other folders. Exit the CHG LOCK menu item.
- Page 50 ______Chapter 4 Using Media Navigation (Playback) Display the CHG LOCK setting screen. Press s. The menu will disappear and the CHG LOCK setting screen will appear. * To stop locking or unlocking, press t. Select the files you want to lock or unlock. to select the folder in which you want to lock or unlock all files, and then press s.
-
Page 51: Starting Media Navigation
Chapter 4 Using Media Navigation (Playback) ______ Starting Media Navigation The following describes how to start Media Navigation used for management of recorded files (see page 14). Always start Media Navigation before performing each operation. CAM/OFF/PLAY switch Starting Media Navigation. Hold down the red button at the center of the switch and set the switch to PLAY. -
Page 52: On-Screen Display And Basic Operation Of Media Navigation
______Chapter 4 Using Media Navigation (Playback) On-Screen Display and Basic Operation of Media Navigation. There are two basic screens for Media Navigation - the FOLDER select screen, which dis- plays file number list in folders, and the file select screen, which displays a list of files. Following are details of the displays on these screens and the basic operation methods. - Page 53 Chapter 4 Using Media Navigation (Playback) ______ To open the folder: Press s to open the selected folder, and the file select screen will appear (see page 48). * If you have selected multiple folders, you cannot open them. To display the menu: Press the MENU button, and the menu for operating folders will appear.
- Page 54 ______Chapter 4 Using Media Navigation (Playback) To select a file: Selected file Higlighted section Press to move the highlighted section up or down and select a file. When the folder contains more files than can be displayed on one screen, hold the next screen will appear.
-
Page 55: Playing Back Files
Chapter 4 Using Media Navigation (Playback) ______ Playing Back Files Operate the following to play back recorded files: * Start Media Navigation (see page 42) and display the FOLDER select screen to start. * You can also use the remote control to operate. Display the file select screen. - Page 56 ______Chapter 4 Using Media Navigation (Playback) Adjusting the volume When you hear the sound from the built-in speaker, use the ZOOM/VOL button to adjust the volume. Pressing increases the volume, and pressing – decreases the volume, When this button is pressed, the volume bar will appear on the left end of the LCD monitor.
-
Page 57: Playback Using The Remote Control
Chapter 4 Using Media Navigation (Playback) ______ Playback Using the Remote Control You can use the remote control to operate playback. * Insert the lithium battery into the remote control in advance. (See page 27) Set the CAM/OFF/PLAY switch to PLAY. Hold down the red button at the center of the switch and set the switch to PLAY. -
Page 58: Dividing Moving Pictures
______Chapter 4 Using Media Navigation (Playback) Dividing Moving Pictures To divide a moving picture file: This is useful when you edit a moving picture file by dividing an unnecessary portion and deleting it. * File once divided cannot be reconnected. * Only moving picture files can be divided. -
Page 59: Macro Recording
________________Chapter 3 Recording Macro Recording You can focus on a subject as near as 8 cm and record it. Set the CAM/OFF/PLAY switch to CAM. Hold down the red button at the center of the switch and set the switch to CAM. The image from the lens will appear on the LCD monitor, and the MP-EG10W will enter the record pause 10/24/1998 mode (“PAUSE”... -
Page 60: Recording With Backlight Corrected
Chapter 3 Recording ________________ Recording with Backlight Corrected If subject is darker than background, use the backlight correction function. Set the CAM/OFF/PLAY switch to CAM. Hold down the red button at the center of the switch and set the switch to CAM. The image from the lens will appear on the LCD monitor, and the MP-EG10W will enter the record pause 10/24/1998 mode (“PAUSE”... -
Page 61: Recording Image Of Your Portrait Using The Remote Control
________________Chapter 3 Recording Recording Image of Your Portrait Using the Remote Control Place the MP-EG10W on the stand and turn the camera block so the lens faces you. You can record yourself using the remote control. Stand Remote control (MP-RM10W) Turn the camera block. -
Page 62: Chapter 3 Recording
Chapter 3 Recording ________________ Buttons on the remote control The following shows the buttons on the remote control used for recording, and their functions: MACRO/ F.SEARCH SHIFT MACRO/SHIFT: To switch macro recording on and off (see page 37). STOP PLAY START/STOP: To start or stop recording. -
Page 63: Rotating The Camera Block And Attaching The Sunshade
Chapter 3 Recording ________________ Rotating the Camera Block and Attaching the Sunshade The camera block is turned to record an image of yourself when the MP-EG10W has been shipped. Rotate it before recording subjects other than yourself. If the LCD screen is difficult to see during shooting outdoors, etc., attach the sunshade (pro- vided) to the LCD screen. - Page 64 ________________Chapter 3 Recording Recording Moving Pictures The MP-EG10W records moving pictures and audio. * The illustrations used in the following text may be dif- ferent from the actual pictures. * Moving picture files recorded by the MP-EG10W cannot be played back by the MP-EG1A. * All files recorded by the MP-EG10W are saved once in “folder 0”...
- Page 65 Chapter 3 Recording ________________ Check the image quality mode. The quality of image to be recorded depends on REM 0:15 the setting of this mode: Switch the image quality 0:00:00 mode between FINE and STND. * The maximum recording time of PC card depends on whether you choose image quality mode FINE or STND (see page 94).
-
Page 66: Recording Still Pictures
________________Chapter 3 Recording Recording Still Pictures * If a still picture has been recorded, the remaining number of storable still pictures (REM) which appears in the on-screen display may not decrease. See “Remaining number indicator of storable still pic- tures” on page 35. * All files recorded by the MP-EG10W are saved once in “folder 0”... -
Page 67: Recording Still Pictures At Intervals
Chapter 3 Recording ________________ Recording Still Pictures at Intervals If the interval recording has been set (see page 96), you can automatically record still pictures at a specified interval. * Check the free memory area on PC card and battery remaining level. * It is recommended that you use AC power supply. -
Page 68: Recording Consecutive Still Pictures
________________Chapter 3 Recording Recording Consecutive Still Pictures This record mode allows you to automatically record five consecutive still pictures at a speed of about two pic- tures per second. * If the brightness of subject changes abruptly during consecutive recording, it could result in overexposure or underexposure. * All files recorded by the MP-EG10W are saved once in “folder 0”... -
Page 69: Charging Battery Pack
Chapter 2 Set-up ___________________ Charging Battery Pack The battery pack is the portable power supply of the MP-EG10W. Charge before use. When the battery remaining level indicator flashes white, you need to re-charge the battery pack. See “Removing the battery pack” instruction (on page 21 ). A fully charged battery pack powers the MP-EG10W for about 40 minutes. Battery pack AC adapter/charger Caution: Be sure to use the specified MP-... -
Page 70: Loading The Battery Pack
___________________Chapter 2 Set-up Loading the Battery Pack Load the battery pack in the MP-EG10W by the following procedure: Open the battery compartment lid. Press the BATT. EJECT button downward. The battery compartment lid will open. BATT. EJECT button Battery compartment lid Load the battery pack. -
Page 71: Using Power Supply From Ac Outlet
Chapter 2 Set-up ___________________ Using Power Supply from AC Outlet You can also use power supply from any AC outlet. AC adapter/charger DC power cord Caution: Be sure to use the specified MP- (MP-AC1A) AC1A AC adapter/charger to use power supply from AC outlet. If you use AC adapter/chargers other than the MP-AC1A, fire or electric shock could result. -
Page 72: Loading The Pc Card
___________________Chapter 2 Set-up Loading the PC Card Set the CAM/OFF/PLAY switch to OFF before inserting or removing the PC card. * Do not use PC cards other than that specified (MP-HD260). * Do not attempt to attach an adhesive tag, etc. to the PC card to remove it easily. If the PC card is removed while the MP-EG10W is operating, it could result in malfunction. -
Page 73: Setting The Date And Time
Chapter 2 Set-up ___________________ Setting the Date and Time The recorded video/audio data management will be performed with the date and time you set when you started to record. Use the following procedure to set the MP-EG10W’s internal clock to the current date and time correctly: * You can also use the remote control to set the date and time. - Page 74 ___________________Chapter 2 Set-up I N I T I A L S E T Select DATE. S E T Press the (R.SEARCH) button to select DATE. S A V E T I A L I C A R D ENTER MENU EXIT D A T E S E T Select the date/time display system.
- Page 75 Chapter 2 Set-up ___________________ Charging the MP-EG10W’s built-in battery: The MP-EG10W incorporates a battery to power the memory which stores the date/time and various set- tings. This built-in battery will discharge after about two months, even if the MP-EG10W is not used. When the battery will discharge, “—/—/—”...
-
Page 76: Inserting Battery Into The Remote Control
___________________Chapter 2 Set-up Inserting Battery into the Remote Control Insert the provided CR2025 lithium battery into the remote control. Remote control Lithium battery (MP-RM10W) for remote control (CR2025) Pull out the battery holder. Push the tab in the direction of the arrow and hold it, then pull out the battery holder. -
Page 77: Tips For Skillful Use Of The Pc Card
Chapter 2 Set-up ___________________ Tips for Skillful Use of the PC Card Use the PC card efficiently. The PC card to be used with the MP-EG10W corresponds to film of a still camera or videotape of a camcorder, but it is a more expensive medium when compared with film and videotape. - Page 78 _______________Chapter 1 Introduction Viewing the On-Screen Display Various types of information appear on the LCD monitor. Here are meaning of each indi- cation and how to interpret them. * Note that all the following indication do not indicate at the same time. * Although a color text appears on the built-in LCD monitor, a white text appears on the TV screen.
- Page 79 Chapter 1 Introduction _______________ [PLAY MODE] * Note that all the follwing indications do not light at the same time. * Although a color text appears on the built-in LCD monitor, a white text appears on the TV screen. On-Screen Display during Recording q File lock !0 Battery remaining level w Record mode...
Need help?
Do you have a question about the MpegCam MP-EG10W and is the answer not in the manual?
Questions and answers