Table of Contents
Advertisement
Quick Links
Owner's Manual
General Assembly, Installation, and Operation Instructions
ATTENTION! READ INSTRUCTIONS CAREFULLY BEFORE ASSEMBLY OR USE
Models: "Yellow Flame"; B18, 20, 24 or 30; FH or FXH; -Z 18, 20, 24 or 30; ME, SE, or RE; Natural Gas or Propane
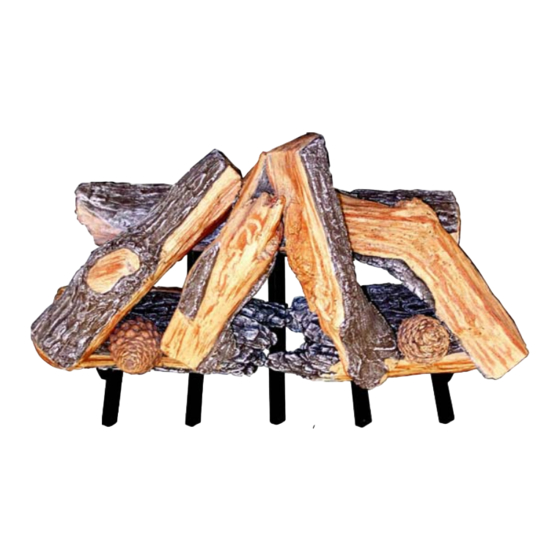
18" Models: Bonfire, Evening Prestige, LoneStar, Manzanita, Prestige, Frosted Oak, White Birch and CrossFire.
20" Models: Evening CampFire, Evening Desire, Evening LoneStar, Evening Prestige, Evening CrossFire, LoneStar
and Frosted Oak.
24" and 30" Models: Bonfire, Evening CampFire, Evening Desire, Evening LoneStar, Evening Prestige, Evening
CrossFire, LoneStar, Manzanita, Prestige, Frosted Oak, White Birch and CrossFire.
WARNING: If the information in this manual is not
followed exactly, a fire or explosion may result caus-
ing property damage, personal injury or loss of life.
— Do not store or use gasoline or other flammable
vapors and liquids in the vicinity of this or any other
appliance.
— WHAT TO DO IF YOU SMELL GAS
Do not try to light any appliance.
•
Do not touch any electrical switch; do not use
•
any phone in your building.
Immediately call your gas supplier from a
•
neighbor's phone. Follow the gas supplier's
instructions.
If you cannot reach your gas supplier, call the fire
•
department.
— Installation and service must be performed by a
qualified installer, service agency or the gas
supplier.
Installation must be performed by a licensed plumber or gas fitter.
•
The chimney flue damper, when used with gas logs, will be welded open or completely removed.
•
A CO detector shall be installed in the room where the appliance is installed.
•
This is a vented gas appliance for use only in a solid-fuel burning fireplace constructed on non-combustible material
with a fully functional chimney flue which must vent all of the products of combustion.
WHEN OPERATING, THE CHIMNEY DAMPER MUST BE FULLY OPEN
The minimum permanent chimney or damper opening is the minimum permanent free opening required by Standards or
Codes to ensure safe operation of the appliance and must be at least 39 square inches for 18"-20" models, 51 square inches
on 24" models and 64" on 30" models based on a minimum chimney height of 10 feet. It is NOT the minimum operating
Yellow Flame Contemporary Gas Heaters are certified to the following standards:
VENTED DECORATIVE APPLIANCE - ANSI Z21.60b-2004, CSA 2.26b-2004
YELLOW FLAME
DECORATIVE VENTED GAS LOG SET
®
Available log set styles and sizes
In the Commonwealth of Massachusetts:
WARNING
MINIMUM FIREPLACE FLUE REQUIREMENTS
damper position, which should be wide open when burning.
12028 E. PHILADELPHIA ST.
WHITTIER, CA CALIFORNIA 90601 U.S.A.
www.rasmussen.biz
INSTALLER: Leave this manual with the appliance.
CONSUMER: Retain this manual for future reference .
Improper installation, alteration, service or
maintenance can cause property damage, personal
injury or loss of life. Read these instructions
thoroughly before installation. For assistance or
additional information, consult your gas log dealer,
qualified installer, service agency or gas supplier.
This appliance may be installed in an aftermarket,
permanently located, manufactured (mobile) home,
where not prohibited by local codes.
This appliance is only for use with type of gas
indicated on the rating plate.
Installation must conform with local codes or, in the
absence of local codes, with the National Fuel Gas
Code, ANSI Z223.1/NFPA 54.
1
Report #10-40
REV YFZ 0410
Last Printed. 4/28/2010 9:04 AM
Advertisement
Table of Contents

Related Manuals for Rasmussen Yellow Flame

Summary of Contents for Rasmussen Yellow Flame
- Page 1 Last Printed. 4/28/2010 9:04 AM ATTENTION! READ INSTRUCTIONS CAREFULLY BEFORE ASSEMBLY OR USE Models: “Yellow Flame”; B18, 20, 24 or 30; FH or FXH; -Z 18, 20, 24 or 30; ME, SE, or RE; Natural Gas or Propane Available log set styles and sizes 18”...
- Page 2 IMPORTANT INFORMATION Due to high temperatures, the appliance should be located out of traffic and away from furniture and draperies. • Children and adults should be alerted to the hazard of high surface temperatures and should stay away to avoid burns or •...
-
Page 3: Parts List
PARTS LIST REQUIRED TOOLS AND MATERIALS Adjustable Wrench and Pipe Wrench. Pipe Sealing compound is required if fittings not already pre-threaded with Teflon tape to prevent gas leaks. DO NOT use Teflon tape or pipe compound on other tapered fittings. 18 Hand held variable remote for “-RE”... -
Page 4: General Installation Instructions
GENERAL INSTALLATION INSTRUCTIONS WARNING: Failure to position the parts in accordance with these diagrams or failure to use only parts specifically approved with this appliance may result in property damage or personal injury. The appliance and it’s appliance main gas valve must be disconnected from the gas supply piping system during any pressure testing of that system at test pressures in excess of 1/2 psi. - Page 5 INSTALLATION AND GAS SUPPLY CONNECTION STEP TWO: BURNER INSTALLATION D) Gas Supply Pipe 1. Place Burner-Grate Assembly inside the firebox, centered from left to right, within 1” to 2” of rear wall (Figure 4). 2. The “EASY” Safety Valve should be placed as far forward and to the E) Flex side of the burner pan as possible (Figure 4B).
- Page 6 PAN MEDIUM (Amount supplied will vary with each size and style of burner) STEP ONE: Completely cover Burner Pipe and Ember Boosters with Pan Medium (Figures 6 and 7A) starting from rear of burner pan and moving toward leading edge. Use entire contents of bag provided, allowing medium to spill over leading edge of burner pan Figures 6 and 7B.
-
Page 7: Log Placement
LOG PLACEMENT CAUTION: Crowded logs will cause poor combustion and result in excessive soot formation. Depending on the log style and size, log sets contain from 6 to 10 individual logs and sometimes pinecones. The largest logs will be the Front and Rear Logs. Some log sets have two separate front logs which simulate a charred/burnt effect between the two halves. - Page 8 PLACEMENT OF “EASY” SAFETY VALVE AND REMOTE RECEIVER The “EASY” Safety Valve (Figures 13 and 17A) and Remote Receiver (-RE and -SE models) (Figure 17A) are both ad- versely affected by heat and must be placed as far forward and to the side of the burner pan as possible. The “EASY” Safety Valve may also be placed open face side down with heat shield up as shown in Figure 14.
-
Page 9: Lighting And Operation
LIGHTING AND OPERATION IMPORTANT! CHIMNEY DAMPER MUST BE WIDE OPEN! THE FLUE MUST VENT ALL PRODUCTS OF COMBUSTION. DAMPER AND GLASS DOORS MUST BE FULLY OPEN BEFORE LIGHTING OR BURNING FOR PROPER VENTILATION AND TO PREVENT HEAT DAMAGE TO VALVE. FIGURE 18 STEP ONE: PILOT LIGHTING (ALL MODELS) C) KNOB POSITION INDICATOR... - Page 10 BURNER OPERATION (“RE” VARIABLE FLAME HEIGHT MODELS AND“SE” REMOTE READY MODELS) FIGURE 21 1. Turn VALVE KNOB to “ON” position (Figure 21A) TRANSMITTER KNOB POSITION C) PILOT ADJUSTMENT 2. Slide switch on the RECEIVER (Figure 22) to INDICATOR SCREW “REMOTE” position. “RE Models 3.
-
Page 11: Normal Operating Characteristics
IMPORTANT This Yellow Flame Gas Log set is for use only in a fully functioning wood burning fireplace with the damper wide open. The flue must vent all of the products of combustion. -
Page 12: Troubleshooting
ANSI/NCSBCS A225.1/NFPA 501A, Manufactured Home Installations Standard. HOW TO ORDER PARTS Parts can be ordered through the supplier from whom you purchased your Yellow Flame Log Set or from Rasmussen. When ordering parts, please specify; 1. Model number and Serial number of the Burner (available on the Rating Plate). - Page 13 (2) RASMUSSEN shall not be liable for any loss, damage incidental ticular purpose, for a period of: or consequential damages of any kind, whether based upon...
Need help?
Do you have a question about the Yellow Flame and is the answer not in the manual?
Questions and answers