Table of Contents
Advertisement
Quick Links
Advertisement
Table of Contents

Related Manuals for Billion BIPAC-5100


Summary of Contents for Billion BIPAC-5100
- Page 1 BIPAC-5100/5100W (Wireless) ADSL Router User Manual...
-
Page 2: Table Of Contents
1.2 Features of the BIPAC-5100/5100W ..............1 1.3 Applications for the BIPAC-5100/5100W ............4 Chapter 2 ....................5 2.1 Important note for using the BIPAC-5100(W) ADSL Router......5 2.2 Package Contents ....................5 2.3 The Front LEDs....................6 2.4The Rear Ports....................... 7 Chapter 3 ....................8... -
Page 3: Chapter 1
802.11b is only supported for the BIPAC-5100W 1.1 Introducing the BIPAC-5100/5100W Welcome to the Billion BIPAC-5100(W) Router. Your Billion router is an “all-in-one” unit, combining an ADSL modem, ADSL router and Ethernet network switch, providing everything you need to get the machines on your network connected to the Internet over your ADSL broadband connection. - Page 4 A 4-port 10/100Mbps fast Ethernet switch is built in with automatic switching between MDI and MDI-X for 10Base-T and 100Base-TX ports. An Ethernet straight or cross-over cable can be used directly for auto detection. Multi-Protocol to Establish A Connection Supports PPPoA (RFC 2364 - PPP over ATM Adaptation Layer 5), RFC 1483 encapsulation over ATM (bridged or routed), PPP over Ethernet (RFC 2516) and IPoA (RFC1577) to establish a connection with the ISP.
- Page 5 Users can specify some services to be visible from outside users. The router can detect incoming service requests and forward either a single port or a range of ports to the specific local computer to handle it. For example, a user can assign a PC in the LAN acting as a WEB server inside and expose it to the outside network.
-
Page 6: Applications For The Bipac-5100/5100W
1.3 Applications for the BIPAC-5100/5100W... -
Page 7: Chapter 2
802.11b is only supported for the BIPAC-5100W 2.1 Important note for using the BIPAC-5100(W) ADSL Router Do not use the BIPAC-5100 / 5100W in high humidity or high temperatures. Do not use the same power source for the BIPAC-5100 / 5100W as other equipment. -
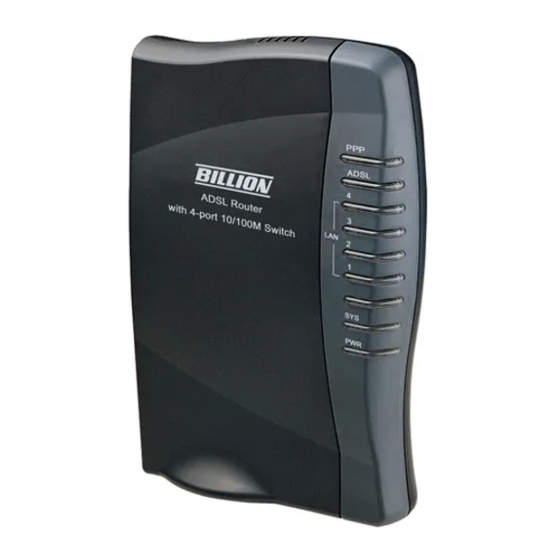
Page 8: The Front Leds
Console (PS2-RS232) Cable AC-DC power adapter (12V DC, 1A) Quick Start Guide 2.3 The Front LEDs Meaning PPP : Lit steady when there is a PPPoA / PPPoE connection. Lit when successfully connected to an ADSL DSLAM ADSL: (“linesync”). Lit when connected to an Ethernet device. LAN Port Green for 100Mbps;... -
Page 9: The Rear Ports
2.4The Rear Ports * Only the BIPAC-5100W has a wireless interface and antenna. BIPAC-5100 router does NOT have an antenna or wireless interface. Port Meaning Power Power ON/OFF switch Switch Connect the supplied power adapter to this jack. After the device is powered on, press it to reset the device or restore to factory default settings. -
Page 10: Chapter 3
Ethernet network adapter must be installed. If not, please refer to your Windows-related or other operating system manuals. Any TCP/IP capable workstation can be used to communicate with or through the BIPAC-5100(W). To configure other types of workstations, please consult the manufacturer’s documentation. - Page 11 Configuring PC in Windows XP 1. Go to Start / Control Panel (in Classic View). In the Control Panel, double-click on Network Connections 2. Double-click Local Area Connection. 3. In the Local Area Connection Status window, click Properties. 4. Select Internet Protocol (TCP/IP) and click Properties.
- Page 12 Configuring PC in Windows 2000 1. Go to Start / Settings / Control Panel. In the Control Panel, double-click on Network and Dial-up Connections. 2. Double-click Local Area Connection. 3. In the Local Area Connection Status window click Properties. 4. Select Internet Protocol (TCP/IP) and click Properties.
- Page 13 Configuring PC in Windows 98/Me 1. Go to Start / Settings / Control Panel. In the Control Panel, double-click on Network and choose the Configuration tab. 2. Select TCP/IP ->NE2000 Compatible, or the name of your Network Interface Card (NIC) in your 3.
-
Page 14: Factory Default Settings
Configuring PC in Windows NT4.0 1. Go to Start / Settings / Control Panel. In the Control Panel, double-click on Network and choose the Protocols tab. 2. Select TCP/IP Protocol and click Properties. 3. Select the Obtain an IP address from a DHCP server radio button and click OK. -
Page 15: Information From Your Isp
DHCP server: DHCP server is enabled. Start IP Address: 192.168.1.100 IP pool counts: 100 3.2.1 Username and Password The default username and password are “admin” and “admin” respectively. If you ever forget the password to log in, you may press the RESET button up to 6 seconds to restore the factory default settings. -
Page 16: Configuring With Your Web Browser
Open your web browser, enter the IP address of your router, which by default is 192.168.1.254, and click “Go”, a user name and password window prompt will appear. The default username and password are “admin” and “admin”. Congratulation! You are now successfully logon to the BIPAC-5100 / 5100W ADSL Router! -
Page 17: Chapter 4
Advanced setup (Password, LAN, Wireless, WAN, NAT, Security, Dynamic DNS, Time Zone, Remote Management, UPNP) Maintenance (System Status, DHCP Table, Wireless, Diagnostic, Firmware) Logout. Please see the relevant sections of this manual for detailed instructions on how to configure your Billion router. -
Page 18: Wizard Setup
4.1 Wizard Setup 4.1.1 Wizard Setup Mode: Select Routing (default) if your ISP allows multiple computers to share an Internet account. Otherwise select Bridge. Encapsulation: Select the encapsulation type your ISP uses from the Encapsulation drop-down list box. Choices vary depending on what you select in the Mode field. -
Page 19: Pppoe
4.1.2 PPPoE Select PPPoE from the Encapsulation in the first wizard screen to display the screen as shown. Service Name: Type the name of your PPPoE service here User Name: Enter the user name exactly as your ISP assigned. Password: Enter the password associated with the user name above. IP Address: Type your ISP assigned IP address in the IP Address text box below. -
Page 20: Enet Encap
IP Address: Type your ISP assigned IP address in the IP Address text box below. Network Address Translation: Select None, SUA Only or Full Feature from the drop-sown list box. Refer to the NAT chapter for more details. 4.1.4 ENET ENCAP Select ENET ENCAP from the Encapsulation in the wizard screen to display the screen as shown. -
Page 21: Pppoa
4.1.5 PPPoA Select PPPoE from the Encapsulation in the first wizard screen to display the screen as shown. Service Name: Type the name of your PPPoE service here User Name: Enter the user name exactly as your ISP assigned. Password: Enter the password associated with the user name above. IP Address: Type your ISP assigned IP address in the IP Address text box below. - Page 22 DHCP client. If set to None, the DHCP server will be disabled. If set to Relay, the BIPAC-5100/5100W acts as a surrogate DHCP server and relays DHCP requests and responses between the remote server and the clients. Enter the IP address of the actual, remote DHCP server in the Remote DHCP Server field in this case.
-
Page 23: Wireless Lan
(Internet Group Multicast Protocol) is a network-layer protocol used to IGMP establish membership in a Multicast group - it is not used to carry user data. The BIPAC-5100/5100W supports both IGMP version 1 (IGMP-v1) and IGMP-v2. Select None to disable it 4.2.2 Wireless LAN 802.11b is only supported for the BIPAC-5100W... -
Page 24: Mac Filter
the ESSID through passive scanning. Channel ID: Select the ID channel that you would like to use. RTS/CTS Threshold: Enter a value between 0 and 2432. Fragmentation Threshold: Enter a value between 256 and 2432. WEP Encryption: To prevent unauthorized wireless stations from accessing data transmitted over the network, the router offers highly secure data encryption, known as WEP. -
Page 25: Wan Setup
MAC addresses not listed will be denied access to the router. MAC Address: Enter the MAC addresses (xx:xx:xx:xx:xx:xx) 4.2.4 WAN Setup A WAN (Wide Area Network) is an outside connection to another network or the Internet. To change BIPAC-5100/5100W’s WAN remote node settings, click WAN. - Page 27 4.2.4.1 Half Bridge Name: Enter the name of your Internet Service Provider Mode: Select Routing (default) or Bridge Encapsulation: select Bridge in the Mode field, select either PPPoA or RFC 1483. select Routing in the Mode field, select PPPoA, RFC 1483, ENET ENCAP or PPPoE. Multiplex: Select the method of multiplexing used by your ISP.
-
Page 28: Nat
Virtual Circuit ID: VPI and VCI define a virtual circuit. VPI: The valid range for the VPI is 0 to 255 VCI: The valid range for the VCI is 32 to 65535 ATM QoS Type: Select CBR to specify fixed (always-on) bandwidth for voice or data traffic. -
Page 29: Selecting The Nat Mode
4.2.5.1 Selecting the NAT Mode None: Select this radio button to disable NAT SUA Only: Select this radio button if you have just one public WAN IP address for your router. Edit Details: Click this link to go to the NAT - Edit SUA/NAT Server Set screen Full Feature: Select this radio button if you have multiple public WAN IP addresses for your router. -
Page 30: Configuring Address Mapping
One-to-one NAT mapping type. M-1: Many-to-One mode maps multiple local IP addresses to one global IP address. This is equivalent to SUA (i.e., PAT, port address translation), Billion's Single User Account feature that previous Billion routers supported only. -
Page 31: Editing An Address Mapping Rule
One-to-one NAT mapping type. M-1: Many-to-One mode maps multiple local IP addresses to one global IP address. This is equivalent to SUA (i.e., PAT, port address translation), Billion's Single User Account feature that previous Billion routers supported only. -
Page 32: Dynamic Dns
here if you have a dynamic IP address from your ISP. Global End IP: This is the ending Inside Global IP Address (IGA). This field is N/A for One-to-one, Many-to-One and Server mapping types. Server Mapping Set: Only available when Type is set to Server. Select a number from 1 to 10 from the drop-down menu to choose a server set from the NAT - Address Mapping Rules screen. -
Page 33: Time Zone
Host Name: Type the domain name assigned to your BIPAC-5100/5100W by your Dynamic DNS provider. E-mail Address: Type your e-mail address. User: Type your user name. Password: Type the password assigned to you. Enable Wildcard: Select this check box to enable DYNDNS Wildcard. - Page 34 Router use the time server (that you configured above) to set its internal system clock. Please wait for up to 60 seconds while the BIPAC-5100/5100W locates the time server. If the BIPAC-5100/5100W cannot find the time server, please check the time server protocol and its IP address.
-
Page 35: Remote Management
Secured Client IP: The default 0.0.0.0 allows any client to use this service to remotely manage the BIPAC-5100/5100W. Type an IP address to restrict access to a client with a matching IP address. - Page 36 Enable the Universal Plug and Play (UPnP) Service: Select this checkbox to activate UPnP. Be aware that anyone could use a UPnP application to open the web configurator's login screen without entering the BIPAC-5100/5100W's IP address Allow users to make configuration changes through UPnP: Select this check...
- Page 37 in the Components selection box. Step 4. Click OK to go back to the Add/Remove Programs Properties window and click Next. Step 5. Restart the computer when prompted. Follow the steps below to install the UPnP in Windows XP. Step 1. Click Start and Control Panel. Step 2.
- Page 38 Step 5. In the Networking Services window, select the Universal Plug and Play check box. Step 6. Click OK to go back to the Windows Optional Networking Component Wizard window and click Next. Auto-discover Your UPnP-enabled Network Device Step 1. Click start and Control Panel. Double-click Network Connections. An icon displays under Internet Gateway.
- Page 39 Step 3. In the Internet Connection Properties window, click Settings to see the port mappings there were automatically created. Step 4. You may edit or delete the port mappings or click Add to manually add port mappings.
-
Page 40: Web Configurator Easy Access
Web Configurator Easy Access With UPnP, you can access the web-based configurator on the BIPAC-5100/5100W without finding out the IP address of the BIPAC-5100/5100W first. This comes helpful if you do not know the IP address of the BIPAC-5100/5100W. Follow the steps below to access the web configurator. - Page 41 Step 4. An icon with the description for each UPnP-enabled device displays under Local Network. Step 5. Right-click on the icon for your BIPAC-5100/5100W and select Invoke. The web configurator login screen displays. Step 6. Right-click on the icon for your BIPAC-5100/5100W and select Properties. A...
-
Page 42: Maintenance
4.3 Maintenance Use the maintenance screens to view system information, upload new firmware, manage configuration and restart your BIPAC-5100/5100W... -
Page 43: System Status
4.3.1 System Status System Status: System Name: This is the name of the router. It is for identification purposes. RAS F/W Version: This is the firmware version and the date created. DSL FW Version: This is the DSL firmware version associated with your router Standard: This is the standard that the router is using. -
Page 44: System Statistics
WAN Information: IP Address: This is the WAN port IP address IP Subnet Mask: This is the WAN port IP subnet mask. Default Gateway: This is the IP address of the default gateway VPI/VCI: This is the Virtual Path Identifier and Virtual Channel Identifier that you entered in the first Wizard screen. -
Page 45: Dhcp Table
CPU Load: This field specifies the percentage of CPU utilization. WAN Port Statistics: This is the WAN port. Link Status: This is the status of your WAN link. Transfer Rate: This is the transfer rate in kbps. Upstream Speed: This is the upstream speed of the router Downstream Speed: This is the downstream speed of the router Node-Link: This field displays the remote node index number and link type. -
Page 46: Wireless Lan-Association List
IP Address: This field displays the IP address relative to the Host Name field MAC Address: This field displays the MAC (Media Access Control) address of the computer with the displayed host name. 4.3.4 Wireless LAN-Association List This screen displays the MAC address(es) of the wireless clients that are currently logged in to the network. -
Page 47: Diagnostic
Channel: This is the index number of the channel. IP Address: This field displays Yes if another AP or Ad-hoc network is using the channel within the router’s transmission range. 4.3.5 Diagnostic These read-only screens display information to help you identify problems with the BIPAC-5100/5100W. - Page 48 Ping: Click this button to ping the IP address that you entered. Reset System: Click this button to reboot the BIPAC-5100/5100W. A warning dialog box is then displayed asking you if you're sure you want to reboot the system.
-
Page 49: Firmware
4.3.6 Firmware To upgrade the firmware of BIPAC-5100(W), you should download or copy the firmware to your local environment first. Press the “Browse…” button to specify the path of the firmware file. Then, click “Upgrade” to start upgrading. When the procedure is completed, BIPAC-5100(W) will reset automatically to make the new firmware work. - Page 50 Reset: Click this button to clear all user-entered configuration information and return the BIPAC-5100/5100W to its factory defaults. Refer to the Resetting the BIPAC-5100/5100W section. After two minutes, log in again and check your new firmware version in the System Status screen.
-
Page 51: Chapter 5
Chapter 5 Troubleshooting If the ADSL Router is not functioning properly, you can refer first to this chapter for simple troubleshooting before contacting your service provider. This could save your time and effort but if the symptoms persist, then consult your service provider. Problems starting up the router Problem Corrective Action... -
Page 52: Problems With The Lan Interface
Frequent loss of Ensure that all other devices connected to the same ADSL linesync telephone line as your router (e.g. telephones, fax machines, (disconnections). analogue modems) have a line filter connected between them and the wall socket (unless you are using a Central Splitter or Central Filter installed by a qualified and licensed electrician), and ensure that all line filters are correctly installed and the right way around. -
Page 53: Appendix
Most problems can be solved by referring to the Troubleshooting section in the User’s Manual. If you cannot resolve the problem with the Troubleshooting chapter, please contact the dealer where you purchased this product. Contact Billion AUSTRALIA http://www.billion.com.au ©2004 Billion Electric Co., Ltd. PC Range P/L. All Rights Reserved. WORLDWIDE http://www.billion.com...
Need help?
Do you have a question about the BIPAC-5100 and is the answer not in the manual?
Questions and answers