Table of Contents
Advertisement
Quick Links
Advertisement
Table of Contents

Related Manuals for Harman MPMi


Summary of Contents for Harman MPMi
- Page 1 USER GUIDE...
- Page 2 Parts of the design of this product may be protected by worldwide patents. Part No. BD10.530100 Soundcraft is a trading division of Harman International Industries Ltd. Informa- tion in this manual is subject to change without notice and does not represent a commitment on the part of the vendor.
-
Page 3: Table Of Contents
Contents IMPORTANT SAFETY INSTRUCTIONS..................4 SAFETY SYMBOL GUIDE......................6 INTRODUCTION..........................7 THE 60-SECOND GUIDE - MFXi....................8 THE 60-SECOND GUIDE - MPMi....................10 WIRING UP..........................12 BLOCK DIAGRAMS........................16 MONO INPUT CHANNELS......................18 STEREO INPUT CHANNELS......................21 MASTER SECTION........................24 Lexicon® FX PROCESSOR OVERVIEW (MFXi only)..............28 FX OPERATION..........................29 FX PROCESSOR CONTROLS....................30 REVERBS............................31... -
Page 4: Important Safety Instructions
IMPORTANT SAFETY INSTRUCTIONS Read these instructions. Keep these instructions. Heed all warnings. Follow all instructions. Do not use this apparatus near water. Clean only with a dry cloth. Do not block any ventilation openings. Install in accordance with the manufacturer’s instructions. - Page 5 with liquids, such as vases, on the apparatus. No naked flame sources, such as lighted candles, should be placed on the apparatus. Ventilation should not be impeded by covering the ventilation openings with items such as newspapers, table cloths, curtains etc. THIS APPARATUS MUST BE EARTHED.
-
Page 6: Safety Symbol Guide
For your own safety and to avoid invalidation of the warranty please read this section carefully. SAFETY SYMBOL GUIDE For your own safety and to avoid invalidation of the warranty all text marked with these symbols should be read carefully. WARNINGS The lightning flash with arrowhead symbol, is intended to alert the user to the presence of un-insulated “dangerous... -
Page 7: Introduction
Built to the highest standards using quality components and surface mount technol- ogy, the MPMi/MFXi is designed to be as easy to use as possible. We have spent years researching the most efficient methods of control for two key reasons: 1) Engineers, musicians, writers and programmers all need to have very few inter- ruptions to the creative process;... -
Page 8: The 60-Second Guide - Mfxi
THE 60-SECOND GUIDE - MFXi To get you working as fast as possible, this manual begins with a 60-second guide. Here you can find quick information on any feature of the console. This shows the MFXi console. MUTE PHANTOM POWER MONITOR OUT SUB OUT MONO... - Page 9 12 MIX/SUB SWITCH When this switch is up, the channel’s post-pan-pot signal is routed to the Mix (left and right) buses. When the switch is depressed, the post-pan-pot signal is routed to the Sub-group (left and right) buses. 13 PEAK LED This is used to indicate that the signal is close to distorting (clipping) on a specific channel.
-
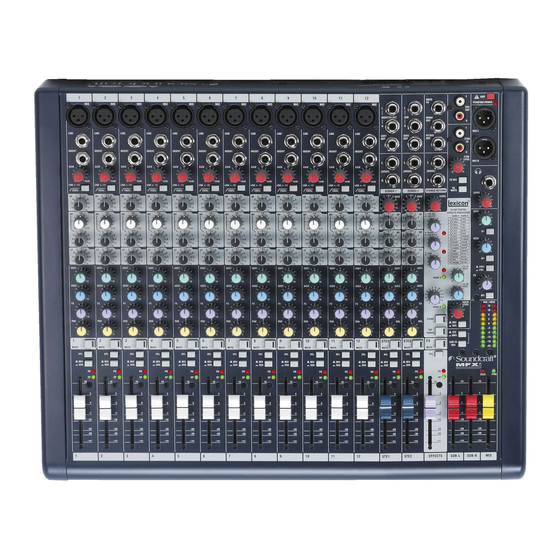
Page 10: The 60-Second Guide - Mpmi
THE 60-SECOND GUIDE - MPMi To get you working as fast as possible, this manual begins with a 60-second guide. Here you can find quick information on any feature of the console. . PHANTOM POWER MONITOR OUT SUB OUT MONO... - Page 11 12 PEAK LED This is used to indicate that the signal is close to distorting (clipping) on a specific channel. 13 SP LED The SP LED glows when a signal is present. The feed point for the LED is post-insert, pre-EQ.
-
Page 12: Wiring Up
WIRING UP Mic Input The MIC input accepts XLR-type connectors and is designed to suit a wide range of BALANCED or UNBALANCED low-level signals, whether from delicate vocals requiring the best low-noise performance, or drum kits needing maxi- mum headroom. Professional dynamic, condenser or ribbon mics are best because these will be LOW IMPEDANCE. - Page 13 A ‘Y’ lead may be required to connect to equipment with separate send and return jacks as shown below: Stereo Inputs STEREO 1/2 These accept 3-pole 6.35mm (1/4”) jacks, or 2-pole mono jacks which will automatically ground the ‘cold’ input. Use these inputs for sources such as keyboards, drum machines, synths, tape machines or as returns from process- ing units.
- Page 14 Polarity (Phase) You will probably be familiar with the concept of polarity in electrical signals and this is of particular importance to balanced audio signals. Just as a balanced signal is highly effective at cancelling out unwanted interference, so two microphones pick- ing up the same signal can cancel out, or cause serious degradation of the signal if one of the cables has the +ve and -ve wires reversed.
- Page 15 PROBLEM SOLVING Basic problem solving is within the scope of any user if a few basic rules are followed. • Get to know the Block Diagram of your console (see page 14). • Get to know what all controls and/or connections in the system are supposed to •...
-
Page 16: Block Diagrams
BLOCK DIAGRAM - MFXi FX (POST) AUX2 POST AUX2 PRE AUX1 PRE GRP(RIGHT) GRP (LEFT) MIX(RIGHT) MIX(LEFT) PFL / AFL PFL / AFL ENABLE... - Page 17 BLOCK DIAGRAM - MPMi AUX 3 POST AUX2 POST AUX2 PRE AUX1 PRE GRP(RIGHT) GRP (LEFT) MIX(RIGHT) MIX(LEFT) PFL / AFL PFL / AFL ENABLE...
-
Page 18: Mono Input Channels
MONO INPUT CHANNELS (MFXi shown) 1 Mic Input The MIC input accepts XLR-type connectors and is designed to suit a wide range of BALANCED or UNBALANCED signals. Professional dynamic, condenser or ribbon mics are best because these will be LOW IMPEDANCE. You can use low-cost HIGH LINE IMPEDANCE mics, but the level of background noise will be higher. - Page 19 The Send may also be tapped off as an alternative pre-fade, pre-EQ direct output if required, using a lead with tip and ring shorted together so that the signal path is not interrupted (see below). LINE 5 Gain INSERT This knob sets how much of the source signal is sent to the rest of the mixer. Too high, and the signal will distort as it overloads the channel.
- Page 20 AUX SEND 1 is fixed pre-fade, AUX 2 is globally switchable between pre and post-fade (see master AUX1 AUX1 section on page 20). On the MPMi, Aux 3 is fixed post-fader. AUX 3 SEND (MPMi only) Aux 3 is fixed post-fade. AUX2...
-
Page 21: Stereo Input Channels
AUX SEND 1 is fixed pre-fade, AUX 2 is globally switchable between pre and post-fade (see master section on page 20). On the MPMi, Aux 3 is fixed post-fader. The send pots are fed with a mono sum of the L & R signals. - Page 22 5 FX SEND (MFXi) This control sets the level of the post-fade signal being sent to the FX bus; from there it is routed to the FX processor. The FX Send is always post-fader. 6 BALANCE This control sets the amount of the channel signal feeding the Left and Right MIX buses, allowing you to balance the source in the stereo image.
-
Page 24: Master Section
MASTER SECTION (MFXi) MUTE PHANTOM POWER MONITOR OUT SUB OUT MONO MIX-L AUX1 AUX2 FX BUS 2TRK 2TRK LEVEL MIX-R HEADPHONES [MONO] TO MIX STEREO RETURN MNTR LEVEL LEVEL AUX1 AUX2 POST MNTR MIX / SOLO LEVEL SUB TO SOLO SUB-L SUB-R... - Page 25 MASTER SECTION (MPMi) PHANTOM POWER MONITOR OUT SUB OUT MONO MONO MIX-L AUX1 AUX2 AUX3 AUX3 2TRK 2TRK LEVEL MIX-R HEADPHONES TO MIX MNTR LEVEL AUX1 AUX2 POST AUX3 MNTR MIX / SOLO LEVEL SUB TO SOLO SUB-L SUB-R...
- Page 26 1 POWER INDICATOR This LED lights to show when power is connected to the console. 2 PHANTOM POWER Many professional condenser mics need PHANTOM POWER, which is a method of sending a powering voltage down the same wires as the mic signal. Press the switch to enable the +48V power to all of the MIC inputs. The adjacent LED illuminates when the power is active.
- Page 27 MIX. The SOLO LED on the Master section illuminates to warn that an AFL is active. There are 2 AFL switches for Auxes 1 &2 on the MFXi, and three for Auxes 1, 2 and 3 on the MPMi.
-
Page 28: Lexicon® Fx Processor Overview (Mfxi Only)
This output carries the signal from the FX bus. It could be used as a third Aux Output if desired if the FX Processor is not needed at the time. The FX sends on the input channels to the FX bus are always post-fade. (on the MPMi, the FX Send output becomes Aux 3 output) 28 MUTE FX (FOOTSWITCH) Using a single pole, momentary footswitch inserted into the MUTE FX input the effects processor can be muted/un-muted. -
Page 29: Fx Operation
Lexicon® FX PROCESSOR OVERVIEW The effects within the console have been designed with both live sound reinforcement and home recording in mind. Featuring the deep, rich reverb algorithms that Lexicon® are renowned for the effects processor offers increased versatility and high quality effects, all instantly accessible via the extremely intuitive front panel controls. -
Page 30: Fx Processor Controls
FX PROCESSOR CONTROLS (MFXi only) 1. Tempo Button - Tapping this button twice sets the Delay Time of the selected program. The LED flashes to indicate current tempo. Can be tapped in time with 24-BIT DIGITAL EFFECTS PROCESSOR A: PRE-DEL music source to synchronise the delay. -
Page 31: Reverbs
REVERBS Reverberation (or “reverb” for short) is the complex effect created by the way we perceive sound in an en- closed space. When sound waves encounter an object or boundary, they don’t just stop. Some of the sound is absorbed by the object, but most of the sound is reflected or is diffused. In an enclosed space, reverb is dependent on many features of that space, including the size, shape and the type of materials that line the walls. -
Page 32: Reverb Controls
Reverse Reverb Reverse reverb works in the opposite fashion from normal reverb. Whereas a normal reverb has the loudest series of reflections heard first that then become quieter over time, the Reverse reverb has the softest reflec- tions (essentially the tail of the reverb) heard first, and then grows louder over time until they abruptly cut off. Ambience Reverb Ambience is used to simulate the effect of a small or medium sized room without noticeable decay. -
Page 33: Delays
Shape This control helps give a sense of both room shape and room size. Low values for Shape keep the majority of sound energy in the early part of the reverb tail. High values move the energy to later in the reverb, and are helpful in creating the sense of a strong rear wall or “backslap. -
Page 34: Modulated Effects
Feedback Controls the number of delay repeats by feeding the delay output signal back into the delay input. This creates a series of delay repeats, each slightly attenuated until they become inaudible. Higher settings create more repeats; lower settings reduce the number of repeats. When this knob is turned fully clockwise, it engages Repeat Hold –... - Page 35 Flanger This effect was originally created by simultaneously recording and playing back two identical programs on two tape recorders, then using hand pressure against the flange of the tape reels to slow down first one machine, then the other. The result was a series of changing phase cancellations and reinforcements, with characteristic swishing, tunneling, and fading sounds.
-
Page 36: Factory Reset
Vibrato Vibrato is obtained by smoothly varying the pitch of the signal just sharp and flat of the original at a deter- mined rate. Vibrato Stereo (Wet only) Rotary Mono (Wet only) Tremolo/Pan Stereo (Wet only) Knob 1: Speed Controls the modulation rate of Vibrato. Knob 2: Depth Controls the maximum amount of pitch shift. -
Page 37: Effects Data Chart
EFFECTS DATA CHART... -
Page 38: Mfxi & Mpmi Typical Specifications
MFXi/MPMi TYPICAL SPECIFICATIONS Frequency Response Mic / Line Input to any Output ..........+/-1.5dB, 20Hz – 20kHz T.H.D. Mic Sensitivity -30dBu, +14dBu @ Mix output ......< 0.01% @ 1kHz Noise Mic Input E.I.N. (maximum gain) ......……..-126.5dBu (150Ω source) Aux, Mix and Masters (@ 0dB, faders down)........………< -82dBu Crosstalk (@ 1kHz) Channel Mute....................>... -
Page 40: Using Your Mfxi Console
USING YOUR MFXi/MPMi CONSOLE The final output from your sound system can only ever be as good as the weakest link in the chain, and especially important is the quality of the source signal because this is the starting point of the chain. Just as you... - Page 41 channels are added to the mix, the meters may move into the red section. Adjust the overall level using the Master Faders if necessary. • Listen carefully for the characteristic sound of “feedback”. If you cannot achieve satisfactory input level setting without feedback, check microphone and speaker placement and repeat the exercise.
-
Page 42: Mark-Up Sheets
MFXi MARK-UP SHEETS You may freely copy this page, and use it to record the settings used for particular applications/gigs. - Page 43 MPMi MARK-UP SHEETS You may freely copy this page, and use it to record the settings used for particular applications/gigs.
-
Page 44: Fitting Optional Rack-Mount Brackets
The rack-mount kit is included with the MFXi12/2 and MPMi12/2. For MFXi8/2 the rack-mount bracket kit is part number RW5765. This may also be used on the MFXi 20/2 and MPMi 20/2 for furniture mounting. WARNING: ensure that the mixer is disconnected from the mains supply and all other equipment before fitting the rack-mounting brackets. -
Page 45: Dimensions
Fitting the Extender Plate (MFXi8 ONLY) The extender plate is fitted to the rackmounting bracket as shown below with M6 screws/cage nuts. Attach captive rack nuts at points Attach rack bolts through points and into fitted rack nuts at points A . -
Page 46: Applications
APPLICATIONS APPLICATION 1 - LIVE SOUND REINFORCEMENT... - Page 47 APPLICATION 2 - MULTISPEAKER APPLICATIONS This configuration demonstrates how multiple speaker configurations can be driven by the MFXi.
- Page 48 APPLICATION 3 - PLACES OF WORSHIP This configuration uses the Aux 2 output to drive an induction loop for the hard of hearing. Aux 1 output is used to generate foldback monitoring for the speaker/singer. The main outputs are used to drive the main speaker system.
- Page 49 APPLICATION 4 - RECORDING The insert points on channels 1-8 may be used to feed a multitrack recorder as shown (link the send and return signals). The Mix outputs are used for a preliminary stereo mix on a DAT recorder.
-
Page 50: Typical Connecting Leads
TYPICAL CONNECTING LEADS... - Page 51 ‘Y’ Cables (Balanced) Where used … Aux, Mix outputs Ring Sleeve SLEEVE RING Ring Sleeve RING SLEEVE Ring Sleeve SLEEVE RING Ring Sleeve RING SLEEVE Headphone Separator Note: for every doubling of headphones the load impedance is halved. Do not go below 32 Ohms. Ring Sleeve Ring...
-
Page 52: Glossary
GLOSSARY After-fade listen: a function that allows the operator to monitor the post-fade signal in a channel independently of the main mix. Auxiliary send An output from the console comprising a mix of signals from channels derived inde- pendently of the main stereo mix. Balance The relative levels of the left and right channels of a stereo signal. - Page 53 Post-fade The point in the signal path after a fader and therefore affected by the fader posi- tion. Pre-fade The point in the signal path before a fader, and therefore unaffected by the fader position. Rolloff A fall in gain at the extremes of the frequency response. Shelving An equaliser response affecting all frequencies above or below the break frequency i.e.
-
Page 54: Warranty
WARRANTY Soundcraft is a trading division of Harman International Industries Ltd . End User means the person who first puts the equipment into regular operation. Dealer means the person other than Soundcraft (if any) from whom the End User purchased the Equipment, provided such a person is authorised for this purpose by Soundcraft or its accredited Distributor.
Need help?
Do you have a question about the MPMi and is the answer not in the manual?
Questions and answers