
Related Manuals for LevelOne GES-2450


Summary of Contents for LevelOne GES-2450
-
Page 1: User Manual
Web Smart Switch LevelOne GES-2450 24 GE + 4GE SFP Web Smart Switch User Manual Version 1.0-1109... -
Page 2: Fcc Certifications
Web Smart Switch FCC Certifications This Equipment has been tested and found to comply with the limits for a Class A digital device, pursuant to part 15 of the FCC Rules. These limits are designed to provide reasonable protection against harmful interference when the equipment is operated in a commercial environment. This equipment generates, uses, and can radiate radio frequency energy and, if not installed and used in accordance with the instruction manual, may cause harmful interference to radio communications. -
Page 3: Table Of Contents
Web Smart Switch Table of Contents Chapter 1 Introduction to the Web Smart Switch ·················································· 6 1.1 General Description ················································································ 6 1.2 The Front Panel ····················································································· 7 1.3 LEDs Definition ······················································································ 7 1.4 The Rear Panel ······················································································ 7 1.5 Installation ····························································································· 9 Chapter 2 Basic Web Management Information ··················································... - Page 4 Web Smart Switch 3.3.4.2 VLAN Port Setting ································································ 37 3.3.4.3 VLAN Port Mode Setting ························································ 38 3.3.4.4 VLAN Ingress Filter ······························································· 39 3.3.5 SVLAN ························································································ 39 3.3.5.1 SVLAN Setting ····································································· 39 3.3.5.2 SVLAN Member Setting ························································· 40 3.3.5.3 SVLAN PVID Setting ····························································· 41 3.3.5.4 SVLAN Service Port ······························································...
- Page 5 Web Smart Switch 3.5.2 ACL Template Setting ····································································· 69 3.5.3 ACL Index Range Setting ································································ 70 3.5.4 ACL Policy Setting ········································································· 71 3.6 QoS ···································································································· 71 3.6.1 Port-based Priority ········································································ 71 3.6.2 802.1 p- based Priority ··································································· 72 3.6.3 DSCP - based Priority ···································································· 73 3.6.4 Priority to Queue Mapping ······························································...
-
Page 6: Chapter 1 Introduction To The Web Smart Switch
LAN without memorizing IP address. Smart Features GES-2450 provides rich features including Link Aggregation, VLANs, IGMP Snooping, Port Trunking, Spanning Tree, Security (Port Security and 802.1x authentication) and other network management to meet the requirements evolving medium and small-sized enterprises. QoS secures the bandwidth for some bandwidth-demanded applications including VoIP or video conference. -
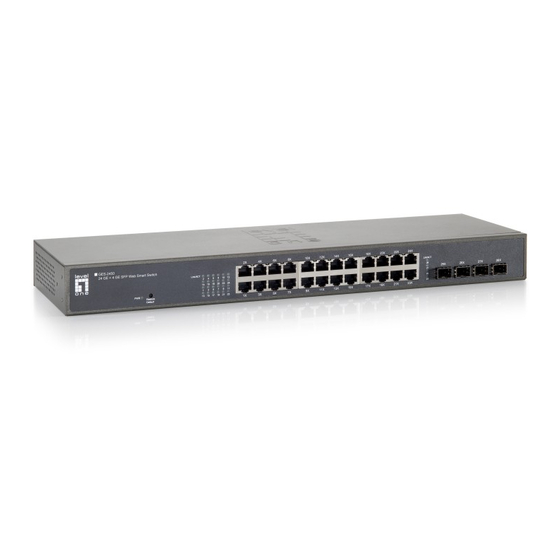
Page 7: The Front Panel
1.2 The Front Panel The following figure shows the front panel of the switch. The following table describes the port labels on the front panel. LABEL DESCRIPTON 24 10/100 RJ-45 Connect these ports to a computer, a hub, an Ethernet switch or router Ethernet Ports Four Use mini-GBIC transceivers in these slots for connections to backbone... - Page 8 Web Smart Switch outlet standard to be within this range. To power on the switch, please plug the female end of the power cord firmly into the receptacle of the switch and the other end into an electric service outlet. After the power cord installation, please check if the power LED is lit for a normal power status.
-
Page 9: Installation
1.5 Installation This switch can be placed on your desktop directly, or mounted in a rack. Please refer to the instructions for installation. Before installing the switch, we recommend: 1. The switch is placed with appropriate ventilation environment. A minimum 25 mm space around the unit is recommended. - Page 10 Web Smart Switch 2. Category 3, 4, 5 or 5e, 6 UTP/STP cable: To make a valid connection and obtain the optimal performance, an appropriate cable that corresponds to different transmitting/receiving speed is required. To choose a suitable cable, please refer to the following table. Media Speed Wiring...
-
Page 11: Chapter 2 Basic Web Management Information
Web Smart Switch Chapter 2 Basic Web Management Information 2.1 System login 1. Start your web browser. 2. Type “http://”and the IP address of the switch (for example, the default management IP address is 192.168.1.1) in the Location or Address field. Press [ENTER]. 3. -
Page 12: The Graphic User Interface
Web Smart Switch 2.2 The Graphic User Interface After the password authorization, the information page shows up. You may click on each folder on the left column of each page to get access to each configuration page. The Graphic User Interface is as follows: –... - Page 13 Web Smart Switch In the navigation panel, click a main link to reveal a list of submenu links shown as the following: Status Network Switching Security Management Diagnostics Maintenance...
- Page 14 Web Smart Switch The following table describes the links in the navigation panel. LINKS DESCRIPTION Status This link takes you to a screen that displays general system System Information information. This sub-menu takes you to screens where you can view and setup system logs.
- Page 15 Web Smart Switch ports. This sub-menu takes you to screens where you can MAC Filtering configure the accessed MAC address. This sub-menu takes you to screens where you can 802.1X configure IEEE 802.1x port authentication for clients communicating via the switch. This link takes you to a screen where you can configure the Port Security port security setting.
-
Page 16: Logging Out Of The Web Configurator
Web Smart Switch Ping6 Test This link takes you to a screen where you can do Ping6 test. This link takes you to a screen where you can configure log Log Setting settings. Factory Default This link takes you back to the factory default configuration. This link takes you to a screen where you can reboot the Reboot Switch switch. -
Page 17: Chapter 3 Web Management Configuration
Web Smart Switch Chapter 3 Web Management Configuration 3.1 Status Use the Status pages to view system information and status. 3.1.1 System Information In the navigation panel, click Status > System Information to display the screen as shown below. This page allow user to configure and browse some system information such as MAC address, IP address, loader version and firmware version and so on. -
Page 18: Log
Web Smart Switch LABEL DESCRIPTION This field displays the descriptive name of the switch for identification System Name purposes. System This field displays the system location of the switch. Location System Contact This field displays the system contact of the switch. This field refers to the Ethernet MAC (Media Access Control) address of MAC Address the switch. - Page 19 Web Smart Switch The following table describes the labels in this screen. LABEL DESCRIPTION Select RAM to display only the logs stored in the RAM. Target Select Flash to display only the logs stored in the Flash memory. Select severity level(s) to filter log messages. The possible severity levels are: ...
-
Page 20: Port
Web Smart Switch Notice- to record the error which need to be noticed. Select category to filter log messages. The categories are based on software and hardware features of the switch. For example the category MIRROR Category records events which deal with the Port Mirroring features you set up and the category SYSTEM records events which deal with the overall operation of the switch. -
Page 21: Port Counters
Web Smart Switch The following table describes the labels in this screen. LABEL DESCRIPTION Port This identifies the Ethernet port. Link Status This field displays Link Up if the port is currently in use. Otherwise it displays Link Down. Tx Good Pkt This field shows the number of frames successfully transmitted on this port. - Page 22 Web Smart Switch...
-
Page 23: Port Error Disabled
Web Smart Switch The following table describes the labels in this screen. LABEL DESCRIPTION Port This identifies the Ethernet port. Mode You have four choices: All, Interface, Etherlike and RMON. 3.1.3.3 Port Error Disabled This page allow user to browse ports which disabled by some protocols such as BPDU Guard, Loopback and UDLD. -
Page 24: Trunk Group
Web Smart Switch The following table describes the labels in this screen. LABEL DESCRIPTION Refresh Period This shows the period interval between last and next refresh. You have three choices: 2 sec, 5 sec and 10 sec.. You can enable or disable this function. 3.1.4 Trunk Group Click Status >... -
Page 25: Mac Address Table
Web Smart Switch LABEL DESCRIPTION This field displays the trunk to identify a trunk group, that is, one logical link Trunk containing multiple ports. Type This field displays the type of the trunk group: a static trunk or an LACP trunk. This field displays which ports are master ports of the trunk. -
Page 26: Static Mac
Web Smart Switch The following table describes the labels in this screen. LABEL DESCRIPTION Select the port number to show or clear dynamic MAC entries. If not select Port any port, VLAN and MAC address, the whole dynamic MAC table will be displayed or cleared. -
Page 27: Network
Web Smart Switch LABEL DESCRIPTION Enter the MAC address in valid MAC address format, that is, six hexadecimal MAC Address character pairs. Static MAC addresses do not age out. VLAN Enter the VLAN identification number the MAC address belongs to. There are two types of MAC entry: ... -
Page 28: Ipv6 Address
Web Smart Switch The following table describes the labels in this screen. LABEL DESCRIPTION Mode Select Static from the drop-down box if you don’t have a DHCP server or if you wish to assign static IP address information to the switch. You need to fill in the following fields when you select this option. -
Page 29: Time
Web Smart Switch The following table describes the labels in this screen. LABEL DESCRIPTION Auto Select Enable or Disable this function. Configuration IPv6 Address Enter the IPv6 address of your switch. If auto configuration mode is disabled, enter IPv6 address in this field. Gateway Enter the IP address of the gateway in dotted decimal notation. - Page 30 Web Smart Switch The following table describes the labels in this screen. LABEL DESCRIPTION SNTP State Select Enable to use Simple Network Time Protocol (SNTP) or Disable to set the time manually. SNTP Server If SNTP is enabled, enter the IP address of the time server you will use. Address SNTP Server It shows the Port Number of SNTP server.
-
Page 31: Switching
Web Smart Switch 3.3 Switching Use the Switching pages to configure settings for the switch ports, trunk and other switch features. 3.3.1 Port Setting This page allow user to configure switch port settings and show port current status. Click Switching > Port Setting in the navigation panel to display the screen as shown below. The following table describes the labels in this screen. -
Page 32: Port Mirroring
Web Smart Switch both ends support. When auto-negotiation is turned on, a port on the switch negotiates with the peer automatically to determine the connection speed and duplex mode. If the peer port does not support auto-negotiation or turns off this feature, the switch determines the connection speed by detecting the signal on the cable and using half duplex mode. -
Page 33: Trunk
Web Smart Switch (a) Destination port: Theoretically it’s possible to set more than one destination port in a network. Actually the port mirroring function will lower the network throughput, and therefore it’s recommended to set “only one” destination port in a network. (b) Mirroring Port: (1)RX: means copy the incoming packets of the selected source port to the selected destination port. - Page 34 Web Smart Switch The following table describes the labels in this screen. LABEL DESCRIPTION Trunk This field displays the trunk group number to identify a trunk group, that is, one logical link containing multiple ports. Type Select the type of the trunk group: a static trunk or an LACP trunk. A static trunk would be aggregated immediately;...
-
Page 35: Lacp
Web Smart Switch Aggregated This field displays the ports that aggregated in a trunk group. A static trunk would be aggregated immediately; an LACP trunk exchanges LACP PDU to link partner to aggregate. Delete Click this button to delete the trunk. 3.3.3.2 LACP Click Switching >... -
Page 36: Vlan
Web Smart Switch 3.3.4 VLAN Each VLAN in a network has a associated VLAN ID, which displays in the IEEE 802.1Q tag in the L2 header of packets transmitted on a VLAN. 3.3.4.1 VLAN Setting This page allow user to add, edit or delete VLAN settings. Click Switching >... -
Page 37: Vlan Port Setting
Web Smart Switch 3.3.4.2 VLAN Port Setting This page allow user to configure VLAN port related settings. Click Switching > VLAN > VLAN Port Setting to access the screen below. A PVID (Port VLAN ID) is a tag that adds to incoming untagged frames received on a port so that the frames are forwarded to the VLAN group that the tag defines. -
Page 38: Vlan Port Mode Setting
Web Smart Switch Accepted Frame This field displays the accepted frame type of the VLAN port. Type 3.3.4.3 VLAN Port Mode Setting This page allow user to configure VLAN port tag mode setting. Click Switching > VLAN > VLAN Port Mode Setting to access the screen below. The following table describes the labels in this screen. -
Page 39: Vlan Ingress Filter
Web Smart Switch 3.3.4.4 VLAN Ingress Filter This page allow user to configure VLAN ingress filter setting. Click Switching > VLAN > VLAN Ingress Filter to access the screen below. The following table describes the labels in this screen. LABEL DESCRIPTION Select Enabled from the drop down box to enable VLAN Ingress Filter. -
Page 40: Svlan Member Setting
Web Smart Switch The following table describes the labels in this screen. LABEL DESCRIPTION VLAN stacking tag protocol identifier (0x0000~0xFFFF). TPID Apply Click Apply to save your changes to the switch. 3.3.5.2 SVLAN Member Setting This page allow user to configure VLAN stacking members. Click Switching->SVLAN->SVLAN Member Setting to access the screen below. -
Page 41: Svlan Pvid Setting
Web Smart Switch LABEL DESCRIPTION Stacking VLAN ID. SVLAN ID Select one or multiple ports as member ports of the SVLAN. Member Port Click Add to add any member port into the SVLAN . 3.3.5.3 SVLAN PVID Setting This page allow user to add or set port VLAN stacking entry in the VLAN stacking table. Click Switching->SVLAN->SVLAN PVID Setting to access the screen below. -
Page 42: Bandwidth Control
Web Smart Switch Click Switching->SVLAN->SVLAN Service Port to access the screen below. The following table describes the labels in this screen. LABEL DESCRIPTION Select the port(s) to configure this settings for. Port Set VLAN stacking aware state: Enabled Enabled: Set as VLAN stacking aware. ... -
Page 43: Port Rate Setting
Web Smart Switch The following table describes the labels in this screen. LABEL DESCRIPTION Ingress Preamble Select the mode of ingress preamble & IFG: & IFG Excluded: exclude preamble & IFG (20 bytes) when count ingress bandwidth rate. Included: include preamble &... - Page 44 Web Smart Switch The following table describes the labels in this screen. LABEL DESCRIPTION Select the ports to enable bandwidth control on. Port Type Select the type of traffic to control, Ingress (incoming) or Egress (outgoing). Select Enable to activate bandwidth control on the selected ports. State Select Disable to turn off bandwidth control on the selected ports.
-
Page 45: Igmp Snooping
Web Smart Switch 3.3.7 IGMP Snooping Use the Switching pages to configure settings for the switch network interface and how the switch connects to a remote server to get services. 3.3.7.1 IGMP Setting Click Switching > IGMP Snooping > IGMP Setting to access the screen below. The following table describes the labels in this screen. -
Page 46: Igmp Vlan Setting
Web Smart Switch LABEL DESCRIPTION Select Enable from the drop down box to enable IGMP Snooping. Select IGMP Snooping Disable to not to use IGMP Snooping. When enabled, it simply monitors the IGMP packets passing through it, picks out the group registration information, and configures the multicast filters accordingly. -
Page 47: Multicast Database
Web Smart Switch The following table describes the labels in this screen. LABEL DESCRIPTION VLAN ID Select the VLANs to configure. Snooping State Select Enable from the drop down box to enable IGMP. Select Disable to not to use IGMP. Querier State Select Enable from the drop down box to enable IGMP Querier Election. -
Page 48: Router Table
Web Smart Switch LABEL DESCRIPTION DIP Address This field displays IP address of this group. This field displays ID of configured VLAN (1~4094). This field displays the ports that selected in the group address. Member Port This field displays the life time of this group. Life(Sec) 3.3.7.4 Router Table Click Switching >... -
Page 49: Stp
Web Smart Switch The following table describes the labels in this screen. LABEL DESCRIPTION Jumbo Frame Specify the maximum Jumbo Frame size in bytes from 0~9216. (Bytes) Apply Click Apply to save any changes to the switch. 3.3.9 STP The Spanning Tree Protocol (STP) is a network protocol that ensures a loop-free topology for any bridged Ethernet local area network. - Page 50 Web Smart Switch The following table describes the labels in this screen. LABEL DESCRIPTION Enabled Select Enabled to use Spanning Tree Protocol (STP) or Rapid Spanning Tree Protocol (RSTP). Select Disabled to not use STP or RSTP. Select the operating mode of STP. Force Version ...
-
Page 51: Stp Port Setting
Web Smart Switch As a general rule: Note: 2 * (Forward Delay – 1) >= Max Age >= 2 * (Hello Time + 1) Set the time any switch should wait before trying to change the STP Max Age topology after unhearing Hello BPDU. Set the Transmit Hold Count used to limit BPDU transmission rate. -
Page 52: Mst Configuration
Web Smart Switch Cost recommended to assign this value according to the speed of the bridge. The slower the media, the higher the cost. Entering 0 means the switch will automatically assign a value. Set the edge port configuration: No: Force to false state ( as link to a bridge). - Page 53 Web Smart Switch The following table describes the labels in this screen. LABEL DESCRIPTION Configuration You can manually set the configuration name for identification. Name Configuration You can manually set the configuration revision for identification. (Range: Revision 0-65535) Apply Click Apply to save your changes to the switch. MSTI is MST Configuration ID.
-
Page 54: Mst Instance Setting
Web Smart Switch 3.3.9.4 MST Instance Setting Click Switching > STP > MST Instance Setting. The following table describes the labels in this screen. LABEL DESCRIPTION MST ID You can manually set the MST ID to specify MST instance. Priority You can manually set the Bridge Priority in the specified MST instance. - Page 55 Web Smart Switch The following table describes the labels in this screen. LABEL DESCRIPTION Port Select Select the port(s) which will use MST setting. MST ID You can manually set the MST ID to specify MST instance. Internal Path You can manually set the internal path cost to the selected ports in the Cost specified MST instance.
-
Page 56: Security
Web Smart Switch Internal Path It displays the internal path cost of the choosed port. Cost Port Priority It displays the port priority you have set. Port Role It displays the port role of the choosed port. Port State It displays the port state of the choosed port. 3.4 Security 3.4.1 Storm Control The following table describes the labels in this screen. -
Page 57: Mac Filtering
Web Smart Switch Click Apply to save your changes to the Switch. Apply This field displays the port number. Port Broadcast This field displays how many broadcast packets can the port receive per (pps) second. Multicast This field displays how many multicast packets can the port receive per (pps) second. -
Page 58: 802.1X
Web Smart Switch Type a descriptive name (up to 32 printable ASCII characters) for this Name filtering rule. This is for identification only. Click Add to add any port into the MAC filtering table. This is the index number for the MAC filtering rules. This field displays the MAC address that will be filtered. - Page 59 Web Smart Switch The following table describes the labels in this screen. LABEL DESCRIPTION Select Enable from the drop-down list box to activate IEEE 802.1x port 802.1X authentication. Select Disable to disable this function. Radius Server IP Enter the IP address of an external RADIUS server in dotted decimal notation.
-
Page 60: 802.1X Port Setting
Web Smart Switch password. Reauthentication Specify how often a client has to re-enter his or her username and Period password to stay connected to the port. (30-65535 sec) Set the reauthentication period of 802.1X if reauthentication is enabled. Click Apply to save your changes to the switch. Apply 3.4.3.2 802.1X Port Setting Click Security >... -
Page 61: Port Security
Web Smart Switch 3.4.4 Port Security Click Security > Port Security to display the configuration screen as shown. The following table describes the labels in this screen. LABEL DESCRIPTION Select the port(s) to configure this setting Port Select Security Port security function. It constraint how many MAC addresses can be learned by a port and drop new one when reach the limitation. -
Page 62: Protected Ports
Web Smart Switch 3.4.5 Protected Ports This page allow user to configure protected port setting to prevent the selected ports from communicate with each other. Click Security > Protected Ports to display the configuration screen as shown. The following table describes the labels in this screen. LABEL DESCRIPTION To select the port to be protected. -
Page 63: Telnet
Web Smart Switch The following table describes the labels in this screen. LABEL DESCRIPTION Set session timeout minutes for user access CLI from console line. If Session Timeout user doesn’t response after session timeout minute, CLI will logout automatically. Enter a number between 0 and 1440 as the session timeout. 0 minutes means never timeout. -
Page 64: Ssh
Web Smart Switch The following table describes the labels in this screen. LABEL DESCRIPTION Set session timeout minutes for user access CLI from telnet line. If user Session Timeout doesn’t response after session timeout minute, CLI will logout automatically. Enter a number between 0 and 1440 as the session timeout. 0 minutes means never timeout. -
Page 65: Http
Web Smart Switch The following table describes the labels in this screen. LABEL DESCRIPTION Set session timeout minutes for user access CLI from SSH line. If user Session Timeout doesn’t response after session timeout minute, CLI will logout automatically. Enter a number between 0 and 1440 as the session timeout. 0 minutes means never timeout. -
Page 66: Acl
Web Smart Switch The following table describes the labels in this screen. LABEL DESCRIPTION Set session timeout minutes for user access WEB from HTTPS Session Timeout protocol. If user doesn’t response after session timeout minute, WEB UI will logout automatically. Enter a number between 0 and 1440 as the session timeout. - Page 67 Web Smart Switch LABEL DESCRIPTION You can manually set the ACL Index. ACL Index Click Add to add the basic information of ACL Index. Index It displays the index information. Name It displays the name of the index. Port List It displays the list of the port.
- Page 68 Web Smart Switch Name Enter ACL name in this field Comment Enter ACL comment in this field. Interface Select the interface to bind: Port number: Enter port number. VLAN ID: Enter VLAN ID. Policy: Enter policy index. ACE Index Enter ACE index in this field to configure ACE.
-
Page 69: Acl Template Setting
Web Smart Switch Enter ToS in this field. 14-src-port Enter Layer 4 source port in this field. 14-dst-port Enter Layer 4 destination port in this field. tcp-flag Enter TCP flag in this field. Action Select the action to take: Permit: permit packet to pass through. -
Page 70: Acl Index Range Setting
Web Smart Switch 14-src-port Click in the square box to set Layer 4 source port into Template. 14-dst-port Click in the square box to set Layer 4 destination port into Template. tcp-flag Click in the square box to set TCP flag into Template. Apply Click Apply to save your changes to the switch. -
Page 71: Acl Policy Setting
Web Smart Switch 3.5.4 ACL Policy Setting The following table describes the labels in this screen. LABEL DESCRIPTION Policy Index You can choose the policy index. To get the basic information of the policy index. VLAN ID Enter VLAN ID and check it to care specified VLAN ID. Port Number Enter port number and check it to care specified port number. -
Page 72: 802.1 P- Based Priority
Web Smart Switch The following table describes the labels in this screen. LABEL DESCRIPTION Select the number of the port for which you want to assign IEEE 802.1p Port priority to incoming frames. Select the QoS port-based priority you want to assign to the packets Priority coming into the switch on the ports specified in the port field. -
Page 73: Dscp - Based Priority
Web Smart Switch The following table describes the labels in this screen. LABEL DESCRIPTION Select the 802.1p value to mapping to the priority and drop precedence. 802.1 p The 802.1p range is 0 to 7. Select the IEEE 802.1p priority you want to assign to the packets coming Priority into the switch on the ports specified in the port field. -
Page 74: Priority To Queue Mapping
Web Smart Switch The following table describes the labels in this screen. LABEL DESCRIPTION Select the DSCP value to mapping to the priority and drop precedence. DSCP The DSCP range is 0 to 63. Select the priority value that the DSCP mapped to. The priority range is Priority 0 to 7. - Page 75 Web Smart Switch traffic assigned to higher index queues gets through faster while traffic in lower index queues is dropped if the network is congested. The following table describes the labels in this screen. LABEL DESCRIPTION Select the priority value to mapping to the Queue ID. The priority range is 0 Priority to 7.
-
Page 76: Packet Scheduling
Web Smart Switch 3.6.5 Packet Scheduling Click QoS > Packet Scheduling to display the screen as shown next. Packet Scheduling is used to help solve performance degradation when there is network congestion. Use this screen to configure queuing algorithms for outgoing traffic. The following table describes the labels in this screen. -
Page 77: Queue Remarking Status
Web Smart Switch The following table describes the labels in this screen. LABEL DESCRIPTION Select the number of the port for which you want to assign IEEE 802.1p Port priority to incoming frames. Select the Queue ID for configuration it’s weighted. The Queue ID range Queue ID is 1 to 8. -
Page 78: Queue Remarking Table
Web Smart Switch The following table describes the labels in this screen. LABEL DESCRIPTION Select the number of the port for which you want to assign IEEE 802.1p Port priority to incoming frames. Click Enabled to enable this function in specified ports. 802.1 p Priority Click Disabled to disable this function in specified ports. -
Page 79: Management
Web Smart Switch The following table describes the labels in this screen. LABEL DESCRIPTION Priority Select the priority value to mapping to new 802.1p, new 802.1ad and DSCP value. The priority range is 0 to 7. New 802.1 p Remark to the new 802.1p priority that the priority and drop precedence Priority mapped to. -
Page 80: Snmp Community
Web Smart Switch The following table describes the labels in this screen. LABEL DESCRIPTION SNMP daemon state: State Select Enabled to activate SNMP daemon. Select Disabled to not use SNMP daemon. 3.7.1.2 SNMP Community Click Management > SNMP->SNMP Community to display the screen as shown next. -
Page 81: Snmp Trap
Web Smart Switch The following table describes the labels in this screen. LABEL DESCRIPTION Community Enter a Community string, this will act as a password for requests from the management station. SNMP community type: Type Read-Only: Read all objects only, it can allow the SNMP manager using this string to collect information from the switch. -
Page 82: Diagnostics
Web Smart Switch the SNMP manager. Click Add to add any trap receiver. IP Address This field displays the IP address where the traps from the switch are sent. Community Type This field displays the password which is sent with each trap to the SNMP manager. -
Page 83: Ping6 Test
Web Smart Switch Enter a number between 1 and 5 as the count and the default configuration is 1. Interval It displays time interval between each ping request packet. Enter a number between 1 and 5 as the interval and the default configuration is 1. -
Page 84: Log Setting
Web Smart Switch Size It displays the size of ping packet. Enter a number between 0 and 5120 as the size and the default configuration is 0. Ping Results After ping finished, results will show in this field. Apply Click Apply to save your changes to the switch. 3.8.3 Log Setting 3.8.3.1 Local Log Use this screen to display the switch logs. -
Page 85: Remote Log
Web Smart Switch logins. Debug - to record events which can be helpful for engineering debugging of the switch’s function. This field is not recommended to track as it creates many messages not helpful to typical users. Notice- to record the error which need to be noticed. Apply Click Apply to save your changes to the switch. -
Page 86: Factory Default
Web Smart Switch Error - to record system failures, such as events which will cause the switch to malfunction and events such as invalid user input in the web configurator. Warning - to record non critical errors on the Switch. The Switch will continue to function when warnings are recorded. -
Page 87: Maintenance
Web Smart Switch Reboot allows you to restart the switch without physically turning the power off. Follow the steps below to reboot the switch. 1. Click Diagnostics->Reboot Switch to view the screen as shown next. 2. Click Reboot button, then the following interface pops up. 3. - Page 88 Web Smart Switch Backup Config with TFTP Page Backup Image with HTTP Page Backup Config with HTTP Page The following table describes the labels in this screen. LABEL DESCRIPTION Select backup method: Backup...
-
Page 89: Upgrade Manager
Web Smart Switch Method TFTP: Use TFTP to backup. HTTP: Use HTTP to backup. IP address of the TFTP server. If the TFTP backup method is selected, Server IP the IP address of the TFTP server must be assigned. Select backup type: Backup Type ... -
Page 90: Configuration Manager
Web Smart Switch The following table describes the labels in this screen. LABEL DESCRIPTION Select upgrade method: Upgrade TFTP: Use TFTP to upgrade. Method HTTP: Use HTTP to upgrade. IP address of the TFTP server. If the TFTP upgrade method is selected, the Server IP IP address of the TFTP server must be assigned. -
Page 91: Account Manager
Web Smart Switch Configuration Manager with new file name Page LABEL DESCRIPTION Configuration You have two choice: startup-config.cfg and New Configuration New Config Name Configuration file name. Our system will save it with sub file name .cfg automatically. Save Click Save Configuration to save running configurations to any file which Configuration user specified Set Startup... -
Page 92: Enable Password
Web Smart Switch The following table describes the labels in this screen. LABEL DESCRIPTION User name Enter your user name for new account. Password Type Select password type for new account: Clear Text: Password without encryption. Encrypted: Password with encryption. ... - Page 93 Web Smart Switch The following table describes the labels in this screen. LABEL DESCRIPTION Password Type Select password type for enable password: Clear Text: Password without encryption. Encrypted: Password with encryption. Password Enter your new system password. Retype Password Retype password to make sure the password is exactly you typed before in “Password”...
-
Page 94: Product Specifications
Web Smart Switch Product Specifications Standard IEEE 802.3/802.3u/802.3ab IEEE 802.3x flow control IEEE 802.3az Energy Efficient Ethernet IEEE 802.1D spanning tree protocol IEEE 802.1p class of service, priority protocols IEEE 802.1Q VLAN tagging IEEE 802.1x port authentication IEEE 802.3ad VLAN stacking IEEE 802.3ad LACP aggregation Interface 24* 10/100/1000Mbps ports...
Need help?
Do you have a question about the GES-2450 and is the answer not in the manual?
Questions and answers