Advertisement
Quick Links
OWNER'S MANUAL
WHISTLER FEATURES
CR85
1
HIGH Performance
6
LASER-RADAR
2
DETECTOR
9
10
8
Features
• Radar Signature ID (RSID)
• Laser Signature ID (LSID)
• 3 Filter Modes
• Ka Max Mode
• Total Band Protection
• OLED Text Display
• Detects POP
™
Mode
• 360° Maxx Coverage
• Real Voice
®
• 3 City Modes/Highway Mode
OPERATION
OPERATION
Power On Self Test & Volume
City/City 1/City 2 Mode
To turn the unit ON or OFF, gently press the
Whistler's Three Stage City Mode is designed
center of the Power/Volume button into the side
to reduce the annoyance of automatic door
of the unit. Each time your Whistler detector
openers, intrusion alarms and other devices which
is turned on, an automatic self-test sequence
share frequencies with police radar. Generally, X
confirms that the speaker and visual displays are
band is used for these devices.
functional.
• Press City button to cancel Highway Mode
Audio Level Adjustment
and engage City Mode.
To change the audio level:
• Move Power/Volume button back to increase
• Press City button again to enter City 1 Mode.
audio level.
• Press City button again to enter City 2 Mode.
• Move Power/Volume button forward to
decrease audio level. As audio level is
• Press City button a fourth time to cancel City 2
adjusted, beeps are provided and the display
Mode and returns the unit to Highway Mode.
indicates volume level.
In City Mode, weak speed/safety warning
Auto Quiet Mode
system
signals give an initial alarm of two
™
Auto Quiet mode reduces the selected audio
beeps, and then remains quiet unless the signal
level to level (1) approximately 5 seconds after
becomes very strong. When the signal strength
a radar or safety warning system
signal is
™
increases, two additional beeps are provided.
detected. The alert for any new signal within
City 1 and City 2 Modes operate the same as
20 seconds will resume at level (1). Auto Quiet
Highway Mode, but in City 1 Mode, only the
mode does not affect laser alerts.
X band sensitivity is lowered. In City 2 Mode,
• Press Quiet (before a signal is detected) to
X-band is not detected.
engage Auto Quiet mode.
Caution: Some towns/small cities may still be
• Once the Auto Quiet mode is engaged, you
using X band radar. City Modes do not change
may cancel the audio alarm by pressing Quiet.
the audio alert for laser.
• Press Quiet (when the unit is not alarming) to
cancel Auto Quiet mode.
Highway Mode
Quiet Mode
Highway mode provides full audio warnings
Quiet mode cancels audio during an alert
any time radar (X, K, Ka, Safety Warning
and any new alert within 20 seconds. After 20
System
) or laser signals are detected, and is
™
seconds of no radar signal detected, the audio
recommended for open road driving.
alerts are restored.
• Press Quiet to cancel the audio.
• Press Quiet a second time during an alert to
restore the standard audio alert pattern.
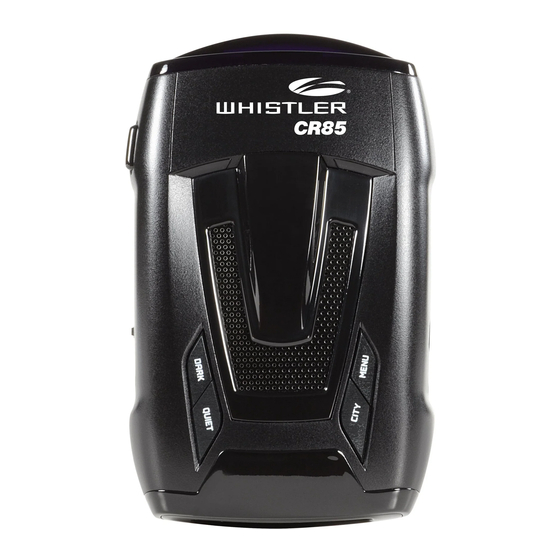
FEATURE DESCRIPTIONS
1. Bracket Release Button – provides quick
and easy release of the mounting bracket.
2. Speaker – provides distinct audio warnings
for X, K, Ka band radar, safety warning system,
and laser.
3. Mounting Bracket Location – slot holds
13
mounting bracket firmly.
4. Radar Antenna – compact, high-efficiency
antenna receives radar signals.
14
5. Front Laser – high gain optical lens
provides increased sensitivity and field of
view for leading-edge laser detection.
6. Rear Laser – an integrated optical
waveguide provides superior detection of
laser signals transmitted from behind.
11
7. City Button - reduces the annoyance of
false alerts typically encountered in urban
7
driving areas.
8. Quiet Button - pressing QUIET before a
signal is detected engages Auto Quiet Mode
which automatically reduces the audio level after
the initial warning to a low audio level setting.
3
Pressing QUIET during a radar/laser encounter
12
silences audio alerts, while allowing visual
alerts to keep you informed.
9. Power / Volume Control – gently press this
4
button in to turn the unit on/off. Move back or
5
forward to adjust the audio level.
• Quiet/Auto Quiet Mode
10. Dim / Dark - engages Dim/Dark modes.
• Dim/Dark Mode
11. Menu Button - enters Option Select Mode.
• Auto Dim
12. Text Display – provides distinct visual confirmation
• Stay Alert
™
of signals detected, signal strength, and indicates
™
• Setting Saver
engaged modes of operation.
•
Selectable Vehicle Battery Saver
™
13. Alert Periscopes - provide an additional
• Safety Warning System
™
attention getting visual alert.
• Alert Priority
14.
–
Power Jack
Provides connection for the
• Alert Periscopes
power cord.
• Traffic Flow Signal Rejection
OPERATION
Alert Periscopes
Whistler's Alert Periscopes provide an added
attention getting visual alert. The two extra LEDs
flash on and off when the unit alarms to provide a
unique visual alert. This alert can be programmed,
through the Option Select Mode to: 1. flash for all
alarms, 2. remain on, or 3. turn LEDs off completely.
Dim/Dark Mode
Dim/Dark Mode reduces the illumination of the
display.
• Press the Dark button to reduce illumination
to a Dim setting.
• Press the Dark button a second time engages
Dark Mode. The display illumination is further
reduced.
Dim or Dark Mode can be engaged during an
alert. In Dark Mode, the display goes dark for
as long as a signal is being detected and for 20
seconds after, then the display returns to the
dimmer setting.
• Press the Dark button a third time to restore
full illumination to the display.
Selectable Vehicle Battery
Saver Mode
The Vehicle Battery Saver Mode automatically shuts
off your detector within 3 hours. The timer is reset if
the detector is turned off, unplugged or any button
is pressed before the timer has expired. The detector
will alert you with an audible and visual warning
before it shuts off. During this warning, you can
momentarily reset the timer by pressing any button. If
the unit has automatically turned off, press the Power
button to turn the unit back on. Refer to "Option
Select Mode" for instructions for changing the
battery saver mode options.
INSTALLATION
Important: Some newer cars have a plastic safety
Mounting Guidelines
coating on the inside of the windshield. The
• Mount the unit as low as possible near the
center of the windshield.
windshield bracket may leave permanent marks on
• Do not mount the unit behind wipers,
this type of surface. To find out if your vehicle has
ornaments, mirrored sunscreens, etc. These
this type of windshield, check the vehicle's owner's
obstructions have metal surfaces which can
manual or ask your dealer. We recommend
affect radar and laser signals and reduce
that you do not leave the suction cup bracket on
critical warning time. (Regular tinted glass
the window in direct sunlight. If the detector is
does not affect reception).
• Some windshields have an Instaclear
or
removed, this may cause blistering of the dash
™
Electriclear
™
type coating, which affect radar
in some vehicles.
signals. Consult your dealer or the owner's
• Slide the detector onto the bracket until it locks into
manual supplied with your vehicle to determine
place.
if your windshield has this coating.
• Avoid placing the unit in direct contact with
• If necessary, the unit may be leveled by bending
the windshield.
the windshield bracket. Press the bracket release
• To reduce the possibility of theft, conceal
button and remove the detector before bending.
the unit when not in use.
Power Cord Connection
• Plug the small end of the power cord into the
unit's power jack.
Windshield
Mounting
• Plug the large end into the vehicle's cigarette
lighter socket.
IMPORTANT: Make sure the unit is level
Note: Cord fits tightly into detector. When
installing the cord, expect some resistance.
Windshield Mounting
Fuse Replacement
• Install the two suction cups and rubber bumper
The lighter socket plug is equipped with a
onto the bracket by fitting them into their holes.
replaceable 2 amp, 3AG fuse located behind
the silver tip. To replace the fuse, carefully
• Press the suction cups onto the windshield at the
unscrew the tip of the plug.
location you have chosen.
Rubber
Bumper
OPERATION
Integrated Real Voice
X/K and Ka Filter Modes
®
When selected, Real Voice
will be used to
There are times when a radar detector in another
®
articulate the following:
vehicle, can emit a frequency which can cause your
detector to falsely alert. These Filter Modes allow you
1. Band Identification
to select the level needed for your area to minimize
2. Safety Warning System messages
the occurrences of these false alerts. X/K and Ka Filter
3. Feature Selection
Mode factory default settings should provide adequate
filtering for most conditions. If you experience excessive
Note: In certain cases, the voice message does
alerts due to radar detectors in other vehicles, increase
not replicate the text message.
the Filter level for the band received. See Option
Selection Mode to change the filter settings.
Teach/Tutorial Mode
Provides simulated alerts for each type of signal.
Ka Max Mode
Ka Max Mode provides enhanced Ka sensitivity -
• Press City and Quiet buttons simultaneously
increased protection. This mode can be selected with
or without RSID. See Option Select Mode for changing
• Display Shows:
Ka options.
• Press Dark button to exit.
Traffic Flow Signal Rejection (TFSR)
Recently, many new products operate on X or K band
Setting Saver
causing nuisance alerts to radar detectors. Some of
Setting Saver stores your personalized settings
these are radar based Traffic Monitoring Systems
mounted to poles alongside the highway and others
so that when the detector is turned off and then
are K Band Lane Change Assistants and Blind Spot
on again, you do not have to re-enter them.
Detectors found on some automobiles. When turned
on in option mode, helps eliminate excessive alerts from
Feature Engaged Confirmation
erroneous X and K-band sources. Traffic flow monitoring
Each time a button is pressed, one beep
systems are getting more common. Many of these
confirms feature "on", two beeps confirm
systems generate radar signals to measure the flow of
traffic across multiple lanes. Most detectors will alert
feature "off".
you to it unnecessarily. This rejection feature examines
the incoming signal and will aid in reducing the alerts to
Auto Dim
such sources.
The Auto Dim feature automatically switches the
illumination of the text display between the
We suggest you turn TFSR on if you are experiencing excessive
X or K band false alerts every half mile or so along stretches of
bright and dim settings according to varying
roadway that contain these traffic flow sensors.
light conditions so that the text display will
Option Select Mode
always be easy to read. To manually override
Press the Menu button to enter Option Select Mode.
the auto dim feature, use the dark button on
Each press of the Menu button changes to the next
the unit. Enter Option Select Mode to turn off
selectable feature.The Dark (D) button and the Quiet
the auto dim feature.
(Q) button turns the feature ON/OFF or Blinking for
example. A button must be pressed within 20 seconds
or Option Select Mode will automatically be exited.(See
page 13 for chart)
INSTALLATION
INSTALLATION
IMPORTANT: Unscrew slowly. The tip contains
a spring which may fly out when disassembling.
Insert the new fuse with the spring and screw on
the tip. With use, the screw cap on the plug may
loosen. Retighten it occasionally.
Installing the Hardwire Kit
The "U" type connector must be secured to
a metal surface that is electrically connected
to the battery ground (negative) terminal.The
spade type connector can connect to either live
12 volts or switched 12 volts at your fuse panel
accessory port. If no port is available, cut off the
spade terminal, expose 1/4 to 1/2 inch of wire,
and splice into a source of 12 volt power.
Fuse Replacement - Hardwire Kit
The inline fuse holder on the power cable is
equipped with a replaceable 2 amp, 3AG fuse
located inside the fuse holder.
To replace the fuse, carefully twist the holder to
open it to gain access to the fuse.
OPERATION
OPERATION
Press and hold Menu button to exit Option
NOTE:
Select Mode.
Feature Display
To Change:
Shows
D=Dark
Q=Quiet
D or Q
S1: Quiet
QUIET
to select
D or Q
S2: Power
POWER
to select
D = ON
AUTO
ADIM:ON
DIM
Q = OFF
D or Q
TONE
TONE 3
to select
TEST
D = ON
TEST
ON
Q = OFF
X
D = ON
X = ON
BAND
Q = OFF
D = ON
K
K = ON
BAND
Q = OFF
Ka
Ka-
D or Q
BAND
MAXID
to select
LSR
D or Q
LASER
NORM
to select
LASER
D or Q
.02-.09 Y
AREA 1
to select
LASER
D or Q
2.6-3.2 Y
AREA 2
to select
LASER
D or Q
3.8-4.2 Y
AREA 3
to select
SWS
D = ON
SWS
™
OFF
Q = OFF
VOICE
D = ON
VOICE
®
ON
Q = OFF
POP
D = ON
POP
™
OFF
Q = OFF
B SVR
D = ON
BATTERY
ON
Q = OFF
SAVER
OPERATION
Option Select Mode
(cont'd)
XK
D or Q
XK FLTR 1
Filter 1, Filter 2, Filter 3
Option
FILTER
to select
D or Q
Ka
Ka FLTR 1
Filter 1, Filter 2, Filter 3
FILTER
to select
D or Q
Alert Periscopes ON
Remote Control of Dim, City,
ALERT
LEDBLNK
Quiet Power Functions
PERISCOPES
to select
(ON, OFF or Blinking)
TFSR
D = ON
TFSR = ON
Remote Control of Dim, City,
TFSR
Quiet Power Functions
OFF
Q = OFF
TFSR = OFF (default)
Auto Dim On
Stay Alert Feature
Auto Dim Off
The Stay Alert Feature is designed to test a driver's
Tone 1, 2, 3
alertness. To engage (when the unit is not alarming) :
(3 Different Tone Patterns)
ON = X, K, Ka Audio Tones
• Press and hold the City button for
approximately 2 seconds. Release the button
OFF = One Beep During Power Up
during or immediately after the alert is given.
X Band ON
X Band OFF
DISPLAY SHOWS:
K Band ON
Within 30-60 seconds, two beeps are sounded; to
K Band OFF
show alertness, the driver must press either the City,
Ka Band (RSID,NORM,
Menu, or Quiet buttons within 3-5 seconds. If a button
OFF,MAX,MAXID)
is pressed within 3-5 seconds, the cycle is repeated.
LASER
If a button is not pressed within 3-5 seconds, an
(NORM,OFF,LSID)
alarm sounds.
Laser Area 1 ON
Laser Area 1 OFF
DISPLAY SHOWS:
Laser Area 2 ON
• Press the Dark button to exit the Stay Alert
Laser Area 2 OFF
feature.
Laser Area 3 ON
Laser Area 3 OFF
WARNING!!!
Stay Alert is NOT intended as a
Turn SWS
ON
substitute for adequate rest. You should NOT operate
™
a vehicle if you are drowsy. During extended periods
Turn SWS
™
OFF
of vehicle operation, you should take frequent breaks.
Improper reliance on the Stay Alert feature may result in
Real VOICE
®
Engaged
vehicle damage, personal injury or death.
Real VOICE
Disengaged
®
POP ON
POP OFF
NEVER OPERATE A
VEHICLE IF YOU
Battery Saver ON
ARE DROWSY!
Battery Saver OFF
Advertisement

Related Manuals for Whistler CR85


Summary of Contents for Whistler CR85
- Page 1 To Change: Option FILTER to select of the unit. Each time your Whistler detector detector to falsely alert. These Filter Modes allow you openers, intrusion alarms and other devices which flash on and off when the unit alarms to provide a 1. Band Identification...
- Page 2 In Most States YES. Laser Facts Alert Priority Reset Features Mode Alerts Whistler has two features that will assist the driving Your Whistler detector is expertly engineered ™ Laser-Radar detectors are legal in every state and designed to exacting quality standards It’s well documented that many radar guns...
Need help?
Do you have a question about the CR85 and is the answer not in the manual?
Questions and answers