Table of Contents
Advertisement
Advertisement
Table of Contents

Subscribe to Our Youtube Channel
Related Manuals for DVDO Quick6


Summary of Contents for DVDO Quick6
- Page 1 DVDO Quick 6x2 4K Ultra HD HDMI Switcher User’s Guide Version 1.0...
-
Page 2: Important Safety Information
• Do not use near heat sources such as room heaters, hot A/V equipment • Read all warnings • Use only accessories approved by DVDO including mounting brackets • Unplug the device during lightning storms or when unused for long periods of time •... -
Page 3: Table Of Contents
Specifications ........................ 28 FCC Interference and Compliance Statement .............. 30 Warranty ........................31 General Warranty Terms .................... 31 DVDO Products Warranty Period ................31 System Warranty ......................31 Obtaining the Warranty Service ................. 32 International Warranty ....................32 Limitation of Liability ....................33 Disclaimer of Warranty .................... -
Page 4: Overview
Overview Quick ™ is DVDO’s latest HDMI switcher for home entertainment and theater applications. Key features • InstaPrevue ® technology • InstaPort ® S technology • 6 HDMI inputs, 2 HDMI outputs; 4K Ultra HD 3D capable • MHL ®... -
Page 5: Instaprevue Visual Switching Technology
• Offset mode: In this mode, the selected window is offset to show which input is being selected • Named mode: In this mode, the selected input name is shown above its preview window Offset Mode Named Mode DVDO Quick A.04... -
Page 6: Instaport S Single-Second Switching Technology
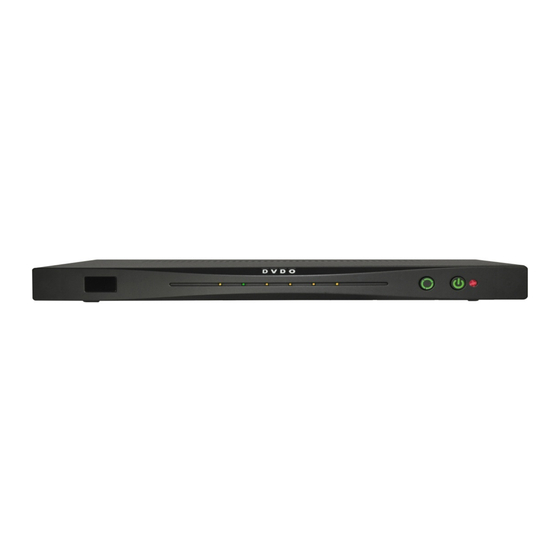
1. IR window – remote control receiver 2. Input indicators (Off = no connection, Amber = HDMI connected, Green = active input) 3. Input select – manually cycles through connected inputs 4. Power switch 5. Power indicator DVDO Quick A.04... -
Page 7: Back Panel
Aux HDMI output, then choose “AVR via HDMI” in the output setup menu. If the Quick connection to the AVR is from the optical or coax S/PDIF output, then choose “AVR via S/PDIF” in the output setup menu. DVDO Quick A.04... - Page 8 With Quick installed, the AVR is used primarily as an audio processor and Quick becomes the primary switch in the system. Quick routes the best possible audio to the AVR and the best possible video to the TV. DVDO Quick A.04...
- Page 9 Since there is no way to detect if the AVR is on or off through S/PDIF, if the user wants to use the TV speakers, the output mode must be switched back to Mirror or “AVR via HDMI” manually. DVDO Quick A.04...
-
Page 10: Mirror Mode
This mode is normally used to feed both a TV and video projector in the same room or for a second monitor in a close but related area (like a bar at the back of a home theater). DVDO Quick A.04... - Page 11 Mirror Mode Routing DVDO Quick A.04...
- Page 12 Note that the On-screen display (OSD) is only shown on the Main output. Capabilities: (EDID) Capabilities: (EDID) 480i, 480p 480i, 480p 720p 720p 1080i, 1080p Stereo PCM Audio Dolby DTS Stereo PCM Audio 720p 720p + Stereo PCM + Stereo PCM 720p + Stereo PCM Mirror Mode Resolution DVDO Quick A.04...
-
Page 13: Audio Return Channel (Arc)
ARC mode. Normally, the TV is left in ARC-on and CEC enabled mode and when the user wants to use ARC, simply switch the audio receiver to S/PDIF input and press the ARC button on the Quick remote. DVDO Quick A.04... -
Page 14: Remote Control
The user selects the input to switch to by using the left/right arrow keys. Pressing ENTER switches to the selected input. Pressing InstaPrevue again or EXIT exits the InstaPrevue system. DVDO Quick A.04... -
Page 15: On Screen Display Menu System
The Change Input menu allows the active input to be directly selected. This is exactly like pressing one of the HDMI input select buttons on the remote control. Making a selection in this menu has no effect on the switching mode. DVDO Quick A.04... - Page 16 If only Mirror mode is used then typically a maximum of stereo PCM is sent over S/PDIF; with this mode enabled, full bitstream DTS audio can be delivered to the AVR. DVDO Quick A.04...
- Page 17 *unchecked, a simple offset is used to show the window selection instead. Selecting Input Naming allows the user to choose an input name to customize. Selecting an input to customize activates an on-screen keyboard. Select Clear [CLR] to remove the existing name. DVDO Quick A.04...
- Page 18 Input 6 is also spaced out a little further from Input 5 to allow space for special MHL devices such as the Roku Streaming Stick. The Information screen displays critical switch settings as well as audio and video information about the current active input. DVDO Quick A.04...
- Page 19 When activated, the input will always appear to be active even if the connected source is off. This results in a blank InstaPrevue and PiP window and an always on amber input LED. * Off DVDO Quick A.04...
- Page 20 1080P, HBR: Sends EDID capability information of 1080p video and High Bit Rate (HD) Audio to all sources regardless of what display is attached. Note that when using a custom EDID, this overrides any choices in the output setup menu. DVDO Quick A.04...
-
Page 21: Updating Firmware
• Firmware version 0101 (filename Q6FW0101.BIN) displays as 01.01 on the information screen Two files are required to update the Quick firmware (both available from DVDO.com as new firmware is released), a .BIN file which contains the actual firmware binary and an .OSD file which contains the fonts, text, and graphics for the OSD. -
Page 22: To Upgrade Firmware Using The Firmware Update Button
• Start with a clean and empty USB flash drive formatted to FAT or FAT32 • If firmware has become corrupted, use the firmware Update button method above DVDO Quick A.04... -
Page 23: Serial Control
The serial port allows anexternal home automation system to control Quick . All menu and remote commands are available as well as a series of queries to determine the status of Quick . Contact DVDO for a detailed command reference. Troubleshooting:... - Page 24 (i.e. Blu-ray or DVD player), audio modes like bitstream DTS and via Aux HDMI or Dolby normally have to be manually selected on the source menu. PS3 and most AVR via S/PDIF DVD players allow the audio mode to be manually selected at “bitstream” which DVDO Quick A.04...
- Page 25 • When updating with the firmware Update button, unplug all HDMI connections from Quick6. Remove power from Quick . Hold firmware update button and apply power.,...
- Page 26 From the Quick remote control, press the ARC button one time to enable ARC channel and again to disable ARC channel. The path for ARC is from the main display “into” the Main Quick HDMI output then DVDO Quick A.04...
- Page 27 Go to lowercase letters and extra symbols clr: Clear entire entry – normally use this first before entering new characters del: delete currently highlighted character spc: space ok: save the entry and return ins: insert a character DVDO Quick A.04...
-
Page 28: Specifications
Names can only be 6 total characters each Quick will not power When updating with the firmware Update button, unplug all HDMI connections up properly, or will from Quick6. Remove power from Quick . Hold firmware update button and not upgrade apply power., firmware... - Page 29 IR and Serial Control Serial protocol: 19200: 8, n, 1 Serial commands available on request from help@DVDO.com USB firmware update using FAT or FAT32 formatted flash drive 12V, 3A DC input Rack mounting via shelf only DVDO Quick A.04...
-
Page 30: Fcc Interference And Compliance Statement
CE mark for Class B ITE (Following European standard EN55022/1998; EN61000-3-2/1995; EN61000-3-3/1995, EN55024/1998, EN60950-1/2001) Radio Frequency Interference Statement Warning: This is a Class B product. In a domestic environment, this product may cause radio interference in which case the user may be required to take adequate measures. DVDO Quick A.04... -
Page 31: Warranty
General Warranty Terms DVDO, Inc., (DVDO), offers a limited warranty for its DVDO products. Any product first sold to you is guaranteed to be free from defects in both components and workmanship under regular uses. The warranty period commences on the date the item ships. -
Page 32: Obtaining The Warranty Service
DVDO; (d) If DVDO determines that any returned Product is not defective, or if DVDO determines that the defect is not covered by the warranty, DVDO will return the Product to the Owner at Owner’s expense, freight collect, and Owner agrees to pay DVDO’s reasonable cost of handling and testing;... -
Page 33: Limitation Of Liability
Limitation of Liability DVDO reserves the right to refuse warranty service of products under disputable conditions. DVDO also holds the rights to declare final decision whether products are within warranty conditions. The following actions and damages will result in voiding the limited warranty: •... -
Page 34: Getting Help
MHL Logo are trademarks or registered trademarks of, and are used under license from, MHL, LLC. in the United States or other countries. HDMI Licensing, LLC, MHL, LLC, and DVDO, Inc. are wholly owned subsidiaries of Silicon Image, Inc. All other trademarks and registered trademarks are the property of their respective owners in the United States or other countries.
Need help?
Do you have a question about the Quick6 and is the answer not in the manual?
Questions and answers