
Related Manuals for Vitamix PORTION BLENDING SYSTEM


Summary of Contents for Vitamix PORTION BLENDING SYSTEM
- Page 1 F O O D S E R V I C E Owner’s Manual Read And Save These Instructions PORTION BLENDING SYSTEM Portion Control Ice Shaver Blender All Models...
-
Page 2: Important Safeguards
If you live outside the US, contact your local Vita-Mix Distributor, or phone the Vita-Mix International Division at +1 (440) 235-5494 or email at international vitamix.com for a distributor in your country. 9. The use of attachments not recommended or sold by Vita-Mix Corporation may cause fire, shock, or injury. - Page 3 Use a soft cloth to wipe the control panel area clean. SAVE THESE INSTRUCTIONS Enjoy the safety of this grounded appliance. The Portion Blending System US power cord comes equipped with a three-prong (grounding) plug which mates with a standard three-prong wall outlet (Figure A). This cord will vary for countries outside the United States.
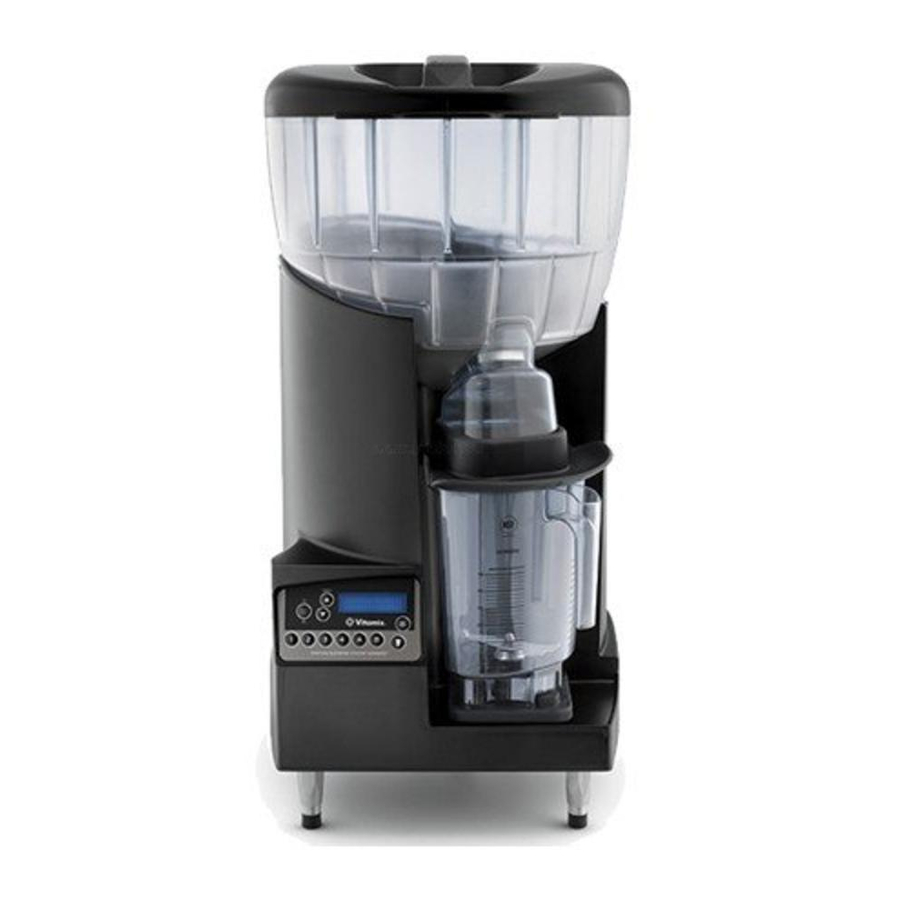
- Page 4 Ice Bin Lid Ice Bin Ice Shelf Ice Chute Splash Guard Shaver Base 64 oz. (2 L) Polycarbonate Container Control Panel Container Pad Leveling Feet...
- Page 5 Setting Up The PBS Place the PBS on a sturdy, level surface or counter. Packaged inside the Ice Bin are items necessary for the operation of the PBS. Remove the Ice Bin Lid and take out the following items: • Container •...
- Page 6 CONTINUED FROM PAGE 5 Using the Drain Hose Kit Clamps Elbow The Drain Hose Kit contains one 90˚ elbow and two hose clamps. When routing to a sink, bucket, or similar recepta- To machine cle use the Drain Hose Kit to eliminate possible kinking of To bucket ˚...
- Page 7 • Avoid using bagged ice that has been stored in a freezer at extremely low temperature. Use of this type of ice may result in freeze-up of the shaver. When you must use bagged ice, it should be stored in an ice chest for a least an hour before use. Replace the Ice Bin Lid and your machine is ready for use.
- Page 8 Shave Only Pre-Set Specialty Drink Buttons Blend Only Portion Blending System ON/OFF switch - Located on the back of the machine the ON/OFF switch controls the power to the PBS. With the machine plugged in, switch the machine to ON to ready the machine for shaving ice and blending.
- Page 9 SHAVE ONLY button - Allows the operator to add more ice after a shave/blend cycle or even shave ice without the blender running. Press and hold the SHAVE ONLY button NOTE: to dispense ice. Shaved ice will be dispensed until the button is released. container must be in place.
- Page 10 Each buttons factory Pre-Set Application. Use the following chart to determine which button you will need. NOTE: The chart below uses the factory settings in determining the use of each PRE-SET button (your machines PRE-SET buttons may be different if your PBS was programmed specifically for your business).
- Page 11 5a. When the blending cycle is complete, and more ice is needed, press and hold the SHAVE ONLY button. By pressing the SHAVE ONLY button more ice will be added to the container. Release the SHAVE ONLY button to stop the shaving of the ice. NOTE: If you wish to blend the contents of the container while adding the additional ice, press the START/STOP button to start the blender then add more ice by pressing the...
- Page 12 The Portion Blending System advanced electronic controls can be custom programmed, by either using the Control Panel or an optional programming chip, available from Vita-Mix ® for a nominal fee and with a minimum unit purchase. Contact your Vita-Mix representative for more information on a programming chip.
- Page 13 5. With the display reading ‘ICE +01’ press the select button to Press increase the amount of ice to an increment of +05 and release NOTE: the select button. Range of adjustments will vary from SAVED button to button. 6. After the desired changes have been made press the START/ Press STOP button to save the changes, then press the Owner Control button (Vita-Mix Logo) to return to blending and test...
-
Page 14: Blade Agitator Assembly
Blade Agitator Assembly Blade Agitator Assembly. Use caution when handling the blade; it is sharp. When inserting the blade assembly through the container bottom, grip the blades with a soft cloth and align the flat sides of the blade assembly with the flat sides of the container. - Page 15 Removal and Installation The PBS Shaving Blade is two blades in one. The blade has two shaving edges so that a fresh edge can be exposed by simply rotating the blade 180 ˚ . Your machine was shipped from the factory with a double edged blade installed. The following instructions can be used to either rotate the blade to expose a fresh edge, or to install a new blade (Item #1550).
- Page 16 Item# Description 120/100V 220/240V 64 oz. (2 L) - Container with ice blade, no lid assembly Lid Plug (for Two Piece Lid) 64 oz. (2 L) - Container no blade assembly or lid assembly Drive Socket Kit - Includes allen wrench & instructions Heavy-duty retainer nut 1151 1151...
- Page 17 #755 #1550 #1191 #1192 #758 PLS511 #752 #1151 or #1552 PLS509 #836 #802 #RBB502 #1222 PLS504 #1551 CST500 PLS503 RBB506...
- Page 18 Removing Ice from the Ice Bin WARNING: To reduce the risk of injury unplug the unit before removing ice from the Ice Bin. Do not operate without lid in place. 1. With the machine off and unplugged remove the Ice Bin Lid. 2.
-
Page 19: Control Panel
CARE NOTE: Do not let mixtures, liquids and food products dry inside the container. Rinse throughout use. Drying product may lock around the blade and weaken/tear the bearings seal when restarted. Do not place containers in the freezer. Extremely low temperature combined with hot ingredients and/or the immediate rapid action of the blade may crack the container. - Page 20 CONTINUED FROM PAGE 19 Ice Chute & Splash Guard Remove and separate the chute and guard from the Ice Bin, then wash in warm soapy water. Rinse clean under running water and dry. Reassemble before use. (See pages 5). WARNING: To reduce the risk of injury unplug the unit before removing ice from the Ice Bin.
- Page 21 If you cannot fix your machine with these suggestions, technical help is available by calling the Vita-Mix Service Hot Line at 1-800-886-5235, or emailing PBSservice vitamix.com. For customers outside the US and Canada please contact your local Vita-Mix distributor. 1. Problem: Solution: •...
- Page 22 CONTINUED FROM PAGE 21 6. Problem: Solution #1: • Machine will not run. Double-check to make sure power cord is • Display screen does not say ‘READY’. firmly in power outlet. Solution #2: Check to make sure the ON/OFF switch is in the ON position.
- Page 23 Portion Blending System: Height of unit: 27 1/2” H (69.85 cm) Additional height needed above machine for adding ice: 20” (50.8 cm) Shipping weight (product only): 58 lbs. (26.5 kg) Dimensions 27 1/2” high x 14 3/4” wide x 16 1/2” deep with lid (69.85 cm x 37.47 cm x 41.91 cm)
-
Page 24: Warranty Information
Warranty Information Your Portion Blending System, depending on the model purchased, may or may not have a Limited One-Year Warranty provided by Vita-Mix or the distributor in the country (outside the US and Canada) in which your machine was purchased. If your machine has a warranty from Vita-Mix (which would be designated by the item number purchased), please complete and mail back the included warranty card.
Need help?
Do you have a question about the PORTION BLENDING SYSTEM and is the answer not in the manual?
Questions and answers