Table of Contents
Advertisement
Advertisement
Table of Contents

Related Manuals for XFX nForce 790i Ultra


Summary of Contents for XFX nForce 790i Ultra
- Page 1 User Guide XFX nForce 790i Ultra 3-Way SLI Motherboard...
-
Page 3: Table Of Contents
XFX nForce 790i 3-Way SLI Motherboard User Guide ........................i XFX nForce 790i Ultra 3-Way SLI Motherboard ............i Before You Begin… ..................... ix Inside the 780i 3-Way SLI Installation CD ...............ix Parts NOT in the Kit ....................x Intentions of the Kit ....................xi XFX nForce 790i Ultra SLI Motherboard...............1... - Page 4 Power Connections .................... 12 24-pin ATX Power (PWR1) ................13 8-pin ATX 12V Power (PWR2)............... 14 Connecting IDE Hard Disk Drives ..............14 Connecting Serial ATA Cables................15 Connecting Internal Headers ................16 Front Panel Header ..................16 IEEE 1394a ....................17 USB Headers ....................
- Page 5 XFX nForce 790i 3-Way SLI Motherboard Advanced BIOS Features ..................34 Removable Device Priority................. 35 Hard Disk Boot Priority..................35 Network Boot Priority ..................35 CPU Internal Cache ................... 35 Quick Power On Self Test.................. 36 First/Second/Third Boot Device ................. 36 Boot Other Device ....................
- Page 6 IDE Function Setup .................... 53 RAID Config ....................... 54 USB Config......................54 MAC Config ......................55 IEEE1394 controller ................... 55 HD Audio ......................55 IDE HDD Block Mode..................55 Onboard FDC Controller ..................55 Onboard Serial Port 1 ..................56 Power Management Setup Menu ................
- Page 7 XFX nForce 790i 3-Way SLI Motherboard NVIDIA Performance Group of NVIDIA Control Panel .......... 68 Device Settings ....................69 Current Hardware Settings................70 Dynamic BIOS Access ..................76 View System Information ................... 77 Profile Policies....................78 Manage Your System BIOS ................79 NVIDIA System Monitor ..................
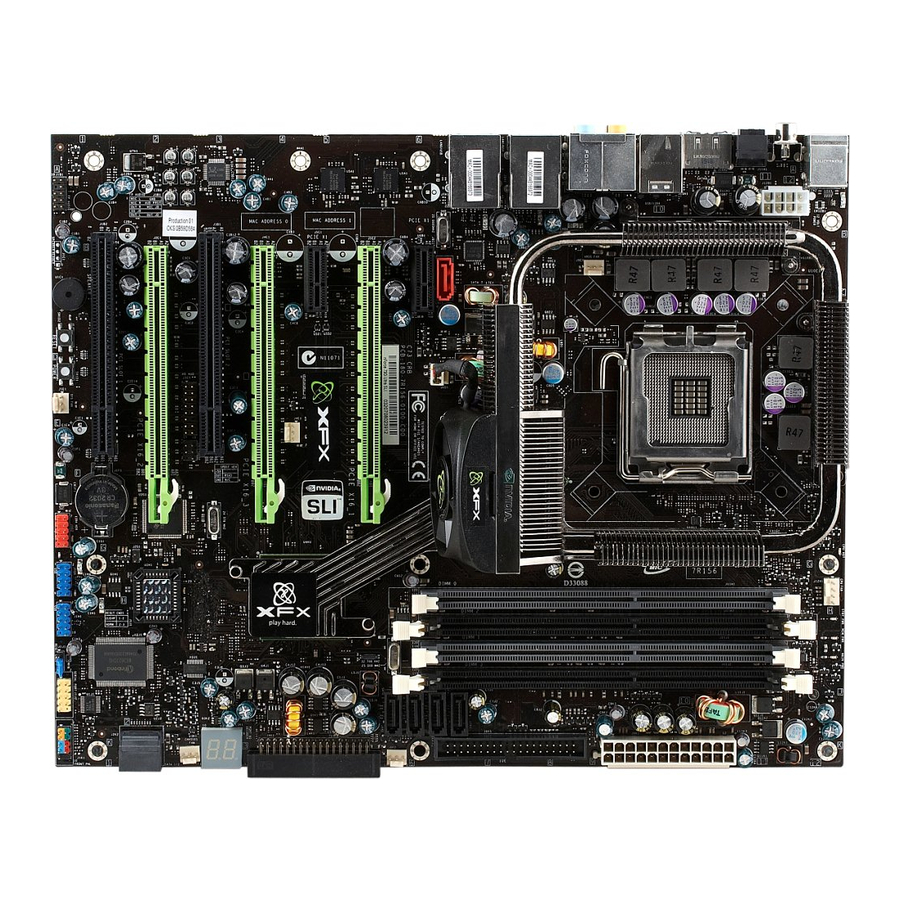
- Page 8 Figure 1. XFX nForce 790i Ultra SLI Motherboard Layout ........5 Figure 2. Chassis Backpanel Connectors ............. 6 Figure 3. Power Supply Connectors..............12 Figure 4. PWR1 Motherboard Connector ............13 Figure 5. BIOS CMOS Setup Utility Main Menu ..........27 Figure 6.
-
Page 9: Before You Begin
XFX nForce 790i 3-Way SLI Motherboard Before You Begin… Inside the 780i 3-Way SLI Installation CD... -
Page 10: Parts Not In The Kit
Parts NOT in the Kit... -
Page 11: Intentions Of The Kit
XFX nForce 790i 3-Way SLI Motherboard Intentions of the Kit building replacing replacing... -
Page 13: Xfx Nforce 790I Ultra Sli Motherboard
XFX nForce 790i Ultra SLI Motherboard Motherboard Specifications... -
Page 15: Unpacking And Parts Descriptions
Unpacking and Parts Descriptions Unpacking Equipment... -
Page 16: Xfx Nforce 790I Ultra Sli Motherboard
XFX nForce 790i Ultra SLI Motherboard... - Page 17 XFX nForce 790i 3-Way SLI Motherboard 23 24...
- Page 18 1394a (Firewire) Port • • •...
-
Page 19: Hardware Installation
Hardware Installation Safety Instructions... -
Page 20: Preparing The Motherboard
Preparing the Motherboard Installing the CPU down away Make sure the CPU is fully seated and level in the socket. -
Page 21: Installing The Cpu Fan
Installing the CPU Fan Installing Memory DIMMs... -
Page 22: Installing The Motherboard
Installing the Motherboard Be sure that the CPU fan assembly has enough clearance for the chassis covers to lock into place and for the expansion cards. Also make sure the CPU Fan assembly is aligned with the vents on the covers. Installing the I/O Shield inside... -
Page 23: Securing The Motherboard Into The Chassis
Securing the Motherboard into the Chassis Connecting Cables and Setting Switches... -
Page 24: Power Connections
Power Connections www.slizone.com... -
Page 25: 24-Pin Atx Power (Pwr1)
24-pin ATX Power (PWR1) -
Page 26: 8-Pin Atx 12V Power (Pwr2)
8-pin ATX 12V Power ( PWR2 Connecting IDE Hard Disk Drives If an ATA-66/100 disk drive and a disk drive using any other IDE transfer protocol are attached to the same cable, the maximum transfer rate between the drives may be reduced to that of the slowest drive. -
Page 27: Connecting Serial Ata Cables
Connecting Serial ATA Cables Connect the locking cable end to the motherboard connector. Connect the end without the lock to the drive. -
Page 28: Connecting Internal Headers
Connecting Internal Headers Front Panel Header HD_LED PWRLED RESET PWRSW No Connect Blank Some chassis do not have all four cables. Be sure to match the name on the connectors to the corresponding pins. -
Page 29: Ieee 1394A
IEEE 1394a Card Edge... -
Page 30: Usb Headers
USB Headers Card Edge... -
Page 31: Audio
Audio... -
Page 32: Fan Connections
Fan Connections PC Health Status... -
Page 33: Com1
COM1... -
Page 34: Fdd Connector
FDD Connector Expansion Slots www.XFXforce.com... -
Page 35: Pci Slots
PCI Slots PCI Express x1 Slots PCI Express x16 Slots... -
Page 36: Jumper Settings
Jumper Settings Clear CMOS Jumper: CLR_CMOS... -
Page 37: Configuring The Bios
Configuring the BIOS... -
Page 38: Enter Bios Setup
Enter BIOS Setup Press F1 to continue, DEL to enter Setup. It is strongly recommended that you do not change the default BIOS settings. Changing some settings could damage your computer. Main Menu Note that on the BIOS screens all data in white is for information only, data in yellow... - Page 39 Phoenix – AwardBIOS CMOS Setup Utility Standard CMOS Features System Monitor Advanced BIOS Features Load Defaults Advanced Chipset Features Set Password Save & Exit Setup Integrated Peripherals Exit Without Saving Power Management Setup PnP/PCI Configurations Esc : Quit : Select Item F10 : Save &...
-
Page 41: Standard Cmos Features Menu
Standard CMOS Features Menu Item Help Phoenix – AwardBIOS CMOS Setup Utility Standard CMOS Features Date (mm:dd:yy) Sat, Jul 01 2006 Item Help Time (hh:mm:ss) 12 : 48: IDE Channel (.) Master [None] Main Level IDE Channel (.) Slave [None] SATA Channel 1 Master [None] Change the day, month,... -
Page 42: Date And Time
Date and Time hour : minute : second Date (mm:dd:yy) Sat, Jul 01 2006 Time (hh:mm:ss) 14 : 48: IDE Channel and SATA Channel IDE Channel (.) Master [None] IDE Channel (.) Slave [None] SATA Channel 1 Master [None] SATA Channel 2 Master [None] SATA Channel 3 Master [None]... - Page 43 [Manual] Access Mode [CHS] IDE HDD Auto-Detect [Press Enter] IDE Channel 0 Slave [Manual} Access Mode [CHS] Capacity 0 MB Cylinder ..0 Head Precomp Cylinder Landing Zone Sector Min= Max=65535 Key in a DEC number : :Move ENTER:Accept ESC:Abort...
-
Page 44: Drive A
Drive A Drive A Drive A [1.44, 3.5 in.] Halt On [All , But Keyboard] Drive A None ..[ ] 360K, 5.25 in..[ ] 1.2M, 5.25 in..[ ] 720K, 3.5 in..[ ] 1.44M, 3.5 in.. -
Page 45: Memory
Memory display-only values Base Memory 640K Extended Memory 1047552K Total Memory 1048576K... -
Page 46: Advanced Bios Features
Advanced BIOS Features The options that have associated sub-menus are designated by a , which precedes the option. Press Enter to display the sub-menus. Phoenix – AwardBIOS CMOS Setup Utility Advanced BIOS Features Removable Device Priority [Press Enter] Item Help Hard Disk Boot Priority [Press Enter] Network Boot Priority... -
Page 47: Removable Device Priority
Removable Device Priority 1. Floppy Disks Hard Disk Boot Priority 1. Ch0. ST3802110A 2. Bootable Add-in Cards Network Boot Priority Network Boot Priority 1. Network 0 : <description of network> 2. Network 1 : <description of network> CPU Internal Cache... -
Page 48: Quick Power On Self Test
Quick Power On Self Test First/Second/Third Boot Device First Boot Device Removable ..[ ] Hard Disk ..[ ] CDROM ..[ ] Network ..[ ] Disabled ..[ ] :Move ENTER:Accept ESC:Abort Boot Other Device Boot Up NumLock Status... -
Page 49: Security Option
Security Option Setup System APIC Mode MPS Version Control For OS Full Screen LOGO Show... -
Page 50: Advanced Chipset Features
Advanced Chipset Features Advanced Chipset Features Phoenix – AwardBIOS CMOS Setup Utility Advanced Chipset Features System Clocks [Press Enter] Item Help FSB & Memory Config [Press Enter] CPU Configuration [Press Enter] Main Level System Voltages [Press Enter] NVMEM memory test [Disable] Voltage control Load timing/voltage set... -
Page 51: System Clocks
System Clocks System Clocks Phoenix – AwardBIOS CMOS Setup Utility System Clocks Parameters Settings Current Val e Item Help **Frequency Settings** CPU Freq, MHz 2933.3 2933.3 FSB Reference Clock, MHz 1066.7 1066.7 Main Level CPU Multiplier CPU frequency PCIe 16_1, MHz [Auto] multiplier. -
Page 52: Frequency Settings
Frequency Settings PCIe Spread Spectrum(SPP) -
Page 53: Ht Multiplier
HT Multiplier [1 x] [5 x]. [1 x] [5 x] Spread Spectrum [Disabled] [UP Spread] [Center Spread]. [Disabled] [UP Spread] [Center Spread]. Disabled... -
Page 54: Fsb & Memory Config
FSB & Memory Config FSB & Memory Config Phoenix – AwardBIOS CMOS Setup Utility FSB & Memory Config Parameters Settings Current Value Item Help SLI-Ready Memory [Disabled] Disabled Main Level CPU Freq, MHz 2933.3 2933.3 CPU Multiplier FSB – Memory Clock Mode [Auto] “CPUOC MAX”... - Page 55 CPUOC x% FSB - Memory Clock Mode Unlinked SLI- Ready Memory Disable FSB (QDR), MHz CPU Freq, MHz CPU Freq, MHz 2933.3 2933.3 CPU Multiplier FSB – Memory Clock Mode [Linked] FSB (QDR), MHz [1067] 1066.7 Actual FSB (QDR), MHz 1066.7 MEM (DDR), MHz Auto...
- Page 56 Actual FSB (QDR) Actual MEM (DDR) Phoenix – AwardBIOS CMOS Setup Utility Memory Timing Setting Item Help Parameters Settings Current Value Memory Timing Setting [Optimal] Main Level tCL (CAS Latency) Auto(5) tRDC Auto(7) Select [Expert] to Auto(7) enter timings manually tRAS Auto(23) Command Per Clock (CDM)
- Page 57 Expert Parameters Settings Current Value Memory Timing Setting [Expert] tCL (CAS Latency) [Auto(5)] tRDC [Auto(7)] [Auto(7)] tRAS [Auto(23)] Command Per Clock (CDM) [Auto(2T)] ** Advanced Memory Settings ** tRRD [Auto(4)] [Auto(28)] [Auto(7)] tWTR [Auto(10)] tREF [Auto] 6.1uS tRDC tRAS Command Per Clock tRRD tWTR tREF...
-
Page 58: Cpu Configuration
CPU Configuration CPU Configuration Phoenix – AwardBIOS CMOS Setup Utility CPU Configuration Limit CPUID MaxVal [Disabled] Item Help Intel SpeedStep Disabled CPU Thermal Control [Disabled] Main Level C1E Enhanced Halt State [Enabled] Execute Disable Bit [Enabled] Virtualization Technology [Enabled] Set linit CPUID MaxVal to 3, should be “Disabled”... -
Page 60: System Voltages
System Voltages System Voltages Phoenix – AwardBIOS CMOS Setup Utility System Voltages Parameters Settings Current Value Item Help CPU Core [Auto] 1.28 CPU FSB [Auto] 1.2V Main Level Memory [Auto] 1.85V nForce SPP [Auto] 1.30V nForce MCP [Auto] 1.50V Voltage level for CPU HT nForce SPP <->... - Page 61 [Auto] [Auto] [Auto] [Auto] [Auto] [Auto] [Auto] [Auto]...
-
Page 62: Nvmem Memory Test
NVMEM Memory Test Load Timing/Voltage Set Save timing/voltage set Auto Load timing/voltage set Press Enter to Exit ..[ ] Select Profile 1 ..[ ] Select Profile 2 ..[ ] Select Profile 3 ..[ ] :Move ENTER:Accept ESC:Abort... -
Page 63: Save Timing/Voltage Set
Save Timing/Voltage Set Auto Save timing/voltage set Press Enter to Exit ..[ ] Select Profile 1 ..[ ] Select Profile 2 ..[ ] Select Profile 3 ..[ ] :Move ENTER:Accept ESC:Abort System BIOS Cacheable HPET Function Enabled Disabled NVIDIA GPU Ex... -
Page 64: Integrated Peripherals Menu
Integrated Peripherals Menu Integrated Peripherals Phoenix – AwardBIOS CMOS Setup Utility Integrated Peripherals IDE Function Setup [Press Enter] Item Help RAID Config [Press Enter] USB Config [Press Enter] Main Level MAC Config [Press Enter] IEEE1394 controller [Auto] HD Audio [Auto] IDE HDD Block Mode [Enabled] Onboard FDC Controller... -
Page 65: Ide Function Setup
IDE Function Setup OnChip IDE Channel0 [Enabled] Primary Master [Auto] Primary Slave [Auto] Primary Master UDMA [Auto] Primary Slave UDMA [Auto] IDE DMA transfer access [Enabled] Serial-ATA Controller [All Enabled] IDE Prefetch Mode [Enabled] OnChip IDE Channel0 [Disabled] Primary Master Auto Primary Slave Auto... -
Page 66: Raid Config
RAID Config RAID Enable [Enabled] SATA 0 Primary RAID [Disabled] SATA 0 Secondary RAID [Disabled] SATA 1 Primary RAID [Disabled] SATA 1 Secondary RAID [Disabled] SATA 2 Primary RAID [Disabled] SATA 2 Secondary RAID [Disabled] RAID Enable [Disabled] SATA 0 Primary RAID Disabled SATA 0 Secondary... -
Page 67: Mac Config
MAC Config MAC0 LAN [Enabled] MAC1 LAN [Disabled] Auto IEEE1394 controller HD Audio IDE HDD Block Mode [Enabled] [Disabled] Onboard FDC Controller... -
Page 68: Onboard Serial Port 1
Onboard Serial Port 1 [3F8/IRQ4] [2E8/IRQ3] [3E8/IRQ4] [Auto] [Disabled]. Power Management Setup Menu Power Management Setup Phoenix – AwardBIOS CMOS Setup Utility Power Management Setup ACPI function [Enabled] Item Help APCI Suspend Type [S1&S3] Soft-Off by PBTN [Instant-Off] Main Level WOL(PME#) From Soft-Off [Disabled] Power-on by Alarm... -
Page 69: Acpi Function
ACPI Function ACPI Suspend Type [S1&S3] [S1(POS)] [S3(STR)] Soft-Off by PBNT [Instant-Off] [Delay 4 Sec] WOL(PME#) From Soft-Off Power On by Alarm [Disable] [Enable] Power-on by Alarm [Disabled] Day of Month Alarm [ 0] Time (hh:mm:ss) Alarm [0 : 0 : 0]... -
Page 70: Power On Function
POWER ON Function [Password] KB Power ON Password POWER ON Function [Password] KB Power ON Password [Enter] Hot Key Power On Ctrl-F1 [Hot Key] Hot key Power On function POWER ON Function [Hot key] KB Power ON Password Enter Hot Key Power On [Ctrl-F1]... -
Page 71: Pnp/Pci Configuration Menu
PnP/PCI Configuration Menu PnP/PCI Configuration Phoenix – AwardBIOS CMOS Setup Utility PnP/PCI Configuration Init Display First [PCI Slot] Item Help Reset Configuration Data [Disabled] Main Level Resources Controlled By [Auto(ESCD)] IRQ Resources Press Enter ** PCI Express relative items ** Maximum Payload Size [4096] ... -
Page 72: Reset Configuration Data
Reset Configuration Data [Enabled] [Disabled] Resources Controlled By [Auto(ESCD)] [Manual] Resources Resources Controlled By [Auto(ESCD)] x IRQ Resources Press Enter Resources Controlled By [Manual)] IRQ Resources [Press Enter]... -
Page 73: Irq Resources
IRQ Resources Resources Controlled By [Manual] IRQ-5 assigned to [PCI Device] IRQ-9 assigned to [Reserved] IRQ-10 assigned to [PCI Device] IRQ-11 assigned to [PCI Device] IRQ-14 assigned to [PCI Device] IRQ-15 assigned to [PCI Device] PCI/VGA Palette Snoop Maximum Payload Size... -
Page 74: System Monitor Menu
System Monitor Menu System Monitor Phoenix – AwardBIOS CMOS Setup Utility System Monitor Dynamic Fan Control [Press Enter] Item Help 47ºC/ 117ºF CPU Core 1.28V Main Level CPU FSB 1.19V Memory 1.81V +3.3V 3.16V +3.3V Dual 3/16V +12V 11.92V 4.99V +Vbat 3.00V CPU Fan Speed... -
Page 75: Dynamic Fan Control
Dynamic Fan Control CPU Fan Speed Control [SmartFan] If temp > 70ºC, Set Fan Speed 100% If temp < 30ºC, Set Fan Speed Manual Fan Speed, % AUX Fan Speed Control, % [100] nForce Fan Speed Control, % [100] Chassis Fan Speed Control, % [100] [SmartFan] [Manual]... - Page 76 This page is blank.
-
Page 77: Installing Drivers And Software
Installing Drivers and Software It is important to remember that before installing the driver CD that is shipped in the kit, you need to load your operating system. The motherboard supports Windows XP 32bit and 64bit and is Vista-capable. -
Page 78: Windows Xp Drivers Install
Windows XP Drivers Install When installing the graphics drivers, the resolution defaults to the lowest setting (typically 800 x 600), making your display very large. Adjust accordingly. If you have multiple graphics cards installed, you will be asked multiple times for all events once the drivers are installed. -
Page 79: Using The Nvidia Software
Using the NVIDIA Software... -
Page 80: Nvidia Performance Group Of Nvidia Control Panel
NVIDIA Performance Group of NVIDIA Control Panel Note All changes made within NVIDIA Performance Group are dynamically applied, and will only remain active for the current Windows session. You can save these settings as a profile by using the Profile menu item. -
Page 81: Device Settings
Device Settings... -
Page 82: Current Hardware Settings
Current Hardware Settings... - Page 83 Motherboard All changes on Adjust Motherboard Settings are dynamically made when you apply them, and only remain active for the current Windows session. You can save these settings as a profile for use later by using the Profile menu item. If a setting does not allow a change, it probably requires a reboot and should be changed in the BIOS or from the Dynamic BIOS Access...
- Page 84 Memory...
-
Page 88: Dynamic Bios Access
Dynamic BIOS Access Note This feature is available only with BIOS support from the motherboard manufacturer. Available screen and features will vary between different makes and models of motherboards. -
Page 89: View System Information
View System Information... -
Page 90: Profile Policies
Profile Policies... -
Page 91: Manage Your System Bios
Manage Your System BIOS... -
Page 92: Nvidia System Monitor
NVIDIA System Monitor... -
Page 97: Appendix A. Post Codes For Tritium Platform
Appendix A. POST Codes for Tritium Platform... -
Page 107: Appendix B. Configuring An Sli Configuration
Appendix B. Configuring an SLI Configuration Figure 17. 3-Way SLI Using GeForce 8800 Ultra... -
Page 108: Forceware Driver
SLI Connector ForceWare Driver InstallShield InstallShield Windows Vista Device Manager Display adapters... - Page 109 Display adapters...
-
Page 110: Enabling 3-Way Sli
Enabling 3-Way SLI NVIDIA Control Panel Settings Set SLI configuration Enable SLI technology (recommended) Selecting Do not use SLI Technology sets the configuration into single GPU mode. - Page 111 3D Settings Show SLI Visual Indicators...
-
Page 112: Verifying 3-Way Sli Is Active
Verifying 3-way SLI is Active... -
Page 113: Index
Index 1394 Cable, 4 Main Menu, 26 2-Port SATA Power Cable, 4 Memory Timing Setting, 44 ACPI function, 57 PnP/PCI Configuration, 59 ACPI Suspend Type, 57 Power Management Setup, 56 Adjust Motherboard Timings screen, 71 Standard CMOS Features, 29 Advanced BIOS Features, 34 System Clocks, 39 Advanced Chipset Functions menu, 38 System Monitor menu, 62... - Page 114 FDD, 22 Event Logging, 83 Execute Disable Bit, 47 front audio, 19 IDE, 14 expansion slots, 22 PWR1, 13 Extended Memory, 33 PWR2, 14 FDC controller function, 55 SATA, 15 Floppy Cable, 3 system fan, 20 Frequency Settings, 40 Cooling fan for CPU, x Front Audio, 19 CPU Configuration menu, 46 front panel header, 16...
- Page 115 configure RAID in BIOS, 54 IDE Prefetch Mode, 53 configure USB in BIOS, 54 IDE/SATA sub-menu, 30 connect IDE drives, 14 IDE-ATA 133 HDD Cable, 4 connect power to motherboard, 13 IEEE 1394 expansion cable, 17 create custom profiles, 78 IEEE 1934a Connector Pins, 17 install CPU, 8 installing...
- Page 116 motherboard Award, 85 install procedure, 10 NVMM, 92 motherboard specifications, 1 power button cable, 16 motherboard, realtime settings and status Power Management Setup menu, 56 information, 81 power supply requirement, x motherboard, setting parameters, 71 Power-on by alarm function, 57 MPS, 37 power-on function, 58 Multi-Processor Specification, 37...
- Page 117 W to R Termination Turnaround, 73 TLP payload size, 61 Write Recovery Time, 73 Total Memory, 33 Write-to-Write timing, 74 tRAS, 45, 72 XFX nForce 790i Ultra Motherboard, 3 tRC, 45 XFX nForce 790i Ultra Motherboard Layout, 5 tRDC, 45 tRDRD, 73...
Need help?
Do you have a question about the nForce 790i Ultra and is the answer not in the manual?
Questions and answers