Advertisement
Quick Links
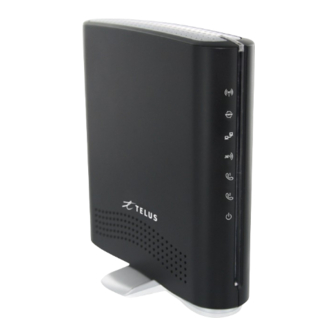
TELUS Smart Hub
Powered by the TELUS 4G network
Package Contents
A
D
F
C
E
B
G
H
A TELUS Smart Hub
B Antenna
C RJ-11 Cable (black cable)
D Ethernet Cable (yellow cable)
E Power Adapter
F Wireless Security Card
G Quick Start Guide
H CD (User Manual)
Hardware Installation
1.
Attach the supplied antenna to the port marked 3G Antenna. (This should be attached in a clockwise
direction.)
2.
Insert your Smart Hub SIM card (until you hear a click) into the SIM slot.
Important Notice about your Smart Hub SIM Card:
Your TELUS Smart Hub SIM card is designed to work only with your Smart Hub device. The SIM card will
become locked if you insert it into another TELUS device and you will not be able to access the internet. If your
SIM card becomes locked, please call customer care.
3.
For voice calls, connect a standard analog telephone to the port labeled Line 1 using the black RJ-11
cable provided.
Please note: Fax machines are not supported by the TELUS Smart Hub.
4.
Connect the power adapter to the Power port on the back of the Smart Hub.
5.
Plug the power adapter into the wall socket.
6.
Wait 60 seconds for the Smart Hub to start up after plugging in the unit.
Please note: The Power LED will stop flashing once the Smart Hub has finished the start up process.
LEDs Explained
WiFi LED:
I ndicates whether WiFi network connection is active. Blinks on traffic
WWW LED:
L ights up when the Smart Hub is connected via WAN Ethernet port
LAN LED:
Indicates that a LAN connection is established
3G LED:
L ights up when the Smart Hub is connected to the TELUS network
LINE 1 LED:
Lights up when the handset connected to line 1 is off the hook
LINE 2 LED:
L ights up when the handset connected to line 2 is off the hook
Power LED:
I ndicates whether your device is ON.
Advertisement

Related Manuals for TELUS Smart Hub


Summary of Contents for TELUS Smart Hub
- Page 1 Hardware Installation TELUS Smart Hub Powered by the TELUS 4G network Attach the supplied antenna to the port marked 3G Antenna. (This should be attached in a clockwise direction.) Insert your Smart Hub SIM card (until you hear a click) into the SIM slot. Important Notice about your Smart Hub SIM Card: Your TELUS Smart Hub SIM card is designed to work only with your Smart Hub device. The SIM card will become locked if you insert it into another TELUS device and you will not be able to access the internet. If your SIM card becomes locked, please call customer care. For voice calls, connect a standard analog telephone to the port labeled Line 1 using the black RJ-11 cable provided. Please note: Fax machines are not supported by the TELUS Smart Hub. Connect the power adapter to the Power port on the back of the Smart Hub. Plug the power adapter into the wall socket. Wait 60 seconds for the Smart Hub to start up after plugging in the unit. Please note: The Power LED will stop flashing once the Smart Hub has finished the start up process. LEDs Explained Package Contents WiFi LED: I ndicates whether WiFi network connection is active. Blinks on traffic WWW LED: L ights up when the Smart Hub is connected via WAN Ethernet port LAN LED:...
- Page 2 Open your Web browser and type 192.168.20.1 into your Wireless Security Card. If your Smart Hub is connected via WiFi the WiFi LED will be blinking blue Wait approximately 30 seconds for the connection the address bar and press enter. The default login when there is data being transmitted. If it is not blinking blue then you may to establish. details are: follow the steps below. ®/MD username: admin A. Confirm that you’re connected to the Smart Hub by typing 192.168.20.1 into the address bar and press enter. If you reach the password: admin Wireless Network Name (SSID): Smart Hub login screen, you are connected to WiFi. If not, you will Nom du réseau sans fil (SSID): xxxxxxxxxxxxxxxxxxxxxx Consult the user manual included on the CD in the need to reconfigure your WiFi connection (refer to Connecting via Wireless Security Key (WPA): Clé de sécurité sans fil (WPA): xxxxxxxxxxxxxxxxxxxxxx...
Need help?
Do you have a question about the Smart Hub and is the answer not in the manual?
Questions and answers