Sign In
Upload
Download
Table of Contents
Contents
Add to my manuals
Delete from my manuals
Share
URL of this page:
HTML Link:
Bookmark this page
Add
Manual will be automatically added to "My Manuals"
Print this page
×
Bookmark added
×
Added to my manuals
Manuals
Brands
Synology Manuals
Server
DS108j
User manual
Synology DS108j User Manual
Nas
Hide thumbs
Also See for DS108j
:
Quick installation manual
(14 pages)
1
2
3
4
Table Of Contents
5
6
7
8
9
10
11
12
13
14
15
16
17
18
19
20
21
22
23
24
25
26
27
28
29
30
31
32
33
34
35
36
37
38
39
40
41
42
43
44
45
46
47
48
49
50
51
52
53
54
55
56
57
58
59
60
61
62
63
page
of
63
Go
/
63
Contents
Table of Contents
Troubleshooting
Bookmarks
Table of Contents
Table of Contents
About this User's Guide
Getting to Know Your Synology Server
Introduction
Storing and Sharing Files Via Internet
PC Data and Server Data Backup
Transferring Data Via FTP
Managing Files through Web Browsers
Sharing Photos, Videos and Blogs with Photo Station 3
Enjoying Entertainment Data Stored on Server
Enjoying Music Instantly Anytime
Programming Your Own Web Site
Video Recording with IP Cameras
USB Printer Server
Specification
1-Bay Models
2-Bay Models
4-Bay Models
5-Bay Models
Limitations
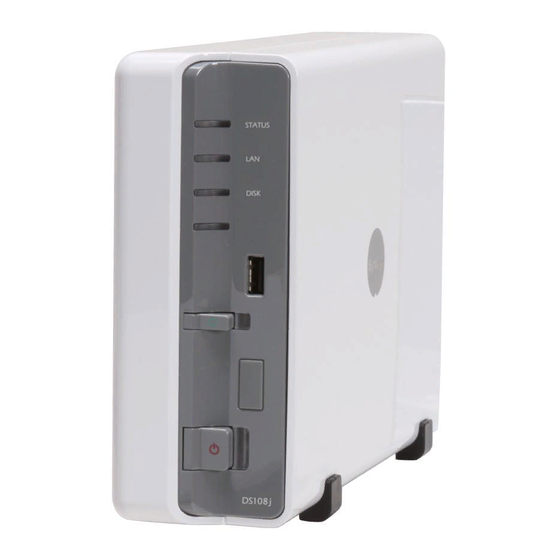
Appearance
1-Bay & 2-Bay Disk Station
4-Bay Cube/Disk Station
Rear View
4-Bay 1U Rack Station
5-Bay Disk Station
LED Indication Descriptions Table
1-Bay & 2-Bay Models
4-Bay Models
5-Bay Models
Managing Synology Server
Entering Web Management UI
Using Setup Utility
Accessing Web Management UI Manually
Managing Synology Server
Connecting from Two Different Network
Managing Volume
Repairing Volume by Hot Swapping
Joining Windows Domain
Accessing Synology Server Via Telnet/Ssh
Accessing Synology Server Via NFS
Resetting Administrator Password
Reinstalling Synology Server
Accessing Synology Server Data
Shared Folders
System Built-In
Administrator-Created
Setting Access Control
Using Network Recycle bin
Setting Encoding
Accessing Shared Folders
From the same Network
Mac User
From Different Network
Server Backup and PC Backup Solutions
Local Backup
Network Backup
Backing up Personal Data
Before Starting
Minimum System Requirement
Installing Synology Data Replicator 3
Using Synology Data Replicator 3
Backing up Synology Server Settings
Synology Server to PC Client
Synology Server to Another Synology Server
Sharing USB Printer
Extra Features
Audio Station
Itunes Service
Multimedia Service
Download Station 2
Enabling Download Station 2
Installing Download Redirector
Web Station
Enabling Web Station and Mysql
Enabling Virtual Host
Web Station's Detail Description
Photo Station 3
Enabling Photo Station 3
Photo Station 3'S Detail Description
Surveillance Station
Enabling Surveillance Station
Surveillance Station's Detailed Description
Usbcopy
Setting Usbcopy Target Location
Mail Notification
Firmware Update
Expanding Storage Capacity
External HDD
External USB HDD
External SATA HDD
Replacing Larger Internal HDD
For One-Bay Models
For Basic or RAID 0 Volume on Two and more Bays Models
For RAID 1 Volume on Two and more Bays Models
For RAID 5 or RAID 6 Volume on Four and more Bays Models
Adding an HDD to a RAID 5/RAID 6 Volume
Troubleshooting
Appendix
Recommended Peripherals
Recommended NTP Server
Advertisement
Quick Links
1
Storing and Sharing Files Via Internet
2
Entering Web Management Ui
Download this manual
NAS Server
User's Guide
Applied Model:
DS108j, DS107, DS107+, DS207, DS207+, DS209+, CS407e,
CS407, DS408, RS407, RS408, RS408-RP, DS508
Document ID:
Synology _UserGuide_NASeries_20080915_enu
Based on Version:
DSM 2.0-0722
Table of
Contents
Previous
Page
Next
Page
1
2
3
4
5
Advertisement
Table of Contents
Need help?
Do you have a question about the DS108j and is the answer not in the manual?
Ask a question
Questions and answers
Related Manuals for Synology DS108j
Storage Synology DS107+ Quick Installation Manual
Disk station (14 pages)
Storage Synology DS109j User Manual
Disk station (63 pages)
Server Synology DS207 Series User Manual
Synology ds207 series user's guide (44 pages)
Print Server Synology 407 Series User Manual
407 series (44 pages)
Server Synology DS207 Series User Manual
(40 pages)
Network Hardware Synology DS107+ Installation Manual
(28 pages)
Storage Synology CS407 Quick Installation Manual
(16 pages)
Network Router Synology RS408-RP Quick Installation Manual
Rack station (15 pages)
Storage Synology DS207+ Quick Installation Manual
(10 pages)
Server Synology DiskStation DS410 Technical Specifications
4-bay all-in-1 nas server with optimal price/performance ratio for home to business workgroup users (2 pages)
Server Synology DiskStation User Manual
(71 pages)
Server Synology DS-106 Series User Manual
(42 pages)
Server Synology Disk Station DS410j Brochure & Specs
Budget-friendly 4-bay nas server for home and small business (2 pages)
Server Synology NAS DS2419+II Hardware Installation Manual
(27 pages)
Server Synology DS101 Series User Manual
(41 pages)
Server Synology DS723+ Product Manual
(50 pages)
This manual is also suitable for:
Ds207+
Ds209+
Cs407e
Cs407
Ds408
Rs407
...
Show all
Rs408
Rs408-rp
Ds508
Ds107+
Table of Contents
Print
Rename the bookmark
Delete bookmark?
Delete from my manuals?
Login
Sign In
OR
Sign in with Facebook
Sign in with Google
Upload manual
Upload from disk
Upload from URL


Need help?
Do you have a question about the DS108j and is the answer not in the manual?
Questions and answers