Toa W-906A User Manual
900 series in-wall mixer power amplifiers
Hide thumbs
Also See for W-906A:
- Operating instructions manual (12 pages) ,
- Manual (28 pages) ,
- Specifications (4 pages)
Table of Contents
Advertisement
Quick Links
Download this manual
See also:
Manual
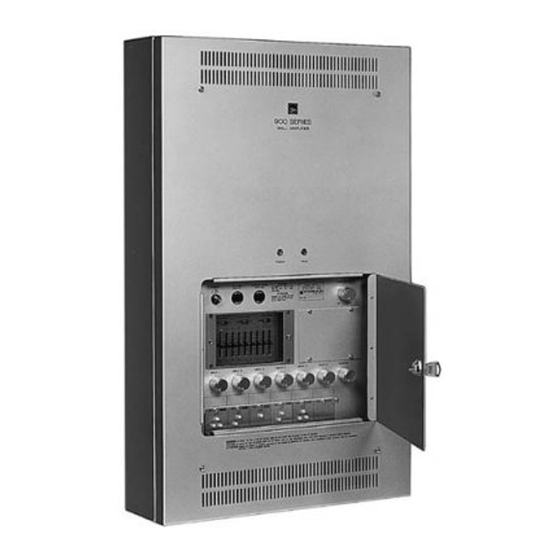
NEW 900 SERIES
IN-WALL MIXER POWER AMPLIFIERS
Thank you for purchasing TOA's New 900 series In-wall Mixer Power Amplifier.
Please carefully follow the instructions in this manual to ensure long, trouble-free use of your equipment.
900 SERIES
WALL AMPLIFIER
POWER
PEAK
POWER
AC FUSE
OUTPUT FUSE
COMPRESSOR
ON
250V 3A
250V 6A
OFF
OFF
MAX
EQUALIZER
HIGH PASS
LOW PASS
OUT
IN
OFF
ON
OFF
ON
63
125
250
500
1k
2k
4k
8k
16k
12
12
6
6
0
0
6
6
12
12
63
125
250
500
1k
2k
4k
8k
16k
INPUT 1
INPUT 2
INPUT 3
INPUT 4
INPUT 5
INPUT 6
MASTER
USER'S MANUAL
W-906A
W-912A
Advertisement
Table of Contents

Related Manuals for Toa W-906A


Summary of Contents for Toa W-906A
- Page 1 INPUT 1 INPUT 2 INPUT 3 INPUT 4 INPUT 5 INPUT 6 MASTER Thank you for purchasing TOA's New 900 series In-wall Mixer Power Amplifier. Please carefully follow the instructions in this manual to ensure long, trouble-free use of your equipment.
-
Page 2: Table Of Contents
TABLE OF CONTENTS 1. IMPORTANT SAFETY INSTRUCTIONS ............ 3 2. SAFETY PRECAUTIONS ................. 4 3. GENERAL DESCRIPTION ................6 4. FEATURES ......................6 5. NOMENCLATURE AND FUNCTIONS Front .......................... 7 6. SERVICING ......................8 7. OPERATION 7.1. Basic Operation Procedure ................8 7.2. -
Page 3: Important Safety Instructions
1. IMPORTANT SAFETY INSTRUCTIONS • Read these instructions. • Keep these instructions. • Heed all warnings. • Follow all instructions. • Do not use this apparatus near water. • Clean only with dry cloth. • Do not block any ventilation openings. Install in accordance with the manufacturer's instructions. •... -
Page 4: Safety Precautions
• Should the following irregularity be found during use, immediately switch off the power, disconnect the power supply plug from the AC outlet and contact your nearest TOA dealer. Make no further attempt to operate the unit in this condition as this may cause fire or electric shock. - Page 5 Indicates a potentially hazardous situation which, if mishandled, could CAUTION result in moderate or minor personal injury, and/or property damage. • Do not place objects on the unit as this may cause it to fall or break which may result in personal injury and/or property damage.
-
Page 6: General Description
The TOA W-906A and W-912A In-Wall Mixer Power Amplifiers control and mix up to six independent input signals plus two inputs with use of WE-2 Expanding kit. The W-906A delivers up to 60 W of output power and the W-912A 120 W. Optional accessory modules are available for use with the W-906A and W-912A to provide versatility for a wide range of operating applications. -
Page 7: Nomenclature And Functions Front
12. Output fuse [OUTPUT FUSE] 4. Blank panels Protects against excessive current flow. Cover the Module input ports when shipped from W-906A: 250 V, 6 A the factory. W-912A: 250 V, 10 A When mounting a module, remove the blank panel corresponding to the port. -
Page 8: Servicing
6. SERVICING Failure Should amplifier fail, contact your nearest TOA authorized contractor or service center. 7. OPERATION Be sure to complete all connections before operation. 7.1. Basic Operation Procedure Step 1. Press the power switch to turn on the power. -
Page 9: Volume Control Cover Attachment
8. VOLUME CONTROL COVER ATTACHMENT To protect the input volume control from accidental operation, it is recommended to replace the control knob with the supplied volume control cover. Step 1. After adjusting the input volume control, remove its knob. Step 2. Attach the supplied volume control cover in place of the knob. Volume control cover YA-910 (accessory) Input volume control knob Note... -
Page 10: Specifications
10. SPECIFICATIONS Model No. W-906A W-912A Type Wall mounting 6-channel mixer power amplifier Output Power 60 W RMS 120 W RMS Power Bandwidth (D): 20 Hz – 20 kHz, 0.5% THD (T): 20 Hz – 20 kHz, 0.5% THD Frequency Response (D): 30 Hz –... -
Page 11: Accessories
• Accessories Volume control cover YA-910 ....3 Machine screw M3 x 10 ......4 Key (for door) ..........2 Flange nut for M3 ........4 Lift-off hinge (receptacle) ......2 Tapping screw 3 x 8 ........4 Machine screw M4 x 10* ......5 Inch screw .......... - Page 12 URL: http://www.toa.jp/ 133-22-009-4B...
Need help?
Do you have a question about the W-906A and is the answer not in the manual?
Questions and answers