
Related Manuals for Wilton 17204


Summary of Contents for Wilton 17204
- Page 1 6" Bench Grinder Model No. 17204 Operation and Safety Instructions For your safety WARNING: Read and understand all instructions. Failure to follow all instructions may result in electric shock, fire and/or serious injury.
-
Page 2: Table Of Contents
LIMITED WARRANTY Wilton Power Tools are warranted against defects in workmanship and material for a period of two (2) years from the date of purchase. This warranty does not cover defects due directly or indirectly to misuse, abuse, negligence or accidents, normal wear-and-tear, improper repair or alterations, lack of maintenance, or use for purposes other than those for which the tool was designed. -
Page 3: Safety
SAFETY Read, understand and follow all operating instructions, Wear the Proper Apparel – and nonslip footwear safety operations and symbols in this manual before when operating power tools. Do not wear loose operating and maintaining your power tool. clothing, gloves, neckties, rings, bracelets or other jewelry which may become caught in moving parts. -
Page 4: Special Safety Rules For Bench Grinders
SAFETY Never Leave the Tool Unattended While it’s Only wear safety goggles that comply with Running – turn OFF the power. Do not leave the tool ANSI Z87.1 unattended until it reaches a complete stop. The operation of any grinder can result in foreign Drugs, Alcohol, Medication –... -
Page 5: Electrical Requirements
SAFETY Keep all wheel guards in place. Do not use the Use a separate electrical circuit for your tools. grinder with the wheel guard removed. This circuit must not be less than a #12 wire and should be protected with a 15 Amp time delayed fuse. Do not try to cut anything with the grinding Before connecting the motor to the power line, make wheel. - Page 6 SAFETY Guidelines for Extension Cords Use only 3-wire extension cords that have 3-prong grounding plugs and 3-pole receptacles that accept Use proper extension cord. Make sure your the tool’s plug. extension cord is in good condition. When using an extension cord, be sure to use one heavy enough to Fig.
-
Page 7: Before You Start
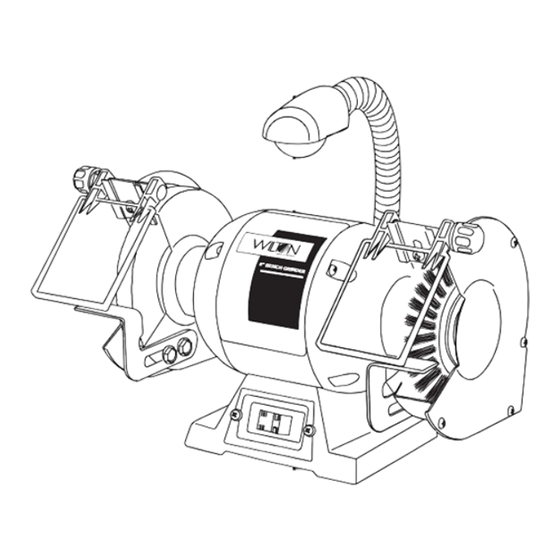
BEFORE YOU START Figure 1 GLOSSARY OF TERMS TOOL REST ARM (10A) --- adjustable to move workpiece closer or away from the grinding wheel. WHEEL GUARD (1) --- houses the wheel, exposing 6 x 3/4 INCH GRINDING WHEEL (11A) --- for only the work surface. -
Page 8: Unpacking Your Bench Grinder
BEFORE YOU START UNPACKING YOUR BENCH Figure 2 GRINDER WARNING: • To avoid injury do not plug the power cord into power source during unpacking and assembly. • To avoid injury, if any part is missing or damaged, do not plug in the bench grinder until the missing or damaged part is replaced, and assembly is complete. -
Page 9: Assembly Instructions
BEFORE YOU START ASSEMBLY INSTRUCTIONS Figure 4 Your bench grinder requires only the assembly of the eye shields and proper adjustment of the tool rests. For your safety, do not plug the grinder into a power source until all adjustments are complete. An 1/16"... -
Page 10: Operation
OPERATION OPERATION 2. Align the mounting holes on the grinder with predrilled holes in a bench or grinder stand. A bench grinder is designed for hand grinding 3. Insert bolts through the holes and tighten, using operations such as sharpening chisels, screwdrivers, washers, and nuts (not included) as shown in Fig. -
Page 11: Changing The Light Bulb
OPERATION 10. Check for proper clearances between the grinding wheel and the tool rests and spark arrestors. 11. While still unplugged, hand turn the wheel to check for alignment and to see if any other part is binding the grinding wheel. 12. -
Page 12: Using Dressing Wheel
OPERATION USING DRESSING WHEEL (NOT SUPPLIED) Figure 10 (Figure 10) Grinding wheels tend to fill up (with the material you are grinding), get dull, and lose their shape. The dressing wheel is the one remedy for all three of these conditions. 1. -
Page 13: Troubleshooting
4. Undersized extension cord 4. Use correct size extension cord; see manual 5. Short circuit 5. Cord, plug, or motor need repair; call Wilton Customer Service Department Motor fails to develop 1. Low line voltage 1. Check power line for proper voltage full power 2. -
Page 14: Service
SERVICE FOR REPLACEMENT PARTS AND SERVICE When servicing your Wilton ® product, use only Wilton ® replacement parts. Use of any other parts may cause product damage. All servicing of the tool should be performed by a qualified service technician.
Need help?
Do you have a question about the 17204 and is the answer not in the manual?
Questions and answers