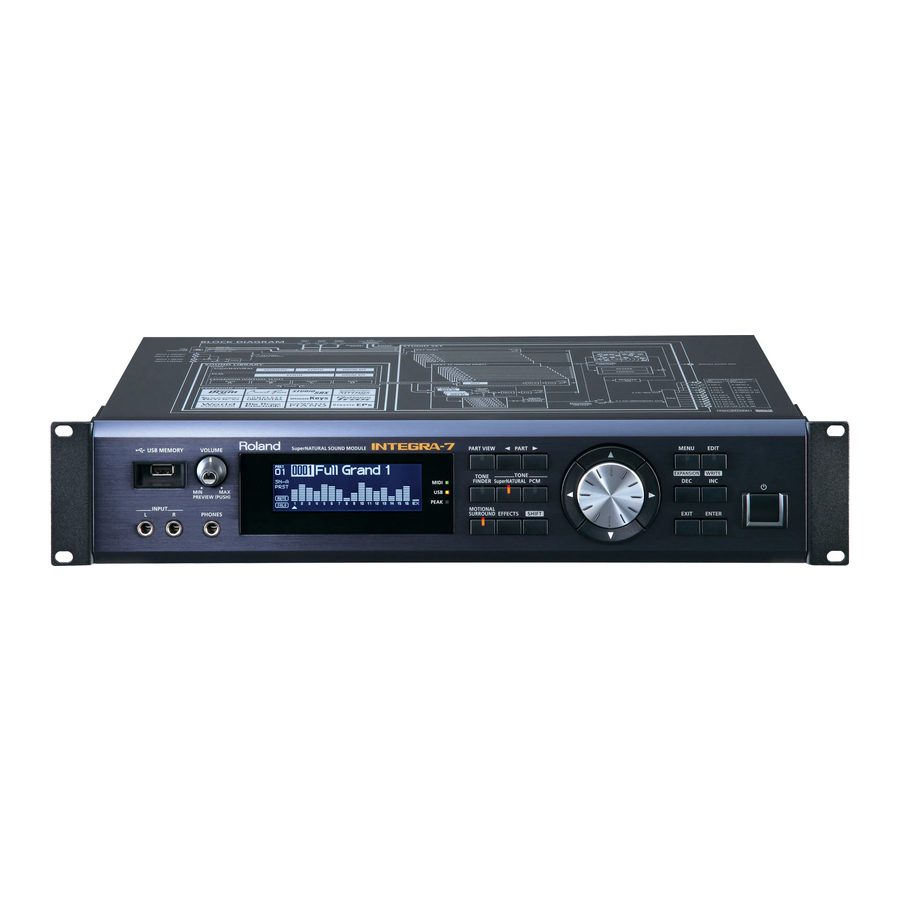
Roland INTEGRA-7 Owners & Installation Manual
Supernatural sound module
Hide thumbs
Also See for INTEGRA-7:
- Owner's manual (17 pages) ,
- Parameter manual (108 pages) ,
- Owner's manual (68 pages)
Table of Contents
Advertisement
Quick Links
Owner's Manual
(this document)
Read this first. It explains the basic things you need to know in order to use
the INTEGRA-7.
PDF Manual
(download from the Web)
• Parameter Guide
This explains all parameters of the INTEGRA-7.
• Sound List
This is a list of the sounds built into the INTEGRA-7.
• MIDI Implementation
This is detailed information about MIDI messages.
To obtain the PDF manual
1.
Enter the following URL in your computer.
http://www.roland.com/manuals/
2.
Choose "INTEGRA-7" as the product name.
Advertisement
Table of Contents

Related Manuals for Roland INTEGRA-7


Summary of Contents for Roland INTEGRA-7
- Page 1 • Parameter Guide http://www.roland.com/manuals/ This explains all parameters of the INTEGRA-7. • Sound List Choose “INTEGRA-7” as the product name. This is a list of the sounds built into the INTEGRA-7. • MIDI Implementation This is detailed information about MIDI messages.
-
Page 2: Important Safety Instructions
WARNING: To reduce the risk of fire or electric shock, do not expose this apparatus to rain or moisture. The lightning flash with arrowhead symbol, within an CAUTION equilateral triangle, is intended to alert the user to the RISK OF ELECTRIC SHOCK presence of uninsulated “dangerous voltage”... -
Page 3: Using The Unit Safely
Copyright © 2012 ROLAND CORPORATION All rights reserved. No part of this publication may be reproduced in any form without the written permission of ROLAND CORPORATION. About WARNING and... - Page 4 “Information” page. your retailer, the nearest Roland an outlet or this unit. Service Center, or an authorized Roland Disconnect everything before moving the unit distributor, as listed on the “Information” page when:...
-
Page 5: Important Notes
Important data should always • Never touch the terminals of the USB flash be backed up USB flash drives, or written • With the factory settings, the INTEGRA-7 will drives. Also, avoid getting the terminals dirty. down on paper (when possible). During... - Page 6 • The copyright of content in this product (the sound waveform data, style data, accompaniment patterns, phrase data, audio loops and image data) is reserved by Roland Corporation. • Purchasers of this product are permitted to utilize said content for the creating, performing, recording and distributing original musical works.
-
Page 7: Table Of Contents
USB MIDI ............45 Turning the INTEGRA-7 On/Off ......21 MIDI Signal Flow . -
Page 8: Quick Guide
What is Behavior Modeling Technology? Not only physical modeling of the instruments, Roland takes it a step further by modeling the instrument’s distinctive behavior that responds to how the performer plays, resulting in true-to-life, expressive sounds in realtime. - Page 9 PCM Drum Kits These were called “rhythm sets” on previous Roland synthesizers; they have been tuned specifically for the INTEGRA-7. A drum kit is a group of multiple percussion instrument sounds assigned so that a different percussion instrument will be heard depending on the key (note number) you play.
-
Page 10: Getting Ready
Connecting your computer via USB If you connect the INTEGRA-7 to your computer using a USB cable, you’ll be able to use your DAW software to record performance data (MIDI data) from a MIDI keyboard connected to the INTEGRA-7, and use performance data (MIDI data) played back by the DAW software to play the sound generator of the INTEGRA-7 (USB MIDI). -
Page 11: About Midi
Connection example 2: Using the INTEGRA-7 as a sound module for live performance Here’s a connection example of including the INTEGRA-7 in an existing live performance system. In this example, the MIDI connector is used to connect a keyboard or another sound module. -
Page 12: Using The Internal Sounds
Using the Internal Sounds About the INTEGRA-7’s screen When you turn on the INTEGRA-7, the top screen will appear. You can choose the type of top screen (p. 48). The “!” indicates use of Part number The “*” indicates an edit Tone number and tone sound that’s not loaded... - Page 13 PCM Synth Tone (PCMS) / PCM Drum Kit (PCMD) The PCM synth tones and PCM drum kits are what were called patches and rhythm sets on previous Roland synthesizers; they are remarkable for their high quality and their rich variations. Many classic sounds tuned specifically for the INTEGRA-7 are...
-
Page 14: Using The Expansion Sounds
The INTEGRA-7 contains all the sound data from the entire SRX series of wave expansion boards, as well as expansion SuperNATURAL tones. You can add these sounds by loading each title into one of the INTEGRA-7’s four EXPANSION Virtual Slots (Slot A–D). (In other words, sound data for up to four titles can be used simultaneously.) The sound data includes tones (patches), drum kits (rhythm sets), instruments, and wave (waveform) data. - Page 15 If you want the expansion sounds to be loaded automatically at start-up You can have the INTEGRA-7 automatically load specified sound data into the EXPANSION Virtual Slots upon startup. * With the factory settings, the sound data will be loaded.
-
Page 16: Creating A Sound Field With Depth
Creating a Sound Field with Depth Connection example Here’s an example of using the INTEGRA-7’s Motional Surround function for 5.1 channel surround output. Place your speakers as shown in the illustration. To use the Motional Surround function, press the [MOTIONAL SURROUND] button to turn the Motional Surround function on. - Page 17 For details on the each parameters, refer to p. 35. What is Motional Surround? The INTEGRA-7 supports two-channel and 5.1 channel surround output. By using the Motional Surround function, you can freely and easily control the placement of each part (p. 34).
-
Page 18: Using Sonar Le To Play Sounds (Windows)
Next, you need to specify the INTEGRA-7 as the MIDI input and output device. In the “MIDI” section of the list at the left of the screen, choose [Select Device]. Enter a check mark for the INTEGRA-7, and clear the check marks from MIDI devices you’re not using. - Page 19 If the input field is not shown, click the track control list and choose “ALL. ” Adjust the recording level. Put the track in recording-standby mode, then get the INTEGRA-7 to start playing. Adjust the input level of the SONAR so that the level meter reaches approximately -6 during the loudest passages.
-
Page 20: Introduction
You can connect headphones (sold separately) here. – Use these when installing the INTEGRA-7 in a 19-inch rack. For details on how to install the INTEGRA-7 in a rack, refer to the owner’s manual included with the rack you’re Rack-mount bracket –... -
Page 21: Turning The Integra-7 On/Off
Before turning the unit on/off, always be sure to turn the volume down. Even with the volume turned down, you might hear some sound when switching the unit on/off. However, this is normal and does not indicate a malfunction. Minimize the volume of the INTEGRA-7 and your speakers. Turn on the power of your speakers. -
Page 22: Rear Panel Connections
With a USB cable, you can connect the This is a coaxial digital output connector. It complies with S/P INTEGRA-7 to your computer. DIF specifications. It outputs the same signal as is output from the OUTPUT A (MIX) jacks. - Page 23 Panel Descriptions OUTPUT jacks (When motional surround (p. 34) is OFF) A (MIX) L/MONO, R jacks These jacks output a stereo signal (L/R) to your amp or mixer. If you want to output in mono, connect to only the L side. Both XLR type and TRS type jacks are provided;...
-
Page 24: Getting Acquainted With The Integra-7
One studio set contains 16 “parts” for tones and one external part (EXT PART). You can assign a tone or drum kit to each part, allowing you to create an ensemble or to play rich-sounding layers. If you’re using an external MIDI device or DAW software, you’ll be able to independently control multiple sounds on a single INTEGRA-7 unit. How a Tone Is Structured A “tone”... -
Page 25: How A Studio Set Is Structured
Tones are organized into groups called “banks. ” Part A “part” is a location to which you can assign a tone or drum kit in order to play it on the INTEGRA-7. Partial A “partial” is a unit of sound within a SuperNATURAL synth tone (p. 38), SuperNATURAL drum kit (p. 39), PCM synth tone (p. 39), or PCM drum kit (p. 40). -
Page 26: Effects
Getting Acquainted with the INTEGRA-7 Effects The INTEGRA-7 contains the following effects; each effect can be edited independently. STUDIO SET PART 1–9, 11–16 TONE MOTIONAL SURROUND MOTIONAL INST/PARTIAL SURROUND 2 CH/ ON/OFF MIX OUT MASTER PART 10 (DRUM PART) REVERB... -
Page 27: About Memory
Of the studio sets and tones saved in the from the panel. INTEGRA-7 is to operate. To store the INTEGRA-7, you can select the desired system parameters, execute the System When you play, the INTEGRA-7 produces sound data and export it to a USB flash Write operation (p. -
Page 28: Basic Operation
Basic Operation This section explains the basic button operations used to operate the INTEGRA-7. [TONE FINDER] button [PART VIEW] button [MENU] button [EDIT] button Accesses the TONE FINDER screen. Accesses the menu screen. Accesses the TONE EDIT screen Accesses the screen that lists all parts. -
Page 29: [Shift] Button Operations
Accesses the Expansion Load screen. Assigning a Name Accesses the corresponding WRITE MENU [SHIFT] + [EDIT] screen for each page. The INTEGRA-7 lets you assign names to the following items. Switches the display type in the top [SHIFT] + [ENTER] screen.. • Studio Set [SHIFT] + [EXIT] Accesses the DEMO MENU screen. -
Page 30: Playing/Creating Sounds
Playing Sounds Choosing a Studio Set Viewing the Part Settings (PART VIEW Screen) A Studio Set stores the sounds selected for each Part, as well as various performance-related settings (except for system parameters). In this screen you can edit the part parameters while focusing on a By switching studio sets you can change sounds at the beginning of single part. -
Page 31: Choosing A Tone
Playing Sounds Choosing a Tone Selecting Drum Kits from a Tone List In the PART VIEW screen you can select the tone for each part. Press the [SuperNATURAL] or [PCM] button. You can view the tone list by category or by type. The tone list will appear. -
Page 32: Editing A Studio Set
Editing a Studio Set Studio Set Common Settings Parameter Value Adjust the volume of each part. Level This setting’s main purpose is to adjust the volume Here you can make settings that are common to the entire studio balance between parts. set. - Page 33 Editing a Studio Set Parameter Value Parameter Value This determines what will happen to the tone’s level For each part, this adjusts the time delay until the when the tone is played at a velocity greater than its Vibrato Delay vibrato (pitch modulation) effect begins.
-
Page 34: Saving A Studio Set
Studio Set. If you want to keep an edited Studio Set, you must save it. In addition to the left/right panning of each sound, the INTEGRA-7 lets you specify its depth in the sound field. -
Page 35: Editing The Motional Surround Settings
Editing a Studio Set Turning Effects On/Off Editing the Motional Surround Settings Here’s how to turn Motional Surround on/off and specify the size of In the top screen, press the [EFFECTS] button. the room. The EFFECTS ROUTING screen will appear. In the MOTIONAL SURROUND screen, press the [ENTER] button. -
Page 36: Editing The Effects Of A Studio Set (Effects Routing Screen)
Here’s how to make final adjustments to the overall tone of Move the cursor to the effect that you want to edit, and INTEGRA-7’s audio output (OUTPUT A (MIX) jacks and PHONES jack). press the [ENTER] button. From the EFFECTS ROUTING screen, move the cursor to Use the cursor buttons to select the setting you want to “MEQ (MASTER EQ)”... -
Page 37: Initializing A Part
Editing a Studio Set Initializing a Part Initializing a Studio Set This operation will initialize the part settings of the current part. Here’s how to initialize the currently selected Studio Set. From the top screen or the STUDIO SET EDIT screen, press From the top screen or the STUDIO SET EDIT screen, press the [MENU] button. -
Page 38: Editing A Tone
Editing a Tone Editing the Tones Assigned to a Part SuperNATURAL Synth Tone (SN-S) Here’s how to edit the sound of each part. PARTIAL 3 Select the part that you want to edit. PARTIAL 2 Press the [EDIT] button. PARTIAL 1 The tone edit screen will differ depending on the type of tone that’s selected for the part. -
Page 39: Supernatural Drum Kit (Sn-D)
Editing a Tone SuperNATURAL Drum Kit (SN-D) PCM Synth Tone (PCMS) PARTIAL 4 PARTIAL 62 PARTIAL 3 PARTIAL 2 PARTIAL 1 PARTIAL 1 DRUM INST LFO 1 COMP+EQ 1 COMP+EQ 4 WAVE COMP+EQ 2 COMP+EQ 5 PITCH COMP+EQ 3 COMP+EQ 6 LFO 2 STEP LFO Explanation... -
Page 40: Pcm Drum Kit (Pcmd)
Editing a Tone PCM Drum Kit (PCMD) Saving a Tone/Drum Kit Edits you make to a Tone/Drum Kit are temporary; they will be lost when you turn off the unit or select another Tone/Drum Kit. If you PARTIAL 88 want to keep an edited Tone/Drum Kit, you must save it. NOTE PARTIAL 1 When you execute the Write operation, the existing data at the... -
Page 41: Editing The Effects Of A Tone
Editing a Tone Editing the Effects of a Tone Editing the COMP (Compressor) and EQ (Equalizer) Settings Here’s how to edit the MFX settings or the settings of the compressor and equalizer used by the drum part. Here’s how to make compressor and equalizer settings for the drum kit of a Drum COMP + EQ Assign part. -
Page 42: Initializing A Tone
Editing a Tone Initializing a Tone Copying a Partial Here’s how you can initialize the settings of the current tone. Here’s how to copy the partial settings of a SuperNATURAL Synth Tone, SuperNATURAL Drum Kit, PCM Synth Tone, or PCM Drum Kit. Press the [EDIT] button. -
Page 43: Use With A Computer
The USB driver sends data from your application to the INTEGRA-7, and data from the INTEGRA-7 to your application. USB MIDI (p. 45) You’ll be able to use the INTEGRA-7 as a MIDI interface with your DAW software, and use the INTEGRA-7’s sound generator to play USB cable performance data (MIDI data) that’s played back by your DAW... -
Page 44: Usb Driver
Install the USB driver on your computer. In the MENU screen, choose “SYSTEM” and press the If you want to use the INTEGRA-7’s USB audio functionality, change [ENTER] button. the USB Driver setting to VENDER and then install the driver. You can download the driver from the Roland website. -
Page 45: Usb Midi
Using the INTEGRA-7 with Your Computer USB MIDI If you connect your computer and MIDI keyboard to the INTEGRA-7 as shown in the illustration and turn the USB-MIDI Thru ON, you’ll be able to use the INTEGRA-7 as a MIDI interface. -
Page 46: Usb Audio
Sound played back by your computer can be output from the INTEGRA-7. MEMO If you want to use the INTEGRA-7’s USB audio functionality, change the USB Driver setting to VENDER and then install the driver. You can download the driver from the Roland website. -
Page 47: Applying Motional Surround To Sounds Of An External Device
Applying Motional Surround to Sounds of an External Device Connection Example You can assign the sound of the external input as the Ext part, and apply Motional Surround to it. It’s best to place the subwoofer at the same distance as the satellite speakers, with the listening position at the center. -
Page 48: Overall Settings
Value Explanation Here you can make overall settings that apply to the entire Specifies the studio set that will be loaded INTEGRA-7, such as those for tuning and MIDI message reception. LAST-SET, when the unit is turned on. Startup (Studio Set... -
Page 49: Viewing The System Version
MIDI messages that will apply in common to OFF, ON OFF, System On will be received (ON) or not be received (OFF). the entire INTEGRA-7, and can be used for CC01–31, controlling volume, tone, etc. System Specifies whether GS Reset messages will be 33–95,... -
Page 50: Convenient Functions
RESTORE p. 53 NOTE flash drive into the INTEGRA-7. Never turn off the unit while the formatting is in progress. Writes sound data of the INTEGRA-7 to a EXPORT p. 51 USB flash drive. Loads previously exported data from a IMPORT p. -
Page 51: Exporting/Importing Sound Data
Exporting/Importing Sound Data Importing Sound Data (Import) From the studio sets and tones saved in the INTEGRA-7, you can In the UTILITY screen, choose “IMPORT” and press the select the desired items and export them to a USB flash drive. -
Page 52: Marking Multiple Items Of Data
Backing Up User Data You can select multiple consecutive items of sound data, and set or You can back up all of settings in the INTEGRA-7 to a USB flash drive clear their marks in a single operation. (sold separately), or restore those settings into the INTEGRA-7’s memory. -
Page 53: Restoring Backed-Up Settings From A Usb Flash Drive
NOTE When you execute the Restore operation, all settings currently saved in the INTEGRA-7 will be lost. If you want to keep the Here’s how to back up the data from a USB flash drive to your current settings, back them up under a different name. -
Page 54: Restoring Backed-Up Data From A Computer To A Usb Flash Drive
USB flash drive. precaution against data loss. NOTE Connect the INTEGRA-7 to your external MIDI device as shown in the illustration before you proceed. • When you copy the backed-up data to the USB flash drive, the “ROLAND”... -
Page 55: Restoring The Factory Settings (Factory Reset)
“OFF” setting as described below. When you execute the Factory Reset operation, all data in the INTEGRA-7 will be lost. If there is any data that you want to keep, In the MENU screen, choose “SYSTEM” and press the back it up to a USB flash drive (p. -
Page 56: Appendix
Check the “Auto Off” system setting. The INTEGRA-7 will The unit turns off automatically be turned off when no operation has been If you want the INTEGRA-7 to stay on, change the “Auto Off” p. 55 unexpectedly performed for a certain length of time. (At the factory settings, system setting to “OFF. - Page 57 Problems with the USB flash drive Format the USB flash drive on the INTEGRA-7. The INTEGRA-7 can use a USB flash drive that’s formatted as FAT. USB flash drive is not (Normally, a USB flash drive will be formatted as FAT when you Check the format of the USB flash drive.
-
Page 58: Error Message List
Make sure that USB flash drive is correctly connected (p. 5). Data could not be read from the USB flash drive. Also make sure that you’re using a USB flash drive sold by Roland. Read Error! The file is damaged. -
Page 59: Midi Implementation Chart
MIDI Implementation Chart Date : Jun. 1, 2012 Model INTEGRA-7 Version : 1.00 Transmitted Recognized Remarks Function... Basic Default 1–16 Changed 1–16 Channel Default Mode 3 Mode Message Mode 3, 4 (M=1) Altered ************** Note 0–127 : True Voice 0–127... -
Page 60: Specifications
USB Flash Memory • SRX-11 Complete Piano Virtual Slots Options (sold • SRX-12 Classic EPs * Use USB Flash Memory sold by Roland. We cannot guarantee separately) operation if other products are used. Expansion SuperNATURAL Sounds (6 titles) • ExSN1 Ethnic * In the interest of product improvement, the specifications and/or appearance of this unit are subject to change without prior notice. -
Page 61: Index
Index [EXIT] button ....20 [PART VIEW] button ....30 Symbols Expansion Sound Data . -
Page 62: Block Diagram
Block Diagram... - Page 63 MEMO...
- Page 64 MEMO...
- Page 65 MEMO...
- Page 66 For EU Countries For China...
- Page 67 INTEGRA-7 Sound Module Roland Corporation U.S. 5100 S. Eastern Avenue Los Angeles, CA 90040-2938 (323) 890-3700 For EU Countries This product complies with the requirements of EMCD 2004/108/EC and LVD 2006/95/EC. For the USA FEDERAL COMMUNICATIONS COMMISSION RADIO FREQUENCY INTERFERENCE STATEMENT This equipment has been tested and found to comply with the limits for a Class B digital device, pursuant to Part 15 of the FCC Rules.
- Page 68 Information When you need repair service, call your nearest Roland Service Center or authorized Roland distributor in your country as shown below. TAIWAN ECUADOR POLAND KUWAIT AFRICA EUROPE ROLAND TAIWAN ENTERPRISE Mas Musika ROLAND POLSKA SP. Z O.O. EASA HUSAIN AL-YOUSIFI &...
Need help?
Do you have a question about the INTEGRA-7 and is the answer not in the manual?
Questions and answers