Bosch Cooker hood Operating And Installation Instructions
Hide thumbs
Also See for Cooker hood:
- Operating and installation instructions (24 pages) ,
- Operating and installation instructions (17 pages)
Table of Contents
Advertisement
Advertisement
Table of Contents

Related Manuals for Bosch Cooker hood


Summary of Contents for Bosch Cooker hood
- Page 1 Operating and installation instructions...
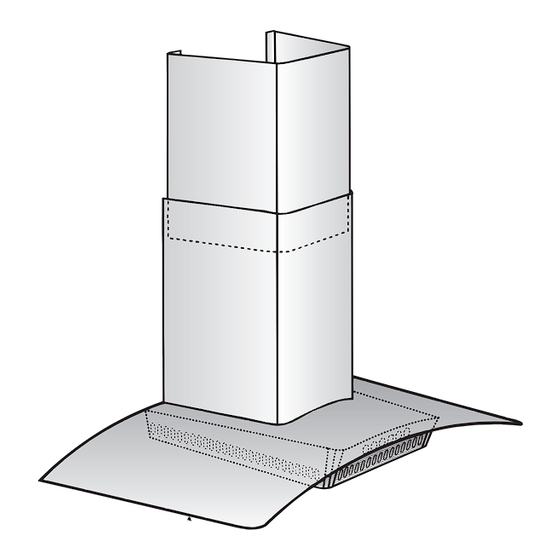
- Page 2 Fig. 1 Abb. 1 ELECTRO mind. mind.
-
Page 3: Appliance Description
Instructions for use: Appliance description Operating modes This can be achieved if combustion air can Chimney flow through non-lockable openings, e.g. in panelling doors, windows and via the air- intake/exhaust-air wall box or by other Light / fan technical measures, such as reciprocal switches interlocking, etc. -
Page 4: Before Using For The First Time
Before using for the first time Important notes: Light bulbs must always be fitted when the extractor hood is in use. The Instructions for Use apply to several versions of this appliance. Accordingly, Defective bulbs should be replaced you may find descriptions of individual immediately to prevent the remaining bulbs features that do not apply to your from overloading. -
Page 5: Operating Procedure
Operating procedure Intensive setting: The most effective method of removing vapours produced during cooking is to: Maximum power is obtained at the intensive setting. It is only required for short Switch the ventilator ON intervals. as soon as you begin cooking. Keep pressing the + button until a ç... -
Page 6: Removing And Inserting Metal Grease Filters
Filters and maintenance Grease filters: Removing and inserting the metal grease filters: Metal filters are used to trap the greasy Warning: The halogen bulbs must be element of the vapours that develop switched off and cool. during cooking. 1. Rotate the two catches on the grease The filter mats are made from non- filter and remove the grease filter. -
Page 7: Inserting/Removing Filter
Filters and maintenance Activated carbon filter: Saturation indicator: For neutralizing odours in recirculating mode. When the activated carbon filter reaches saturation point, an acoustic signal is Caution: sounded for 10 seconds after the fan has As the filter becomes more and more switched off, and a appears in the ã... -
Page 8: Cleaning And Care
Cleaning and care Replacing the light bulbs Disconnect the extractor hood from the 1. Switch off the extractor hood and pull electricity supply by pulling out the mains out the mains plug or switch off the plug or switching it off at the fuse box. electricity supply at the fuse box. -
Page 9: If You Encounter A Problem
Setting the saturation indicator If you encounter a problem If an appears in the display: If it becomes necessary to change the ã operating mode (exhaust-air/recirculating See "Filters and maintenance" Section. mode), the saturation indicator for the filters If is not possible to operate the extractor must also be altered (see Installation hood: Instructions). -
Page 10: Installation Instructions
Installation Instructions: Important information Additional information concerning gas Old appliances are not worthless cookers: rubbish. Valuable raw materials can be reclaimed by recycling old appliances. When installing gas hotplates, comply Before disposing of your old appliance, with the relevant national statutory render it unusable. -
Page 11: Prior To Installation
Prior to installation Exhaust-air mode mind.95 705- mind. 1100 The exhaust air is discharged upwards This can be achieved if combustion air can through a ventilation shaft or directly flow through non-lockable openings, e.g. in through the outside wall into the open. doors, windows and via the air- intake/exhaust-air wall box or by other Exhaust air should neither be directed... - Page 12 Prior to installation For optimum extractor hood efficiency: Connecting a l 150 mm exhaust-air pipe: Short, smooth air exhaust pipe. Mount the pipe directly onto the air As few bends in the pipe as possible. outlet on the hood. Diameter of pipe to be as large as possible and no tight bends in pipe.
-
Page 13: Electrical Connection
Prior to installation Electrical connection WARNING: THIS APPLIANCE MUST BE Preparing the wall EARTHED The wall must be flat and perpendicular. IMPORTANT: Fitting a Different Plug: Ensure that the wall is capable of The wires in the mains lead are coloured in providing a firm hold for mounting accordance with the following code: screws and plugs. -
Page 14: Installation
Installation This extractor hood is intended to be Note: Take into account any special mounted onto the kitchen wall. accessories that are going to be fitted. 1. Remove the grease filter 5. Screw on the upper and the two lower (refer to Operating Instructions). - Page 15 Installation 07. Screw in the lower bolt (hex bolt). 12. Insert the upper flue duct (slots downwards) into the lower flue duct. Protect the cover panels from scratches, for example by laying the template used for marking the wall over the top edge of the lower section.
- Page 16 DHZ 5185 360732 E-Mail: bosch-infoteam@bshg.com Online-Shop: www.bosch-eshop.com 9000 020 484 Printed in Germany 0609 Es.
Need help?
Do you have a question about the Cooker hood and is the answer not in the manual?
Questions and answers